2015 RENAULT TRAFIC belt
[x] Cancel search: beltPage 195 of 292
3.33
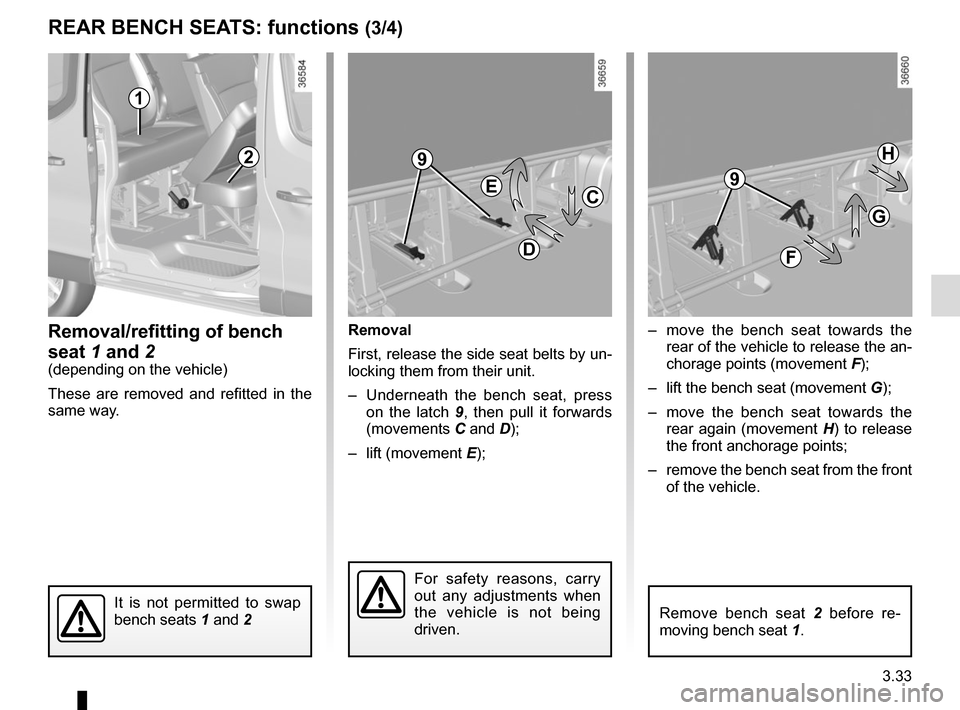
– move the bench seat towards the rear of the vehicle to release the an-
chorage points (movement F);
– lift the bench seat (movement G);
– move the bench seat towards the rear again (movement H) to release
the front anchorage points;
– remove the bench seat from the front of the vehicle.
REAR BENCH SEATS: functions (3/4)
Removal/refitting of bench
seat 1 and 2
(depending on the vehicle)
These are removed and refitted in the
same way. Removal
First, release the side seat belts by un-
locking them from their unit.
– Underneath the bench seat, press
on the latch 9, then pull it forwards
(movements C and D);
– lift (movement E);
It is not permitted to swap
bench seats 1 and 2
1
2
C
D
E
F
G
H
For safety reasons, carry
out any adjustments when
the vehicle is not being
driven.
Remove bench seat 2 before re-
moving bench seat 1.
9
9
Page 196 of 292
3.34
REAR BENCH SEATS: functions (4/4)
Refitting
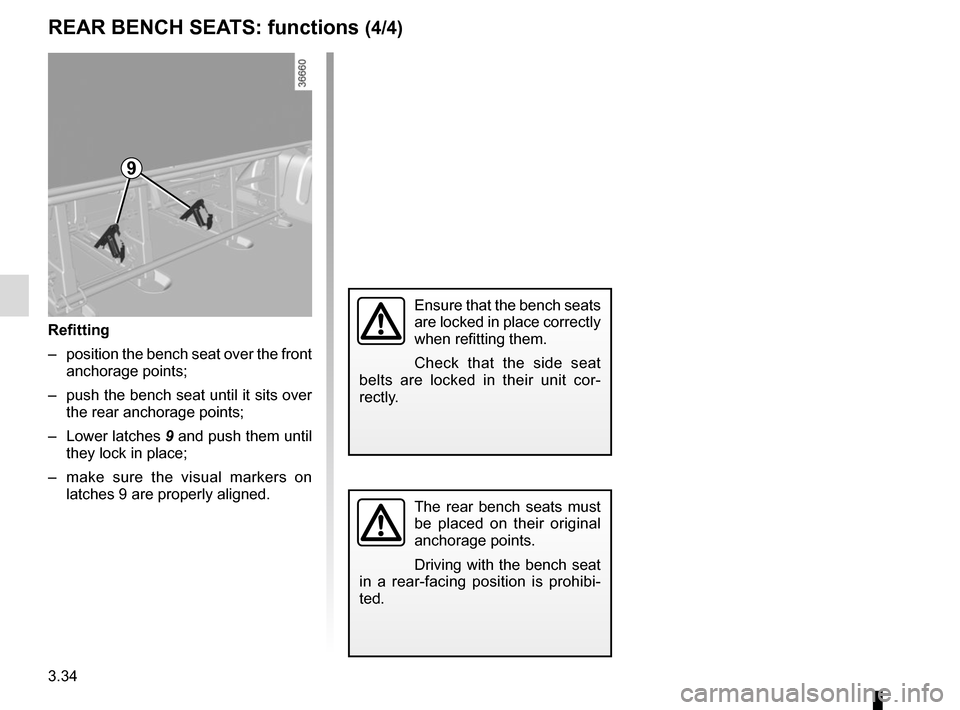
– position the bench seat over the front anchorage points;
– push the bench seat until it sits over the rear anchorage points;
– Lower latches 9 and push them until
they lock in place;
– make sure the visual markers on latches 9 are properly aligned.
Ensure that the bench seats
are locked in place correctly
when refitting them.
Check that the side seat
belts are locked in their unit cor-
rectly.
The rear bench seats must
be placed on their original
anchorage points.
Driving with the bench seat
in a rear-facing position is prohibi-
ted.
9
Page 198 of 292
3.36
LUGGAGE NET (1/2)
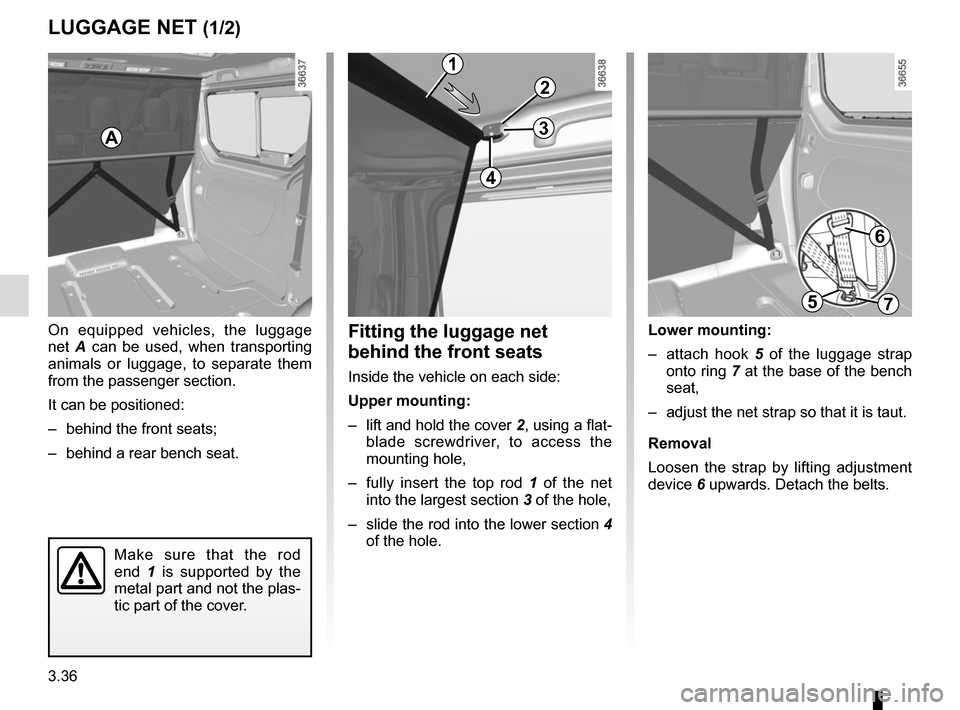
On equipped vehicles, the luggage
net A can be used, when transporting
animals or luggage, to separate them
from the passenger section.
It can be positioned:
– behind the front seats;
– behind a rear bench seat.Fitting the luggage net
behind the front seats
Inside the vehicle on each side:
Upper mounting:
– lift and hold the cover 2, using a flat-
blade screwdriver, to access the
mounting hole,
– fully insert the top rod 1 of the net
into the largest section 3 of the hole,
– slide the rod into the lower section 4
of the hole.
Lower mounting:
– attach hook 5 of the luggage strap
onto ring 7 at the base of the bench
seat,
– adjust the net strap so that it is taut.
Removal
Loosen the strap by lifting adjustment
device 6 upwards. Detach the belts.
Make sure that the rod
end 1 is supported by the
metal part and not the plas-
tic part of the cover.
A
1
2
3
4
6
75
Page 199 of 292
3.37
LUGGAGE NET (2/2)
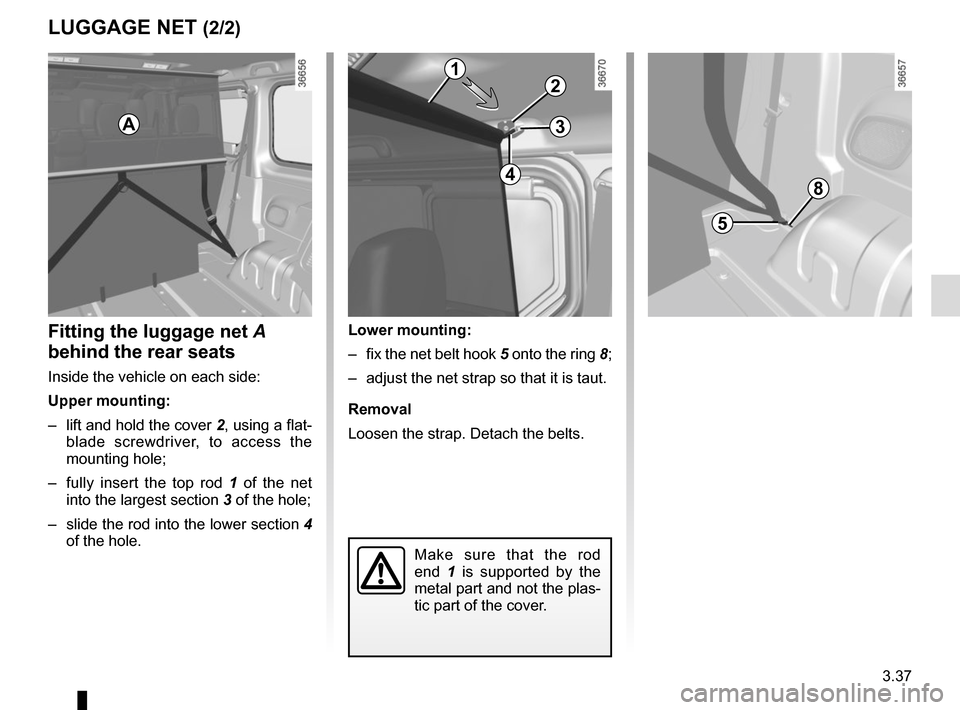
Fitting the luggage net A
behind the rear seats
Inside the vehicle on each side:
Upper mounting:
– lift and hold the cover 2, using a flat-
blade screwdriver, to access the
mounting hole;
– fully insert the top rod 1 of the net
into the largest section 3 of the hole;
– slide the rod into the lower section 4
of the hole. Lower mounting:
– fix the net belt hook 5 onto the ring 8;
– adjust the net strap so that it is taut.
Removal
Loosen the strap. Detach the belts.
Make sure that the rod
end
1 is supported by the
metal part and not the plas-
tic part of the cover.
1
2
3
4
5
8
A
Page 200 of 292
3.38
TRANSPORTING OBJECTS (1/2)
Always position the heavi-
est items directly on the
floor. Use the lashing points
on the luggage compart-
ment floor, if these are fitted to the
vehicle. The load should be loaded
in such a way that no items will be
thrown forward and strike the occu-
pants if the driver has to brake sud-
denly or while driving on a steep
gradient. Fasten the rear seat belts,
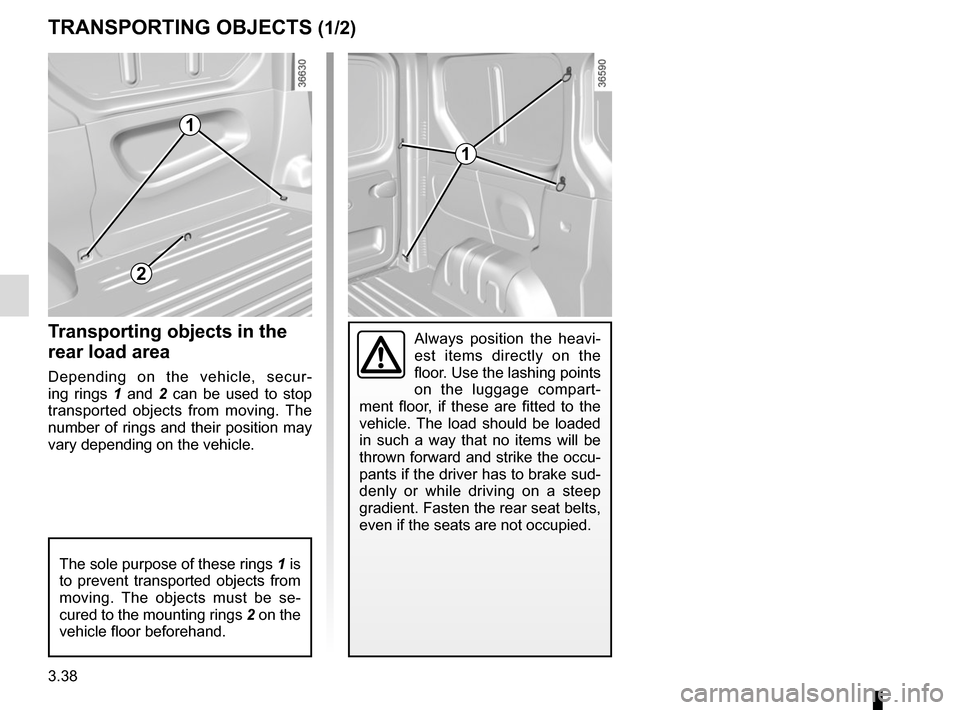
even if the seats are not occupied.Transporting objects in the
rear load area
Depending on the vehicle, secur-
ing rings 1 and 2 can be used to stop
transported objects from moving. The
number of rings and their position may
vary depending on the vehicle.
The sole purpose of these rings 1 is
to prevent transported objects from
moving. The objects must be se-
cured to the mounting rings 2 on the
vehicle floor beforehand.
1
1
2
Page 219 of 292
4.15
Glass instrument panel(e.g. instrument panel, clock, exterior
temperature display, radio display, etc.)
Use a soft cloth (or cotton wool).
If this does not clean it properly, use a
soft cloth (or cotton wool) slightly mois-
tened with soapy water and then wipe
clean with a soft damp cloth or cotton
wool.
Finally, carefully dry off with a soft dry
cloth.
Cleaning products containing alco-
hol must not be used under any cir-
cumstances.
Seat belts
These must be kept clean.
Use products selected by our Technical
Department (Approved outlets) or
warm, soapy water and a sponge and
wipe with a dry cloth.
Detergents or dyes must not be used
under any circumstances.
INTERIOR TRIM MAINTENANCE (1/2)
Textiles (seats, door trim, etc)
Vacuum-clean the textiles regularly.
Liquid stain
Use soapy water.
Dab lightly (never rub) with a soft cloth,
rinse and remove the excess.
Solid or pasty stain
Carefully remove the excess solid or
pasty material immediately with a
spatula (working from the edges to the
centre to avoid spreading the stain).
Clean as for a liquid stain.
Special instructions for sweets or
chewing gum
Put an ice cube on the stain to solidify
it, then proceed as for a solid stain.
A well-maintained vehicle will last
longer. It is therefore recommended to
maintain the interior of the vehicle regu-
larly.
A stain should always be dealt with
swiftly.
Whatever type of stain is on the trim,
use
cold (or warm) soapy water with
natural soap.
Detergents (washing-up liquid, pow-
dered products, alcohol-based prod-
ucts) should not be used.
Use a soft cloth.
Rinse and soak up the excess.
For further recommendations for
maintaining the interior, and/or for
any unsatisfactory results, please
see an authorised dealer.
Page 261 of 292

5.41
OPERATING FAULTS (7/7)
Electrical equipmentPOSSIBLE CAUSESWHAT TO DO
Traces of condensation in the lights. Traces of condensation may be a nat- ural phenomenon caused by varia-
tions in temperature.
In this case, the traces will disappear
slowly once the lights are switched
on.
The front seat belt reminder light
comes on when the seat belts are
fastened. An object is stuck between the floor
and the seat and is disrupting the op-
eration of the sensor. Remove all objects from underneath the
front seats.
Page 285 of 292

7.1
ALPHABETICAL INDEX (1/5)
A
ABS ..............................................................1.86, \
2.21 → 2.25
accessories.............................................................\
........... 5.30
accessories socket ................................................. 3.28 – 3.29
additional methods of restraint .......................................... 1.43 side protection ............................................................. 1.42
to the front seat belts .......................................1.37 → 1.40
to the rear seat belts .................................................... 1.41
adjusting your driving position ..1.28 – 1.30, 1.32 → 1.36, 3.30
advice on antipollution ....................................................... 2.16
air bag.......................................1.37 → 1.40, 1.42 – 1.43, 1.84
activating the front passenger air bags ........................ 1.79
deactivating the front passenger air bags .................... 1.77
air conditioning ........................................................3.4 → 3.13
air vents ...................................................................... 3.2 – 3.3
anti-corrosion check ..............................................6.18 → 6.22
anti-corrosion protection .................................................... 4.13
anti-lock braking system: ABS ...............................2.21 → 2.25
antipollution advice .................................................................\
......... 2.16
armrest: front ..................................................................\
............ 3.23
ashtray .................................................................... 3.28 – 3.29
audible and visual signals................................................ 1.108
B
battery............................................................ 4.12, 5.24 – 5.25 troubleshooting ................................................. 5.24 – 5.25
bonnet..................................................................\
....... 4.2 – 4.3
brake fluid ........................................................................\
.... 4.8
bulbs changing ..........................................................5.14 \
→ 5.21
C
catalytic converter.....................................................\
......... 2.10
central door locking 1.4 → 1.6, 1.13, 1.16 → 1.21, 1.23 → 1.27 changing a bulb .....................................................5.14
→ 5.21
changing a wheel...................................................... 5.9 – 5.10
changing gear .................................................................... 2.11
child restraint/seat ....................1.44 – 1.45, 1.47 → 1.64, 1.77
child safety......1.15, 1.40, 1.44 – 1.45, 1.47 → 1.64, 1.77, 2.4,
3.14 – 3.15
child seats..........................................1.44 – 1.45, 1.4\
7 → 1.64
children ................................. 1.2, 1.7, 1.44 – 1.45, 3.14 – 3.15
children (safety) ................................................... 1.2, 1.7, 1.15
cigar lighter ............................................................. 3.28 – 3.29
cleaning: inside the vehicle .............................................. 4.15 – 4.16
clock ..................................................................... 1.99 – 1.100
closing the doors ........................................... 1.14 – 1.15, 1.27
control instruments ..........................1.84 → 1.91, 1.99 – 1.100
controls ...............................................................\
...1.80 → 1.83
courtesy light ................................................. 3.17 – 3.18, 5.20
cruise control ................................................1.87, 2.29 → 2.32
cruise control-speed limiter....................................2.26 → 2.32
D
dashboard..............................................................1\
.80 → 1.83
deadlocking the doors ................................................ 1.6, 1.13
demisting rear screen ......................................................... 3.8 → 3.11
windscreen .................................................. 3.5, 3.8 → 3.11
dimensions .............................................................\
...6.4 → 6.7
dipstick................................................................\
................. 4.4
display ................................................................\
...1.84 → 1.89
doors...................................................................\
...1.18 → 1.21
doors/tailgate .......................1.2 → 1.8, 1.13, 1.23 – 1.24, 1.27
driver’s position .....................................................1.80 → 1.87
driving ............ 2.2 →
2.6, 2.10, 2.14, 2.18 → 2.33, 2.35 – 2.36
driving position settings ............................................................1.3\
2 → 1.36
driving recommendations ......................................2.12 → 2.15