Page 51 of 268

1.45
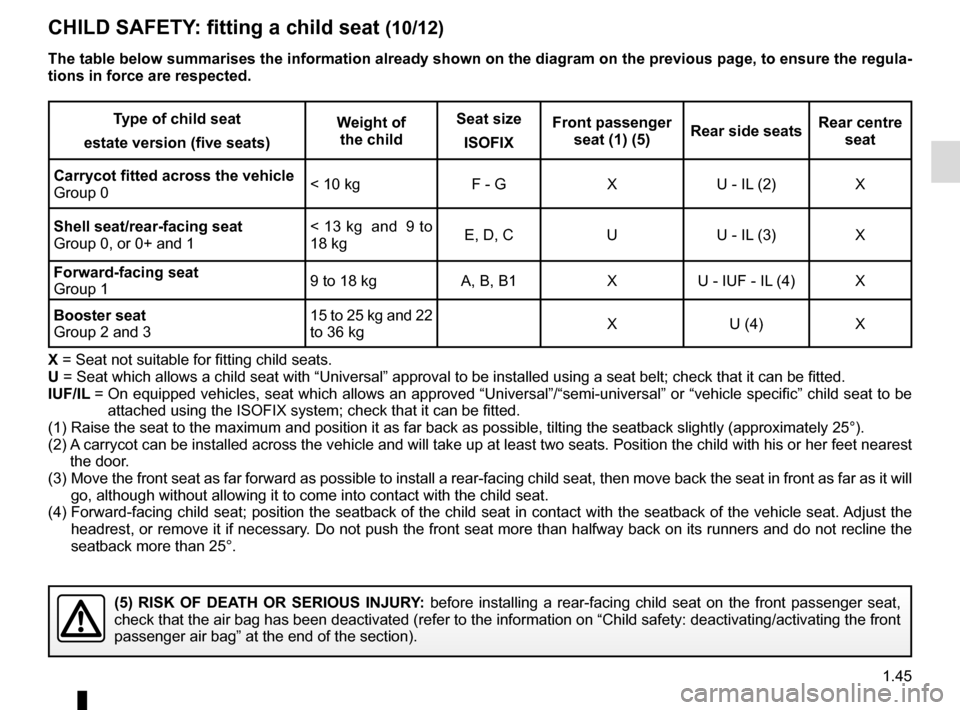
Type of child seat
estate version (five seats) Weight of
the child Seat size
ISOFIX Front passenger
seat (1) (5) Rear side seats Rear centre
seat
Carrycot fitted across the vehicle
Group 0 < 10 kg
F - GXU - IL (2) X
Shell seat/rear-facing seat
Group 0, or 0+ and 1 < 13 kg and 9 to
18 kg
E, D, C
UU - IL (3) X
Forward-facing seat
Group 1 9 to 18 kg
A, B, B1XU - IUF - IL (4) X
Booster seat
Group 2 and 3 15 to 25 kg and 22
to 36 kg
X
U (4) X
X = Seat not suitable for fitting child seats.
U = Seat which allows a child seat with “Universal” approval to be ins\
talled using a seat belt; check that it can be fitted.
IUF/IL = On equipped vehicles, seat which allows an approved “Universal”/“\
semi-universal” or “vehicle specific” child seat to be
attached using the ISOFIX system; check that it can be fitted.
(1) Raise the seat to the maximum and position it as far back as possible, t\
ilting the seatback slightly (approximately 25°).
(2) A carrycot can be installed across the vehicle and will take up at least \
two seats. Position the child with his or her feet nea rest
the door.
(3) Move the front seat as far forward as possible to install a rear-facing \
child seat, then move back the seat in front as far as it will
go, although without allowing it to come into contact with the child sea\
t.
(4) Forward-facing child seat; position the seatback of the child seat in co\
ntact with the seatback of the vehicle seat. Adjust the
headrest, or remove it if necessary. Do not push the front seat more than halfway back on its runners and d\
o not recline the
seatback more than 25°.
CHILD SAFETY: fitting a child seat (10/12)
(5) RISK OF DEATH OR SERIOUS INJURY: before installing a rear-facing child seat on the front passenger seat,\
check that the air bag has been deactivated (refer to the information o\
n “Child safety: deactivating/activating the front
passenger air bag” at the end of the section).
The table below summarises the information already shown on the diagram \
on the previous page, to ensure the regula-
tions in force are respected.
Page 52 of 268

1.46
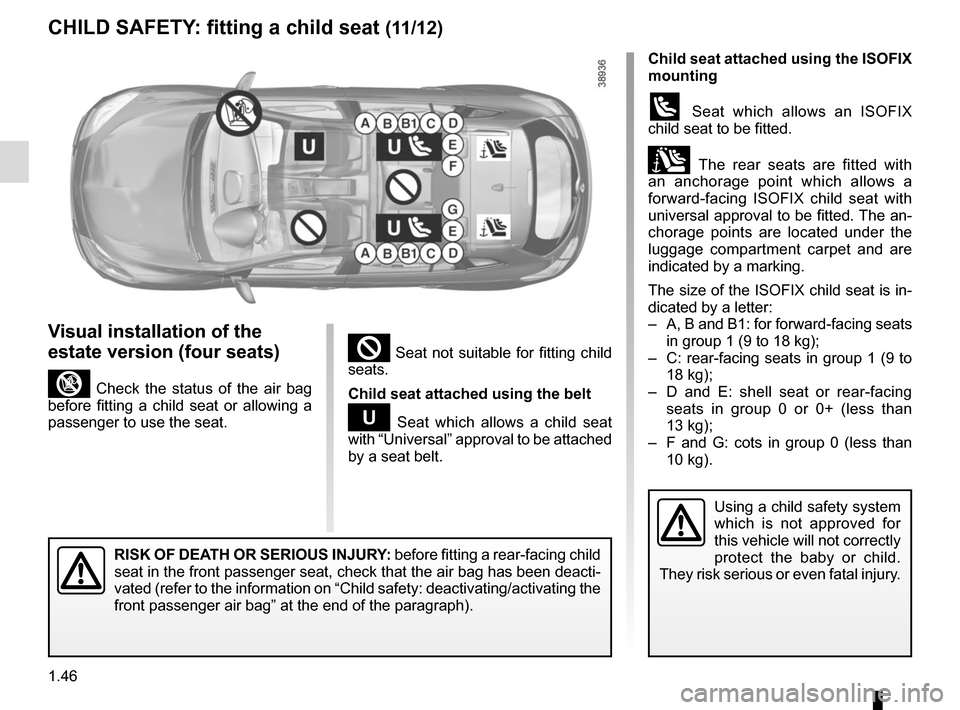
Child seat attached using the ISOFIX
mounting
ü Seat which allows an ISOFIX
child seat to be fitted.
± The rear seats are fitted with
an anchorage point which allows a
forward-facing ISOFIX child seat with
universal approval to be fitted. The an-
chorage points are located under the
luggage compartment carpet and are
indicated by a marking.
The size of the ISOFIX child seat is in-
dicated by a letter:
– A, B and B1: for forward-facing seats in group 1 (9 to 18 kg);
– C: rear-facing seats in group 1 (9 to 18 kg);
– D and E: shell seat or rear-facing seats in group 0 or 0+ (less than
13 kg);
– F and G: cots in group 0 (less than 10 kg).
² Seat not suitable for fitting child
seats.
Child seat attached using the belt
¬ Seat which allows a child seat
with “Universal” approval to be attached
by a seat belt.
CHILD SAFETY: fitting a child seat (11/12)
Using a child safety system
which is not approved for
this vehicle will not correctly
protect the baby or child.
They risk serious or even fatal injury.
Visual installation of the
estate version (four seats)
³ Check the status of the air bag
before fitting a child seat or allowing a
passenger to use the seat.
RISK OF DEATH OR SERIOUS INJURY: before fitting a rear-facing child
seat in the front passenger seat, check that the air bag has been deacti\
-
vated (refer to the information on “Child safety: deactivating/activ\
ating the
front passenger air bag” at the end of the paragraph).
Page 53 of 268

1.47
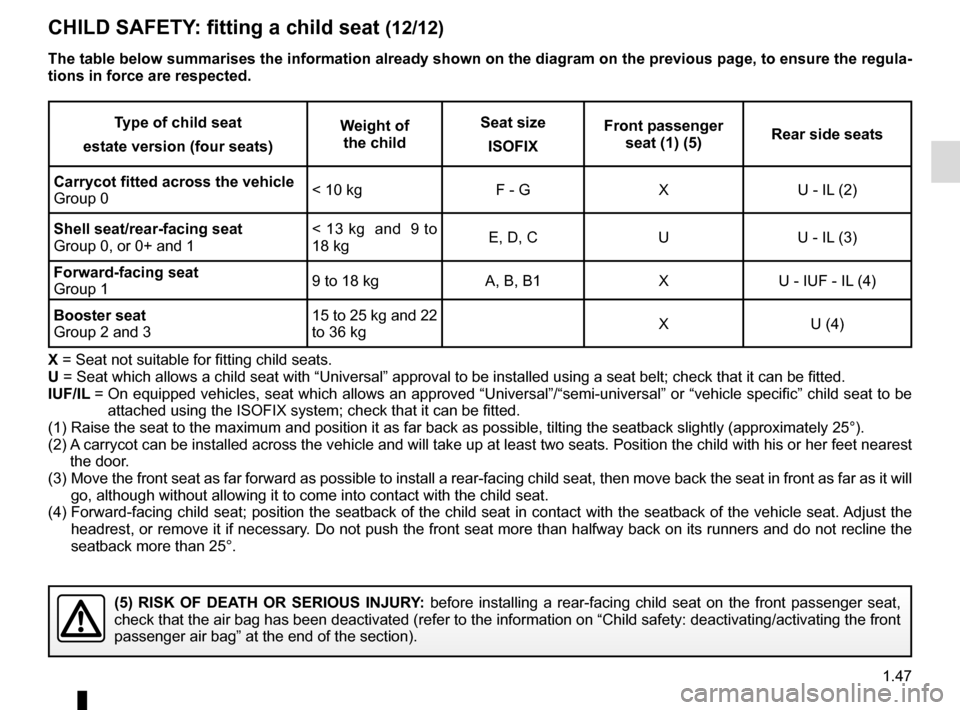
Type of child seat
estate version (four seats) Weight of
the child Seat size
ISOFIX Front passenger
seat (1) (5) Rear side seats
Carrycot fitted across the vehicle
Group 0 < 10 kg
F - GXU - IL (2)
Shell seat/rear-facing seat
Group 0, or 0+ and 1 < 13 kg and 9 to
18 kg
E, D, C
UU - IL (3)
Forward-facing seat
Group 1 9 to 18 kg
A, B, B1 XU - IUF - IL (4)
Booster seat
Group 2 and 3 15 to 25 kg and 22
to 36 kg
X
U (4)
X = Seat not suitable for fitting child seats.
U = Seat which allows a child seat with “Universal” approval to be ins\
talled using a seat belt; check that it can be fitted. IUF/IL = On equipped vehicles, seat which allows an approved “Universal”/“\
semi-universal” or “vehicle specific” child seat to be
attached using the ISOFIX system; check that it can be fitted.
(1) Raise the seat to the maximum and position it as far back as possible, t\
ilting the seatback slightly (approximately 25°).
(2) A carrycot can be installed across the vehicle and will take up at least \
two seats. Position the child with his or her feet nea rest
the door.
(3) Move the front seat as far forward as possible to install a rear-facing \
child seat, then move back the seat in front as far as it will
go, although without allowing it to come into contact with the child sea\
t.
(4) Forward-facing child seat; position the seatback of the child seat in co\
ntact with the seatback of the vehicle seat. Adjust the
headrest, or remove it if necessary. Do not push the front seat more than halfway back on its runners and d\
o not recline the
seatback more than 25°.
The table below summarises the information already shown on the diagram \
on the previous page, to ensure the regula-
tions in force are respected.
CHILD SAFETY: fitting a child seat (12/12)
(5) RISK OF DEATH OR SERIOUS INJURY: before installing a rear-facing child seat on the front passenger seat,\
check that the air bag has been deactivated (refer to the information o\
n “Child safety: deactivating/activating the front
passenger air bag” at the end of the section).
Page 152 of 268

3.12
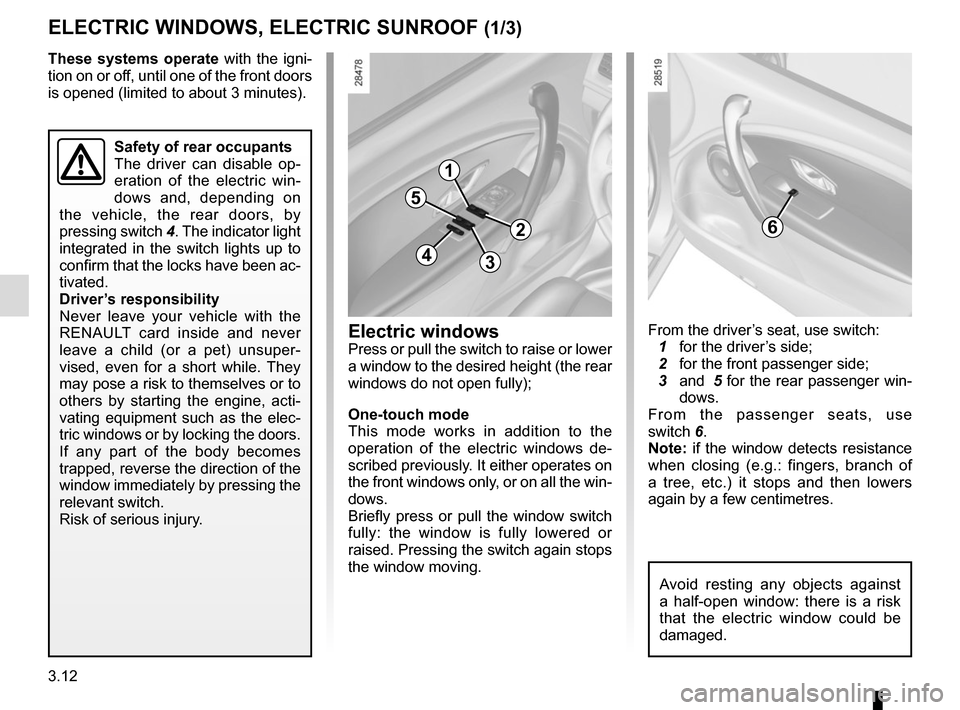
These systems operate with the igni-
tion on or off, until one of the front doors
is opened (limited to about 3 minutes).
From the driver’s seat, use switch:
1 for the driver’s side;
2 for the front passenger side;
3 and 5 for the rear passenger win-
dows.
From the passenger seats, use
switch 6.
Note: if the window detects resistance
when closing (e.g.: fingers, branch of
a tree, etc.) it stops and then lowers
again by a few centimetres.
ELECTRIC WINDOWS, ELECTRIC SUNROOF (1/3)
Electric windows
Press or pull the switch to raise or lower
a window to the desired height (the rear
windows do not open fully);
One-touch mode
This mode works in addition to the
operation of the electric windows de-
scribed previously. It either operates on
the front windows only, or on all the win-
dows.
Briefly press or pull the window switch
fully: the window is fully lowered or
raised. Pressing the switch again stops
the window moving.
1
2
34
5
6
Avoid resting any objects against
a half-open window: there is a risk
that the electric window could be
damaged.
Safety of rear occupants
The driver can disable op-
eration of the electric win-
dows and, depending on
the vehicle, the rear doors, by
pressing switch 4. The indicator light
integrated in the switch lights up to
confirm that the locks have been ac-
tivated.
Driver’s responsibility
Never leave your vehicle with the
RENAULT card inside and never
leave a child (or a pet) unsuper-
vised, even for a short while. They
may pose a risk to themselves or to
others by starting the engine, acti-
vating equipment such as the elec-
tric windows or by locking the doors.
If any part of the body becomes
trapped, reverse the direction of the
window immediately by pressing the
relevant switch.
Risk of serious injury.
Page 163 of 268
3.23
Press button 1 and lower the
seatback(s) A.
To fold down the seatback
Ensure that the front seats are far
enough forward.
Lower the rear headrests (refer to the
information on the “Rear headrests” in
Section 1).
Place the seat belts 2 in their guides
3.Sport tourer versions
Depending on the vehicle, seatback A
can be folded down on its own to allow
long or bulky objects to be transported.
REAR BENCH SEAT functions (1/2)
1
A
2
3
For safety reasons, carry
out any adjustments when
the vehicle is not being
driven.
Before moving the seat-
back, put seat belt 2 in belt
guide 3 to avoid damaging
it.
Page 164 of 268
3.24
When refitting the seat-
back, make sure it is cor-
rectly locked in place.
If seat covers are fitted,
make sure these do not prevent the
seatback latch from locking in.
Make sure that the seat belts are
positioned correctly.
Reposition the headrests.
The seat and the seatback may be
folded away to allow bulky objects to be
carried.
To fold away the seat base
Tilt seat base B against the front seats.
To fold down the seatback
After folding the seat base down,
remove the rear headrests (refer to the
section on “rear headrests”) then press
button 1 and lower the seatback(s) C.
In all situations, remove the rear
headrests (refer to the informa-
tion on the “Rear headrests” in
Section 1).
For safety reasons, carry
out any adjustments when
the vehicle is not being
driven.
1
CB
REAR BENCH SEAT functions (2/2)
When moving the rear
bench seat, ensure that
nothing obstructs the an-
chorage points (part of the
body, a pet, gravel, cloth, toys, etc.).
Page 171 of 268
3.31
TRANSPORTING OBJECTS IN THE BOOT
Always position the objects transported
so that the largest surface is against:
– The rear bench seatback for normal loads (example A).
– The front seatbacks with the rear
seatbacks folded down, the mobile
floor in the flat-floor position (exam-
ple B).
If you have to place objects on the folded
seatback, it is necessary that you lower
the headrests before folding the seat-
back so that it can be folded as flat as
possible against the seat.
B
A
Always position the heavi-
est items directly on the
floor. Use the lashing
points 1 on the boot floor, if
these are fitted to the vehicle. The
luggage should be loaded in such a
way that no items will be thrown for-
ward and strike the occupants if the
driver has to brake suddenly. Fasten
the rear seat belts, even if the seats
are not occupied.
1
Page 173 of 268
3.33
TRANSPORTING OBJECTS: luggage net (1/2)
Luggage net A
On equipped vehicles, this can be used
when transporting animals or luggage,
to separate them from the passenger
section.
It can be positioned:
– behind the front seats;
– behind the rear bench seat.
Fitting the luggage net
behind the front seats
Inside the vehicle on each side:
– lift cover 1 to access the upper
mounting ring of the net;
– fix the net belt hook onto the ring;
– to access the lower mounting 2
for the net the first time you use it,
contact an approved Dealer;
– once you have accessed the lower mounting, attach the hook 2 of the
net strap to the ring;
– adjust the net strap so that it is taut.
A
2
1
The luggage net is desig-
ned to retain a maximum
weight of 10 kg.
Risk of injury.