Page 46 of 425

The SABIC deploys downward, covering the side win-
dows. An inflating SABIC pushes the outside edge of the
headliner out of the way and covers the window. The
SABICs inflate with enough force to injure you if you are
not belted and seated properly, or if items are positioned
in the area where the SABICs inflate. Children are at an
even greater risk of injury from a deploying air bag.
The SABICs may help reduce the risk of partial or
complete ejection of vehicle occupants through side
windows in certain side impact events.
WARNING!
•Your vehicle is equipped with left and right
Supplemental Side Air Bag Inflatable Curtains
(SABICs). Do not stack luggage or other cargo up
high enough to block the deployment of the
(Continued)
WARNING! (Continued)
SABICs. The trim covering above the side win-
dows where the SABIC and its deployment path
are located should remain free from any obstruc-
tions.
• Your vehicle is equipped with SABICs. In order for
the SABICs to work as intended, do not install any
accessory items in your vehicle which could alter
the roof. Do not add an aftermarket sunroof to your
vehicle. Do not add roof racks that require perma-
nent attachments (bolts or screws) for installation
on the vehicle roof. Do not drill into the roof of the
vehicle for any reason.
The SABICs and SABs (“Side Air Bags”) are designed to
activate in certain side impacts. The Occupant Restraint
Controller (“ORC”) determines whether the deployment
of the Side Air Bags in a particular impact event is
appropriate, based on the severity and type of collision.
44 THINGS TO KNOW BEFORE STARTING YOUR VEHICLE
Page 153 of 425

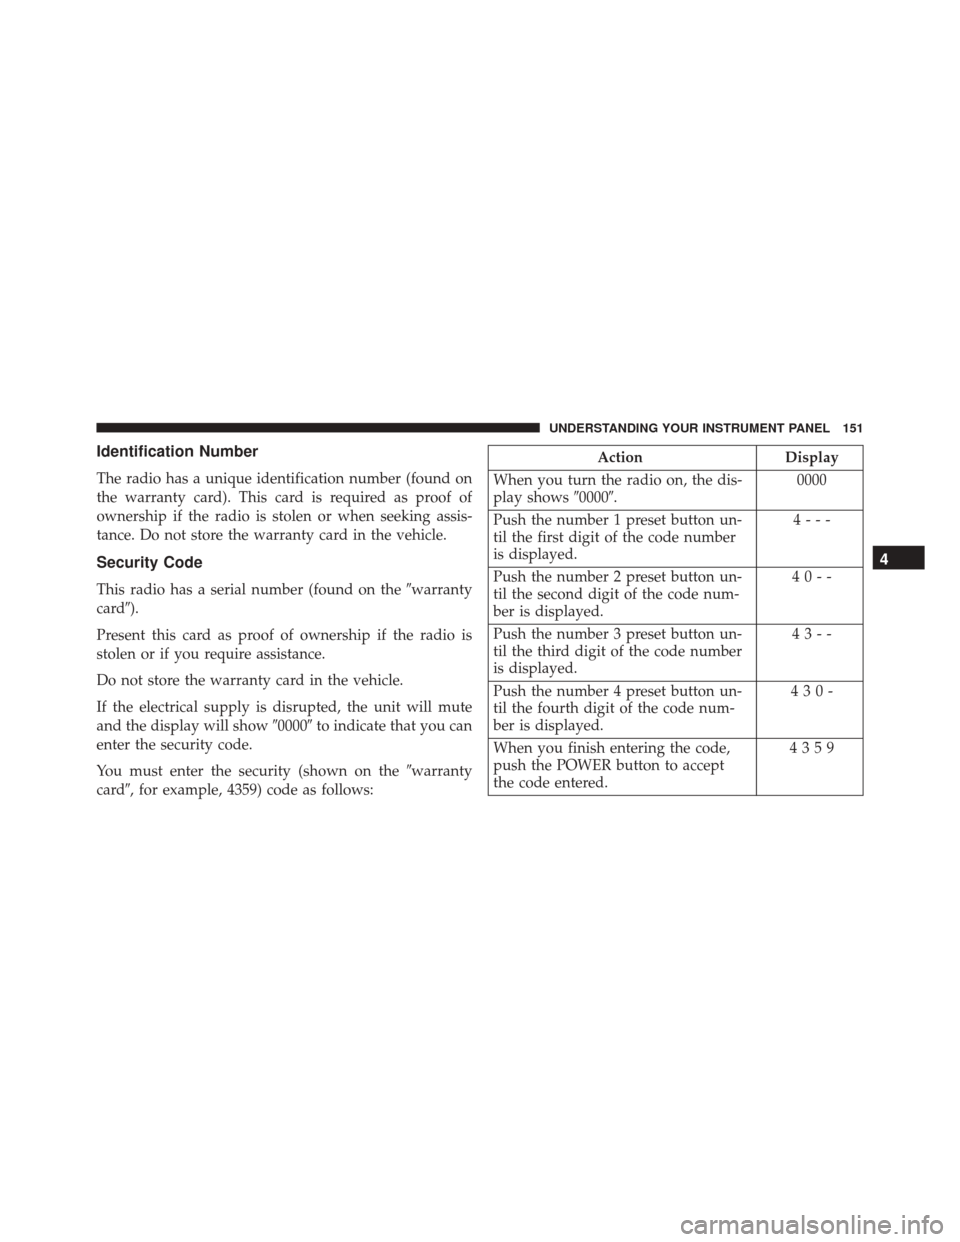
Identification Number
The radio has a unique identification number (found on
the warranty card). This card is required as proof of
ownership if the radio is stolen or when seeking assis-
tance. Do not store the warranty card in the vehicle.
Security Code
This radio has a serial number (found on the�warranty
card�).
Present this card as proof of ownership if the radio is
stolen or if you require assistance.
Do not store the warranty card in the vehicle.
If the electrical supply is disrupted, the unit will mute
and the display will show �0000�to indicate that you can
enter the security code.
You must enter the security (shown on the �warranty
card�, for example, 4359) code as follows:
Action Display
When you turn the radio on, the dis-
play shows �0000�. 0000
Push the number 1 preset button un-
til the first digit of the code number
is displayed. 4---
Push the number 2 preset button un-
til the second digit of the code num-
ber is displayed. 40--
Push the number 3 preset button un-
til the third digit of the code number
is displayed. 43--
Push the number 4 preset button un-
til the fourth digit of the code num-
ber is displayed. 430-
When you finish entering the code,
push the POWER button to accept
the code entered. 4359
4
UNDERSTANDING YOUR INSTRUMENT PANEL 151
Page 330 of 425

▫Appearance Care And Protection From
Corrosion .......................... .355
▫ Cleaning The Instrument Panel Cupholders . .361
� FUSES ............................. .362
▫ Underhood Fuses ..................... .363
▫ Interior Fuses ........................370
▫ Right Central Pillar Fuses ................374
� VEHICLE STORAGE ....................375
� REPLACEMENT BULBS .................376
� BULB REPLACEMENT ..................378
▫ Headlamps Low Beam And High beam .....378
▫ Front Turn Signal/Parking Lamps .........379▫
Daytime Running Lamp (DRL)/Front Side Marker
Lamp ............................. .379
▫ Front Fog Lamps ..................... .380
▫ Front, Rear Roof Lamps .................381
▫ Rear Tail, Stop, Backup, Turn Signal And Rear
Side Marker Lamps ....................381
� FLUID CAPACITIES ....................382
� FLUIDS, LUBRICANTS, AND GENUINE
PARTS ............................. .383
▫ Engine ............................ .383
▫ Chassis ............................385
328 MAINTAINING YOUR VEHICLE
Page 379 of 425
Exterior Bulbs
Bulb Number
Front Low and High Beam Headlamp H7LL
Front Park/Turn Signal Lamps 7444NA
Daytime Running Lamps (If Equipped) 7440
Front Side Marker Lamps WY5W
Rear Tail/Stop Lamps 7443
Rear Turn Signal Lamps 7440NA
Rear Backup Lamps 921
Rear Side Marker Lamps W3W
Front Fog Lamps H11
License Plate Lamps C5W
Front Roof Lamps WY5W
Rear Roof Lamps W3W
NOTE:
•Numbers refer to commercial bulb types that can be purchased from your authorized dealer.
•If a bulb needs to be replaced, visit your authorized dealer.
7
MAINTAINING YOUR VEHICLE 377
Page 383 of 425
Front, Rear Roof Lamps
1. Remove two screw and remove the lamp assembly.
2. Remove the socket bulb by turning counterclockwise.
3. Remove bulb and replace as needed.
4. Reinstall the bulb socket and rotate clockwise to lockin place.
5. Reinstall lamp.
Rear Tail, Stop, Backup, Turn Signal And Rear
Side Marker Lamps
1. Open rear doors.
2. Remove the two screws and remove the tail lamp.
3. Remove the tail/stop, turn signal, backup and rear side marker bulb/socket by rotating counter-
clockwise.
4. Remove the bulb and replace as needed.
5. Reinstall bulb/socket and rotate clockwise to lock in place.
6. Reinstall lamp.
7
MAINTAINING YOUR VEHICLE 381