Page 5 of 292
3
Partner-2-VU_en_Chap00a_Sommaire_ed01-2015
corresponds to
a left hand drive
vehicle.corresponds to a
right hand drive
vehicle.
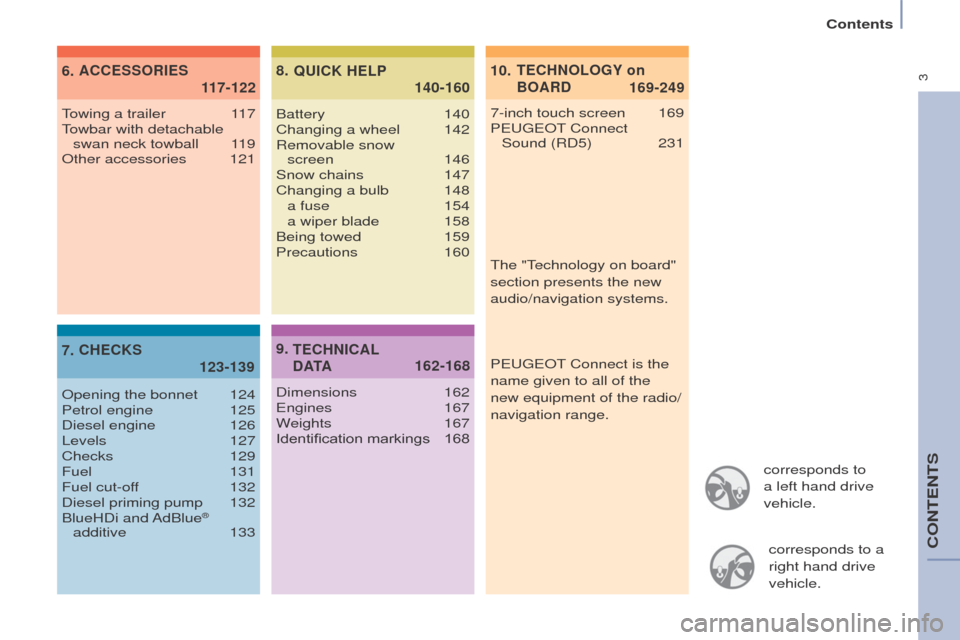
TECHNOLOGY on
BOARD
ACCESSORIES
CHECKS QUICK HELP
7-inch touch screen 169
P EUGEOT Connect
Sound (RD5)
231
T
owing a trailer
1
17
Towbar with detachable swan neck towball
1
19
Other accessories
121
Opening the bonnet
124
Petrol engine
125
Diesel engine
126
Levels
127
Checks
129
Fuel
131
Fuel cut-off
132
Diesel priming pump
132
BlueHDi
and AdBlue
®
additive
133 Battery
140
Changing a wheel
142
Removable snow
screen 146
Snow chains
147
Changing a bulb
148 a fuse
154 a wiper blade
158
Being towed
159
Precautions
160
TECHNICAL
D ATA
Dimensions 162
Engines 167
Weights
167
Identification markings
168The "T
echnology on board"
section presents the new
audio/navigation systems.
P EUGEOT
Connect is the
name given to all of the
new equipment of the radio/
navigation range.
117-122
123-139 140-160
162-168 169-249
6.
7. 8.
9. 10.
Contents
CONTENTS
Page 8 of 292
6
Partner-2-VU_en_Chap01_vue-ensemble_ed01-2015
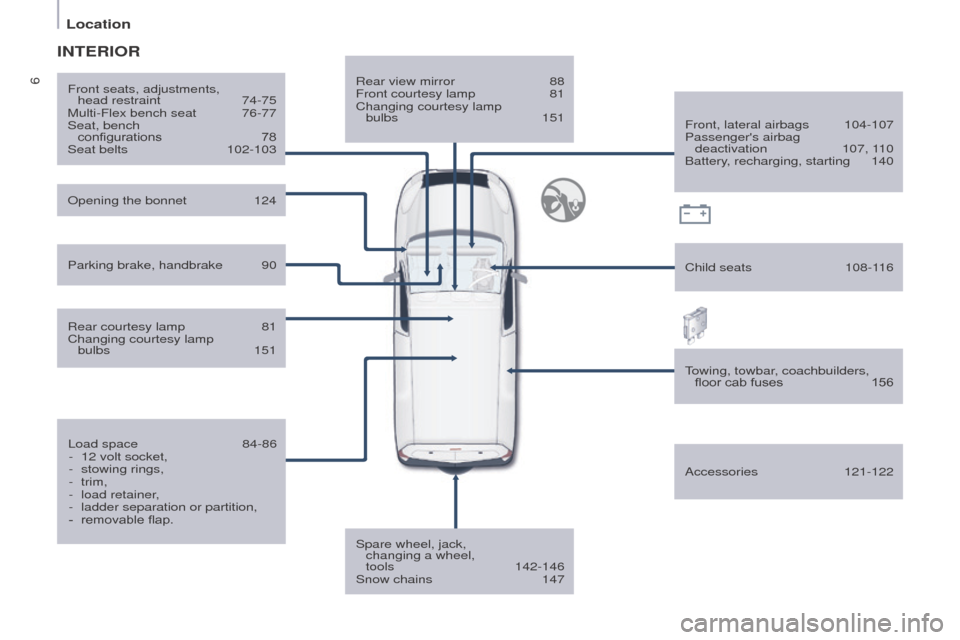
Rear view mirror 88
Front courtesy lamp 81
Changing courtesy lamp
bulbs
151
Spare wheel, jack,
changing a wheel,
tools
142-146
Snow chains
147 Front, lateral airbags
104-107
Passenger's airbag
deactivation
107, 1
10
Battery, recharging, starting
140
Opening the bonnet
124
T
owing, towbar, coachbuilders, floor cab fuses
156
Front seats, adjustments,
head restraint
74-75
Multi-Flex bench seat
76-77
Seat, bench
configurations
78
Seat belts
102-103
INTERIOR
Rear courtesy lamp 81
Changing courtesy lamp
bulbs
151
Load space
84-86
-
12 volt socket,
-
stowing rings,
-
trim,
-
load retainer
,
-
ladder separation or partition,
-
removable flap. Child seats
108-1
16
Parking brake, handbrake
90
Accessories
121-122
Location
Page 9 of 292
7
Partner-2-VU_en_Chap01_vue-ensemble_ed01-2015
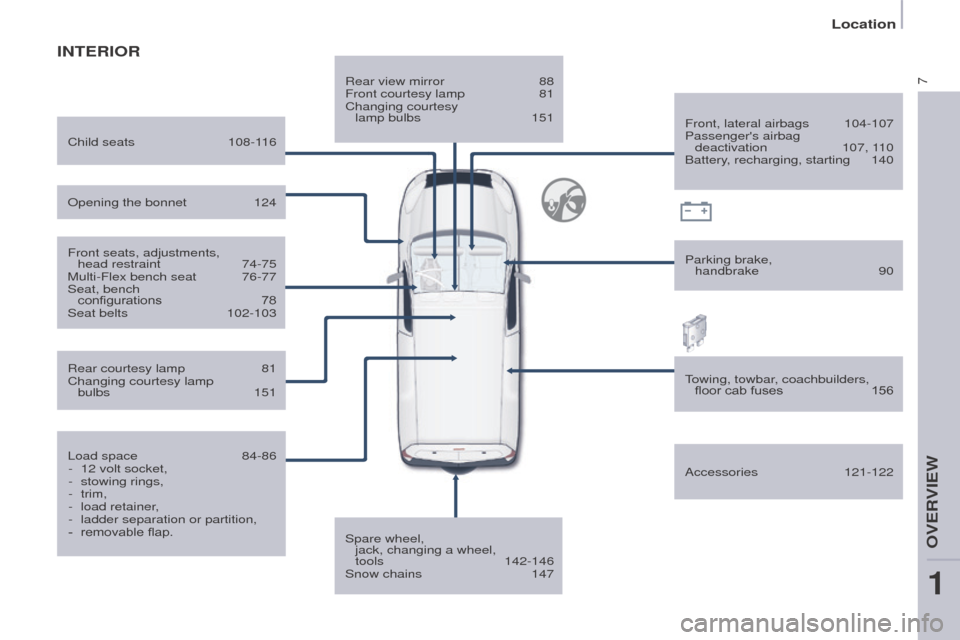
INTERIOR
Rear view mirror 88
Front courtesy lamp 81
Changing courtesy
lamp bulbs
151
Spare wheel,
jack, changing a wheel,
tools
142-146
Snow chains
147 Front, lateral airbags
104-107
Passenger's airbag
deactivation
107, 1
10
Battery, recharging, starting
140
Child seats
108-1
16
Parking brake, handbrake
90
Front seats, adjustments,
head restraint
74-75
Multi-Flex bench seat
76-77
Seat, bench
configurations
78
Seat belts
102-103 Accessories
121-122
Rear courtesy lamp
81
Changing courtesy lamp
bulbs
151
Load space
84-86
-
12 volt socket,
-
stowing rings,
-
trim,
-
load retainer
,
-
ladder separation or partition,
-
removable flap.
Opening the bonnet
124
T
owing, towbar, coachbuilders, floor cab fuses
156
1
OVERVIEW
Location
Page 10 of 292
8
Partner-2-VU_en_Chap01_vue-ensemble_ed01-2015
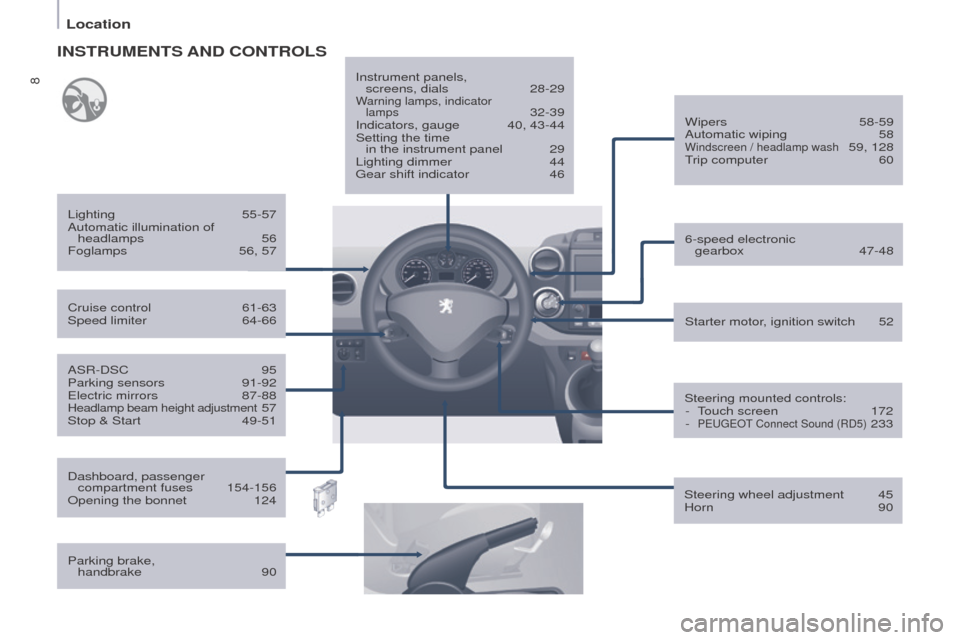
ASR-DSC 95
Parking sensors 91-92
Electric mirrors
87-88Headlamp beam height adjustment 57
Stop & Start
49-51 Starter motor
, ignition switch
52
Wipers
58-59
Automatic wiping
58Windscreen / headlamp wash 59, 128
T
rip computer
60
Cruise control
61-63
Speed limiter
64-66
Lighting
55-57
Automatic illumination of headlamps
56
Foglamps
56, 57
INSTRUMENTS AND CONTROLS
Dashboard, passenger
compartment fuses 154-156
Opening the bonnet
124
Parking brake,
handbrake
90 Instrument panels,
screens, dials
28-29Warning lamps, indicator
lamps 32-39
Indicators, gauge 40, 43-44
Setting the time
in the instrument panel
29
Lighting dimmer
44
Gear shift indicator
46
Steering mounted controls:-
T
ouch screen
172
-
PEUGEOT Connect Sound (RD5) 233
Steering wheel adjustment
45
Horn
90
6-speed electronic
gearbox
47-48
Location
Page 12 of 292
10
Partner-2-VU_en_Chap01_vue-ensemble_ed01-2015
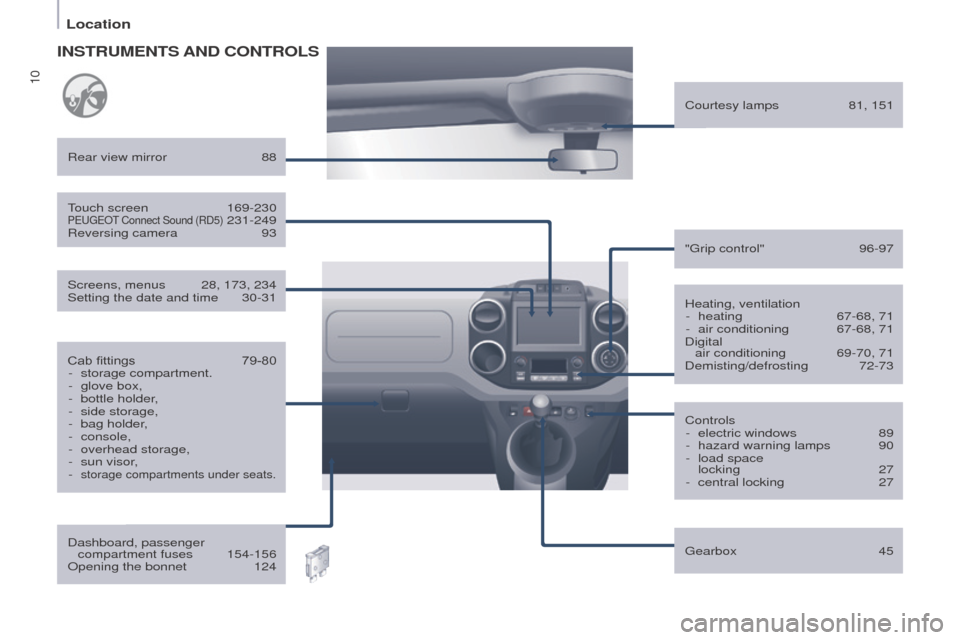
Heating, ventilation- heating 67-68, 71
-
air conditioning
67-68, 71
Digital
air conditioning
69-70, 71
Demisting/defrosting
72-73
Rear view mirror
88
Controls-
electric windows
89
-
hazard warning lamps
90
-
load space
locking
27
-
central locking
27
"Grip control"
96-97
Cab fittings
79-80
-
storage compartment.
-
glove box,
-
bottle holder
,
-
side storage,
-
bag holder
,
-
console,
-
overhead storage,
-
sun visor
,
-
storage compartments under seats.
Dashboard, passenger compartment fuses 154-156
Opening the bonnet
124
T
ouch screen
169-230PEUGEOT Connect Sound (RD5) 231-249
Reversing camera
93
Screens, menus
28, 173, 234
Setting the date and time
30-31
Gearbox
45
Courtesy lamps
81, 151
INSTRUMENTS AND CONTROLS
Location
Page 14 of 292
12
Partner-2-VU_en_Chap01_vue-ensemble_ed01-2015
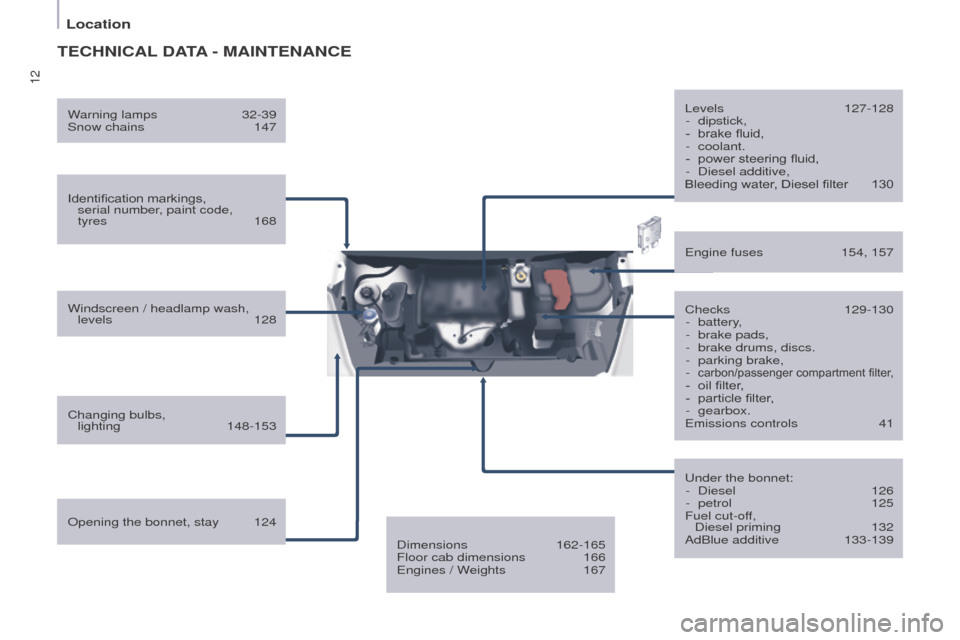
TECHNICAL DATA - M AINTENANCE
Identification markings,
serial number, paint code,
tyres
168
Windscreen / headlamp wash, levels
128
Changing bulbs,
lighting
148-153 Checks
129-130
-
battery
,
-
brake pads,
-
brake drums, discs.
-
parking brake,
-
carbon/passenger compartment filter,- oil filter,
- particle filter ,
-
gearbox.
Emissions controls
41
Engine fuses
154, 157
Under the bonnet: -
Diesel
126
-
petrol
125
Fuel cut-of
f,
Diesel priming
132
AdBlue additive
133-139
Opening the bonnet, stay
124 Levels
127-128
-
dipstick,
-
brake fluid,
-
coolant.
-
power steering fluid,
-
Diesel additive,
Bleeding water
, Diesel filter
130
W
arning lamps
32-39
Snow chains
147
Dimensions
162-165
Floor cab dimensions
166
Engines / W
eights
167
Location
Page 71 of 292
69
Partner-2-VU_en_Chap04_Ergonomie_ed01-2015
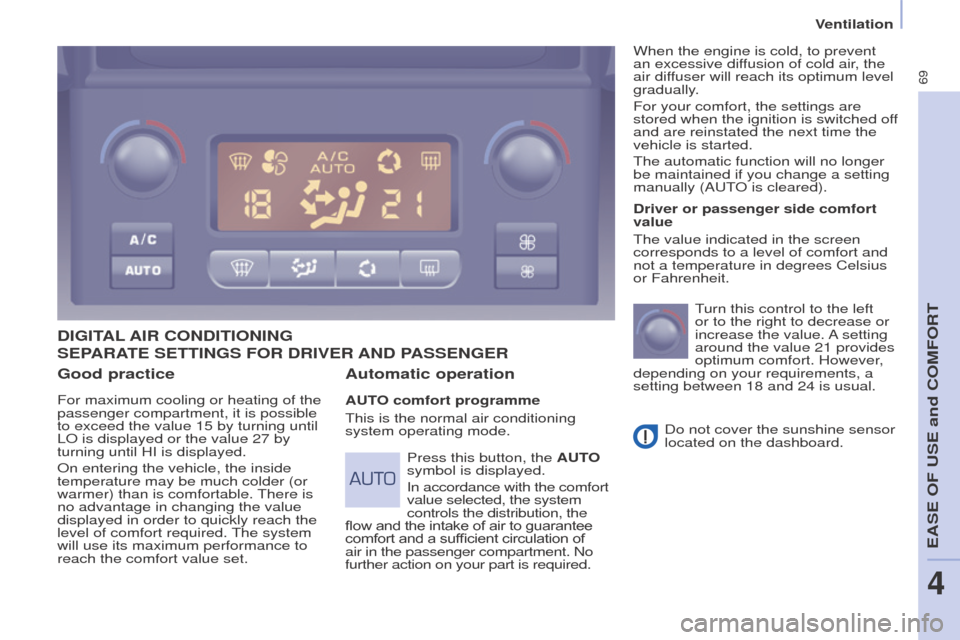
Good practice
For maximum cooling or heating of the
passenger compartment, it is possible
to exceed the value 15 by turning until
LO is displayed or the value 27 by
turning until HI is displayed.
On entering the vehicle, the inside
temperature may be much colder (or
warmer) than is comfortable. There is
no advantage in changing the value
displayed in order to quickly reach the
level of comfort required. The system
will use its maximum performance to
reach the comfort value set.
DIGITAL AIR CONDITIONING
Automatic operation
AUTO comfort programme
This is the normal air conditioning
system operating mode. Driver or passenger side comfort
value
The value indicated in the screen
corresponds to a level of comfort and
not a temperature in degrees Celsius
or Fahrenheit.
Turn this control to the left
or to the right to decrease or
increase the value. A setting
around the value 21 provides
optimum comfort. However,
depending on your requirements, a
setting between 18 and 24 is usual.
Do not cover the sunshine sensor
located on the dashboard.
Press this button, the AUTO
symbol is displayed.
In accordance with the comfort
value selected, the system
controls the distribution, the
flow and the intake of air to guarantee
comfort and a sufficient circulation of
air in the passenger compartment. No
further action on your part is required. When the engine is cold, to prevent
an excessive diffusion of cold air, the
air diffuser will reach its optimum level
gradually.
For your comfort, the settings are
stored when the ignition is switched off
and are reinstated the next time the
vehicle is started.
The automatic function will no longer
be maintained if you change a setting
manually (AUTO is cleared).
SEPARATE SETTINGS FOR DRIVER AND
PASSENGER
Ventilation
EASE OF USE and COMFORT
4
Page 72 of 292
70
Partner-2-VU_en_Chap04_Ergonomie_ed01-2015
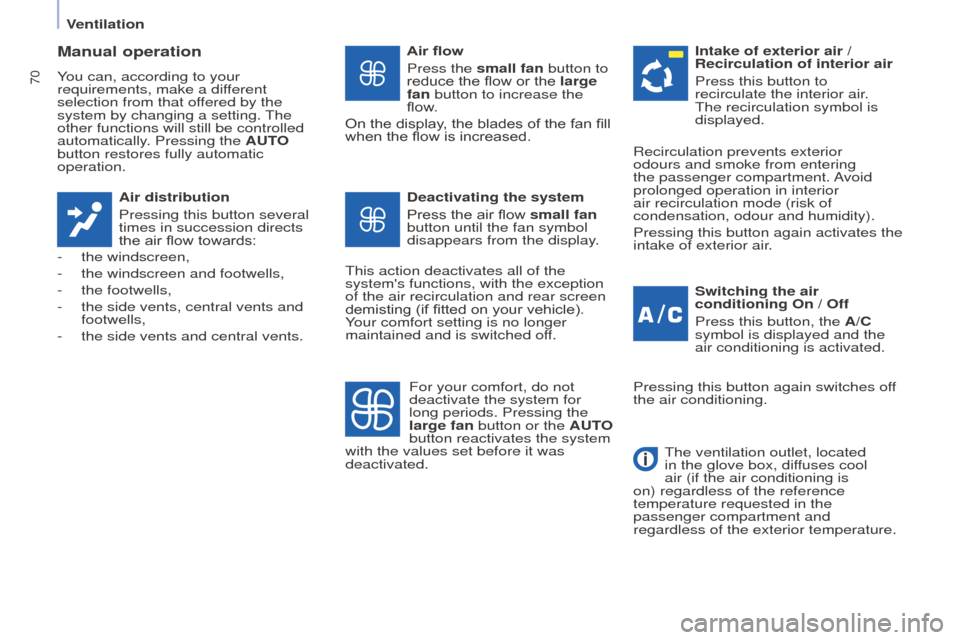
Manual operation
You can, according to your
requirements, make a different
selection from that offered by the
system by changing a setting. The
other functions will still be controlled
automatically. Pressing the AUTO
button restores fully automatic
operation.Air distribution
Pressing this button several
times in succession directs
the air flow towards:
-
the windscreen,
-
the windscreen and footwells,
-
the footwells,
-
the side vents, central vents and
footwells,
-
the side vents and central vents. Air flow
Press the
small fan button to
reduce the flow or the large
fan button to increase the
flow.
On the display, the blades of the fan fill
when the flow is increased.
Switching the air
conditioning On / Off
Press this button, the A/C
symbol is displayed and the
air conditioning is activated.
Deactivating the system
Press the air flow small fan
button until the fan symbol
disappears from the display.
This action deactivates all of the
system's functions, with the exception
of the air recirculation and rear screen
demisting (if fitted on your vehicle).
Your comfort setting is no longer
maintained and is switched off. Intake of exterior air /
Recirculation of interior air
Press this button to
recirculate the interior air.
The recirculation symbol is
displayed.
For your comfort, do not
deactivate the system for
long periods. Pressing the
large fan button or the AUTO
button reactivates the system
with the values set before it was
deactivated. Recirculation prevents exterior
odours and smoke from entering
the passenger compartment. Avoid
prolonged operation in interior
air recirculation mode (risk of
condensation, odour and humidity).
Pressing this button again activates the
intake of exterior air.
Pressing this button again switches off
the air conditioning.
The ventilation outlet, located
in the glove box, diffuses cool
air (if the air conditioning is
on) regardless of the reference
temperature requested in the
passenger compartment and
regardless of the exterior temperature.
Ventilation