Page 5 of 276

3
cont
Ent
S
5. SAFEtY 98-120 6. AccESSorIES 121-125
7.
cHEcKS 126-141 8.
QuIcK HELP
142-171
9.
tEcHnIcAL
dAtA 172-182
Parking brake 98
Hazard warning lamps 98
Horn 99
Braking assistance systems
99trajectory control systems 101
Lane departure warning system
105
Seat belts 106
Airbags 1
10
Deactivating the passenger's
front airbag
11
1
Child seats
113
ISOFIX seats 117
towing a trailer 121
Roof carrying systems 123
Other accessories 124
Snow chains 125
Opening the bonnet
127underbonnet 128
Levels 129
Checks 131
Fuel 134
BlueHDi and AdBlue
® additive 136 Battery
142
Changing a fuse 145
Changing a bulb 149
Changing a wiper blade
155
Changing a wheel 156
Puncture repair kit 161towing the vehicle 163
Detachable towball 164glossary of labels 168
Dimensions
172engines 177
W
eights
179
Identification markings 182
10. AudIo EQuIPMEnt
and tELEMAtIcS
SPE
cIAL
FEA
turES
touch screen Audio-telematic system 183
Audio system 231
Crew cab
249
Chassis Cab / Floor Cab
251
Double cab 254tipper body 258
Rear seat belts.
Child seats / ISOFIX
mountings at the rear
Contents
Page 6 of 276
4
cEntrE conSoLE
1. Audio / Navigation system.
2. Heating / Air conditioning.
3. Storage / portable ashtray.
4. 12 volt accessory socket (180 W max).
5.
u
SB port / Cigarette lighter
.6. Dynamic stability control (DCS/ASR) /
Intelligent traction control.
7.
Hill descent control.
8. Lane departure warning system.
9. Hazard warning lamps. 10.
Central locking / Locking indicator
lamp.
11
.
Demisting / Defrosting.
12.
g
ear lever
.
Presentation
Page 7 of 276
5
InStruMEntS And controLS
1. Fusebox.
2. Additional programmable heating.
3. Cruise control / sped limiter controls. 4.
Vehicle configuration / Headlamp beam
height / Front/rear foglamps.
5.
Lighting and direction indicator
control stalk.
6. Instrument panel with screen. 7.
Wiper / screenwash / trip computer
control stalk.
8.
Ignition switch.
9. Driver's front airbag / Horn.
10. Steering mounted audio system
controls.
1
OVeRVIeW
Presentation
Page 10 of 276
8
Lane departure warning system 105
Hill descent control 104
Intelligent traction Control 103
ASR, DSC 101-102
Vehicle configuration
90-91
Setting the time 91
Reversing camera 95touch screen audio system 183-230
Audio system 231-247
tachograph 93 Cab fittings
76-80
● cigarette lighter,
● glove box - cooled,
● overhead storage,
● portable ashtray,
● courtesy lamps,
● 12 volt socket / USB port,
● writing table / multifunction
support,
●
storage compartments.
Demisting-defrosting
59
Central locking 22
Locking indicator lamp 22
Hazard warning lamps 98 Ventilation, heating,
A/C
60-62, 63-64
● manual air conditioning,
● mono-zone digital air
conditioning,
●
air recirculation.
Opening the bonnet
127
Dashboard fuses
145-146
InStruMEntS And controLS
Location
Page 78 of 276
76
cAB FIttInGS
Front seat storage
there is a fixed storage tray, located under
the driver's seat.
central glove box
If this has a lock, you can lock it using
the
key
.
It permits access to the auxiliary sockets
(Jack and
uSB) used to transfer data to the
audio system. If your vehicle is fitted with a seat with
variable vibration reduction, it does not
have any storage compartments.the location under the passenger's seat
is dedicated to storage of the tool box,
containing the tools to be used when
changing a wheel or bulb or when towing the
vehicle...
to take out the box, turn the control a
quarter of a turn to release, then pull the box
forwards.
When putting it back in place, do not forget
to turn the control a quarter of a turn in the
opposite direction to secure the box in its
location.
Practical information
Page 89 of 276

87PErSonALISAtIon - conFIGurAtIon
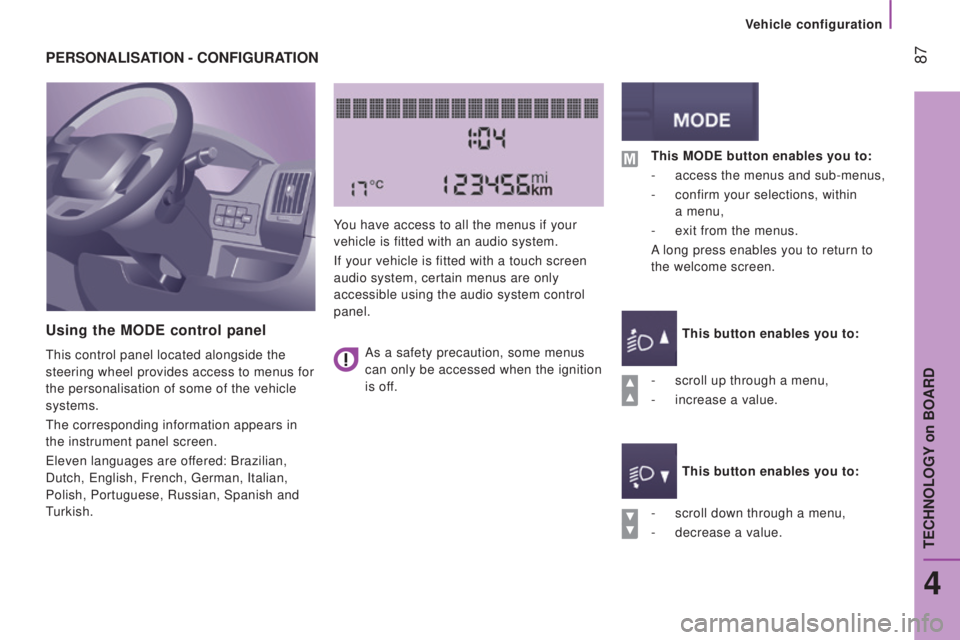
using the ModE control panel
this control panel located alongside the
steering wheel provides access to menus for
the personalisation of some of the vehicle
systems.
the corresponding information appears in
the instrument panel screen.
eleven languages are of
fered: Brazilian,
Dutch,
english, French, german, Italian,
Polish, Portuguese, Russian, Spanish and
turkish. You have access to all the menus if your
vehicle is fitted with an audio system.
If your vehicle is fitted with a touch screen
audio system, certain menus are only
accessible using the audio system control
panel.
-
scroll down through a menu,
-
decrease a value.
this ModE button enables you to:
-
access the menus and sub-menus,
-
confirm your selections, within
a
menu,
-
exit from the menus.
A long press enables you to return to
the welcome screen.
this button enables you to:
this button enables you to:
-
scroll up through a menu,
-
increase a value.
As a safety precaution, some menus
can only be accessed when the ignition
is off.
4
teCHNOLOgY on BOARD
Vehicle configuration
Page 92 of 276

90
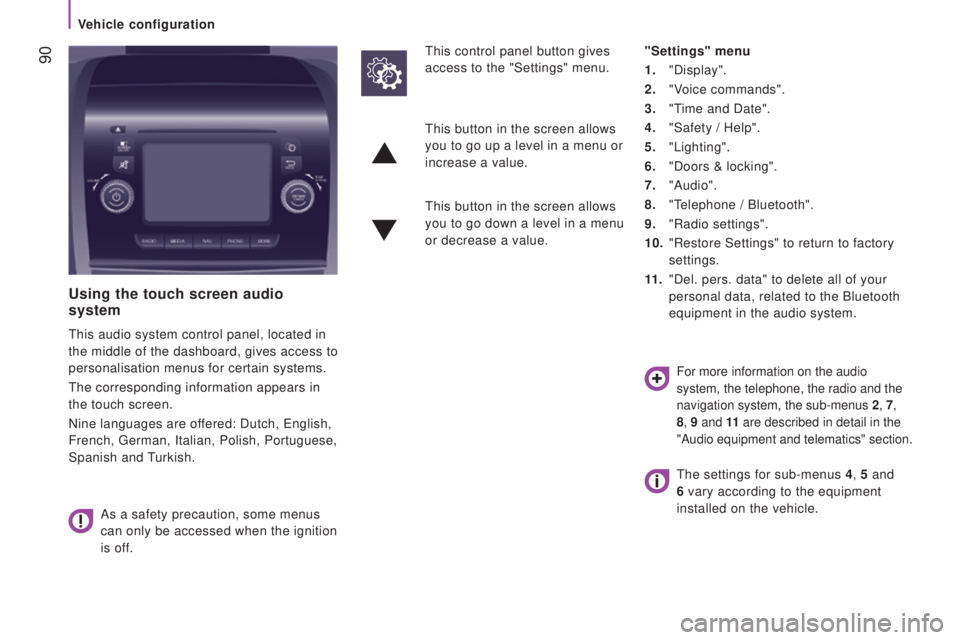
using the touch screen audio
system
this audio system control panel, located in
the middle of the dashboard, gives access to
personalisation menus for certain systems.
the corresponding information appears in
the touch screen.
Nine languages are offered: Dutch,
english,
French,
german, Italian, Polish, Portuguese,
Spanish and
turkish.
As a safety precaution, some menus
can only be accessed when the ignition
is off.
this control panel button gives
access to the "Settings" menu. "Settings" menu
1.
"Display".
2.
"Voice commands".
3.
"time and Date".
4.
"Safety / Help".
5.
"Lighting".
6.
"Doors & locking".
7.
"Audio".
8.
"telephone / Bluetooth".
9.
"Radio settings".
10.
"Restore Settings" to return to factory
settings.
11
.
"Del. pers. data" to delete all of your
personal data, related to the Bluetooth
equipment in the audio system.
this button in the screen allows
you to go up a level in a menu or
increase a value.
this button in the screen allows
you to go down a level in a menu
or decrease a value.
For more information on the audio
system, the telephone, the radio and the
navigation system, the sub-menus
2
, 7,
8, 9 and 11 are described in detail in the
"Audio equipment and telematics" section.
the settings for sub-menus 4 , 5 and
6 vary according to the equipment
installed on the vehicle.
Vehicle configuration
Page 97 of 276

95
rEVErSInG cAMErA
If your vehicle is fitted with this camera, it is
located at the rear, next to the third brake
lamp.
It sends images to the screen installed
in the cab.
this rear vision is an aid to
manoeuvring.
the reversing camera may be coupled with
rear parking sensors.Screen
the camera sends the images to a 5 inch
LCD colour screen.
this screen is also
the one used by the touch screen audio-
telematic system.
Activation and deactivation of the system
is done in the settings menu of the touch
screen audio-telematic system.
operation
the camera comes into operation when
reverse gear is engaged and remains active
up to approximately 9 mph (15 km/h). It is
deactivated above 11 mph (18 km/h).
the camera also comes on, with the vehicle
stationary, when the rear doors are opened.
Switching off
When a forward gear is engaged, the last
image remains displayed for approximately
5
seconds then switches of
f.
In the same way, the last image also
remains displayed, with the vehicle
stationary, when the rear doors are closed.
Good practice
With optimum vehicle conditions (position
on the road, loading level) the maximum
area of visibility covered by the camera has
a field depth approximately 3 m long and
5.5
m wide.
the area of visibility may vary depending on
the external weather conditions (brightness,
rain, snow, fog,
...), the load in the vehicle
and the position of the vehicle on the road.
When cleaning the camera and the screen,
avoid using a detergent or a tool which may
scratch the glass.
use a non-abrasive cloth or a small brush.
4
teCHNOLOgY on BOARD
Parking sensors