Page 40 of 192
38
Bipper_en_Chap03_pret-a-partir_ed02-2014
KEY
this locks and unlocks the doors on the
vehicle, opens and closes the fuel filler cap,
as well as starting and stopping the engine.
REMOTE CONTROL BATTERY
Reference: CR 2032/3 volts. -
use the screwdriver as a lever to extract
the battery holder housing 2,
- remove the housing and change the
battery 3 observing the polarities,
-
put the battery holder housing
2 back
inside the key and secure it by turning the
screw 1.
Changing the remote control
battery
there is a risk of damage if
the replacement battery does not
conform.
Only use batteries which are identical or of
an equivalent type to those recommended
by a P
euge O t
dealer
.
take used batteries
to an approved collection point.
-
press the button to eject the
key,
-
turn the screw
1 from the
closed padlock to the open
padlock using a screwdriver
with a thin tip,
Switching off the engine leads to a loss
of braking assistance.
Access
Page 44 of 192

42
Bipper_en_Chap03_pret-a-partir_ed02-2014
OPENING FROM THE INSIDEDriver's door
Pull the interior handle to unlock.
Anti-intrusion security: as soon as the
vehicle speed reaches about 12 mph
(20 km/h), a characteristic locking noise
indicates that your vehicle has been locked
automatically.
t
his function can be set in the configuration
menu; Select "Autoclose", then "ON" or
"OFF".
It is deactivated when the vehicle is
delivered.
Opening to 180°
Press the catch while opening the door to
increase the opening angle of the door.
Side-hinged rear doors
the 60/40 type asymmetrical hinged rear
doors have four closing points, including a
central closing point.
Pull the handle towards you.
Start by opening the large hinged door, then
unlock by pulling the lever to release and
open the small hinged door.
The two hinged doors open to 90°.
Driving with the small hinged door open
is permitted to make the transportation
of long loads easier. Observe the customary
safety indications, to attract the attention of
other drivers. Refer to the "
t
echnology on board -
Vehicle configuration" section.
Access
Page 46 of 192
44
Bipper_en_Chap03_pret-a-partir_ed02-2014
CLOSING FROM INSIDE
Central locking
Push the interior handle to lock the entire
vehicle or the door concerned. However,
if one of the doors is open or is not closed
correctly, the central locking does not work.Always remove the key from the
ignition when leaving the vehicle,
even for a short time. Closing from 180°t
he check strap will re-attach automatically
when the hinged doors are closed, the small
door being closed first.
Load space
Press to lock the sliding side
doors and the rear doors ( l ight
van) from the driving position.
Anti-intrusion security
When moving off, this system locks the side
doors and load space doors automatically
when you reach approximately 12 mph
(20
km/h).
If none of the doors are opened during the
journey, the locking remains active.
This function is set in the configuration menu;
select "Autoclose", then "ON" or "OFF".
It is deactivated when the vehicle is
delivered.
Access
Page 47 of 192

45
Bipper_en_Chap03_pret-a-partir_ed02-2014
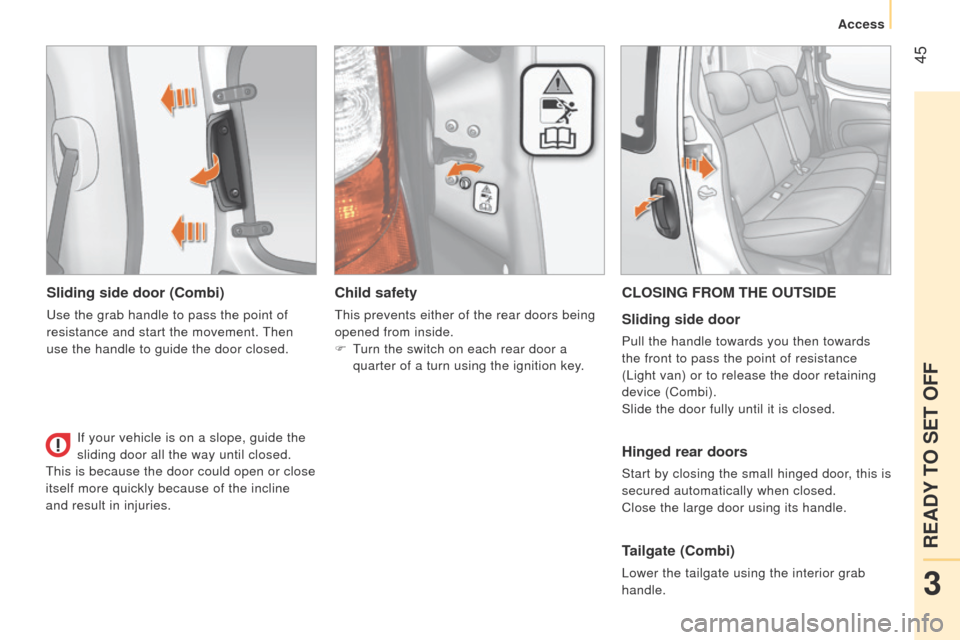
Sliding side door (Combi)
use the grab handle to pass the point of
resistance and start the movement.
t
hen
use the handle to guide the door closed.
Child safety
this prevents either of the rear doors being
opened from inside.
F
t
urn the switch on each rear door a
quarter of a turn using the ignition key.
CLOSING FROM THE OUTSIDE
Sliding side door
Pull the handle towards you then towards
the front to pass the point of resistance
(
l ight van) or to release the door retaining
device (Combi).
Slide the door fully until it is closed.
Hinged rear doors
Start by closing the small hinged door, this is
secured automatically when closed.
Close the large door using its handle.
Tailgate (Combi)
lower the tailgate using the interior grab
handle.
If your vehicle is on a slope, guide the
sliding door all the way until closed.
t
his is because the door could open or close
itself more quickly because of the incline
and result in injuries.
3
READY TO SET OFF
Access
Page 69 of 192
67
Bipper_en_Chap04_ergonomie_ed02-2014
ONE-PIECE REAR BENCH SEAT
Table position
Press the head restraint and its lug
simultaneously to place the head restraint in
the low position.
u
nlock the seat back by pushing the two
side controls.
t
he red indicator becomes
visible.
Fold the seat back onto the seat cushion.
Fully folded position
After placing the seat back in the table
position, pull the central strap to unlock the
rear feet of the seat.
l
ift the seat fully to secure it in the fully
folded position.
Removing the bench seat
After placing the bench seat in the fully
folded position, lower the transverse bar to
unlock the front feet of the seat.
l
ift the bench seat to detach it from its front
anchorages.
When driving, to secure the bench,
detach the red retaining strap, located
on the back of the bench seat cushion, and
fix one end to a front head restraint spindle
and the other to the side of the seat cushion.
4
EASE OF USE and COMFORT
Seats
Page 71 of 192

69
Bipper_en_Chap04_ergonomie_ed02-2014
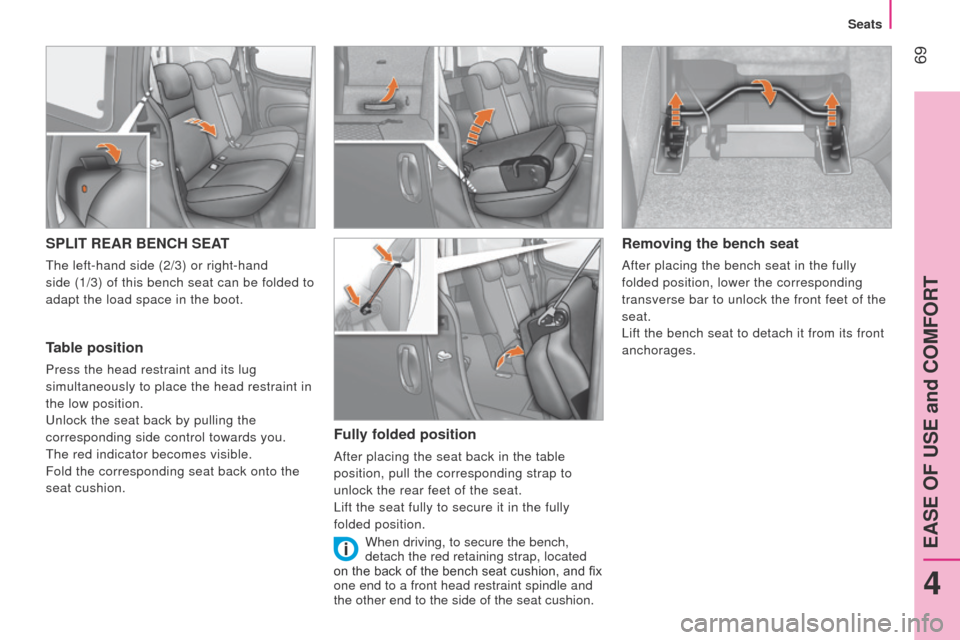
SPLIT REAR BENCH SEAT
the left-hand side (2/3) or right-hand
side (1/3) of this bench seat can be folded to
adapt the load space in the boot.
Table position
Press the head restraint and its lug
simultaneously to place the head restraint in
the low position.
u
nlock the seat back by pulling the
corresponding side control towards you.
t
he red indicator becomes visible.
Fold the corresponding seat back onto the
seat cushion.
Fully folded position
After placing the seat back in the table
position, pull the corresponding strap to
unlock the rear feet of the seat.
l
ift the seat fully to secure it in the fully
folded position.
Removing the bench seat
After placing the bench seat in the fully
folded position, lower the corresponding
transverse bar to unlock the front feet of the
seat.
l
ift the bench seat to detach it from its front
anchorages.
When driving, to secure the bench,
detach the red retaining strap, located
on the back of the bench seat cushion, and fix
one end to a front head restraint spindle and
the other end to the side of the seat cushion.
4
EASE OF USE and COMFORT
Seats
Page 78 of 192
76
Bipper_en_Chap04_ergonomie_ed02-2014
Smoker's kit
located at the base of the centre console,
this consists of a cigarette lighter and an
ashtray.
12 V socket (180 W max)
An accessory socket is provided next to the
cigarette lighter.
FRONT FITTINGS
Folding writing table
(Light van)
this is located in the centre of the
dashboard. In the absence of a table, the
vehicle is fitted with a storage compartment.
t
he clip can be used to secure A5 format
documents, slips, etc.
Pull the top of the table to unfold it, push to
fold it.
Door pockets
With recess for storing a 1 litre bottle.
Practical information
Page 80 of 192

78
Bipper_en_Chap04_ergonomie_ed02-2014
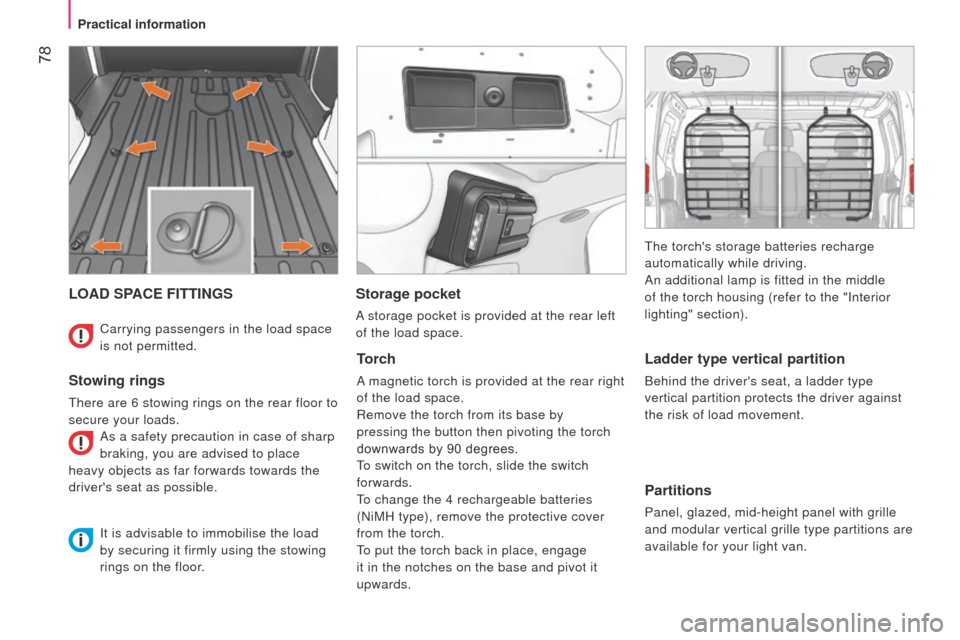
LOAD SPACE FITTINGS
Stowing rings
there are 6 stowing rings on the rear floor to
secure your loads. As a safety precaution in case of sharp
braking, you are advised to place
heavy objects as far forwards towards the
driver's seat as possible.
Storage pocket
A storage pocket is provided at the rear left
of the load space.
Torch
A magnetic torch is provided at the rear right
of the load space.
Remove the torch from its base by
pressing the button then pivoting the torch
downwards by 90 degrees.
to switch on the torch, slide the switch
forwards.
to change the 4 rechargeable batteries
(NiMH type), remove the protective cover
from the torch.
to put the torch back in place, engage
it in the notches on the base and pivot it
upwards.
Ladder type vertical partition
Behind the driver's seat, a ladder type
vertical partition protects the driver against
the risk of load movement.
Partitions
Panel, glazed, mid-height panel with grille
and modular vertical grille type partitions are
available for your light van.
Carrying passengers in the load space
is not permitted.
It is advisable to immobilise the load
by securing it firmly using the stowing
rings on the floor.
t
he torch's storage batteries recharge
automatically while driving.
An additional lamp is fitted in the middle
of the torch housing (refer to the "Interior
lighting" section).
Practical information