Page 91 of 364

89
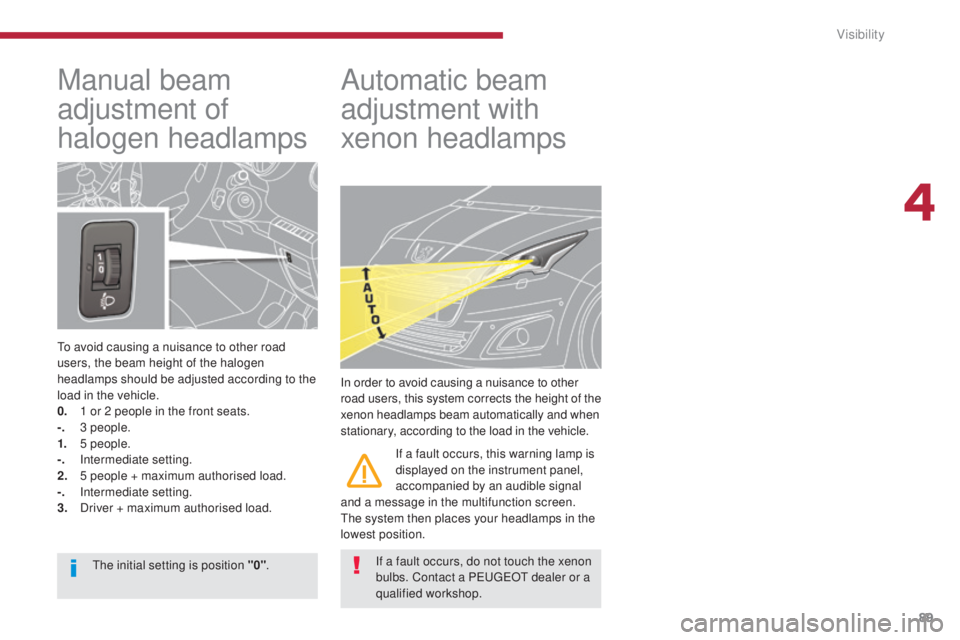
Manual beam
adjustment of
halogen headlamps
To avoid causing a nuisance to other road
users, the beam height of the halogen
headlamps should be adjusted according to the
load in the vehicle.
0.
1 o
r 2 people in the front seats.
-.
3
people.
1.
5
people.
-.
I
ntermediate setting.
2.
5 p
eople + maximum authorised load.
-.
I
ntermediate setting.
3.
D
river + maximum authorised load.
Automatic beam
adjustment with
xenon headlamps
In order to avoid causing a nuisance to other
road users, this system corrects the height of the
xenon headlamps beam automatically and when
stationary, according to the load in the vehicle. If a fault occurs, this warning lamp is
displayed on the instrument panel,
accompanied by an audible signal
and a message in the multifunction screen.
The system then places your headlamps in the
lowest position.
If a fault occurs, do not touch the xenon
bulbs. Contact a PEUGEOT dealer or a
qualified workshop.
The initial setting is position "0"
.
4
Visibility
Page 95 of 364
93
Windscreen wash
Pull the wiper stalk towards you.
The windscreen wash then the wipers operate
for a set time.
The headlamp wash is also activated if the
dipped beam headlamps are on .
Screenwash/headlamp wash low
level
In the case of vehicles fitted with
headlamp washers, when the
minimum level of the reservoir
is reached, this warning lamp is
displayed in the instrument panel, accompanied
by an audible signal and a message.
The warning lamp is displayed when the
ignition is switched on, or every time the stalk is
operated, until the reservoir is refilled.
Next time you stop, refill the screenwash /
headlamp wash reservoir.
Headlamp wash
Press the end of the lighting stalk to activate
the headlamp wash, when the dipped beam
headlamps are on.
4
Visibility
Page 103 of 364

101
Centre console
Storage
F Slide the cover for access to the 10.5 litre storage compartment.
This can hold 2 half-litre bottles.
A ventilation outlet delivers cooled air.
PEUGEOT C onnect USB
This connection unit consists of a JACK
auxiliary socket and/or a USB port.
It permits the connection of a portable device,
such as a digital audio player of the iPod
® type
or a USB memory stick.
It reads the audio file formats (mp3, ogg, wma,
wav...) which are transmitted to your audio
system and played via the vehicle's speakers.
You can manage these files using the steering
mounted controls or the audio system control
panel and display them in the multifunction
screen. Connected to the USB port, the portable device
charges automatically.
While charging, a message is displayed if the
current consumption by the portable device
exceeds the power rating of the port.
For more information on the use of
this equipment, refer to the "Audio
equipment and telematics" section.
Storage space for the driver and front
passenger.
5
Fittings
Page 104 of 364

102
Mats
Refitting
To refit the mat on the driver's side:
F p osition the mat correctly,
F
r
efit the fixings by pressing,
F
c
heck that the mat is secured correctly.
Fitting
When fitting the mat for the first time, on the
driver's side use only the fixings provided in the
wallet attached.
The other mats are simply placed on the carpet.
Removal
To remove the mat on the driver's side:
F m ove the seat as far back as possible,
F
un
clip the fixings,
F
r
emove the mat.
12 V accessory
sockets
F To connect a 12 V accessory (max power: 120 Watts), remove the cover
and connect a suitable adaptor.
Exceeding the maximum power could result in
damage to your accessory. Removable carpet protection.
To avoid any risk of jamming of the
pedals:
-
o
nly use mats which are suited to
the fixings already present in the
vehicle; these fixings must be used,
-
n
ever fit one mat on top of another.
The use of mats not approved by
PEUGEOT may inter fere with access to
the pedals and hinder the operation of
the cruise control / speed limiter.
The mats approved by PEUGEOT have
two fixings located below the seat.
The connection of an electrical device
not approved by PEUGEOT, such as a
USB charger, may adversely affect the
operation of vehicle electrical systems,
causing faults such as poor telephone
reception or inter ference with displays
in the screens.
Fittings
Page 106 of 364

104
Rear multimedia
This multimedia system allows rear passengers
to connect one or two external portable
systems (audio or video player, games
consoles, DVD player...). The sound is played
through two Bluetooth
® wireless headphone
sets, while the video content is displayed in
two
7-inch screens built into the backs of the
front seat head restraints.
Description
This system operates only with the
engine running. The pack includes:
-
t
he connection and control panel fitted on
the rear face of the centre console,
-
t
wo 7-inch screens built into the front head
restraints (with protective covers),
-
t
wo wireless Bluetooth technology
headphone sets with rechargeable
batteries,
-
a 1
2 V charger with two outlets allowing the
simultaneous charging of two headphones. 1.
P
ower switch
2.
A
V1 video input (yellow RCA socket)
3.
S
tereo audio input A (red and white
RC A
s o c ket s)
4.
A
V2 video input (yellow RCA socket)
5.
S
tereo audio input B (red and white
RC A
s o c ket s)
6.
S
election of display in the left hand screen
(AV1 o r AV2)
7.
S
election of display in the right hand
screen (AV1 or AV2)
8. C onnection indicator lamps for the
Bluetooth audio headphones (blue)
Fittings
Page 107 of 364

105
1. Screen power switch
2. Display adjustment buttons
Each headphone set has a switch,
a connection indicator lamp (blue)
and a channel selector (A or B).
Operation
F With the engine running, connect your portable system to the RCA connectors
(e.g. with AV1 on the left).
F
P
ress the switch on the control panel,
the indicator lamp comes on and the AV1
indicator lamps come on.
F
M
ake a long press on the switch, its
indicator lamp flashes in blue.
F
M
ake a long press on the control panel
switch, the pairing with the headphone set
is complete when the blue indicator lamps
on the headphones and on the system are
on continuously.
F
R
epeat the operation for the other
headphone set.
F
P
ress the screen switch if you have a video
source.
F
S
tart playing your portable system. F
I
t is possible at any time to modify the
source for the video display (using
button 6 or 7 on the control panel: the
indicator lamp for the source selected
comes on) as well as the audio channel
(using the selector on the headphones).
The Multimedia system allows the
connection of a third Bluetooth
headphone set, not supplied.
If your seat is in the table position,
position a cover to avoid damaging the
screen.
These covers also conceal each
screen.
5
Fittings
Page 141 of 364

139
Front seat belts not fastened /
u nfastened warning lamp
Fastening
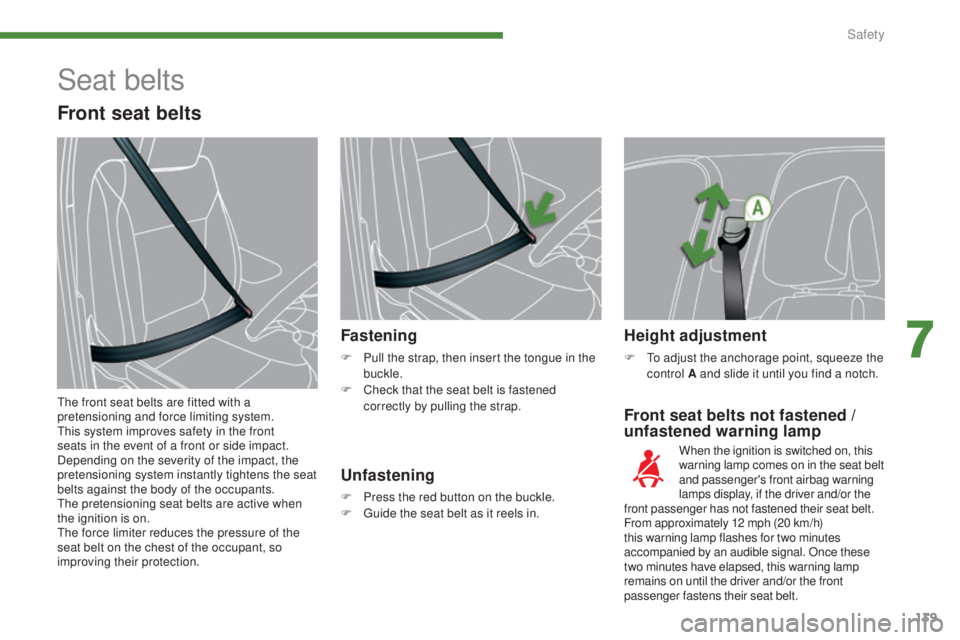
F Pull the strap, then insert the tongue in the
buckle.
F
C
heck that the seat belt is fastened
correctly by pulling the strap.
Height adjustment
F To adjust the anchorage point, squeeze the control A and slide it until you find a notch.
When the ignition is switched on, this
warning lamp comes on in the seat belt
and passenger's front airbag warning
lamps display, if the driver and/or the
front passenger has not fastened their seat belt.
From approximately 12 mph (20 km/h)
this warning lamp flashes for two minutes
accompanied by an audible signal. Once these
two minutes have elapsed, this warning lamp
remains on until the driver and/or the front
passenger fastens their seat belt.
Unfastening
F Press the red button on the buckle.
F
G uide the seat belt as it reels in.
Seat belts
Front seat belts
The front seat belts are fitted with a
pretensioning and force limiting system.
This system improves safety in the front
seats in the event of a front or side impact.
Depending on the severity of the impact, the
pretensioning system instantly tightens the seat
belts against the body of the occupants.
The pretensioning seat belts are active when
the ignition is on.
The force limiter reduces the pressure of the
seat belt on the chest of the occupant, so
improving their protection.
7
Safety
Page 142 of 364

140
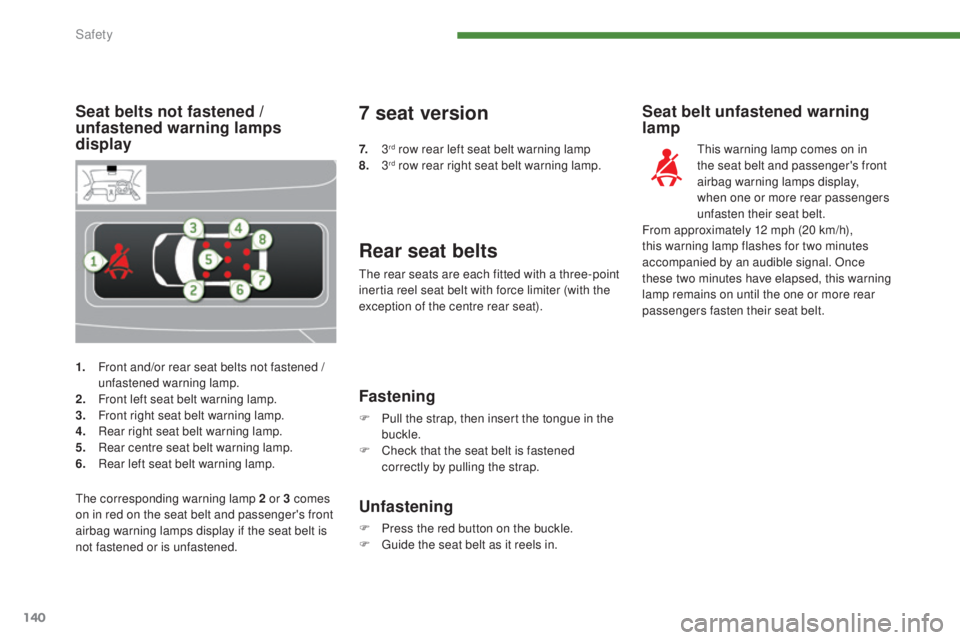
1. Front and/or rear seat belts not fastened /
unfastened warning lamp.
2.
F
ront left seat belt warning lamp.
3.
F
ront right seat belt warning lamp.
4.
R
ear right seat belt warning lamp.
5.
R
ear centre seat belt warning lamp.
6.
R
ear left seat belt warning lamp.
Seat belts not fastened /
u nfastened warning lamps
display
Rear seat belts
The rear seats are each fitted with a three-point
inertia reel seat belt with force limiter (with the
exception of the centre rear seat).
Seat belt unfastened warning
lamp
This warning lamp comes on in
the seat belt and passenger's front
airbag warning lamps display,
when one or more rear passengers
unfasten their seat belt.
From approximately 12 mph (20 km/h),
this warning lamp flashes for two minutes
accompanied by an audible signal. Once
these two minutes have elapsed, this warning
lamp remains on until the one or more rear
passengers fasten their seat belt.
Fastening
F Pull the strap, then insert the tongue in the buckle.
F
C
heck that the seat belt is fastened
correctly by pulling the strap.
Unfastening
F Press the red button on the buckle.
F G uide the seat belt as it reels in.
The corresponding warning lamp 2 or 3 comes
on in red on the seat belt and passenger's front
airbag warning lamps display if the seat belt is
not fastened or is unfastened.
7 seat version
7.
3rd row rear left seat belt warning lamp
8.
3rd row rear right seat belt warning lamp.
Safety