2015 PEUGEOT 5008 warning light
[x] Cancel search: warning lightPage 4 of 364

.
.
Interior fittings 99
Centre console 1 01
Rear multimedia
1
04
Panoramic sunroof
1
06
Boot fittings 5 -seat version
1
08
Boot fittings 7-seat version
1
09
Fittings
Child seats 1 15
Deactivating the passenger's front airbag 1 17
ISOFIX mountings
1
27
Child lock
1
34
Child safety
Over view
Instrument panels 1
4
Indicator and warning lamps 1 6
Indicators
2
7
Distance recorders
3
1
Screen A without audio equipment
3
2
Screen A with audio equipment
3
4
Screen C (PEUGEOT Connect Sound (RD5))
3
6
16/9 retractable colour screen (PEUGEOT Connect Navigation (RT6))
3
9
Trip computer
4
2
Monitoring
Heating and Ventilation 60
Manual air conditioning 6 2
Rear screen demist - defrost
6
4
Dual-zone digital air conditioning
6
5
Front seats
6
8
Rear seats, 2
nd row 7 3
Access to the 3rd row 7 5
Rear seats, 3rd row 7 6
Seat modularity 7 8
Mirrors
7
9
Steering wheel adjustment
8
1
Comfort
Remote control key 4 6
Alarm 5 1
Electric windows
5
3
Doors
55
Boot
5
8
Access
Lighting controls 8 2
Daytime running lamps 8 6
Automatic illumination of headlamps
87
H
eadlamp height adjustment
8
9
Directional lighting
9
0
Wiper controls
9
1
Automatic rain sensitive wipers
9
4
Courtesy lamps
9
6
Interior mood lighting
9
7
Visibility
Eco-driving
Contents
Page 9 of 364

7
Instruments and controls
Head-up display 158 -159
Distance alert 1 60-162
Lighting controls
8
2- 87
Direction indicators
1
35
Speed limiter
1
63-165
Cruise control
16
6 -168 Door mirrors
7
9
Electric windows, deactivating
5
3-54
Switch panel
8
-10
Stop & Start
1
80 -182
Headlamp beam height adjustment
8
9
Instrument panels, screens
1
4-16
Warning lamps
1
6-26
Indicators
2
7-31
Gear shift indicator
1
79
Buttons
2
9, 31
-
c
heck / service indicator /
trip distance recorder
-
l
ighting dimmer
Steering wheel adjustment
8
1
H or n
13 5
Multifunction screens
3
2- 40
-
S
creen A
-
S
creen C
-
1
6/9 colour screen
Retractable screen
4
1
Emergency or assistance call
2
70 -271
Centre switch panel
8
-10
Hazard warning lamps
1
35
Head-up display
1
58 -159
Distance alert
1
60-162 Wiper controls
9
1-95
Trip computer
4
2- 45
Ignition switch, starting-
switching off
1
48 -150
Panoramic sunroof
1
06 -107
.
Over view
Page 16 of 364

14
Instrument panels
Panel grouping together the vehicle operation indication dials and warning lamps.
Instruments
1. Rev counter. I
ndicates the engine speed (x 1 000 rpm).
2.
C
oolant temperature gauge.
I
ndicates the temperature of the engine
coolant (° Celsius).
3.
F
uel level.
I
ndicates the quantity of fuel remaining in
the tank.
4.
S
peedometer.
I
ndicates the current speed of the moving
vehicle (mph or km/h).
5.
S
creen.
6.
C
ontrol switch.
T
emporary display of the service indicator
and driving range with the AdBlue
®
additive.
D
isplay and reset the selected function (trip
distance recorder or service indicator).
7.
I
nstrument panel lighting dimmer.
A
djusts the brightness of the lighting of
the instruments and controls, if the vehicle
lighting is on.
For more information, refer to the
section corresponding to the button or
function and its associated display.
Monitoring
Page 18 of 364

16
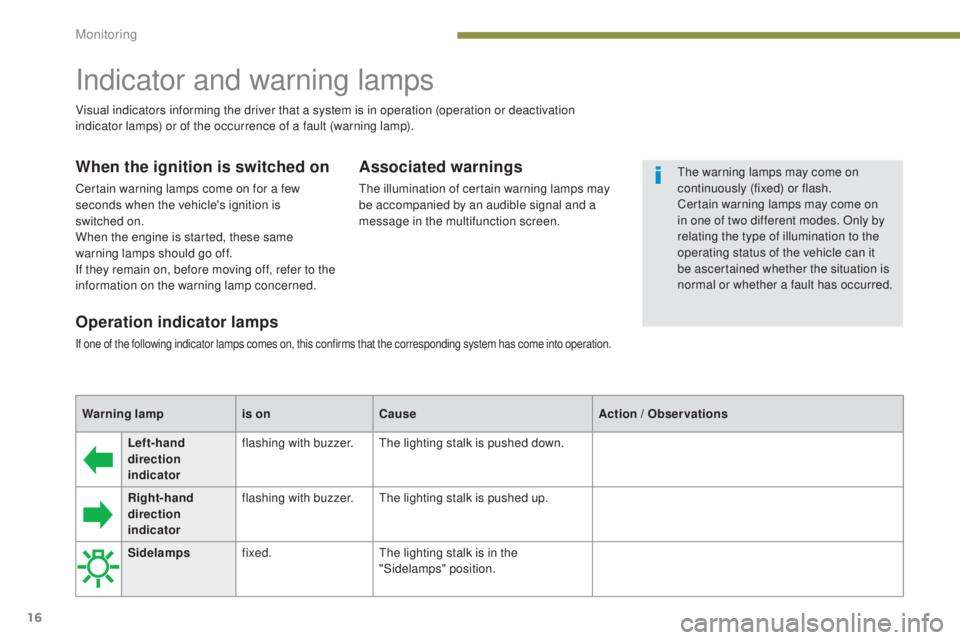
Left-hand
direction
indicator flashing with buzzer.
The lighting stalk is pushed down.
Right-hand
direction
indicator flashing with buzzer.
The lighting stalk is pushed up.
Operation indicator lamps
If one of the following indicator lamps comes on, this confirms that the corresponding system has come into operation.
Warning lamp is onCause Action / Observations
Sidelamps fixed. The lighting stalk is in the
"Sidelamps" position.
Indicator and warning lamps
When the ignition is switched on
Certain warning lamps come on for a few
seconds when the vehicle's ignition is
switched
on.
When the engine is started, these same
warning lamps should go off.
If they remain on, before moving off, refer to the
information on the warning lamp concerned.
Associated warnings
The illumination of certain warning lamps may
be accompanied by an audible signal and a
message in the multifunction screen.
Visual indicators informing the driver that a system is in operation (operation or deactivation
indicator lamps) or of the occurrence of a fault (warning lamp).
The warning lamps may come on
continuously (fixed) or flash.
Certain warning lamps may come on
in one of two different modes. Only by
relating the type of illumination to the
operating status of the vehicle can it
be ascertained whether the situation is
normal or whether a fault has occurred.
Monitoring
Page 19 of 364

17
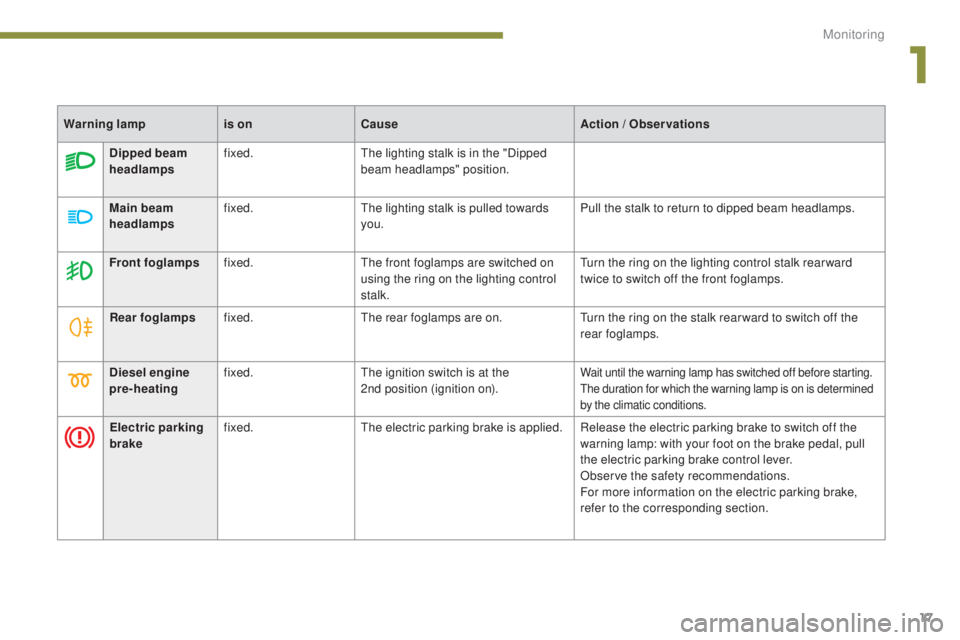
Diesel engine
pre-heatingfixed.
The ignition switch is at the
2nd
position (ignition on).Wait until the warning lamp has switched off before starting.
The duration for which the warning lamp is on is determined
by the climatic conditions.
Dipped beam
headlampsfixed.
The lighting stalk is in the "Dipped
beam headlamps" position.
Main beam
headlamps fixed.
The lighting stalk is pulled towards
you. Pull the stalk to return to dipped beam headlamps.
Front foglamps fixed. The front foglamps are switched on
using the ring on the lighting control
stalk. Turn the ring on the lighting control stalk rear ward
twice to switch off the front foglamps.
Rear foglamps fixed. The rear foglamps are on. Turn the ring on the stalk rear ward to switch off the
rear foglamps.
Electric parking
brake fixed.
The electric parking brake is applied. Release the electric parking brake to switch off the
warning lamp: with your foot on the brake pedal, pull
the electric parking brake control lever.
Observe the safety recommendations.
For more information on the electric parking brake,
refer to the corresponding section.
Warning lamp
is onCause Action / Observations
1
Monitoring
Page 20 of 364

18
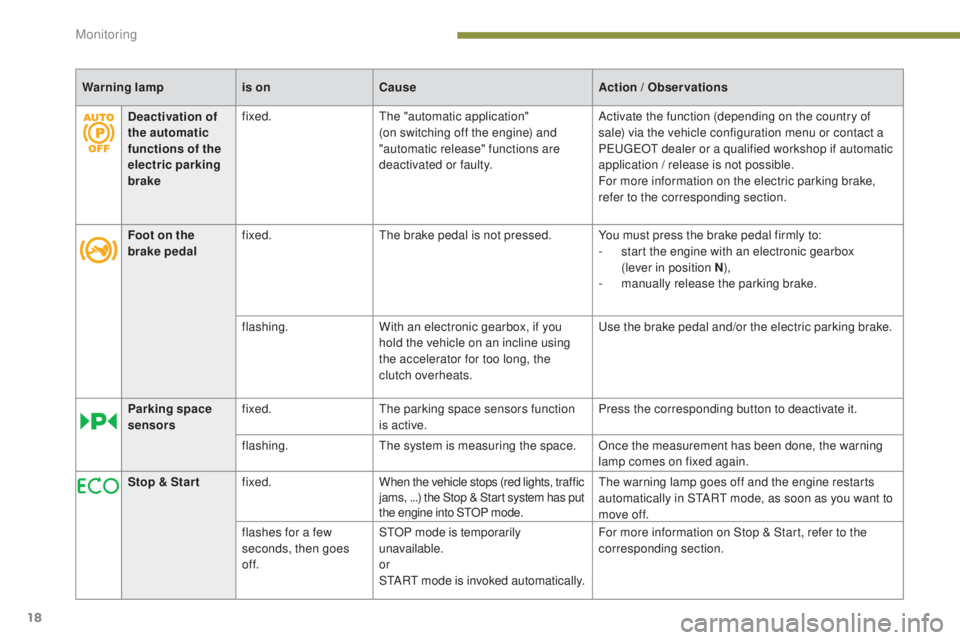
Warning lampis onCause Action / Observations
Deactivation of
the automatic
functions of the
electric parking
brake fixed.
The "automatic application"
(on switching off the engine) and
"automatic release" functions are
deactivated or faulty. Activate the function (depending on the country of
sale) via the vehicle configuration menu or contact a
PEUGEOT dealer or a qualified workshop if automatic
application / release is not possible.
For more information on the electric parking brake,
refer to the corresponding section.
Foot on the
brake pedal fixed.
The brake pedal is not pressed. You must press the brake pedal firmly to:
-
s
tart the engine with an electronic gearbox
(lever in position N ),
-
m
anually release the parking brake.
flashing. With an electronic gearbox, if you
hold the vehicle on an incline using
the accelerator for too long, the
clutch overheats. Use the brake pedal and/or the electric parking brake.
Parking space
sensors fixed.
The parking space sensors function
is active. Press the corresponding button to deactivate it.
flashing. The system is measuring the space. Once the measurement has been done, the warning
lamp comes on fixed again.
Stop & Star t fixed. When the vehicle stops (red lights, traffic
jams, ...) the Stop & Start system has put
the engine into STOP mode. The warning lamp goes off and the engine restarts
automatically in START mode, as soon as you want to
move off.
flashes for a few
seconds, then goes
of f. STOP mode is temporarily
unavailable.
or
START mode is invoked automatically. For more information on Stop & Start, refer to the
corresponding section.
Monitoring
Page 39 of 364

37
"Trip computer" menu
Alert log
This summarises the active warning messages,
displaying them in succession in the
multifunction screen
Status of functions
This summarises the status of the functions
present on the vehicle.
F
P
ress the "MENU"
button to gain access
to the general menu.
F
P
ress the arrows, then the "OK"
button to
select the "Trip computer" menu.
Once this menu has been selected, you can
consult information concerning the status of the
vehicle (alert log, status of the functions...).
Define the vehicle parameters
Once this menu has been selected, you can
activate or deactivate the following equipment:
-
w
iper linked with reverse gear (refer to the
"Visibility" section),
-
s
elective unlocking (refer to the "Access"
section),
-
g
uide-me-home lighting (refer to the
"Visibility" section),
-
d
irectional headlamps (refer to the
"Visibility" section),
-
a
utomatic parking brake* (refer to the
"Driving" section),
-
...
"Personalisation-
Configuration" menu
Once this menu has been selected, you can
gain access to the following functions:
-
d
efine the vehicle parameters,
-
d
isplay configuration,
-
c
hoice of language.
F In the "Trip computer" menu, select one
of the applications. This allows you to enter an approximate value
for the distance to the final destination.
Enter the distance to the
destination
* Depending on the country of sale.
1
Monitoring
Page 69 of 364

67
Switching the system off/on
F Turn the air flow control to the left until all of the indicator lamps go off.
This action switches off all of the functions of
the system.
Temperature related comfort is no longer
guaranteed but a slight flow of air, due to the
movement of the vehicle, can still be felt.
F
T
urn the air flow dial to the right or press
the "AUTO" button to reactivate the
system with the values set before it was
switched
off.
9. Rear ventilation (Rear)
F Press this button to allow the air
to circulate towards the rear. The
temperature will be equal to the
left-hand comfort value for the rear
left passengers and equal to the
right-hand comfort value for the
rear right passengers. The indicator
lamp in the button comes on.
8. Air recirculation
F Press this button to recirculate the interior air. The indicator
lamp comes on.
-
A
ir closed/intake (automatic
mode). Press this button, the
warning lamp comes on.
7. Air flow adjustment
F Turn this control to the left to decrease the air flow or to the
right to increase the air flow.
The air flow indicator lamps, between the two
fans, come on progressively according to the
value requested.
With Stop & Start, when demisting has
been activated, the STOP mode is not
available.
Avoid driving for prolonged periods with
the system off.
-
F
orced closing of the air intake
(manual mode). Press this
button to recirculate the interior
air, the warning lamp come on.
Air recirculation enables the passenger
compartment to be isolated from exterior
odours and smoke.
F
A
s soon as possible, press the "auto"
button to allow the intake of exterior air and
avoid the misting of windows.
3
Comfort