Page 61 of 348
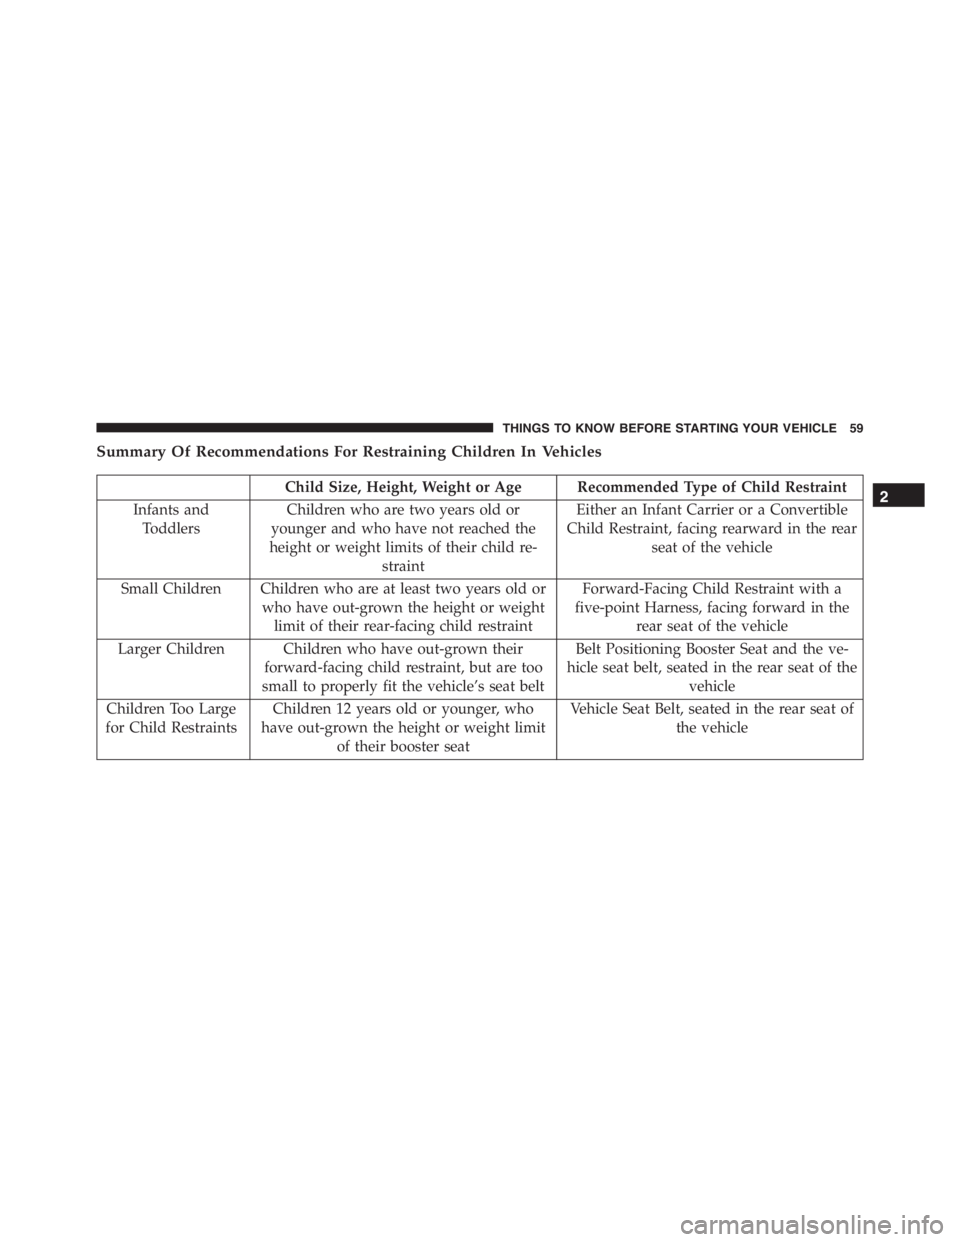
Summary Of Recommendations For Restraining Children In Vehicles
Child Size, Height, Weight or Age Recommended Type of Child Restraint
Infants and
ToddlersChildren who are two years old or
younger and who have not reached the
height or weight limits of their child re-
straintEither an Infant Carrier or a Convertible
Child Restraint, facing rearward in the rear
seat of the vehicle
Small Children Children who are at least two years old or
who have out-grown the height or weight
limit of their rear-facing child restraintForward-Facing Child Restraint with a
five-point Harness, facing forward in the
rear seat of the vehicle
Larger Children Children who have out-grown their
forward-facing child restraint, but are too
small to properly fit the vehicle’s seat beltBelt Positioning Booster Seat and the ve-
hicle seat belt, seated in the rear seat of the
vehicle
Children Too Large
for Child RestraintsChildren 12 years old or younger, who
have out-grown the height or weight limit
of their booster seatVehicle Seat Belt, seated in the rear seat of
the vehicle2
THINGS TO KNOW BEFORE STARTING YOUR VEHICLE 59
Page 62 of 348
Infant and Child Restraints
Safety experts recommend that children ride rear-facing
in the vehicle until they are two years old or until they
reach either the height or weight limit of their rear-facing
child restraint. Two types of child restraints can be used
rear-facing: infant carriers and convertible child seats.
The infant carrier is only used rear-facing in the vehicle.
It is recommended for children from birth until they
reach the weight or height limit of the infant carrier.
Convertible child seats can be used either rear-facing or
forward-facing in the vehicle. Convertible child seats
often have a higher weight limit in the rear-facing
direction than infant carriers do, so they can be used
rear-facing by children who have outgrown their infant
carrier but are still less than at least two years old.
Children should remain rear-facing until they reach the
highest weight or height allowed by their convertible
child seat.
WARNING!
•Never place a rear-facing child restraint in front of
an air bag. A deploying Passenger Advanced Front
Air Bag can cause death or serious injury to a child
12 years or younger, including a child in a rear-
facing child restraint.
•Only use rear-facing child restraint in a vehicle
with a rear seat.
60 THINGS TO KNOW BEFORE STARTING YOUR VEHICLE
Page 63 of 348
Older Children And Child Restraints
Children who are two years old or who have outgrown
their rear-facing convertible child seat can ride forward-
facing in the vehicle. Forward-facing child seats and
convertible child seats used in the forward-facing direc-
tion are for children who are over two years old or who
have outgrown the rear-facing weight or height limit of
their rear-facing convertible child seat. Children should
remain in a forward-facing child seat with a harness for
as long as possible, up to the highest weight or height
allowed by the child seat.
All children whose weight or height is above the
forward-facing limit for the child seat should use a
belt-positioning booster seat until the vehicle’s seat belts
fit properly. If the child cannot sit with knees bent over
the vehicle’s seat cushion while the child’s back is against
the seatback, they should use a belt-positioning boosterseat. The child and belt-positioning booster seat are held
in the vehicle by the seat belt.
WARNING!
•Improper installation can lead to failure of an
infant or child restraint. It could come loose in a
collision. The child could be badly injured or
killed. Follow the child restraint manufacturer ’s
directions exactly when installing an infant or
child restraint.
•After a child restraint is installed in the vehicle, do
not move the vehicle seat forward or rearward
because it can loosen the child restraint attach-
ments. Remove the child restraint before adjusting
the vehicle seat position. When the vehicle seat has
been adjusted, reinstall the child restraint.
(Continued)
2
THINGS TO KNOW BEFORE STARTING YOUR VEHICLE 61
Page 67 of 348
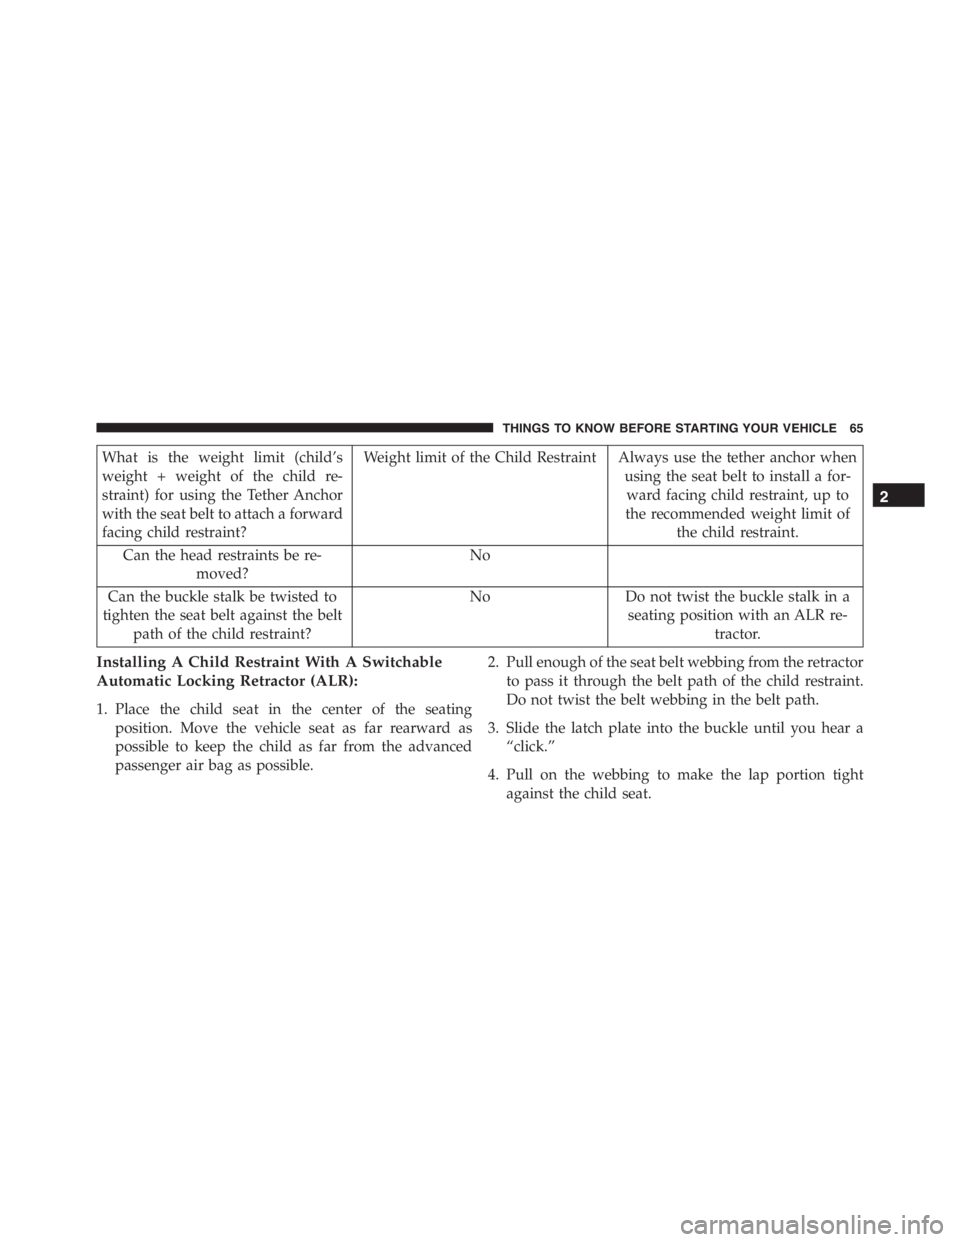
What is the weight limit (child’s
weight + weight of the child re-
straint) for using the Tether Anchor
with the seat belt to attach a forward
facing child restraint?Weight limit of the Child Restraint Always use the tether anchor when
using the seat belt to install a for-
ward facing child restraint, up to
the recommended weight limit of
the child restraint.
Can the head restraints be re-
moved?No
Can the buckle stalk be twisted to
tighten the seat belt against the belt
path of the child restraint?No Do not twist the buckle stalk in a
seating position with an ALR re-
tractor.
Installing A Child Restraint With A Switchable
Automatic Locking Retractor (ALR):
1. Place the child seat in the center of the seating
position. Move the vehicle seat as far rearward as
possible to keep the child as far from the advanced
passenger air bag as possible.2. Pull enough of the seat belt webbing from the retractor
to pass it through the belt path of the child restraint.
Do not twist the belt webbing in the belt path.
3. Slide the latch plate into the buckle until you hear a
“click.”
4. Pull on the webbing to make the lap portion tight
against the child seat.
2
THINGS TO KNOW BEFORE STARTING YOUR VEHICLE 65
Page 69 of 348
Installing Child Restraints Using The Top Tether
Anchorage:
WARNING!
Do not attach a tether strap for a rear-facing car seat
to any location in front of the car seat, including the
seat frame or a tether anchorage. Only attach the
tether strap of a rear-facing car seat to the tether
anchorage that is approved for that seating position,
located behind the top of the vehicle seat. See the
section “Lower Anchors and Tethers for CHildren
(LATCH) Restraint System” for the location of ap-
proved tether anchorages in your vehicle.
Always use the tether anchor when using the seat belt to
install a forward facing child restraint, up to the recom-
mended weight limit of the child restraint. This vehicle is
equipped with a tether anchorage, located behind the
front passenger seat, near the floor.
Upper Tether Anchorage
2
THINGS TO KNOW BEFORE STARTING YOUR VEHICLE 67
Page 182 of 348
Cornering Brake Control System (CBC)
The system acts when braking on corners, optimizing the
distribution of brake pressure on the four wheels: the
system prevents the wheels on the inside of the corner
(less affected by the weight of the car) from locking,
ensuring better stability and direction for the car.
Drag Torque Control System (DTC)
This is an integral part of the ESC system and intervenes
in the event of sudden downshifting, or during braking
when the ABS intervenes, restoring torque to the engine
and thus preventing excessive drag at the drive wheels,
which may lead the wheels to lock and a loss of car
stability, above all in low-grip conditions.
AntiSlip Regulation System (ASR)
WARNING!
•Electronic Stability Control (ESC) cannot prevent
the natural laws of physics from acting on the
vehicle, nor can it increase the traction afforded by
prevailing road conditions. ESC cannot prevent all
collisions, including those resulting from excessive
speed in turns, driving on very slippery surfaces, or
hydroplaning. ESC also cannot prevent collisions
resulting from loss of vehicle control due to inap-
propriate driver input for the conditions. Only a
safe, attentive, and skillful driver can prevent col-
lisions.The capabilities of an ESC equipped ve-
hicle must never be exploited in a reckless or
dangerous manner which could jeopardize the us-
er ’s safety or the safety of others.
(Continued)
180 STARTING AND OPERATING
Page 186 of 348
Electronic Q2 System (E-Q2)
The�Electronic Q2�system intervenes during accelera-
tion on corners, braking the inner drive wheel and thus
increasing the traction of the outer wheel (which bears
more of the car ’s weight): the torque is thus distributed
optimally between the drive wheels in accordance with
the driving conditions and road surface, permitting par-
ticularly effective, sporty driving.
Ready Alert Brake System (RAB)
This function activates automatically if the accelerator
pedal is released rapidly, reducing the brake pad travel
(both at front and back), with the aim of preparing the
braking system and enhancing its responsiveness, thus
reducing the stopping distance in the event of subse-
quent braking.
TIRE SAFETY INFORMATION
Tire Markings
1 — U.S. DOT Safety Standards
Code (TIN)4 — Maximum Load
2 — Size Designation 5 — Maximum Pressure
3 — Service Description 6 — Treadwear, Traction and
Temperature Grades 184 STARTING AND OPERATING
Page 194 of 348
Tire And Loading Information PlacardThis placard tells you important information about the:
1. Number of people that can be carried in the vehicle.
2. Total weight your vehicle can carry.
3. Tire size designed for your vehicle.
4. Cold tire inflation pressures for the front, rear, and
spare tires.
Loading
The vehicle maximum load on the tire must not exceed
the load carrying capacity of the tire on your vehicle. You
will not exceed the tire’s load carrying capacity if you
adhere to the loading conditions, tire size, and cold tire
inflation pressures specified on the Tire and Loading
Information placard and in the “Vehicle Loading” section
of this manual.
Tire And Loading Information Placard
192 STARTING AND OPERATING