Page 90 of 348
Activation
Remove the key or turn the ignition to the OFF/LOCK
position, and pull the multifunction lever toward the
steering wheel, within two minutes. Each time the lever
is pulled, the activation of the lights will be extended by
30 seconds. The activation of the lights can be extended to
a maximum of 210 seconds.
Deactivation
Pull the multifunction lever toward the steering wheel
and hold it for more than two seconds.
Dimmer Controls
The dimmer controls are located on the left side of the
instrument panel below the instrument cluster.Pressing the up or down arrow will increase or decrease
the brightness of the instrument panel lights.
Dimmer Controls
88 UNDERSTANDING THE FEATURES OF YOUR VEHICLE
Page 94 of 348
WARNING!
Sudden loss of visibility through the windshield
could lead to a collision. You might not see other
vehicles or other obstacles. To avoid sudden icing of
the windshield during freezing weather, warm the
windshield with defroster before and during wind-
shield washer use.
TILT/TELESCOPING STEERING COLUMN
This feature allows you to tilt the steering column
upward or downward. It also allows you to lengthen or
shorten the steering column. The tilt/telescoping control
handle is located below the steering wheel at the end of
the steering column.To unlock the steering column, push the lever downward
(toward the floor). To tilt the steering column, move the
steering wheel upward or downward as desired. To
lengthen or shorten the steering column, pull the steering
wheel outward or push it inward as desired. To lock the
Tilt/Telescoping Column Lever
92 UNDERSTANDING THE FEATURES OF YOUR VEHICLE
Page 115 of 348

as intended. TPMS malfunctions may occur for a variety
of reasons, including the installation of replacement or
alternate tires or wheels on the vehicle that prevent the
TPMS from functioning properly. Always check the
TPMS malfunction telltale after replacing one or more
tires or wheels on your vehicle, to ensure that the
replacement or alternate tires and wheels allow the TPMS
to continue to function properly.
WARNING!
The TPMS has been optimized for the original
equipment tires and wheels. TPMS pressures and
warning have been established for the tire size
equipped on your vehicle. Undesirable system opera-
tion or sensor damage may result when using re-
placement equipment that is not of the same size,
type, and/or style. Aftermarket wheels can cause
(Continued)
WARNING!(Continued)
sensor damage. Do not use tire sealant from a can or
balance beads if your vehicle is equipped with a
TPMS, as damage to the sensors may result.
2. Turn Signal Indicators
The arrows will flash in unison with the exte-
rior turn signal, when using the turn signal
lever.
3. Electronic Stability Control (ESC) OFF Indicator
Light
This light indicates the Electronic Stability Con-
trol (ESC) is off.
4
UNDERSTANDING YOUR INSTRUMENT PANEL 113
Page 154 of 348

SYSTEM.............................175")
▫Shallow Standing Water.................171
�PARKING BRAKE......................173
�BRAKE SYSTEM.......................175
�ESC (ELECTRONIC STABILITY CONTROL)
SYSTEM.............................175
▫System Activation.....................177
▫System Intervention...................177
▫Electronic Brake Distribution System (EBD) . . .177
▫Four-Wheel Anti-Lock Brake System (ABS) . . .178
▫Cornering Brake Control System (CBC)......180
▫Drag Torque Control System (DTC)........180
▫AntiSlip Regulation System (ASR).........180
▫Hill Start Assist (HSA)..................182▫Hydraulic Brake Assistant System (HBA). . . .183
▫Electronic Q2 System (E-Q2).............184
▫Ready Alert Brake System (RAB)..........184
�TIRE SAFETY INFORMATION.............184
▫Tire Markings........................184
▫Tire Identification Number (TIN)...........188
▫Tire Terminology And Definitions..........190
▫Tire Loading And Tire Pressure...........191
�TIRES — GENERAL INFORMATION........196
▫Tire Pressure........................196
▫Tire Inflation Pressures.................197
▫Tire Pressures For High Speed Operation. . . .199
▫Radial Ply Tires......................199
152 STARTING AND OPERATING
Page 156 of 348

STARTING PROCEDURES
Before starting your vehicle, adjust your seat, adjust both
inside and outside mirrors, and fasten your seat belts.
WARNING!
•Never leave children alone in a vehicle, or with
access to an unlocked vehicle.
•Allowing children to be in a vehicle unattended is
dangerous for a number of reasons. A child or
others could be seriously or fatally injured. Chil-
dren should be warned not to touch the parking
brake, brake pedal or the transmission gear selec-
tor.
•Do not leave the Key Fob in or near the vehicle (or
in a location accessible to children). A child could
operate power windows, other controls, or move
the vehicle.
Automatic Transmission
To start the engine press the brake pedal: the system
engages NEUTRAL (N) automatically.
After the starting procedure, FIRST (1st) gear or RE-
VERSE (R) can be engaged.
Irrespective of the mode selected (AUTO/MANUAL), to
engage FIRST (1st) gear or REVERSE (R), it is necessary
to press the brake pedal and press the 1 button on the
transmission control panel (or the�+�steering wheel
stalk) to engage FIRST (1st) gear or the R button to
engage REVERSE (R).
When FIRST (1st) gear is engaged, the system sets itself to
AUTO mode.
NEUTRAL (N) can be engaged again by pressing the N
button with the brake pedal pressed.
154 STARTING AND OPERATING
Page 157 of 348
 without pressing the brake
pedal, no gear change request is implemented by the
system.
NOTE:REVERSE (R) cannot be engaged")
When the 1, N or R buttons are pressed (or�+�steering
wheel stalk is operated) without pressing the brake
pedal, no gear change request is implemented by the
system.
NOTE:REVERSE (R) cannot be engaged by pressing the
�-�stalk on the steering wheel.
Normal Starting
NOTE:Normal starting of either a cold or a warm
engine is obtained without pumping or pressing the
accelerator pedal.
Turn the ignition switch to the AVV/ACC (START)
position and release it when the engine starts. If the
engine fails to start within 10 seconds, turn the ignition
switch to the STOP (OFF/LOCK) position, wait 10 to 15
seconds, then repeat the “Normal Starting” procedure.
Cold Weather Operation
Your engine is designed to operate at temperatures as
low as 0°F (-18°C).
NOTE:Use of the recommended SAE 5W-40 Synthetic oil
and adhering to the prescribed oil change intervals is
important to prevent engine damage and ensure satisfac-
tory starting in cold conditions.
If Engine Fails To Start
WARNING!
Never pour fuel or other flammable liquids into the
throttle body air inlet opening in an attempt to start
the vehicle. This could result in a flash fire causing
serious personal injury.
5
STARTING AND OPERATING 155
Page 159 of 348

•Unintended movement of a vehicle could injure
those in or near the vehicle. As with all vehicles,
you should never exit a vehicle while the engine is
running. Before exiting the")
WARNING!(Continued)
•Unintended movement of a vehicle could injure
those in or near the vehicle. As with all vehicles,
you should never exit a vehicle while the engine is
running. Before exiting the vehicle, always apply
the parking brake, shift the transmission into gear,
turn the engine OFF, and remove the ignition key.
•When leaving the vehicle, always remove the igni-
tion key and lock your vehicle.
•Never leave children alone in a vehicle, or with
access to an unlocked vehicle. Allowing children to
be in a vehicle unattended is dangerous for a
number of reasons. A child or others could be
seriously or fatally injured. Children should be
warned not to touch the parking brake, brake pedal
or the transmission gear selector.
(Continued)
WARNING!(Continued)
•Do not leave the ignition key in or near the vehicle
(or in a location accessible to children). A child
could operate power windows, other controls, or
move the vehicle.
Using The Transmission
This vehicle is equipped with a Six-Speed Alfa Twin
Clutch transmission with steering wheel mounted shift
paddles.
When the ignition is in the OFF position, the transmission
controls (shift paddles on the steering wheel, and gear
selector buttons on the center console) are disabled.5
STARTING AND OPERATING 157
Page 160 of 348
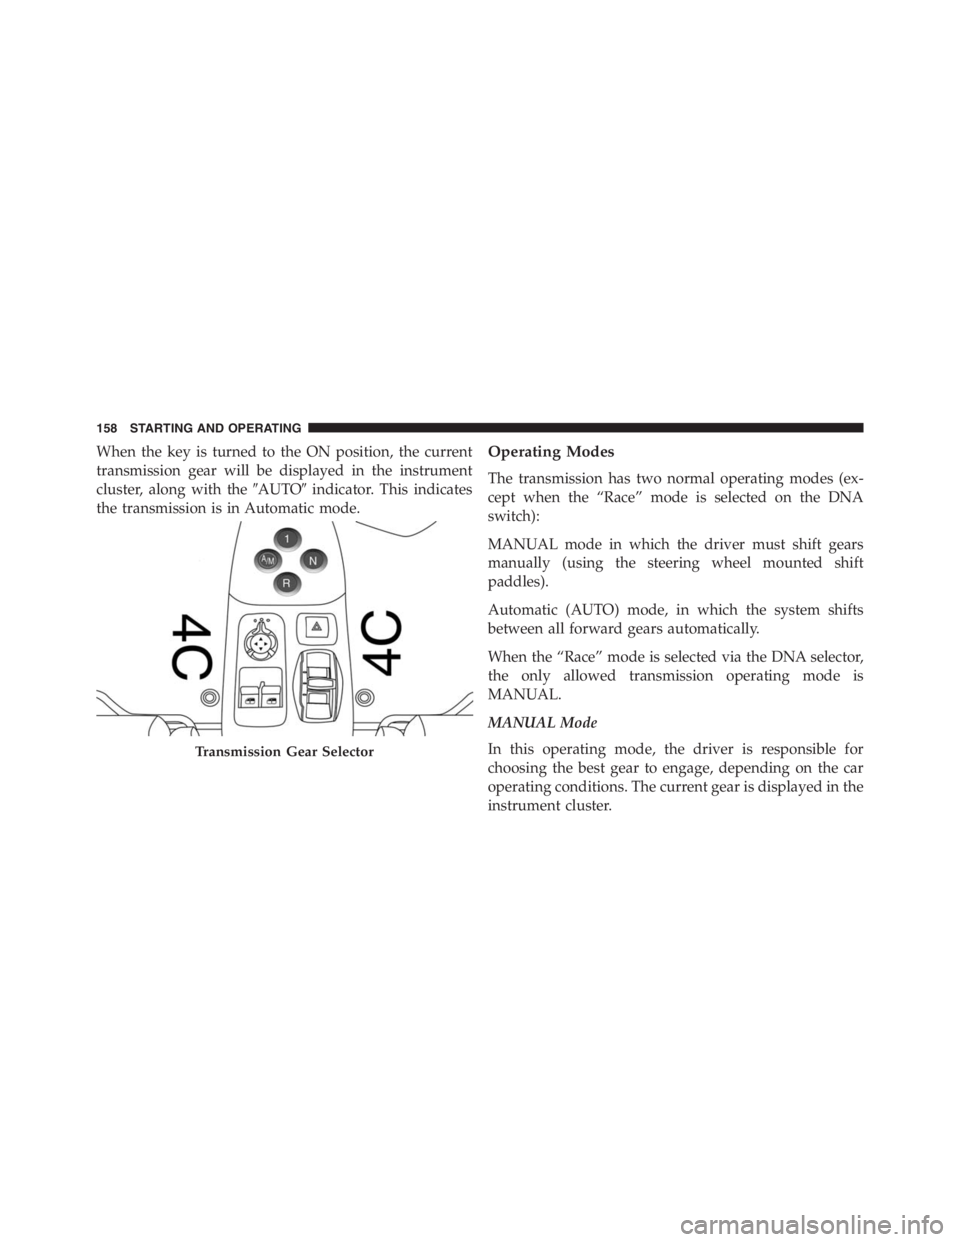
When the key is turned to the ON position, the current
transmission gear will be displayed in the instrument
cluster, along with the�AUTO�indicator. This indicates
the transmission is in Automatic mode.Operating Modes
The transmission has two normal operating modes (ex-
cept when the “Race” mode is selected on the DNA
switch):
MANUAL mode in which the driver must shift gears
manually (using the steering wheel mounted shift
paddles).
Automatic (AUTO) mode, in which the system shifts
between all forward gears automatically.
When the “Race” mode is selected via the DNA selector,
the only allowed transmission operating mode is
MANUAL.
MANUAL Mode
In this operating mode, the driver is responsible for
choosing the best gear to engage, depending on the car
operating conditions. The current gear is displayed in the
instrument cluster.
Transmission Gear Selector
158 STARTING AND OPERATING