2015 Peugeot 308 lock
[x] Cancel search: lockPage 204 of 416
202
308_en_Chap06_securite_ed01-2015
Operation
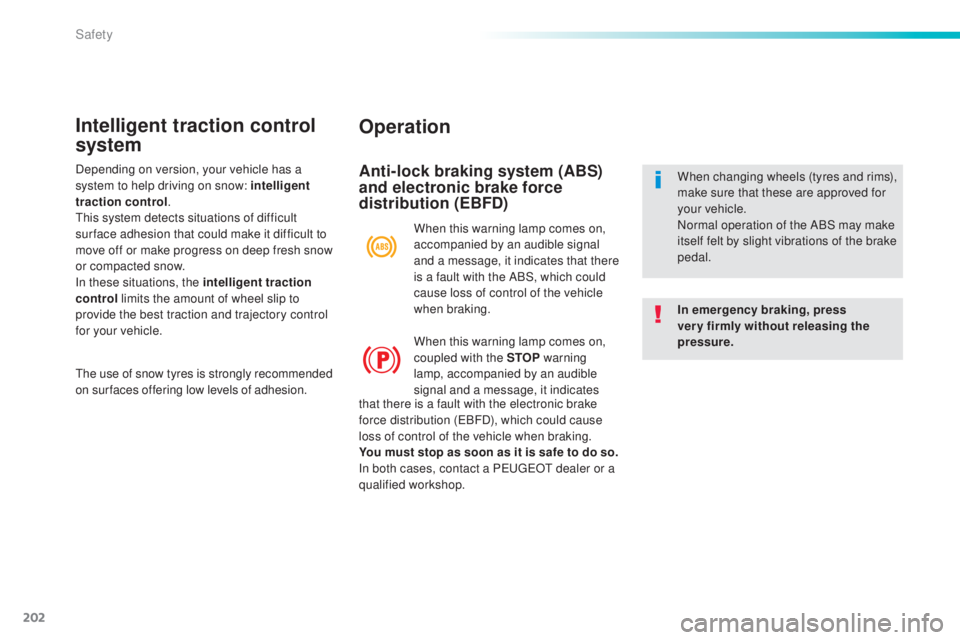
Anti-lock braking system (ABS)
and electronic brake force
distribution (EBFD)
In emergency braking, press
very firmly without releasing the
pressure. When changing wheels (tyres and rims),
make sure that these are approved for
your vehicle.
Normal operation of the ABS may make
itself felt by slight vibrations of the brake
pedal.
When this warning lamp comes on,
accompanied by an audible signal
and a message, it indicates that there
is a fault with the ABS, which could
cause loss of control of the vehicle
when braking.
When this warning lamp comes on,
coupled with the STOP
warning
lamp, accompanied by an audible
signal and a message, it indicates
Intelligent traction control
system
the use of snow tyres is strongly recommended
on sur faces offering low levels of adhesion. that there is a fault with the electronic brake
force distribution (
eB
FD), which could cause
loss of control of the vehicle when braking.
You must stop as soon as it is safe to do so.
In both cases, contact a P
e
uge
Ot
dealer or a
qualified workshop.
Depending on version, your vehicle has a
system to help driving on snow: intelligent
traction control
.
th
is system detects situations of difficult
sur face adhesion that could make it difficult to
move off or make progress on deep fresh snow
or compacted snow.
In these situations, the intelligent traction
control limits the amount of wheel slip to
provide the best traction and trajectory control
for your vehicle.
Safety
Page 208 of 416
206
308_en_Chap06_securite_ed01-2015
the driver must ensure that passengers use
the seat belts correctly and that they are all
restrained securely before setting off.
Wherever you are seated in the vehicle,
always fasten your seat belt, even for short
journeys.
Do not interchange the seat belt buckles as
they will not fulfil their role fully.
th
e seat belts are fitted with an inertia reel
permitting automatic adjustment of the
length of the strap to your size.
t
h
e seat belt
is stowed automatically when not in use.
Before and after use, ensure that the seat
belt is reeled in correctly.
th
e lower part of the strap must be
positioned as low as possible on the pelvis.
th
e upper part must be positioned in the
hollow of the shoulder.
th
e inertia reels are fitted with an automatic
locking device which comes into operation in
the event of a collision, emergency braking
or if the vehicle rolls over. You can release
the device by pulling the strap firmly and
then releasing it so that it reels in slightly.Recommendations for children
use a suitable child seat if the passenger is
less than 12 years old or shorter than one
and a half metres.
Never use the same seat belt to secure more
than one person.
Never allow a child to travel on your lap.
For more information, refer to the "Child
seats" section.
In order to be effective, a seat belt must:
-
b
e tightened as close to the body as
possible,
-
b
e pulled in front of you with a smooth
movement, checking that it does not
twist,
-
b
e used to restrain only one person,
-
n
ot bear any trace of cuts or fraying,
-
n
ot be converted or modified to avoid
affecting its performance.
In accordance with current safety
regulations, for all repairs on your vehicle's
seat belts, go to a qualified workshop with
the skills and equipment needed, which a
P
e
uge
Ot d
ealer is able to provide.
Have your seat belts checked regularly by a
P
e
uge
Ot
dealer or a qualified workshop,
particularly if the straps show signs of
damage.
Clean the seat belt straps with soapy
water or a textile cleaning product, sold by
P
e
uge
Ot d
ealers.
After folding or moving a seat or rear bench
seat, ensure that the seat belt is positioned
and reeled in correctly.
In the event of an impact
Depending on the nature and
seriousness of the impact , the
pretensioning device may be deployed
before and independently of the airbags.
Deployment of the pretensioners is
accompanied by a slight discharge of
harmless smoke and a noise, due to the
activation of the pyrotechnic cartridge
incorporated in the system.
In all cases, the airbag warning lamp comes
on.
Following an impact, have the seat belts
system checked, and if necessary replaced,
by a P
e
uge
Ot
dealer or a qualified
workshop.
Safety
Page 229 of 416
227
308_en_Chap06_securite_ed01-2015
Child seatsInstalling a booster
cushion
Recommendations
the legislation on carrying a child on the
front passenger seat is specific to each
country. Refer to the legislation in force in
the country in which you are driving.
Deactivate the passenger's front airbag
when a rear ward facing child seat is installed
on the front passenger seat. Otherwise, the
child would risk being seriously injured or
killed if the airbag were deployed.
For optimum installation of the forward facing
child seat, ensure that the back of the child
seat is as close as possible to the backrest
of the vehicle's seat, or in contact if possible.
th
e head restraint must be removed before
installing a child seat with a backrest on the
passenger seat.
en
sure that the head restraint is stowed or
attached securely so that it is not thrown
around the vehicle in the event of sharp
braking.
Refit the head restraint as soon as the child
seat is removed.
th
e incorrect installation of a child seat in a
vehicle compromises the child's protection in
the event of an accident.
Check that there is no seat belt or seat belt
buckle under the child seat as this could
destabilise it.
Remember to fasten the seat belts or the
child seat harnesses keeping the slack in
relation to the child's body to a minimum ,
even for short journeys.
For the installation of a child seat using a
seat belt, ensure that this is well tensioned
on the child seat and that it is holding the
child seat firmly against the seat of your
vehicle. If your front passenger seat is
adjustable, move it forward if necessary.
At the rear seats, always leave sufficient
space between the front seat and:
-
a r
ear ward facing child seat,
-
t
he feet of a child seated in a for ward
facing child seat.
For this, move the front seat for ward and if
necessary straighten its backrest.
Children at the front
the chest part of the seat belt must be
positioned on the child's shoulder without
touching the neck.
en
sure that the lap part of the seat belt
passes correctly over the child's thighs.
P
e
uge
Ot
recommends the use of a booster
seat which has a back, fitted with a seat belt
guide at shoulder level.
As a safety precaution, do not leave:
-
o
ne or more children alone and
unsupervised in a vehicle,
-
a c
hild or an animal in a vehicle which
is exposed to the sun, with the windows
closed,
-
t
he keys within reach of children inside
the vehicle.
to p
revent accidental opening of the doors,
use the child lock.
ta
ke care not to open the rear windows by
more than one third.
to p
rotect young children from the rays of
the sun, fit side blinds on the rear windows.
6
Safety
Page 230 of 416
228
308_en_Chap06_securite_ed01-2015
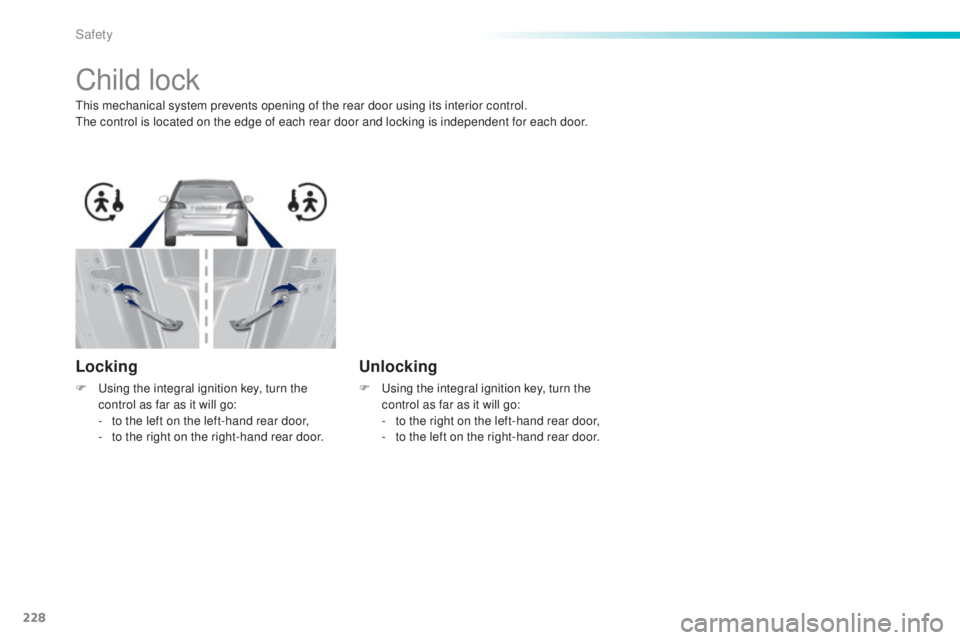
Child lock
this mechanical system prevents opening of the rear door using its interior control.the control is located on the edge of each rear door and locking is independent for each door.
Locking
F using the integral ignition key, turn the control as far as it will go:
-
t
o the left on the left-hand rear door,
-
t
o the right on the right-hand rear door.
Unlocking
F using the integral ignition key, turn the control as far as it will go:
-
t
o the right on the left-hand rear door,
-
t
o the left on the right-hand rear door.
Safety
Page 240 of 416

238
308_en_Chap07_info-pratiques_ed01-2015
F Remove the bolt cover from each of the bolts using the tool 3 (according to
equipment).
F
F
it the security socket 4 on the
wheelbrace
1 to slacken the security bolt
(if
fitted).
F
S
lacken the other bolts using the
wheelbrace 1 o n l y. F
P osition the foot of the jack on the ground,
ensuring that it is directly below the
vehicle's jacking point A or B , the one
closest to the wheel to be changed.
Removing a wheel
Parking the vehicle
Immobilise the vehicle where it does not
block traffic: the ground must be level,
stable and not slippery.
Apply the parking brake unless it has
been programmed to automatic mode,
switch off the ignition and engage first
gear to block the wheels.
Check that the braking warning lamp
and the P warning lamp in the parking
brake control lever come on.
th
e occupants must get out of the
vehicle and wait where they are safe.
Never go underneath a vehicle raised
using a jack; use an axle stand.
Do not use:
-
t
he jack for any other purpose than lifting
the vehicle,
-
a j
ack other than the one supplied by the
manufacturer.
en
sure that the jack is stable. If the ground is slippery or loose, the jack may slip or drop -
Risk of injury!
en
sure that the jack is positioned only at one of the jacking points A or B under the vehicle,
making sure that the vehicle's contact sur face is centred on the head of the jack. Other wise
there is a risk of damage to the vehicle and/or of the jack dropping - Risk of injury!
Practical information
Page 262 of 416
260
308_en_Chap07_info-pratiques_ed01-2015
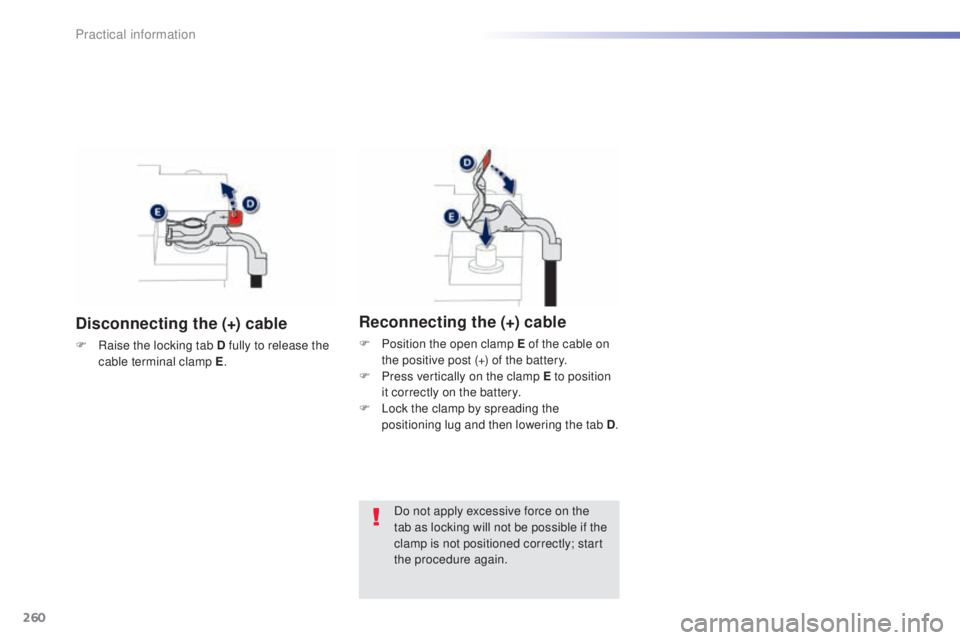
Disconnecting the (+) cable
F Raise the locking tab D fully to release the cable terminal clamp E .
Reconnecting the (+) cable
F Position the open clamp E of the cable on
the positive post (+) of the battery.
F
P
ress vertically on the clamp E to position
it correctly on the battery.
F
L
ock the clamp by spreading the
positioning lug and then lowering the tab D .
Do not apply excessive force on the
tab as locking will not be possible if the
clamp is not positioned correctly; start
the procedure again.
Practical information
Page 268 of 416
266
308_en_Chap07_info-pratiques_ed01-2015
General recommendations
Observe the legislation in force in your country.ensure that the weight of the towing vehicle is higher than that of the towed vehicle.
th
e driver must remain at the wheel of the towed vehicle and must have a valid driving licence.
When towing a vehicle with all four wheels on the ground, always use an approved towing
arm; rope and straps are prohibited.
th
e towing vehicle must move off gently.
When towing a vehicle with the engine off, there is no longer any power assistance for
braking or steering.
In the following cases, you must always call on a professional recovery service:
-
v
ehicle broken down on a motor way or fast road,
-
f
our-wheel drive vehicle,
-
w
hen it is not possible to put the gearbox into neutral, unlock the steering, or release
the parking brake,
-
t
owing with only two wheels on the ground,
-
w
here there is no approved towing arm available...
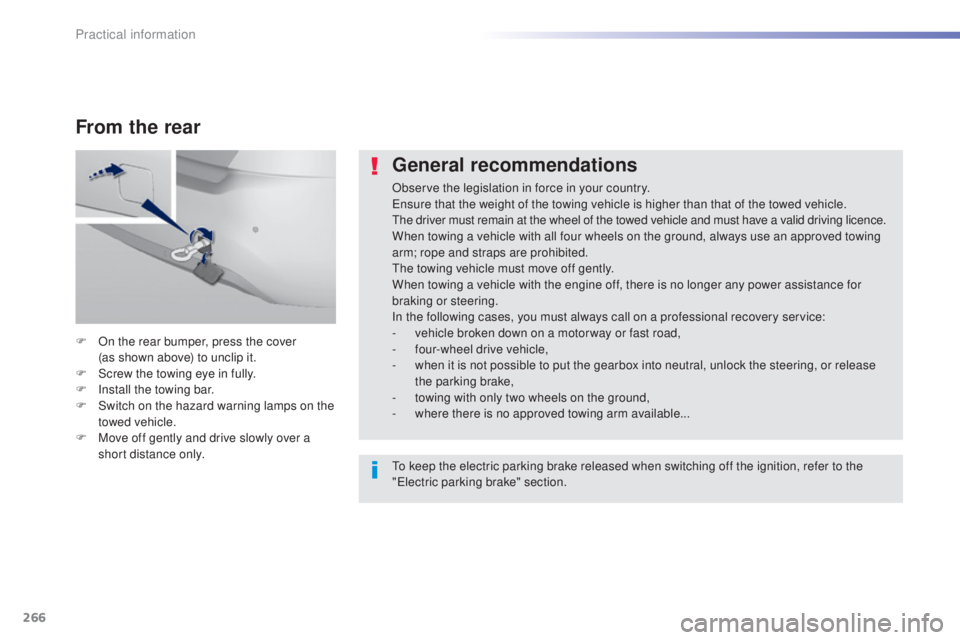
F
O
n the rear bumper, press the cover
(as shown above) to unclip it.
F
S
crew the towing eye in fully.
F
I
nstall the towing bar.
F
S
witch on the hazard warning lamps on the
towed vehicle.
F
M
ove off gently and drive slowly over a
short distance only.
From the rear
to keep the electric parking brake released when switching off the ignition, refer to the
"el ectric parking brake" section.
Practical information
Page 287 of 416
285
308_en_Chap08_verifications_ed01-2015
Recommendations on storage
Never store bottles of AdBlue® in your
vehicle.
AdBlue
® freezes at about -11°C and
deteriorates above 25°C. It is recommended
that bottles be stored in a cool area and
protected from direct sunlight.
und
er these conditions, the additive can be
kept for at least a year.
If the additive has frozen, can be used once it
has completely thawed out.
Procedure
Before topping-up, ensure that the vehicle is
parked on a flat and level sur face.
In wintry conditions, ensure that the
temperature of the vehicle is above -11°C.
Otherwise, by freezing, the AdBlue
® cannot
be poured into its tank. Park your vehicle in a
warmer area for a few hours to allow the top-up
to be carried out.
F
S
witch off the ignition and remove the
key, or if your vehicle has one, press
the S
tA
R
t/
S
tO
P button to switch off
the
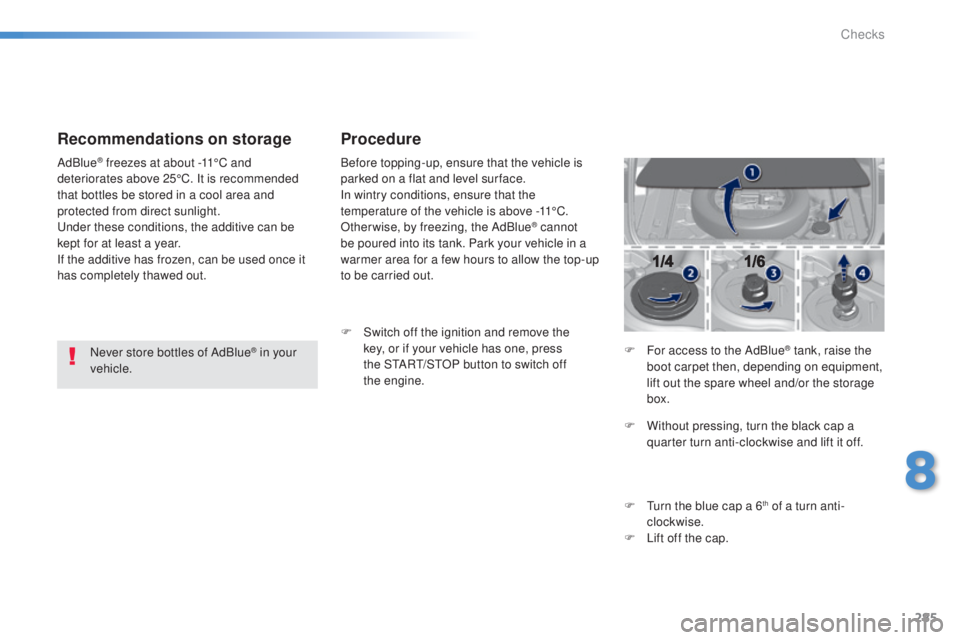
engine. F
F
or access to the AdBlue
® tank, raise the
boot carpet then, depending on equipment,
lift out the spare wheel and/or the storage
box.
F
W
ithout pressing, turn the black cap a
quarter turn anti-clockwise and lift it off.
F
t
u
rn the blue cap a 6
th of a turn anti-
clockwise.
F
L
ift off the cap.
8
Checks