2015 Peugeot 308 key
[x] Cancel search: keyPage 210 of 416
208
308_en_Chap06_securite_ed01-2015
Deactivating the passenger's
front airbag
Only the passenger's front airbag can be
deactivated.
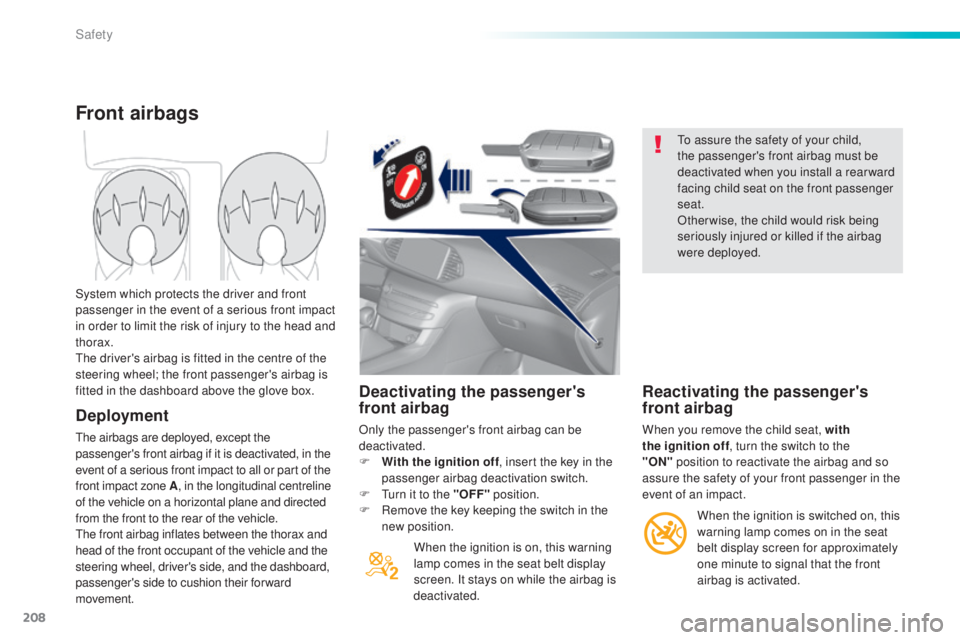
F
W
ith the ignition off , insert the key in the
passenger airbag deactivation switch.
F
t
u
rn it to the "OFF" position.
F
R
emove the key keeping the switch in the
new position.
When the ignition is on, this warning
lamp comes in the seat belt display
screen. It stays on while the airbag is
deactivated.
to a
ssure the safety of your child,
the passenger's front airbag must be
deactivated when you install a rear ward
facing child seat on the front passenger
seat.
Otherwise, the child would risk being
seriously injured or killed if the airbag
were deployed.
Reactivating the passenger's
front airbag
When you remove the child seat, with
the ignition off , turn the switch to the
"ON"
position to reactivate the airbag and so
assure the safety of your front passenger in the
event of an impact.
Front airbags
Deployment
the airbags are deployed, except the
passenger's front airbag if it is deactivated, in the
event of a serious front impact to all or part of the
front impact zone A , in the longitudinal centreline
of the vehicle on a horizontal plane and directed
from the front to the rear of the vehicle.
th
e front airbag inflates between the thorax and
head of the front occupant of the vehicle and the
steering wheel, driver's side, and the dashboard,
passenger's side to cushion their forward
movement. System which protects the driver and front
passenger in the event of a serious front impact
in order to limit the risk of injury to the head and
thorax.
th
e driver's airbag is fitted in the centre of the
steering wheel; the front passenger's airbag is
fitted in the dashboard above the glove box.
When the ignition is switched on, this
warning lamp comes on in the seat
belt display screen for approximately
one minute to signal that the front
airbag is activated.
Safety
Page 229 of 416
227
308_en_Chap06_securite_ed01-2015
Child seatsInstalling a booster
cushion
Recommendations
the legislation on carrying a child on the
front passenger seat is specific to each
country. Refer to the legislation in force in
the country in which you are driving.
Deactivate the passenger's front airbag
when a rear ward facing child seat is installed
on the front passenger seat. Otherwise, the
child would risk being seriously injured or
killed if the airbag were deployed.
For optimum installation of the forward facing
child seat, ensure that the back of the child
seat is as close as possible to the backrest
of the vehicle's seat, or in contact if possible.
th
e head restraint must be removed before
installing a child seat with a backrest on the
passenger seat.
en
sure that the head restraint is stowed or
attached securely so that it is not thrown
around the vehicle in the event of sharp
braking.
Refit the head restraint as soon as the child
seat is removed.
th
e incorrect installation of a child seat in a
vehicle compromises the child's protection in
the event of an accident.
Check that there is no seat belt or seat belt
buckle under the child seat as this could
destabilise it.
Remember to fasten the seat belts or the
child seat harnesses keeping the slack in
relation to the child's body to a minimum ,
even for short journeys.
For the installation of a child seat using a
seat belt, ensure that this is well tensioned
on the child seat and that it is holding the
child seat firmly against the seat of your
vehicle. If your front passenger seat is
adjustable, move it forward if necessary.
At the rear seats, always leave sufficient
space between the front seat and:
-
a r
ear ward facing child seat,
-
t
he feet of a child seated in a for ward
facing child seat.
For this, move the front seat for ward and if
necessary straighten its backrest.
Children at the front
the chest part of the seat belt must be
positioned on the child's shoulder without
touching the neck.
en
sure that the lap part of the seat belt
passes correctly over the child's thighs.
P
e
uge
Ot
recommends the use of a booster
seat which has a back, fitted with a seat belt
guide at shoulder level.
As a safety precaution, do not leave:
-
o
ne or more children alone and
unsupervised in a vehicle,
-
a c
hild or an animal in a vehicle which
is exposed to the sun, with the windows
closed,
-
t
he keys within reach of children inside
the vehicle.
to p
revent accidental opening of the doors,
use the child lock.
ta
ke care not to open the rear windows by
more than one third.
to p
rotect young children from the rays of
the sun, fit side blinds on the rear windows.
6
Safety
Page 230 of 416
228
308_en_Chap06_securite_ed01-2015
Child lock
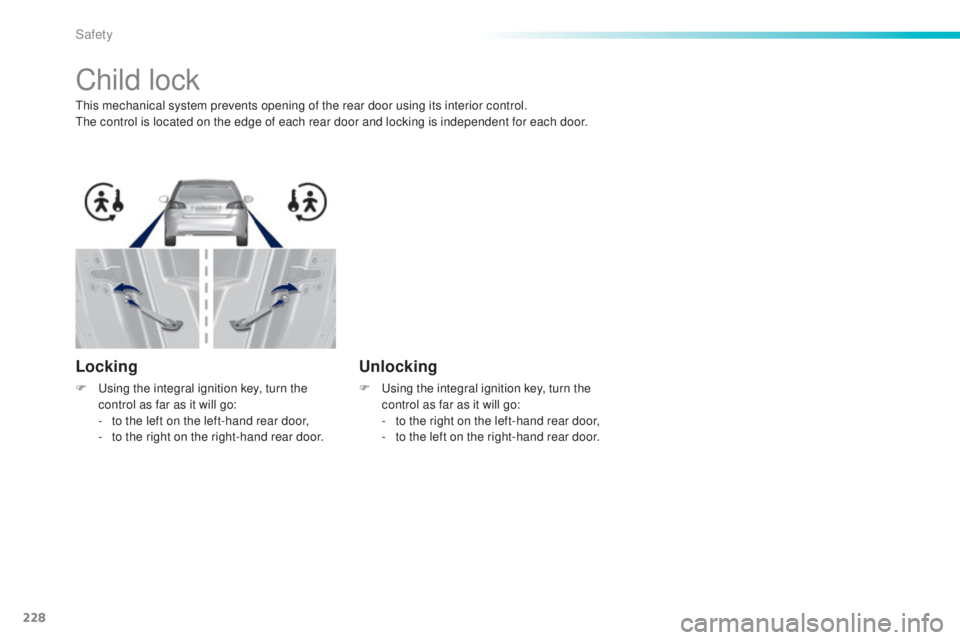
this mechanical system prevents opening of the rear door using its interior control.the control is located on the edge of each rear door and locking is independent for each door.
Locking
F using the integral ignition key, turn the control as far as it will go:
-
t
o the left on the left-hand rear door,
-
t
o the right on the right-hand rear door.
Unlocking
F using the integral ignition key, turn the control as far as it will go:
-
t
o the right on the left-hand rear door,
-
t
o the left on the right-hand rear door.
Safety
Page 263 of 416
261
308_en_Chap07_info-pratiques_ed01-2015
Starting using another
battery
First check that the slave battery has a
nominal voltage of 12 V and a capacity
at least equal to that of the discharged
battery.
Do not try to start the engine by
connecting a battery charger.
Do not disconnect the (+) terminal when
the engine is running.
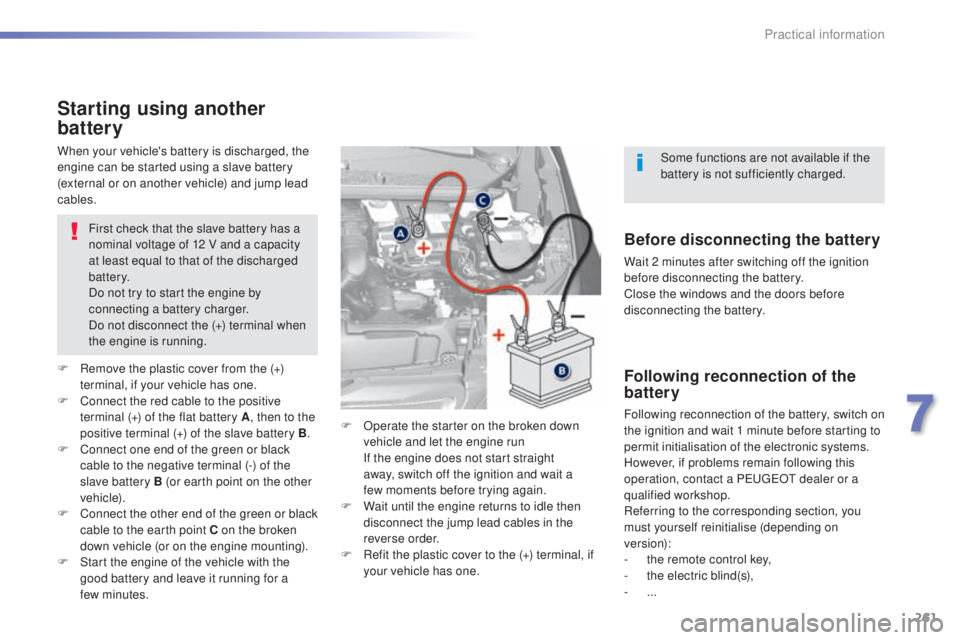
F
R
emove the plastic cover from the (+)
terminal, if your vehicle has one.
F
C
onnect the red cable to the positive
terminal (+) of the flat battery A , then to the
positive terminal (+) of the slave battery B.
F
C
onnect one end of the green or black
cable to the negative terminal (-) of the
slave battery B (or earth point on the other
vehicle).
F
C
onnect the other end of the green or black
cable to the earth point C on the broken
down vehicle (or on the engine mounting).
F
S
tart the engine of the vehicle with the
good battery and leave it running for a
few
minutes. F
O
perate the starter on the broken down
vehicle and let the engine run
I
f the engine does not start straight
away, switch off the ignition and wait a
few
moments before trying again.
F
W
ait until the engine returns to idle then
disconnect the jump lead cables in the
reverse order.
F
R
efit the plastic cover to the (+) terminal, if
your vehicle has one.
When your vehicle's battery is discharged, the
engine can be started using a slave battery
(external or on another vehicle) and jump lead
cables.Before disconnecting the battery
Wait 2 minutes after switching off the ignition
before disconnecting the battery.
Close the windows and the doors before
disconnecting the battery.
Following reconnection of the
battery
Following reconnection of the battery, switch on
the ignition and wait 1 minute before starting to
permit initialisation of the electronic systems.
However, if problems remain following this
operation, contact a P
e
uge
Ot
dealer or a
qualified workshop.
Referring to the corresponding section, you
must yourself reinitialise (depending on
version):
-
t
he remote control key,
-
t
he electric blind(s),
-
...Some functions are not available if the
battery is not sufficiently charged.
7
Practical information
Page 276 of 416
274
308_en_Chap08_verifications_ed01-2015
PeugeOt & t O tA L,
A PARtNeRSHIP tO DeL IVe R
Be
tte R
P
e
RFORMANC
e
!
Innovation, the key to success
the tOtAL Research and Development and
Pe
ugeOt teams work together to develop high
quality lubricants that meet the requirements
of P
e
uge
Ot
vehicles. For you, this is the
assurance that the performance of your engine
is optimised while also ensuring its durability.
th
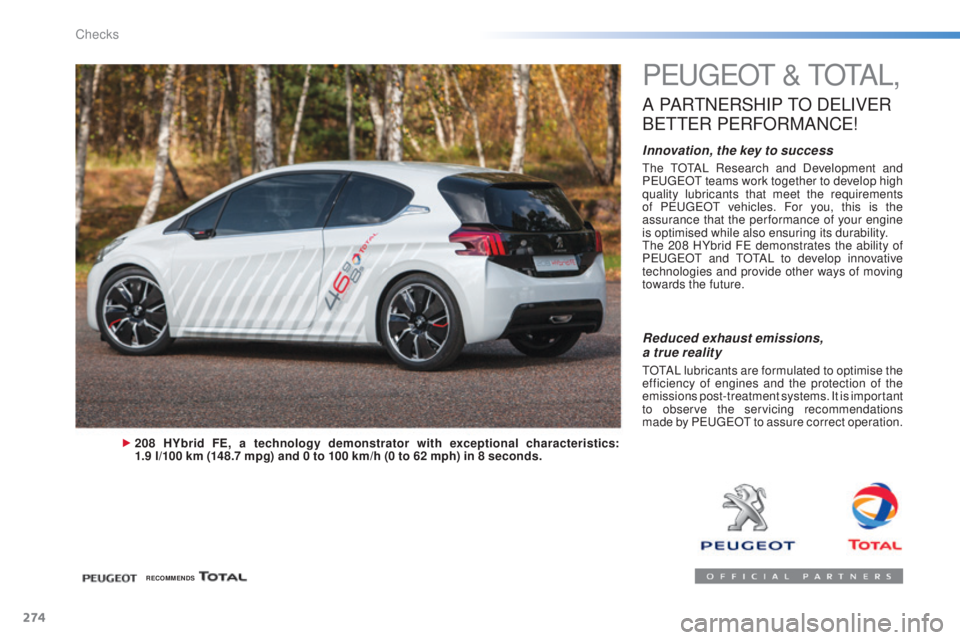
e 208 HYbrid F
e
demonstrates the ability of
P
e
uge
Ot
and
tOtA
L to develop innovative
technologies and provide other ways of moving
towards the future.
208 HYbrid FE, a technology demonstrator with exceptional characteristics:
1.9 l/100 km (148.7 mpg) and 0 to 100 km/h (0 to 62 mph) in 8 seconds.
Reduced exhaust emissions,
a true reality
tOtAL lubricants are formulated to optimise the
efficiency of engines and the protection of the
emissions post-treatment systems. It is important
to observe the servicing recommendations
made by P
e
uge
Ot
to assure correct operation.
RECOMMENDS
Checks
Page 287 of 416
285
308_en_Chap08_verifications_ed01-2015
Recommendations on storage
Never store bottles of AdBlue® in your
vehicle.
AdBlue
® freezes at about -11°C and
deteriorates above 25°C. It is recommended
that bottles be stored in a cool area and
protected from direct sunlight.
und
er these conditions, the additive can be
kept for at least a year.
If the additive has frozen, can be used once it
has completely thawed out.
Procedure
Before topping-up, ensure that the vehicle is
parked on a flat and level sur face.
In wintry conditions, ensure that the
temperature of the vehicle is above -11°C.
Otherwise, by freezing, the AdBlue
® cannot
be poured into its tank. Park your vehicle in a
warmer area for a few hours to allow the top-up
to be carried out.
F
S
witch off the ignition and remove the
key, or if your vehicle has one, press
the S
tA
R
t/
S
tO
P button to switch off
the
engine. F
F
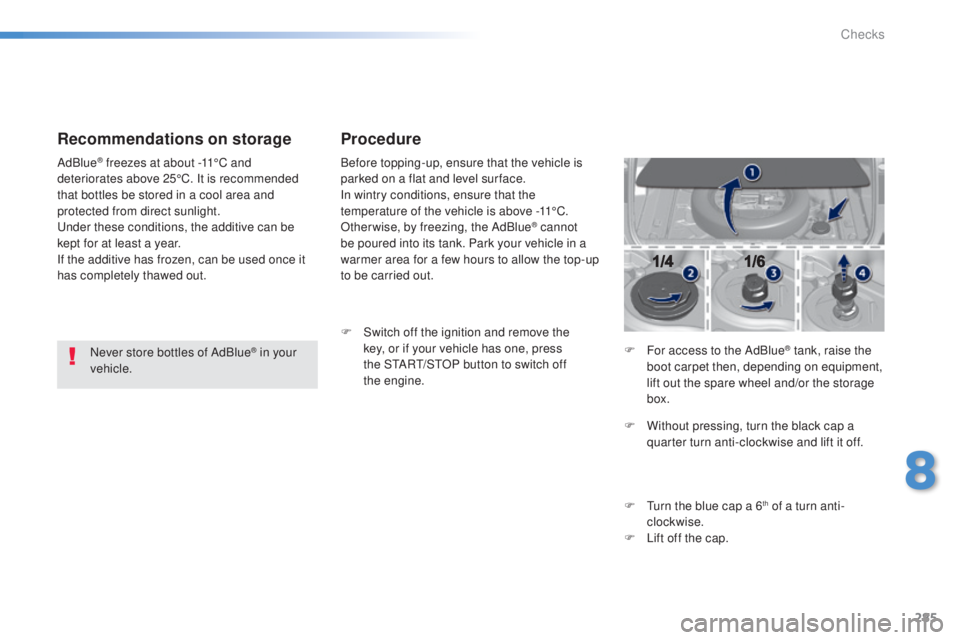
or access to the AdBlue
® tank, raise the
boot carpet then, depending on equipment,
lift out the spare wheel and/or the storage
box.
F
W
ithout pressing, turn the black cap a
quarter turn anti-clockwise and lift it off.
F
t
u
rn the blue cap a 6
th of a turn anti-
clockwise.
F
L
ift off the cap.
8
Checks
Page 288 of 416
286
308_en_Chap08_verifications_ed01-2015
Never dispose of AdBlue® additive
bottles in the household waste. Place
them in a special container provided
this purpose or take them to your dealer.
Important
: if your vehicle's
AdBlue
® tank is completely empty -
w
hich is confirmed by the alert
messages and the impossibility of
starting the engine, you must add at
least 3.8 litres (so two 1.89 litre bottles). F
A
fter emptying the bottle, wipe away any
spillage around the tank filler using a damp
cloth.
If any additive is split or splashed, wash
immediately with cold water or wipe with
a damp cloth.
If the additive has crystallised, clean it
off using a sponge and hot water.
F
R
efit the blue cap to the tank and turn it a
6
th of a turn clockwise, to its stop.
F
R
efit the black cap and turn it a quarter of
a turn clockwise without pressing.
e
n
sure
that the indicator on the cap lines up with
the indicator on the support.
F
D
epending on equipment, return the spare
wheel and/or the storage box to the bottom
of the boot.
F
R
efit the boot carpet and close the tailgate. Important: when topping
-up after
running out of additive , signalled
by the message "
to
p up emissions
additive: Starting prevented", you
must wait for about 5 minutes before
switching on the ignition, without
opening the driver's door, unlocking
the vehicle, introducing the key
into the ignition switch, or placing
the key of the "Keyless Entr y and
Star ting" system inside the vehicle.
Switch on the ignition, then wait for
10 seconds before starting the engine.
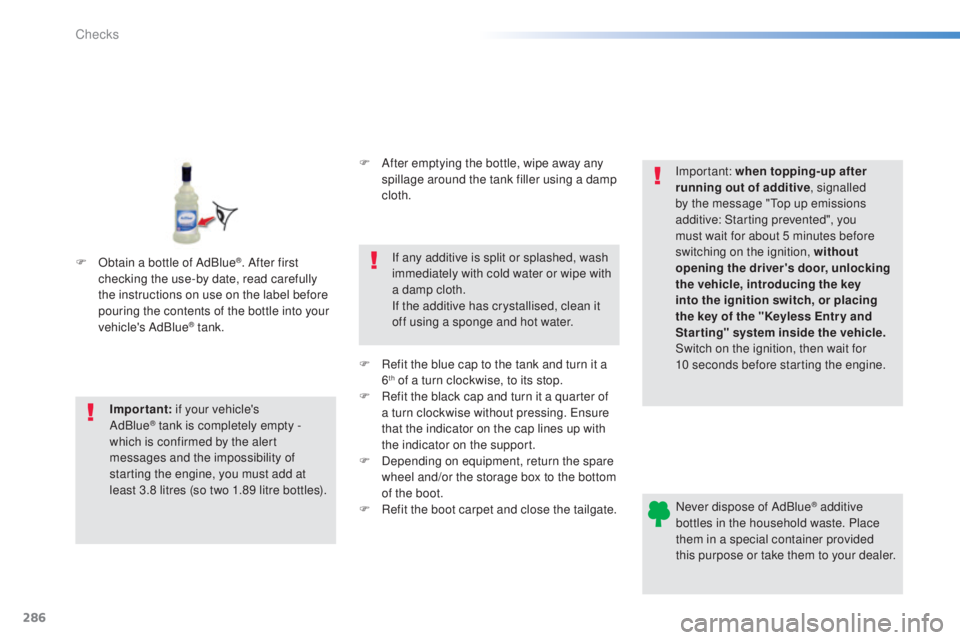
F
O
btain a bottle of AdBlue
®. After first
checking the use-by date, read carefully
the instructions on use on the label before
pouring the contents of the bottle into your
vehicle's AdBlue
® tank.
Checks
Page 304 of 416

01GENERAL OPERATION
* Depending on equipment.
"Air conditioning "
allows control of the
settings for temperature
and air flow.
"Driving assistance"
allows access to the trip
computer and certain
vehicle functions to be
activated, deactivated
and adjusted.
"Media"
allows selection of a
radio station, the various
music sources and the
display of photographs. "Navigation"*
allows settings for
navigation and the choice
of a destination. "Configuration
"
allows sound settings,
the color schemes
and the brightness
of instruments and
controls to be adjusted
and gives access to the
interactive help for the
main vehicle systems
and warning lamps.
"Connected services "*
allows connection to
an applications portal
to facilitate, make
safe and personalise
journeys by means
of a connection
key available on
subscription from a
P
euge O t
dealer
.
"Telephone"
allows the connection
of a mobile telephone
via Bluetooth.
302