2015 Peugeot 308 removing
[x] Cancel search: removingPage 240 of 416

238
308_en_Chap07_info-pratiques_ed01-2015
F Remove the bolt cover from each of the bolts using the tool 3 (according to
equipment).
F
F
it the security socket 4 on the
wheelbrace
1 to slacken the security bolt
(if
fitted).
F
S
lacken the other bolts using the
wheelbrace 1 o n l y. F
P osition the foot of the jack on the ground,
ensuring that it is directly below the
vehicle's jacking point A or B , the one
closest to the wheel to be changed.
Removing a wheel
Parking the vehicle
Immobilise the vehicle where it does not
block traffic: the ground must be level,
stable and not slippery.
Apply the parking brake unless it has
been programmed to automatic mode,
switch off the ignition and engage first
gear to block the wheels.
Check that the braking warning lamp
and the P warning lamp in the parking
brake control lever come on.
th
e occupants must get out of the
vehicle and wait where they are safe.
Never go underneath a vehicle raised
using a jack; use an axle stand.
Do not use:
-
t
he jack for any other purpose than lifting
the vehicle,
-
a j
ack other than the one supplied by the
manufacturer.
en
sure that the jack is stable. If the ground is slippery or loose, the jack may slip or drop -
Risk of injury!
en
sure that the jack is positioned only at one of the jacking points A or B under the vehicle,
making sure that the vehicle's contact sur face is centred on the head of the jack. Other wise
there is a risk of damage to the vehicle and/or of the jack dropping - Risk of injury!
Practical information
Page 247 of 416

245
308_en_Chap07_info-pratiques_ed01-2015
Main beam headlamps
(halogen model)
F Remove the protective plastic cover by pulling on the tab.
F
t
u
rn the connector (with its bulb) towards
the top (1/4 turn).
F
R
emove the bulb by pulling it out and
change it.
For reassembly, carry out these operations in
reverse order.
Dipped beam headlamps
(halogen model)
F Remove the protective plastic cover by
pulling on the tab.
F
D
isconnect the bulb connector.
F
D
isengage the two springs (press then
move them outwards).
F
e
x
tract the bulb by pulling and change it.
For reassembly, carry out these operations in
reverse order.
Be aware that the area behind the
right-hand headlamp (facing forwards)
may be hot, with the risk of burns
(over flow
pipe).
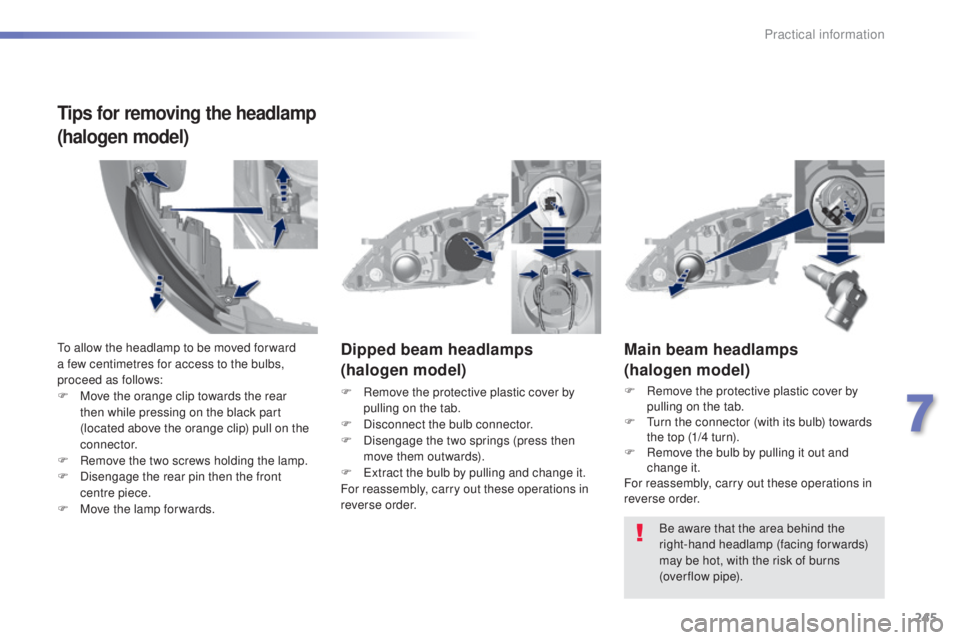
to a
llow the headlamp to be moved for ward
a few centimetres for access to the bulbs,
proceed as follows:
F
M
ove the orange clip towards the rear
then while pressing on the black part
(located above the orange clip) pull on the
connector.
F
R
emove the two screws holding the lamp.
F
D
isengage the rear pin then the front
centre piece.
F
M
ove the lamp for wards.
Tips for removing the headlamp
(halogen model)
7
Practical information
Page 252 of 416

250
308_en_Chap07_info-pratiques_ed01-2015
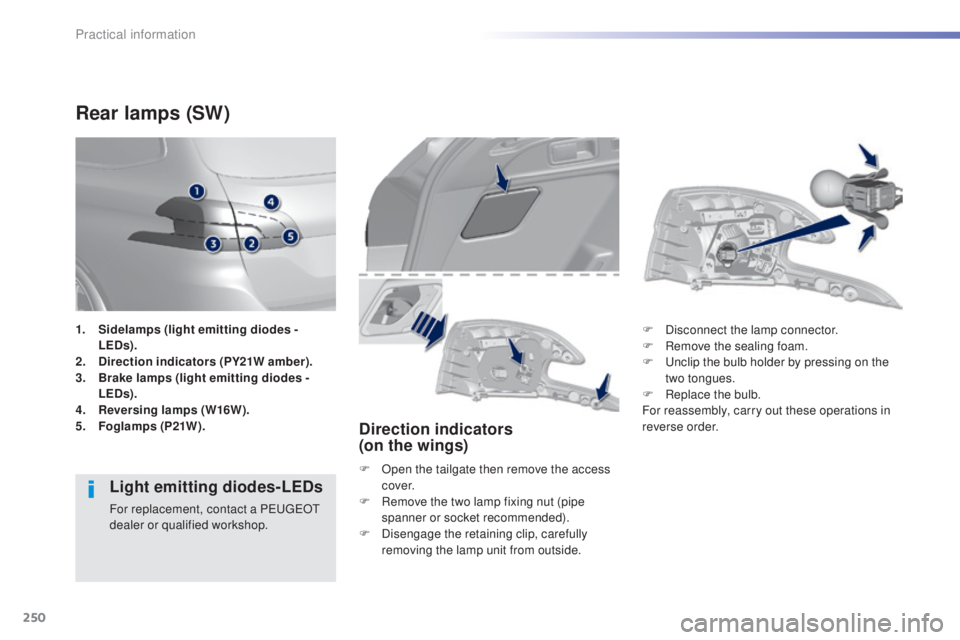
Rear lamps (SW)
Light emitting diodes-LEDs
For replacement, contact a PeugeOt
dealer or qualified workshop.
Direction indicators
(on the wings)
F Open the tailgate then remove the access c ove r.
F
R
emove the two lamp fixing nut (pipe
spanner or socket recommended).
F
D
isengage the retaining clip, carefully
removing the lamp unit from outside. F
D
isconnect the lamp connector.
F
R
emove the sealing foam.
F u
n
clip the bulb holder by pressing on the
two tongues.
F
R
eplace the bulb.
For reassembly, carry out these operations in
reverse order.
1.
S
idelamps (light emitting diodes -
LEDs).
2.
D
irection indicators (PY21W amber).
3.
B
rake lamps (light emitting diodes -
LEDs).
4.
R
eversing lamps (W16W).
5.
F
oglamps (P21W).
Practical information
Page 266 of 416

264
308_en_Chap07_info-pratiques_ed01-2015
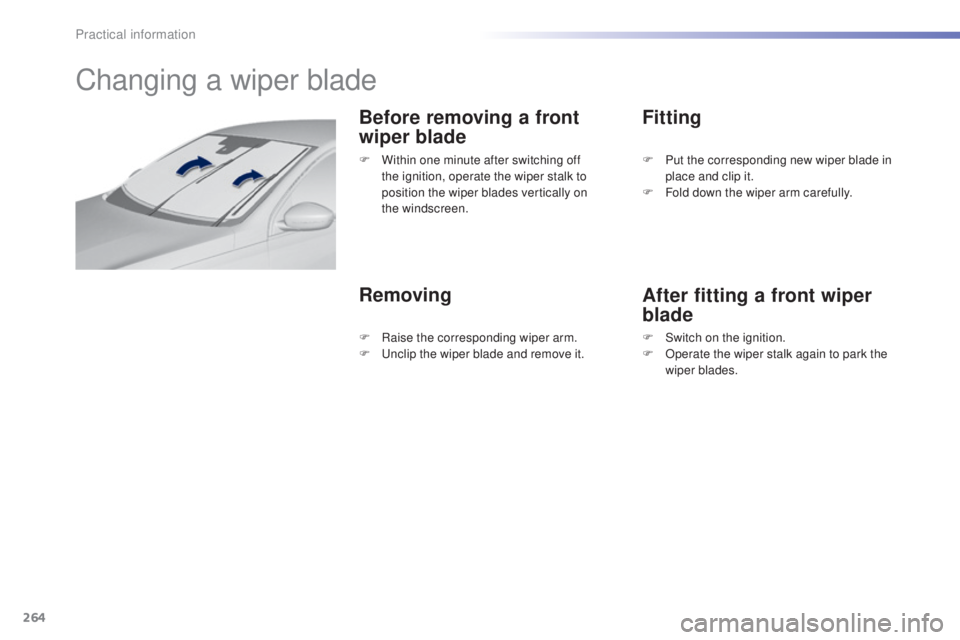
Changing a wiper blade
Before removing a front
wiper blade
RemovingFitting
After fitting a front wiper
blade
F Within one minute after switching off
the ignition, operate the wiper stalk to
position the wiper blades vertically on
the
windscreen. F
P ut the corresponding new wiper blade in
place and clip it.
F
F
old down the wiper arm carefully.
F
Ra
ise the corresponding wiper arm.
F
u
n
clip the wiper blade and remove it. F
S
witch on the ignition.
F
O
perate the wiper stalk again to park the
wiper blades.
Practical information
Page 269 of 416

267
308_en_Chap07_info-pratiques_ed01-2015
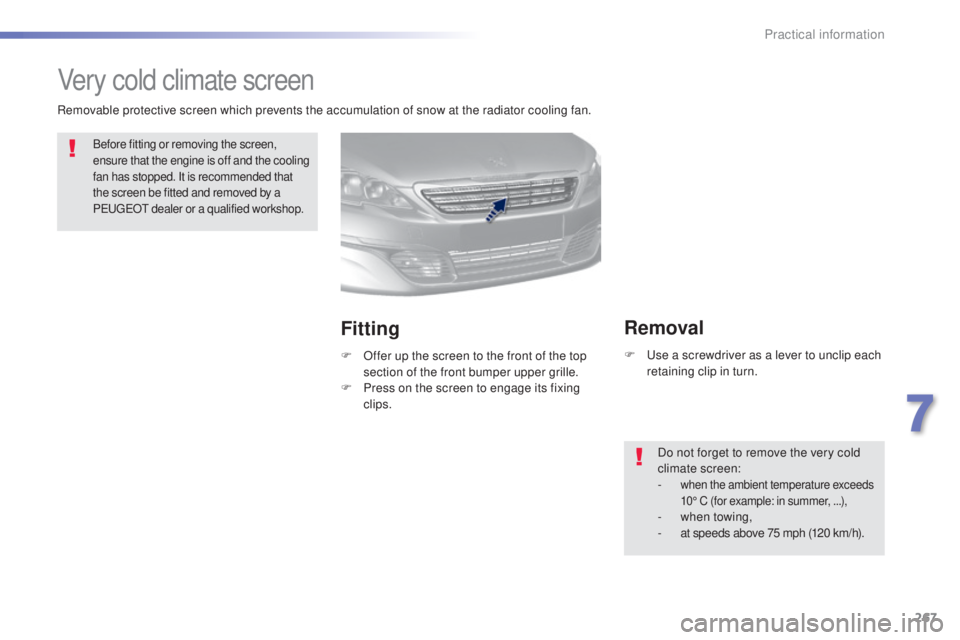
Very cold climate screen
Before fitting or removing the screen,
ensure that the engine is off and the cooling
fan has stopped. It is recommended that
the screen be fitted and removed by a
P
e
uge
Ot
dealer or a qualified workshop.
Fitting
F Offer up the screen to the front of the top section of the front bumper upper grille.
F
P
ress on the screen to engage its fixing
clips.
Removal
F use a screwdriver as a lever to unclip each retaining clip in turn.
Do not forget to remove the very cold
climate screen:
-
when the ambient temperature exceeds
10° C (for example: in summer, ...),
- when towing,
- at speeds above 75 mph (120 km/h).
Removable protective screen which prevents the accumulation of snow at the radiator cooling fan.
7
Practical information
Page 400 of 416

398
Seat adjustment ........................................80, 81
Seat belts ...................................... 20
4-206, 218
Seats, electric
................................................. 81
Seats, rear
................................................. 85, 86
Serial number, vehicle
......................................................... 296
Service indicator
............................................. 29
Servicing
...............................
..........................10
Setting the clock
...........................46, 47, 48, 49
Sidelamps
.................................... 181, 243, 244,
246 -248, 250
Side repeater
..............................
..................247
Ski flap
..............................
..............................93
Snow chains
.................................................. 2
42
Spare wheel
...............................
..........235, 236
Speed limiter
......................................... 13 9, 14 0
Spotlamps, side
.................................... 187, 247
Starting the engine
........................113 , 11 6 , 118
Starting using another battery
...................... 2
61
Steering mounted controls, audio
................................................... 305, 375
Stop & Start
........................ 24, 38, 76, 110, 136,
137, 259, 275, 291
Storage
.......................................... 88, 90, 93 -95
Storage wells
............................................ 94, 95
Storing driving positions ........................................................ 82
Stowing rings
............................................ 94, 95
Switching off the engine
................ 11
5 , 117, 118
Synchronising the remote control
..................................................... 5
6, 66
Synthesiser, voice ............................................................ 343
System settings
............................................. 352
Paint colour code
..........................................
296
Panoramic glass sunroof
................................ 75
Park Assist
............................................. 170 -17 7
Parking brake, electric
............. 20, 121-127, 292
Parking brake manual
..................... 1
5, 120, 292
Parking sensors, front
................................... 167
Parking sensors, rear .................................... 166
Particle filter
.......................................... 290, 291
Passenger compartment filter
...................... 291
P
e
uge
Ot C
ONN
eCt A
PPS
....................... 35
5
Peuge
O
t Connect Assistance
................... 298
Peuge
O
t Connect SOS
............................. 29
8
Peuge
O
t Connect Sound (RD5)
................ 37
3
Player, CD MP3
..................................... 318, 379
Port,
u
S
B
......................... 8
8, 91, 318, 382, 384
Priming the fuel system
................................ 278
Protecting children
................ 206, 208, 212-228
Puncture
........................................................ 229
Radio
..................................................... 312, 37 7
RDS
....................................................... 315, 377
Rear foglamp .................183, 248, 249, 250, 251
Rear screen (demisting)
................................ 111
Recharging the battery
................................. 2
62
Reduction of electrical load
.......................... 263
Refilling AdBlue ..................................... 284-287
Regeneration of the particle filter
................. 2
91
Reinitialising the remote control
............... 5
6, 66
Remote control
.......................................... 5
0- 67
Removable screen (snow shield).......... 267, 268Safety for children
................. 206, 208, 212-228
Screen, instrument panel
.................. 12, 35, 130
Screen menu map
....... 306, 308, 310, 324, 326,
328, 344, 356, 358, 388 -390
Screen, multifunction (with audio equipment)
........... 4
7, 48, 376, 388
Screen, without audio equipment
................... 49
Screenwash
.................................................. 19 0
Screenwash fluid level
.......................... 191, 29 0
Screenwash reservoir
................................... 290
SCR (Selective Catalytic Reduction)
............ 279
P
RS
Removing a wheel ........................................ 23 8
Removing the mat ........................................... 89
Repair kit, puncture
....................................... 229
Replacing bulbs
.................................... 243-252
Replacing fuses
..............................
......253-258
Replacing the air filter
...................................291
Replacing the oil filter
................................... 2
91
Replacing the passenger compartment filter
...................................... 291
Replacing wiper blades .........................192, 26 4
Resetting the service indicator
.......................31
Resetting the trip recorder
..............................33
Reversing camera
......................................... 169
Reversing lamp
..................................... 2
48, 250
Risk areas (update)
....................................... 333
Roof bars
............................................... 2
70, 271
Roof blind
........................................................ 75
Routine checks
..................................... 291, 292
Running out of fuel (Diesel)
..........................2
78
Alphabetical index