2015 Peugeot 208 open bonnet
[x] Cancel search: open bonnetPage 12 of 341
10
208_en_Chap01_vue-ensemble_ed01-2015
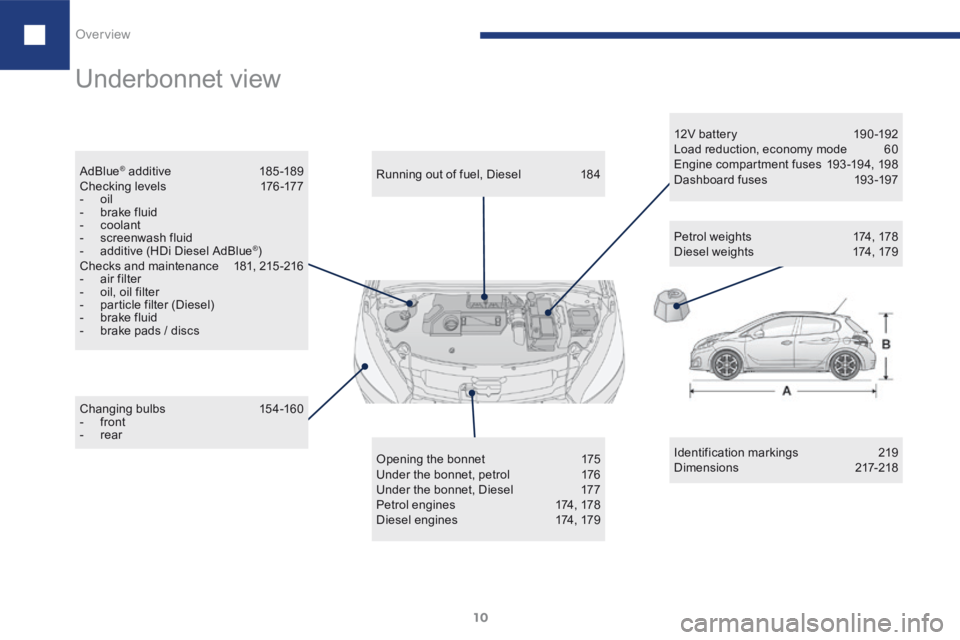
Underbonnet view
Identification markings 219
Dimensions 217-218
Changing bulbs
154-160
- front
- rear Running out of fuel, Diesel
184
Opening the bonnet 175
Under the bonnet, petrol 176
Under the bonnet, Diesel 177
Petrol engines 174, 178
Diesel engines 174, 17912V bat ter y
19 0 -192
Load reduction, economy mode 60
Engine compartment fuses 193-194, 198
Dashboard fuses 193-197
Petrol weights 174, 178
Diesel weights 174, 179
AdBlue
® additive
185 -189
C h e c k i n g l eve l s 176 -17 7
- oil
- brake fluid
- coolant
- screenwash fluid
- additive (HDi Diesel AdBlue
®)
Checks and maintenance 181, 215-216
- air filter
- oil, oil filter
- particle filter (Diesel)
- brake fluid
- brake pads / discs
Over view
Page 31 of 341
29
208_en_Chap02_ Acces-Demarrage_ed01-2015
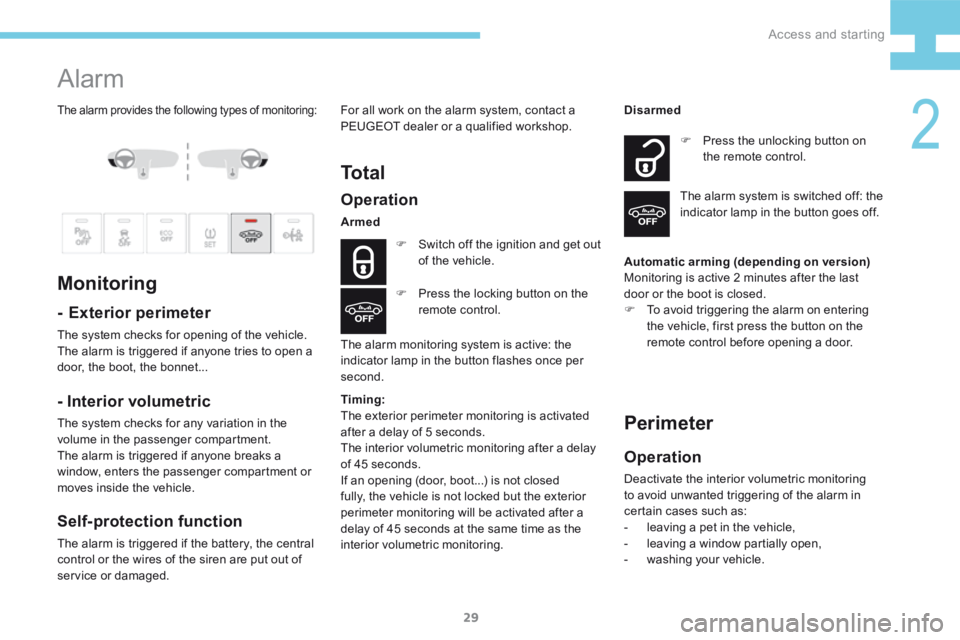
The alarm provides the following types of monitoring:
Alarm
Monitoring
- Exterior perimeter
The system checks for opening of the vehicle.
The alarm is triggered if anyone tries to open a
door, the boot, the bonnet...
Operation
Armed
F Switch off the ignition and get out
of the vehicle.
The alarm monitoring system is active: the
indicator lamp in the button flashes once per
second. F
Press the unlocking button on
the remote control.
Disarmed
The alarm system is switched off: the
indicator lamp in the button goes off.
F Press the locking button on the
remote control.
- Interior volumetric
The system checks for any variation in the
volume in the passenger compartment.
The alarm is triggered if anyone breaks a
window, enters the passenger compartment or
moves inside the vehicle.
Self-protection function
The alarm is triggered if the battery, the central
control or the wires of the siren are put out of
service or damaged. For all work on the alarm system, contact a
PEUGEOT dealer or a qualified workshop.
To t a l
Automatic arming (depending on version)
Monitoring is active 2 minutes after the last
door or the boot is closed.
F
To avoid triggering the alarm on entering
the vehicle, first press the button on the
remote control before opening a door.
Perimeter
Operation
Deactivate the interior volumetric monitoring
to avoid unwanted triggering of the alarm in
certain cases such as:
- leaving a pet in the vehicle,
- leaving a window partially open,
- washing your vehicle.
Timing:
The exterior perimeter monitoring is activated
after a delay of 5 seconds.
The interior volumetric monitoring after a delay
of 45 seconds.
If an opening (door, boot...) is not closed
fully, the vehicle is not locked but the exterior
perimeter monitoring will be activated after a
delay of 45 seconds at the same time as the
interior volumetric monitoring.
2
Access and starting
Page 59 of 341
57
208_en_Chap03_Indicateurs_ed01-2015
Oil level
PrincipleAdvice
Dipstick
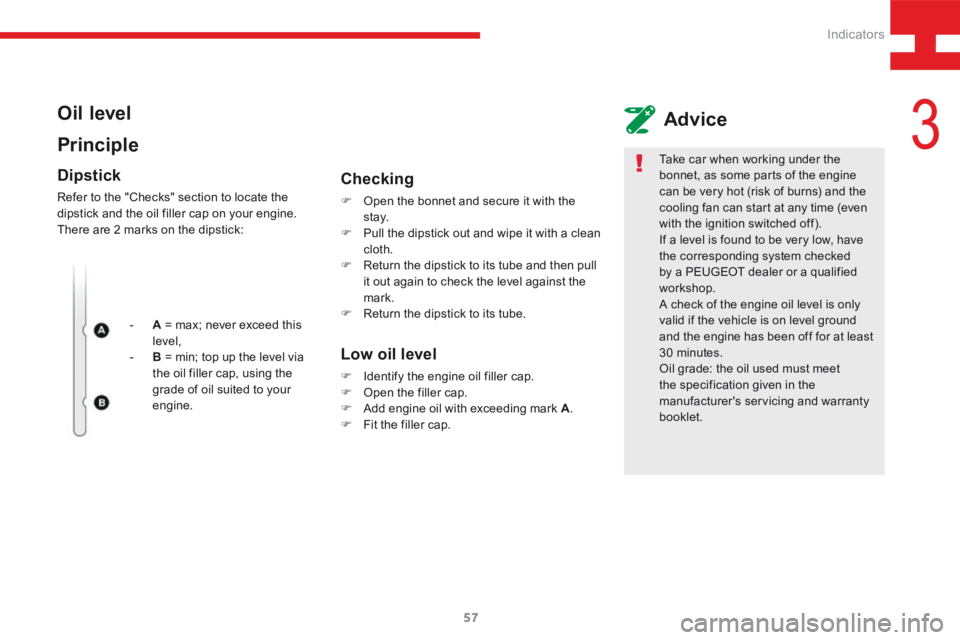
Refer to the "Checks" section to locate the
dipstick and the oil filler cap on your engine.
There are 2 marks on the dipstick:
- A = max; never exceed this
level,
- B = min; top up the level via
the oil filler cap, using the
grade of oil suited to your
engine.
Checking
F Open the bonnet and secure it with the
st ay.
F Pull the dipstick out and wipe it with a clean
cloth.
F Return the dipstick to its tube and then pull
it out again to check the level against the
mark.
F Return the dipstick to its tube.
Low oil level
F Identify the engine oil filler cap.
F Open the filler cap.
F Add engine oil with exceeding mark A .
F Fit the filler cap. Take car when working under the
bonnet, as some parts of the engine
can be very hot (risk of burns) and the
cooling fan can start at any time (even
with the ignition switched off).
If a level is found to be very low, have
the corresponding system checked
by a PEUGEOT dealer or a qualified
workshop.
A check of the engine oil level is only
valid if the vehicle is on level ground
and the engine has been off for at least
30 minutes.
Oil grade: the oil used must meet
the specification given in the
manufacturer's servicing and warranty
booklet.
3
Indicators
Page 88 of 341
86
208_en_Chap04_confort_ed01-2015
Maintenance
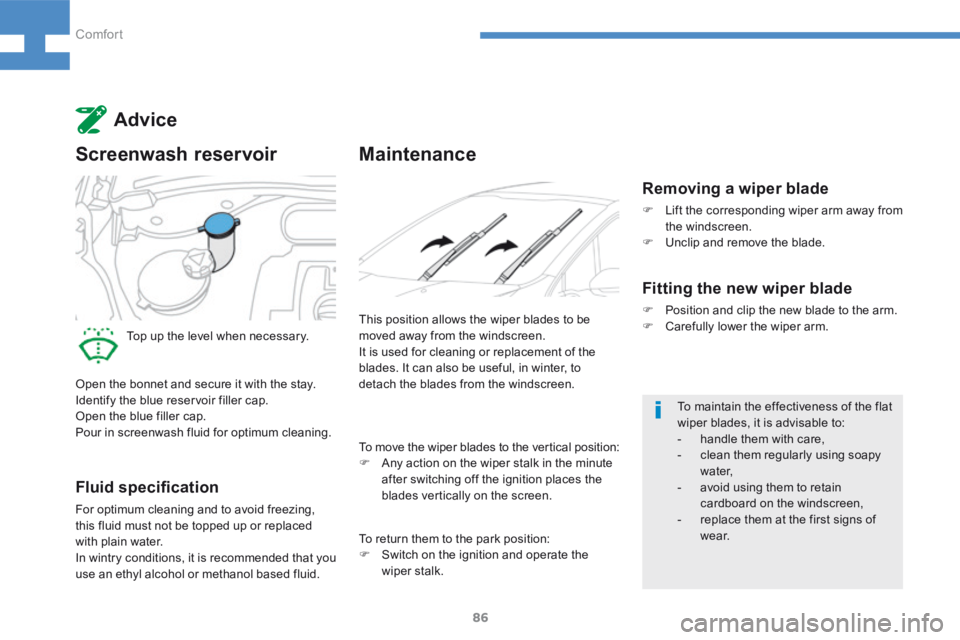
This position allows the wiper blades to be
moved away from the windscreen.
It is used for cleaning or replacement of the
blades. It can also be useful, in winter, to
detach the blades from the windscreen.To maintain the effectiveness of the flat
wiper blades, it is advisable to:
- handle them with care,
- clean them regularly using soapy
water,
- avoid using them to retain
cardboard on the windscreen,
- replace them at the first signs of
w e a r.
To move the wiper blades to the vertical position:
F
Any action on the wiper stalk in the minute
after switching off the ignition places the
blades vertically on the screen.
Advice
Screenwash reservoir
Top up the level when necessary.
Open the bonnet and secure it with the stay.
Identify the blue reservoir filler cap.
Open the blue filler cap.
Pour in screenwash fluid for optimum cleaning.
Fluid specification
For optimum cleaning and to avoid freezing,
this fluid must not be topped up or replaced
with plain water.
In wintry conditions, it is recommended that you
use an ethyl alcohol or methanol based fluid.
Removing a wiper blade
F Lift the corresponding wiper arm away from
the windscreen.
F Unclip and remove the blade.
Fitting the new wiper blade
F Position and clip the new blade to the arm.
F Carefully lower the wiper arm.
To return them to the park position:
F Switch on the ignition and operate the
wiper stalk.
Comfort
Page 177 of 341
175
208_en_Chap08_Informations-pratiques_ed01-2015
Bonnet
The location of the interior release lever
prevents opening of the bonnet when
the left hand front door is closed.
Before doing anything under the
bonnet, switch off the Stop & Start
system to avoid any risk of injury
resulting from an automatic change to
S TA R T m o d e .
Closing
F
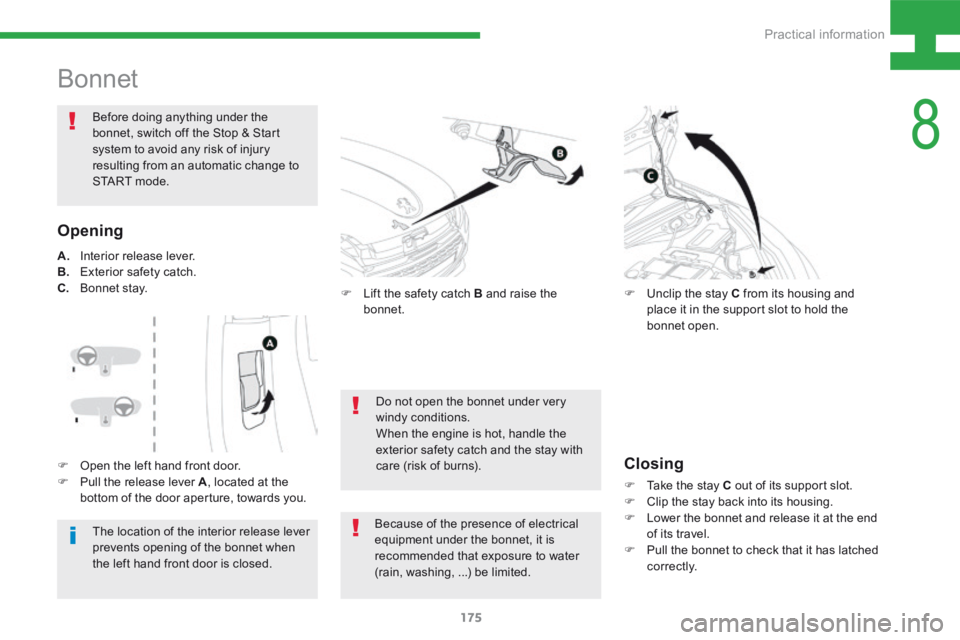
Take the stay C out of its support slot.
F Clip the stay back into its housing.
F Lower the bonnet and release it at the end
of its travel.
F Pull the bonnet to check that it has latched
c o r r e c t l y.
F
Unclip the stay C from its housing and
place it in the support slot to hold the
bonnet open.
Do not open the bonnet under very
windy conditions.
When the engine is hot, handle the
exterior safety catch and the stay with
care (risk of burns).
Opening
F Lift the safety catch B and raise the
bonnet.
A.
Interior release lever.
B. Exterior safety catch.
C. B o n n et st ay.
Because of the presence of electrical
equipment under the bonnet, it is
recommended that exposure to water
(rain, washing, ...) be limited.
F
Open the left hand front door.
F Pull the release lever A , located at the
bottom of the door aperture, towards you.
8
Practical information
Page 186 of 341
184
208_en_Chap08_Informations-pratiques_ed01-2015
On vehicle fitted with HDi engines, the fuel
system must be primed if you run out of fuel.
For versions with a manual priming pump,
refer to the drawing of the corresponding
underbonnet view.
If the tank on your vehicle is fitted with
a misfuel prevention device, refer to the
corresponding section.
Running out of fuel (Diesel)
If the engine does not start first time,
don't keep trying. Start the procedure
again from the beginning.
1.4 HDi engine
F Add at least five litres of Diesel fuel to the
tank.
F Open the bonnet.
F Press and release the priming pump until
resistance is felt (there may be resistance
on the first press).
F Operate the starter motor to start the
engine.
F Close the bonnet.
1.6 HDi engine
(except BlueHDi version)
F Add at least five litres of Diesel fuel to the
tank.
F Open the bonnet.
F If necessary, unclip the styling cover for
access to the priming pump.
F Squeeze and release the priming pump
repeatedly until resistance is felt (there
may be resistance at the first press).
F Operate the starter to start the engine
(if the engine does not start at the first
attempt, wait around 15 seconds before
trying again).
F If the engine does not start after a few
attempts, operate the priming pump again
then start the engine.
F Refit the styling cover and clip it in place.
F Close the bonnet.
1.6 HDi engine
(BlueHDi version)
F Add at least five litres of Diesel fuel to the
tank.
F Switch the ignition on (without starting the
engine).
F Wait around 6 seconds and switch off the
ignition.
F Repeat the operation 10 times.
F Operate the starter motor to start the
engine.
Practical information
Page 192 of 341
190
208_en_Chap08_Informations-pratiques_ed01-2015
Battery
The presence of this label indicates
the use of a 12 V lead-acid battery with
special technology and specification, for
which the involvement of a PEUGEOT
dealer or qualified workshop is required
when replacing or disconnecting the
battery.
Failure to observe this recommendation
may cause premature wear of the
battery.
After refitting the battery, the Stop &
Start system will only be active after
several hours depending on the climatic
conditions and the state of charge of
the battery (up to about 8 hours).F
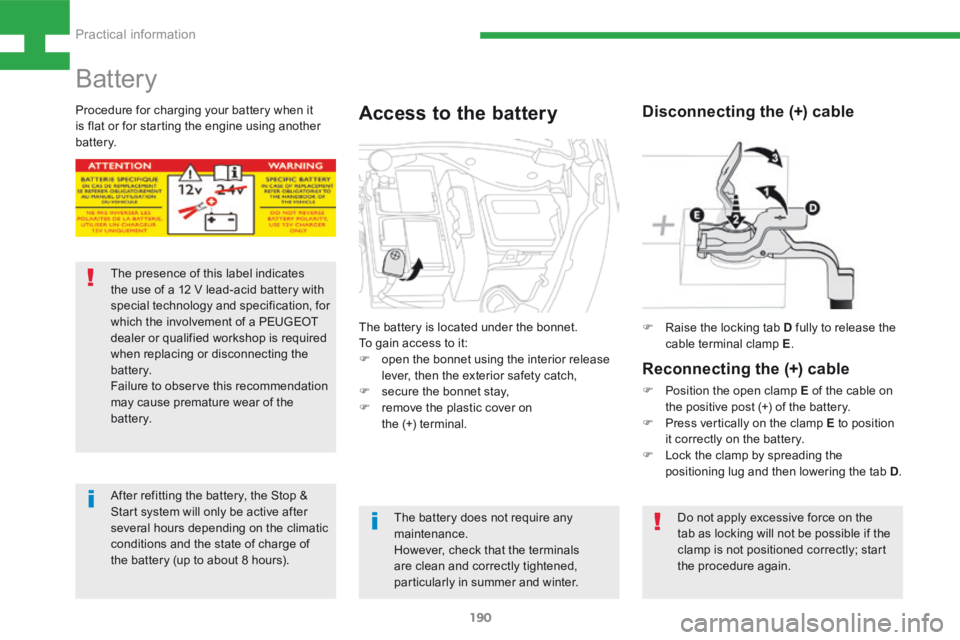
Raise the locking tab D fully to release the
cable terminal clamp E .
Disconnecting the (+) cable
Reconnecting the (+) cable
F Position the open clamp E of the cable on
the positive post (+) of the battery.
F Press vertically on the clamp E to position
it correctly on the battery.
F Lock the clamp by spreading the
positioning lug and then lowering the tab D .
Do not apply excessive force on the
tab as locking will not be possible if the
clamp is not positioned correctly; start
the procedure again.
Procedure for charging your battery when it
is flat or for starting the engine using another
battery.
The battery is located under the bonnet.
To gain access to it:
F open the bonnet using the interior release
lever, then the exterior safety catch,
F secure the bonnet stay,
F remove the plastic cover on
the (+) terminal.
Access to the battery
The battery does not require any
maintenance.
However, check that the terminals
are clean and correctly tightened,
particularly in summer and winter.
Practical information
Page 323 of 341
321
208_en_Chap10_index-alpha_ed01-2015
Maintenance, routine .................................... 142
Map reading lamps ......................................... 25
Markings, identification .................................219
Mat ................................................................ 162
Menu ........................... 228, 230, 234, 242, 244,
246, 256, 258, 260, 270, 272
Menus (audio) ............................... 242, 244, 246
Menus (Touch screen) ......................... 223, 227
Mirror, rear view ............................................ 111
Mirrors, door .................................................. 11 0
Misfuel prevention ......................................... 182
Mountings, Isofix ............................................. 96
MP3 CD ......................................... 252, 293, 314
Navigation ..................................................... 228
Number plate lamps ...................................... 160
M
N
Kit, temporary puncture
repair ........................................................... 203
Labels, identification ..................................... 219
Lamps, parking ............................................. 151
LEDs - light-emitting diodes ......................................................... 159
Level, AdBlue
®
additive ....................................................... 185
Level, brake fluid ............................... 41, 43, 215
Level, Diesel additive .................................... 181
Level, engine coolant ...................................... 51
Level, engine oil ...................................... 5 7, 2 1 5
Levels and checks ....................... 51, 56, 73, 86,
176, 177, 189, 215, 216
Level, screenwash fluid .................................. 86
Light-emitting diodes - LEDs ........................................................... 159
Lighting dimmer .............................................. 52
Lighting, directional ....................................... 153
Lighting, guide-me home ................12, 149, 151
Lighting, interior ........................................ 25, 27
Lighting, mood ................................................ 27
Loading ................................................. 142, 16 4
Load reduction mode ............................................................. 60
Locating your vehicle ........................................................... 12
Locking the boot .............................................. 28
Low fuel level .......................................... 46, 180
L
Identification, vehicle .................................... 219
Ignition ............................................................. 15
Immobiliser, electronic ..............................13, 3 3
Indicator, coolant temperature .................. 3 4, 51
Indicator, engine oil level ........................ 5 7, 2 1 5
Indicator lamps, operation ........................37- 4 8
Indicators, direction ......................14 4, 155, 159
Inflating tyres ........................................ 142, 219
Inflating tyres and accessories (using the kit) .............................................. 206
Input, auxiliary ............................... 252, 293, 312
Instrument panels ........................................... 34
Instruments and controls ................................61
Internet ................................................. 264, 265
Isofix mountings .............................................. 96
I
Jack .............................................. 208, 209, 252
Jukebox ......................................................... 255
Jump starting ................................................ 191
J
Key with remote control .......... 11, 13, 15, 16, 33
Kit, hands-free ...................................... 2 74 , 2 9 6
K
Opening the bonnet ...................................... 175
Opening the boot ...................................... 28, 31
Opening the doors .................................... 11, 2 8
Opening the fuel filler flap ............................. 180
Opening the panoramic roof blind ....................................................... 26
O
.
Alphabetical index