Page 5 of 341
3
208_en_Chap00a_sommaire_ed01-2015
Fittings 161
Fitting roof bars 164
Towing a trailer 165
To w i n g 16 7
Accessories 169
Fittings
General information 174
B o n n et 175
We i g ht s 179
Fuel tank 180
BlueHDi and AdBlue
® additive 185
Battery 190
Fuses 193
Triangle 199
Under-inflation 200
Temporary puncture repair kit 203
Spare wheel 208
Advice 215
Dimensions 217
Identification markings 219
Practical information
Emergency call 220
Assistance call 221
7-inch touch screen 223
Audio system / Bluetooth 287
Audio system 307
Audio equipment and telematics
Alphabetical index
Direction indicators 144
Hazard warning lamps 144
Lighting 145
Automatic illumination of headlamps 149
LED lamps 150
Daytime running lamps 150
Headlamp adjustment 152
Cornering lighting 153
Changing a bulb 154
Lighting and signalling Key
Warning
This symbol marks warnings which it is
essential to observe for your own safety,
for the safety of others or to avoid any risk
of damaging your vehicle.
InformationThis symbol draws your attention to
additional information for better use of
your vehicle.
Protection of the environmentThis symbol accompanies advice relating
to protection of the environment.
AdviceThis symbol indicates a reminder of
practical information.
Section identificationColoured blocks separate and identify each
section.
Start
Heading
End
Contents
Page 6 of 341
4
208_en_Chap01_vue-ensemble_ed01-2015
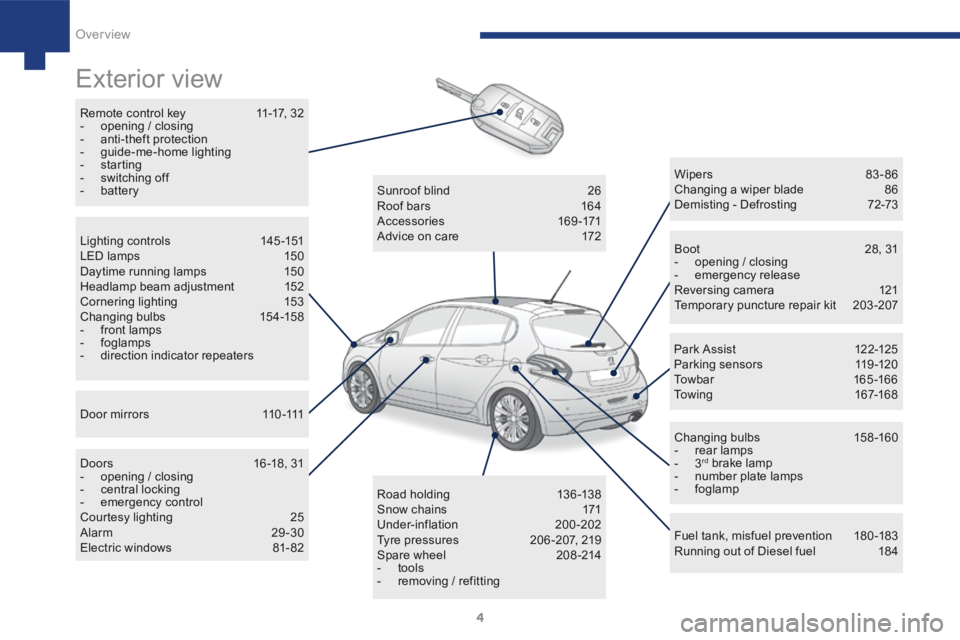
Exterior view
Remote control key 11-17, 32
- opening / closing
- anti-theft protection
- guide-me-home lighting
- starting
- switching off
- battery
Boot 28, 31
- opening / closing
- emergency release
Reversing camera 121
Temporary puncture repair kit 203-207
Wipers 83 - 86
Changing a wiper blade
86
Demisting - Defrosting 72-73
Changing bulbs 158-160
- rear lamps
- 3
rd brake lamp
- number plate lamps
- foglamp
Fuel tank, misfuel prevention 180-183
Running out of Diesel fuel 184
Sunroof blind
26
Roof bars 164
Accessories 169-171
Advice on care 172
Road holding 13 6 -13 8
Snow chains 171
Under-inflation 200-202
Tyre pressures 206 -207, 219
Spare wheel 208-214
- tools
- removing / refitting
Lighting controls
145-151
LED lamps 150
Daytime running lamps 150
Headlamp beam adjustment 152
Cornering lighting 153
Changing bulbs 154-158
- front lamps
- foglamps
- direction indicator repeaters
D o o r m i r r o r s 11 0 -111
Doors 16 -18, 31
- opening / closing
- central locking
- emergency control
Courtesy lighting 25
Alarm 29-30
Electric windows 81- 82 Par k A ssist
12 2-125
Parking sensors 119-120
Towbar 165 -166
Towing 167-168
Over view
Page 12 of 341
10
208_en_Chap01_vue-ensemble_ed01-2015
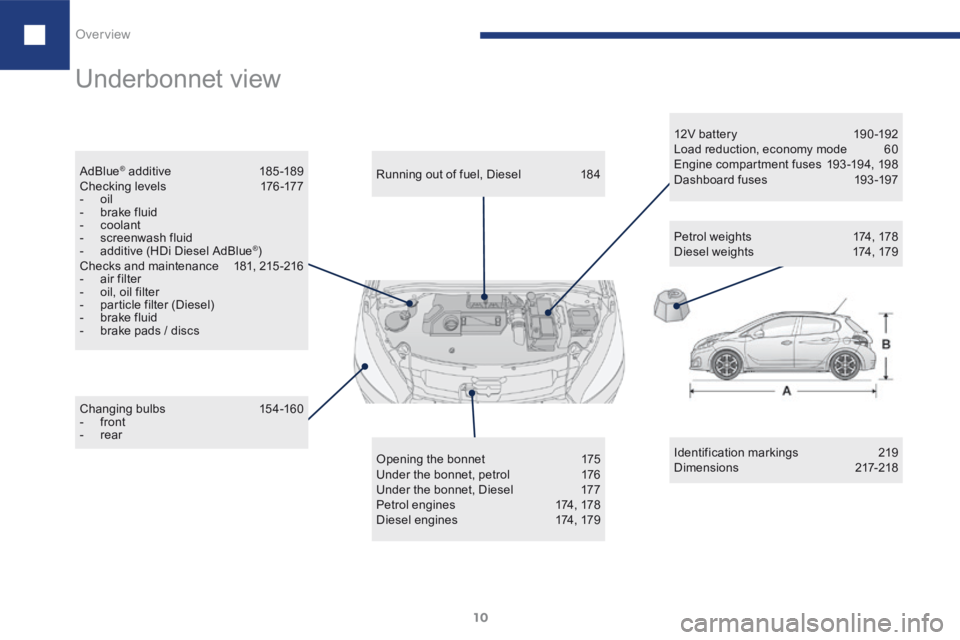
Underbonnet view
Identification markings 219
Dimensions 217-218
Changing bulbs
154-160
- front
- rear Running out of fuel, Diesel
184
Opening the bonnet 175
Under the bonnet, petrol 176
Under the bonnet, Diesel 177
Petrol engines 174, 178
Diesel engines 174, 17912V bat ter y
19 0 -192
Load reduction, economy mode 60
Engine compartment fuses 193-194, 198
Dashboard fuses 193-197
Petrol weights 174, 178
Diesel weights 174, 179
AdBlue
® additive
185 -189
C h e c k i n g l eve l s 176 -17 7
- oil
- brake fluid
- coolant
- screenwash fluid
- additive (HDi Diesel AdBlue
®)
Checks and maintenance 181, 215-216
- air filter
- oil, oil filter
- particle filter (Diesel)
- brake fluid
- brake pads / discs
Over view
Page 152 of 341
150
208_en_Chap06_Feux-Signalisations_ed01-2015
Daytime running lamps
Daytime lighting, compulsory in certain
countries, which comes on automatically when
the engine is started making the vehicle more
visible to other users.
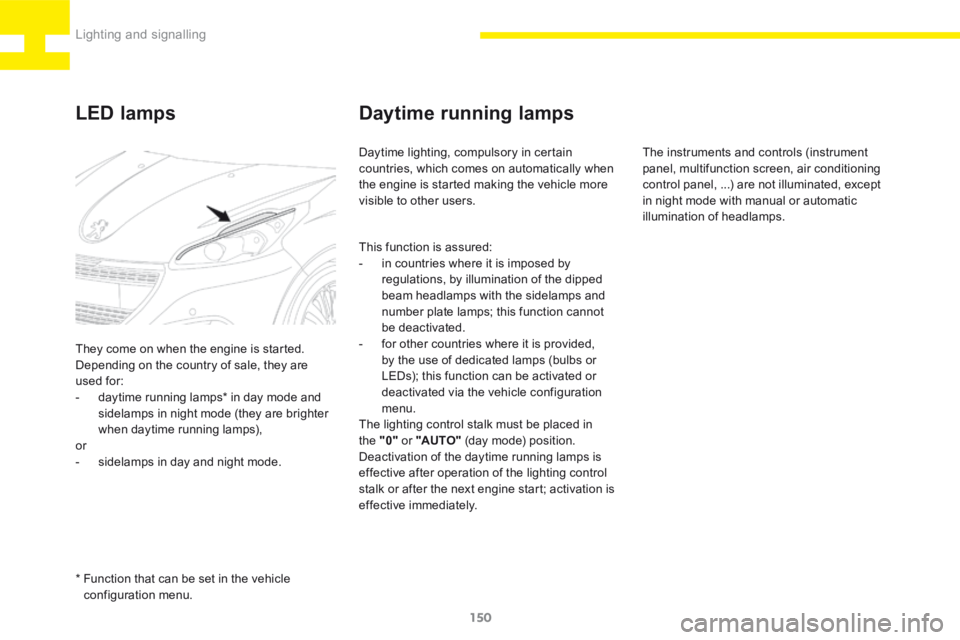
LED lamps
They come on when the engine is started.
Depending on the country of sale, they are
used for:
- daytime running lamps* in day mode and
sidelamps in night mode (they are brighter
when daytime running lamps),
or
- sidelamps in day and night mode.
* Function that can be set in the vehicle
configuration menu. This function is assured:
-
in countries where it is imposed by
regulations, by illumination of the dipped
beam headlamps with the sidelamps and
number plate lamps; this function cannot
be deactivated.
- for other countries where it is provided,
by the use of dedicated lamps (bulbs or
LEDs); this function can be activated or
deactivated via the vehicle configuration
menu.
The lighting control stalk must be placed in
the "0" or "AUTO" (day mode) position.
Deactivation of the daytime running lamps is
effective after operation of the lighting control
stalk or after the next engine start; activation is
effective immediately. The instruments and controls (instrument
panel, multifunction screen, air conditioning
control panel, ...) are not illuminated, except
in night mode with manual or automatic
illumination of headlamps.
Lighting and signalling
Page 156 of 341
154
208_en_Chap06_Feux-Signalisations_ed01-2015
Changing a bulb
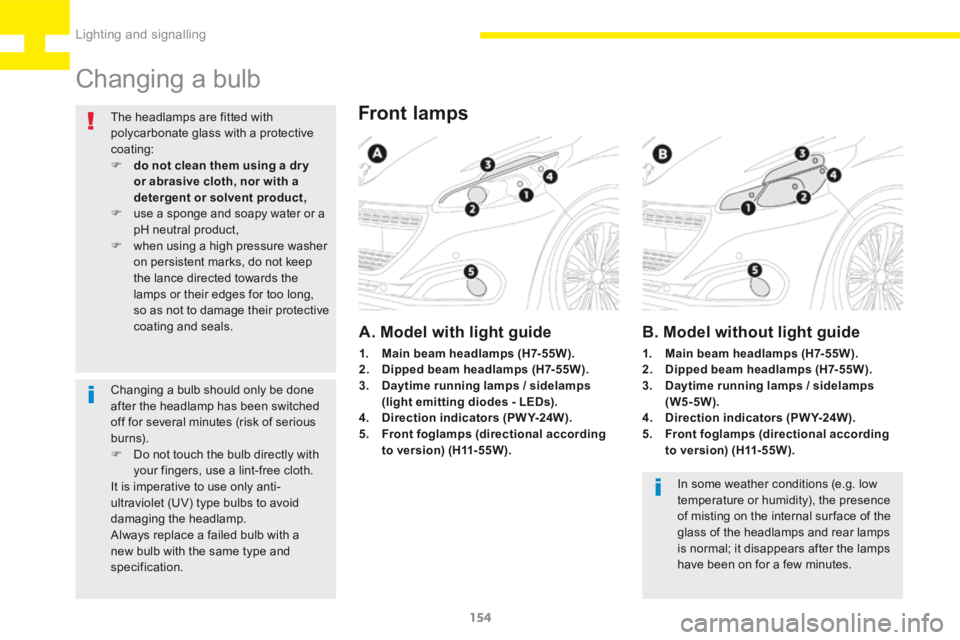
Front lamps
A. Model with light guide
In some weather conditions (e.g. low
temperature or humidity), the presence
of misting on the internal sur face of the
glass of the headlamps and rear lamps
is normal; it disappears after the lamps
have been on for a few minutes.
The headlamps are fitted with
polycarbonate glass with a protective
coating:
F
do not clean them using a dr y
or abrasive cloth, nor with a
detergent or solvent product,
F use a sponge and soapy water or a
pH neutral product,
F when using a high pressure washer
on persistent marks, do not keep
the lance directed towards the
lamps or their edges for too long,
so as not to damage their protective
coating and seals.
B. Model without light guide
1. Main beam headlamps (H7-55W).
2. Dipped beam headlamps (H7-55W).
3. Daytime running lamps / sidelamps
(light emitting diodes - LEDs).
4. Direction indicators (PWY-24W).
5. Front foglamps (directional according
to version) (H11-55W). 1.
Main beam headlamps (H7-55W).
2. Dipped beam headlamps (H7-55W).
3. Daytime running lamps / sidelamps
(W5-5W).
4. Direction indicators (PWY-24W).
5. Front foglamps (directional according
to version) (H11-55W).
Changing a bulb should only be done
after the headlamp has been switched
off for several minutes (risk of serious
burns).
F
Do not touch the bulb directly with
your fingers, use a lint-free cloth.
It is imperative to use only anti-
ultraviolet (UV) type bulbs to avoid
damaging the headlamp.
Always replace a failed bulb with a
new bulb with the same type and
specification.
Lighting and signalling
Page 157 of 341
155
208_en_Chap06_Feux-Signalisations_ed01-2015
Amber coloured bulbs, such as the
direction indicators, must be replaced
with bulbs of identical specifications
and colour.
When refitting, close the protective
cover carefully to preserve the sealing
of the headlamp.
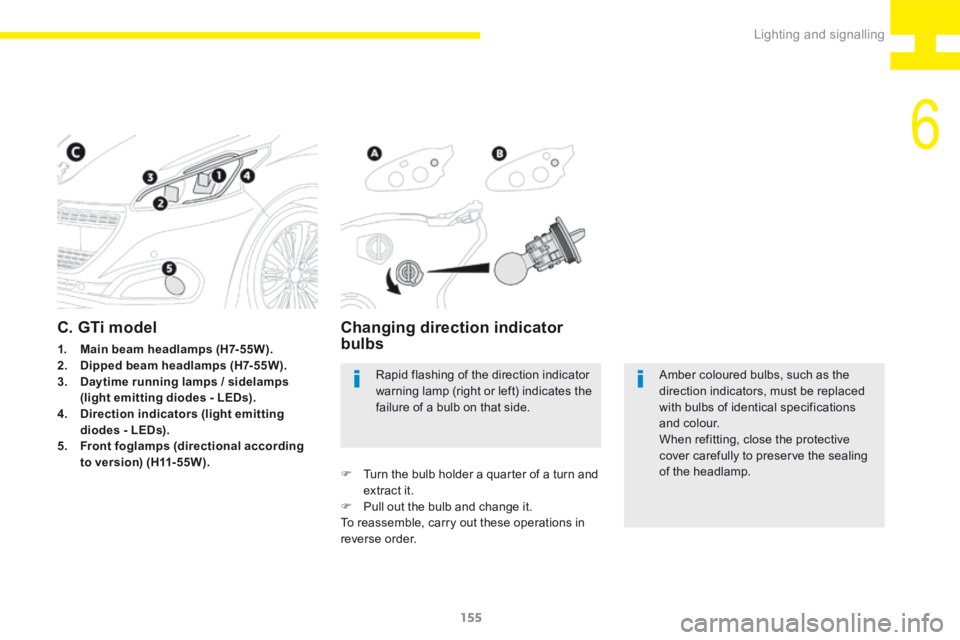
Rapid flashing of the direction indicator
warning lamp (right or left) indicates the
failure of a bulb on that side.
Changing direction indicator
bulbs
F
Turn the bulb holder a quarter of a turn and
extract it.
F Pull out the bulb and change it.
To reassemble, carry out these operations in
reverse order.
C. GTi model
1. Main beam headlamps (H7-55W).
2. Dipped beam headlamps (H7-55W).
3. Daytime running lamps / sidelamps
(light emitting diodes - LEDs).
4. Direction indicators (light emitting
diodes - LEDs).
5. Front foglamps (directional according
to version) (H11-55W).
6
Lighting and signalling
Page 158 of 341
156
208_en_Chap06_Feux-Signalisations_ed01-2015
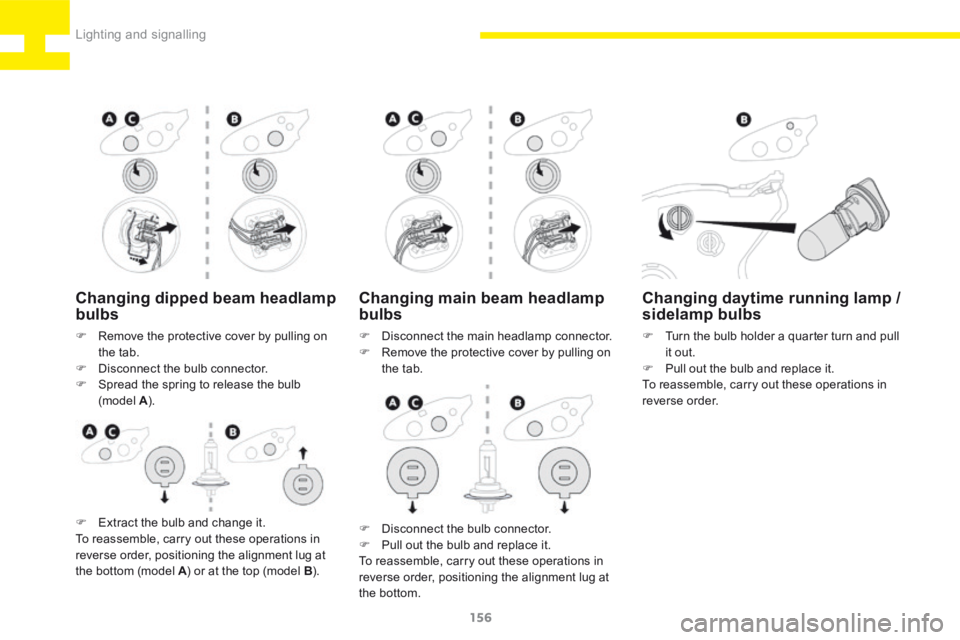
Changing main beam headlamp
bulbs
F Disconnect the main headlamp connector.
F Remove the protective cover by pulling on
the tab.
Changing daytime running lamp /
sidelamp bulbs
F Turn the bulb holder a quarter turn and pull
it out.
F Pull out the bulb and replace it.
To reassemble, carry out these operations in
reverse order.
F Disconnect the bulb connector.
F Pull out the bulb and replace it.
To reassemble, carry out these operations in
reverse order, positioning the alignment lug at
the bottom.
Changing dipped beam headlamp
bulbs
F Remove the protective cover by pulling on
the tab.
F Disconnect the bulb connector.
F Spread the spring to release the bulb
(model A ).
F Extract the bulb and change it.
To reassemble, carry out these operations in
reverse order, positioning the alignment lug at
the bottom (model A ) or at the top (model B ).
Lighting and signalling
Page 159 of 341
157
208_en_Chap06_Feux-Signalisations_ed01-2015
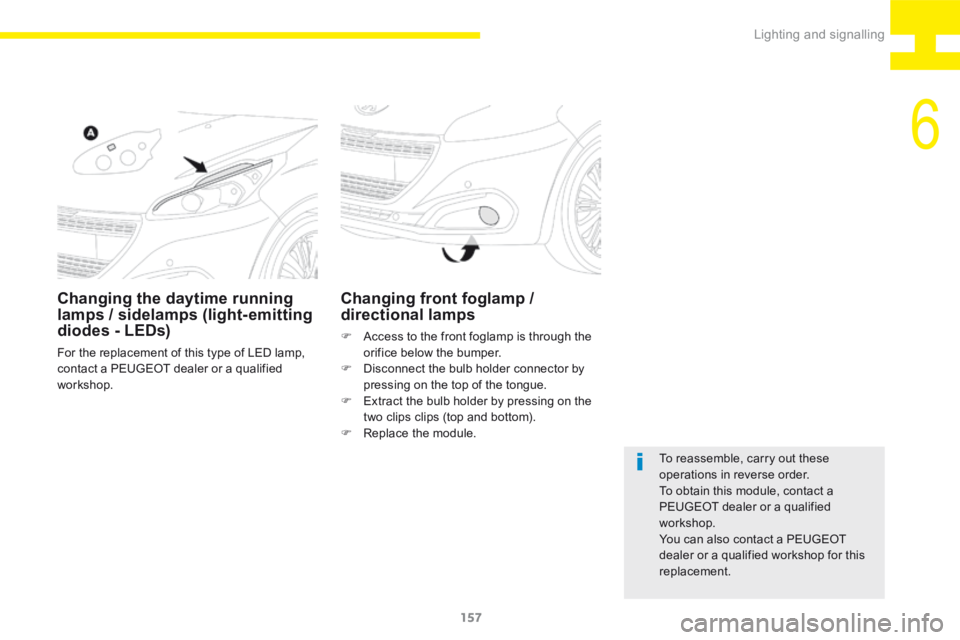
Changing the daytime running
lamps / sidelamps (light- emitting
diodes - LEDs)
For the replacement of this type of LED lamp,
contact a PEUGEOT dealer or a qualified
workshop.
Changing front foglamp /
directional lamps
F Access to the front foglamp is through the
orifice below the bumper.
F Disconnect the bulb holder connector by
pressing on the top of the tongue.
F Extract the bulb holder by pressing on the
two clips clips (top and bottom).
F Replace the module.
To reassemble, carry out these
operations in reverse order.
To obtain this module, contact a
PEUGEOT dealer or a qualified
workshop.
You can also contact a PEUGEOT
dealer or a qualified workshop for this
replacement.
6
Lighting and signalling