2015 PEUGEOT 2008 key
[x] Cancel search: keyPage 144 of 340
142
2008_en_Chap07_securite_ed01-2015
Deactivation
This warning lamp comes on in the
instrument panel when the ignition is
on and until the airbag is reactivated.To assure the safety of your child,
the passenger's front airbag must
be deactivated when you install a
"rear facing" child seat on the front
passenger seat.
Otherwise, the child would risk being
seriously injured or killed if the airbag
were deployed.
In the event of a fault, identified by the
illumination of at least one of the two
airbag warning lamps, do not install a
passenger (adult or child) at the front.
Have it checked by a PEUGEOT dealer
or qualified workshop.
Reactivation
When you remove the child seat, with the
ignition on, turn the switch to the "ON"
position to reactivate the airbag and so assure
the safety of your front passenger in the event
of an impact.
Operating fault
If this warning lamp comes on in the
instrument panel, accompanied by
an audible warning and a message
in the screen, contact a PEUGEOT
dealer or a qualified workshop to have the
system checked. The airbags may no longer be
deployed in the event of a serious impact.
If this warning lamp flashes, contact
a PEUGEOT dealer or a qualified
workshop. The passenger's front
airbag may no longer be deployed in
the event of a serious impact.
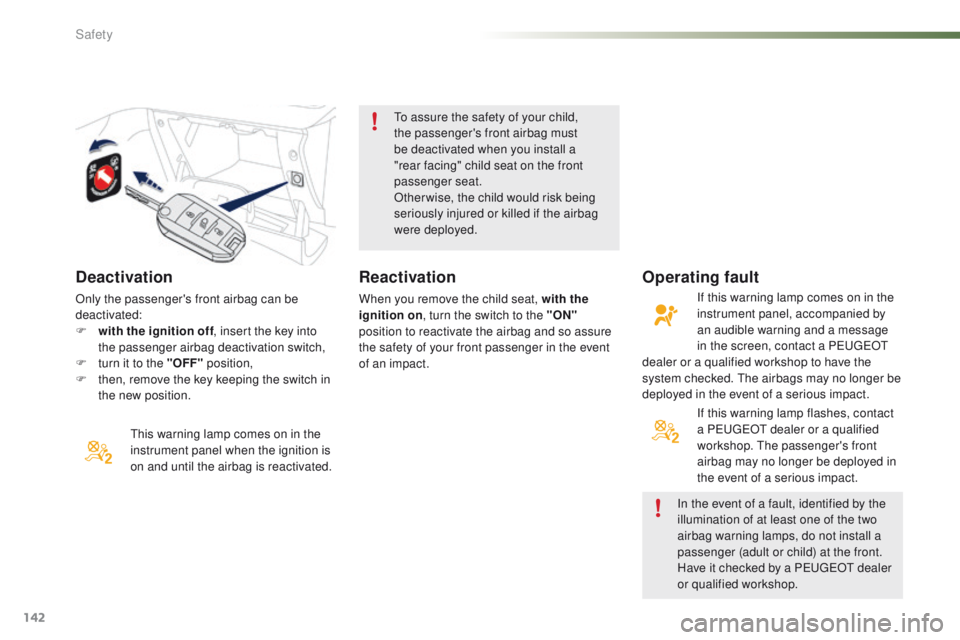
Only the passenger's front airbag can be
deactivated:
F
w
ith the ignition off , insert the key into
the passenger airbag deactivation switch,
F
t
urn it to the "OFF" position,
F
t
hen, remove the key keeping the switch in
the new position.
Safety
Page 155 of 340
153
2008_en_Chap08_securite-enfants_ed01-2015
The incorrect installation of a child seat in a
vehicle compromises the child's protection in
the event of an accident.
Ensure that there is no seat belt or seat belt
buckle under the child seat, as this could
destabilise it.
Remember to fasten the seat belts or the
child seat harnesses keeping the slack
relative to the child's body to a minimum,
even for short journeys.
When installing a child seat using the seat
belt, ensure that the seat belt is tightened
correctly on the child seat and that it secures
the child seat firmly on the seat of your
vehicle. If your passenger seat is adjustable,
move it for wards if necessary.
At rear seating positions, always leave
sufficient space between the front seat and:
-
a "
rear ward facing" child seat,
-
t
he child's feet for a child seat fitted
"forward facing".
To do this, move the front seat for wards
and, if necessary, move its backrest into the
upright position.
Advice on child seats
Installing a booster
seatFor optimum installation of the "forward-
facing" child seat, ensure that the back of
the child seat is as close as possible to the
backrest of the vehicle's seat, in contact if
possible.
You mst remove the head restraint before
installing a child seat with backrest to a
passenger seat.
Ensure that the head restraint is stored or
attached securely to prevent it from being
thrown around the vehicle in the event of
sharp braking. Refit the head restraint when
the child seat is removed.
Children at the front
The legislation on carrying children on the
front passenger seat is specific to each
country. Refer to the legislation in force in
your country.
Deactivate the passenger airbag when a
"rear ward-facing" child seat is installed on
the front seat.
Otherwise, the child would risk being
seriously injured or killed if the airbag were
to inflate. The chest part of the seat belt must be
positioned on the child's shoulder without
touching the neck.
Ensure that the lap part of the seat belt
passes correctly over the child's thighs.
PEUGEOT recommends the use of a booster
seat which has a back, fitted with a seat belt
guide at shoulder level.
As a safety precaution, do not leave:
-
a c
hild or children alone and
unsupervised in a vehicle,
-
a c
hild or an animal in a vehicle which
is exposed to the sun, with the windows
closed,
- t he keys within reach of children inside
the vehicle.
To prevent accidental opening of the doors
and rear windows, use the "Child lock".
Take care not to open the rear windows by
more than one third.
To protect young children from the rays of
the sun, fit side blinds on the rear windows.
8
Child safety
Page 160 of 340
158
2008_en_Chap08_securite-enfants_ed01-2015
Electric child lock
Remote control system to prevent opening of the rear doors using their interior controls.
Switching on
F With the ignition on, press this button.
The indicator lamp in the button comes on,
accompanied by a message to confirm that the
child lock is on.
This indicator lamp remains on until the child
lock is switched off.
It is still possible to open the doors from the
outside and operate the rear electric windows
from the driver's control panel.
Switching off
F With the ignition on, press this button again.
The indicator lamp in the button goes off,
accompanied by a message to confirm that the
child lock is off.
This indicator lamp remains off while the child
lock is switched off.
Any other status of the indicator lamp
indicates a fault with the electric
child
lock.
Have it checked by a PEUGEOT dealer
or a qualified workshop.
This system is independent and in no
circumstances does it take the place of
the central locking control.
Check the status of the child lock each
time you switch on the ignition.
Always remove the key from the ignition
when leaving the vehicle, even for a
short time.
Manual child
lock
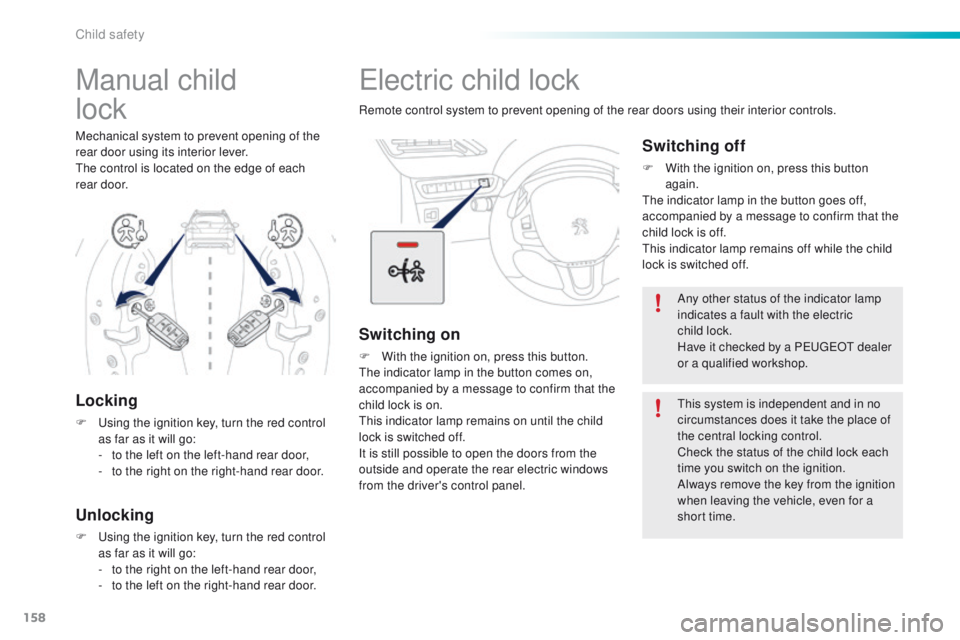
Locking
F Using the ignition key, turn the red control as far as it will go:
-
t
o the left on the left-hand rear door,
-
t
o the right on the right-hand rear door.
Unlocking
F Using the ignition key, turn the red control as far as it will go:
-
t
o the right on the left-hand rear door,
-
t
o the left on the right-hand rear door.
Mechanical system to prevent opening of the
rear door using its interior lever.
The control is located on the edge of each
rear
door.
Child safety
Page 161 of 340
159
2008_en_Chap09_info-pratiques_ed01-2015
Low fuel level
When the fuel tank minimum level is
reached this warning lamp comes on
in the instrument panel. There remains
approximately 5 litres of fuel in the tank.
When the warning lamp flashes there is
ver y little fuel remaining in the tank.
The key cannot be removed from the
lock until the cap is refitted.
Removing the filler cap may cause an
inrush of air. This vacuum is per fectly
normal and results from the sealing of
the system.
Fuel tank
Fuel tank capacity: approximately 50 litres.
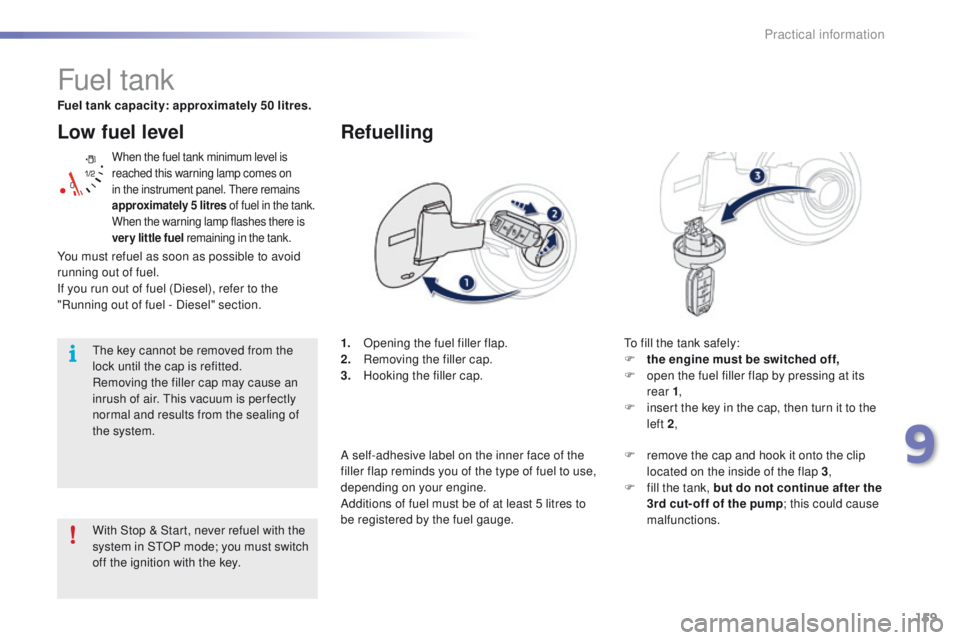
1.
O
pening the fuel filler flap.
2.
R
emoving the filler cap.
3.
H
ooking the filler cap.
Refuelling
To fill the tank safely:
F t he engine must be switched off,
F
o
pen the fuel filler flap by pressing at its
rear 1 ,
F
i
nsert the key in the cap, then turn it to the
left 2 ,
With Stop & Start, never refuel with the
system in STOP mode; you must switch
off the ignition with the key. F
r
emove the cap and hook it onto the clip
located on the inside of the flap 3 ,
F
f
ill the tank, but do not continue after the
3rd cut- off of the pump ; this could cause
malfunctions.
You must refuel as soon as possible to avoid
running out of fuel.
If you run out of fuel (Diesel), refer to the
"Running out of fuel - Diesel" section.
A self-adhesive label on the inner face of the
filler flap reminds you of the type of fuel to use,
depending on your engine.
Additions of fuel must be of at least 5 litres to
be registered by the fuel gauge.
9
Practical information
Page 162 of 340
160
2008_en_Chap09_info-pratiques_ed01-2015
If you have put in the wrong fuel for
the engine of your vehicle, you must
have the fuel tank drained and filled
with the correct fuel before star ting
the engine.
Fuel supply
cut- off
Your vehicle is fitted with a safety system that
cuts off the supply of fuel in the event of an
impact.
When you have filled the tank:
F
p
ut the cap back in place,
F
t
urn the key to the right, then remove it
from the cap,
F
c
lose the flap.
Practical information
Page 172 of 340
170
2008_en_Chap09_info-pratiques_ed01-2015
Never store bottles of AdBlue® in your
vehicle.
Recommendations on storage
AdBlue® freezes at about -11°C and
deteriorates above 25°C. It is recommended
that bottles be stored in a cool area and
protected from direct sunlight.
Under these conditions, the additive can be
kept for at least a year.
If the additive has frozen, it can be used once it
has completely thawed out.
Procedure
Before topping-up, ensure that the vehicle is
parked on a flat and level sur face.
In wintry conditions, ensure that the
temperature of the vehicle is above -11°C.
Otherwise, by freezing, the AdBlue
® cannot
be poured into its tank. Park your vehicle in a
warmer area for a few hours to allow the top-up
to be carried out.
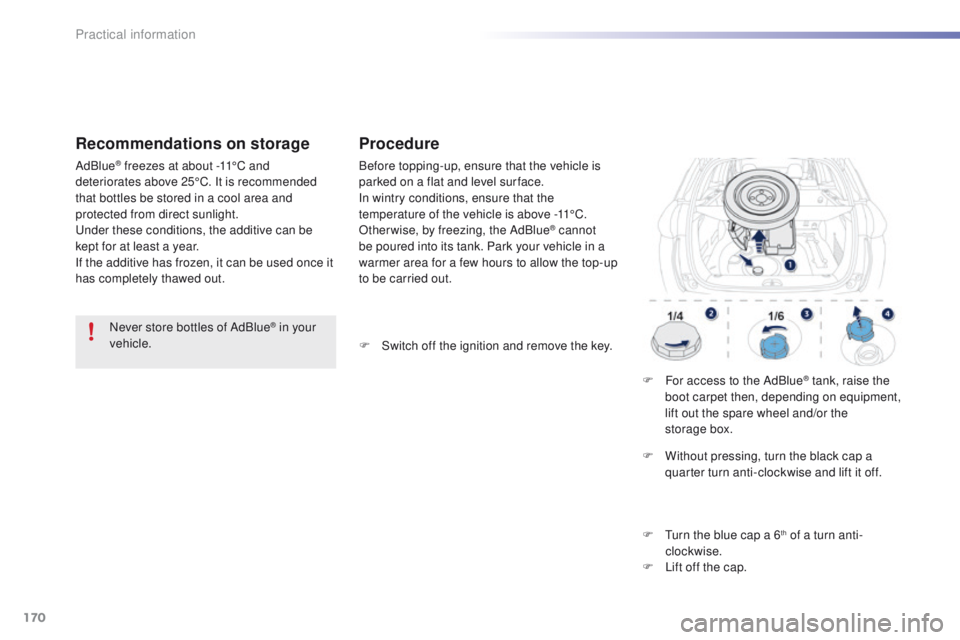
F
F
or access to the AdBlue
® tank, raise the
boot carpet then, depending on equipment,
lift out the spare wheel and/or the
storage
box.
F
S
witch off the ignition and remove the key.
F
W
ithout pressing, turn the black cap a
quarter turn anti-clockwise and lift it off.
F
T
urn the blue cap a 6
th of a turn anti-
clockwise.
F
L
ift off the cap.
Practical information
Page 173 of 340
171
2008_en_Chap09_info-pratiques_ed01-2015
Important: if your vehicle's AdBlue®
tank is completely empty - which is
confirmed by the alert messages and
the impossibility of starting the engine,
you must add at least 3.8 litres
(so two 1.89 litre bottles). If any additive is split or splashed, wash
immediately with cold water or wipe with
a damp cloth.
If the additive has crystallised, clean it
off using a sponge and hot water.
Important:
in the event of a top-up
after a breakdown because of a lack
of additive , signalled by the message
"Top up emissions additive: Starting
prevented", you must wait around
5 minutes before switching on the ignition,
without opening the driver's door,
locking the vehicle or introducing the
key into the ignition switch .
Switch on the ignition, then, after
10
seconds, start the engine.
Never dispose of AdBlue® additive
bottles in the household waste. Place
them in a special container provided
this purpose or take them to your
dealer.
F
O
btain a bottle of AdBlue
®. After first
checking the use-by date, read carefully
the instructions on use on the label before
pouring the contents of the bottle into your
vehicle's AdBlue
® tank. F
A
fter emptying the bottle, wipe away any
spillage around the tank filler using a damp
cloth.
F
R
efit the blue cap to the tank and turn it
a 6
th of a turn clockwise, to its stop.
F
R
efit the black cap and turn it a quarter of
a turn clockwise without pressing. Ensure
that the indicator on the cap lines up with
the indicator on the support.
F
D
epending on equipment, return the spare
wheel and/or the storage box to the bottom
of the boot.
F
R
efit the boot carpet and close the tailgate.
9
Practical information
Page 202 of 340
200
2008_en_Chap09_info-pratiques_ed01-2015
It is advisable to disconnect the battery
if the vehicle is to be left unused for
more than one month.
The batteries contain harmful substances
such as sulphuric acid and lead. They
must be disposed of in accordance
with regulations and must not, in any
circumstances, be discarded with household
waste.
Take used remote control batteries and
vehicle batteries to a special collection point.
Protect your eyes and face before
handling the battery.
All operations on the battery must be
carried out in a well ventilated area and
away from naked flames and sources
of sparks, so as to avoid the risk of
explosion or fire.
Do not try to charge a frozen battery;
the battery must first be thawed out to
avoid the risk of explosion. If the battery
has been frozen, before charging have
it checked by a PEUGEOT dealer or a
qualified workshop who will check that
the internal components have not been
damaged and the casing is not cracked,
which could cause a leak of toxic and
corrosive acid.
Do not reverse the polarity and use only
a 12 V charger.
Do not disconnect the terminals while
the engine is running.
Do not charge the batteries without
disconnecting the terminals first.
Wash your hands afterwards.
Do not push the vehicle to start the
engine if you have an electronic or
automatic gearbox.Before disconnecting the battery
Wait 2 minutes after switching off the ignition
before disconnecting the battery.
Close the windows and the doors before
disconnecting the battery.
Following reconnection of the
battery
Following reconnection of the battery, switch on
the ignition and wait 1 minute before starting to
permit initialisation of the electronic systems.
However, if problems remain following this
operation, contact a PEUGEOT dealer or a
qualified workshop.
Referring to the corresponding section, you
must yourself reinitialise:
-
t
he remote control key,
-
t
he on-board satellite navigation system.
The Stop & Start battery does not have
to be disconnected for charging.
Charging the battery using
a battery charger
F Disconnect the battery from the vehicle.
F
F ollow the instructions for use provided by
the manufacturer of the charger.
F
C
onnect the battery starting with the
negative terminal (-).
F
C
heck that the terminals and connectors
are clean. If they are covered with sulphate
(whitish or greenish deposit), remove them
and clean them.
Practical information