2015 PEUGEOT 108 wheel
[x] Cancel search: wheelPage 70 of 271
68
108_en_Chap05_conduite_ed01-2015
A few driving recommendations
Observe the driving regulations at all times and
remain vigilant whatever the traffic conditions.
Pay close attention to the traffic and keep your
hands on the wheel so that you are ready to
react at any time to any eventuality.
On a long journey, a break every two hours is
strongly recommended.
In difficult weather, drive smoothly, anticipate
the need to brake and increase the distance
from other vehicles.Never drive with the parking brake
applied - Risk of overheating and
damage to the braking system!
Do not park or run the engine when
stationary in areas where inflammable
substances and materials (dry grass,
dead leaves...) might come into contact
with the hot exhaust system - Risk of
fire!
Never leave a vehicle unsupervised
with the engine running. If you have
to leave your vehicle with the engine
running, apply the parking brake
and put the gearbox into neutral or
position
N, depending on the type of
gearbox.
Driving on flooded roads
We strongly advise against driving on flooded
roads, as this could cause serious damage
to the engine or gearbox, as well as to the
electrical systems of your vehicle.
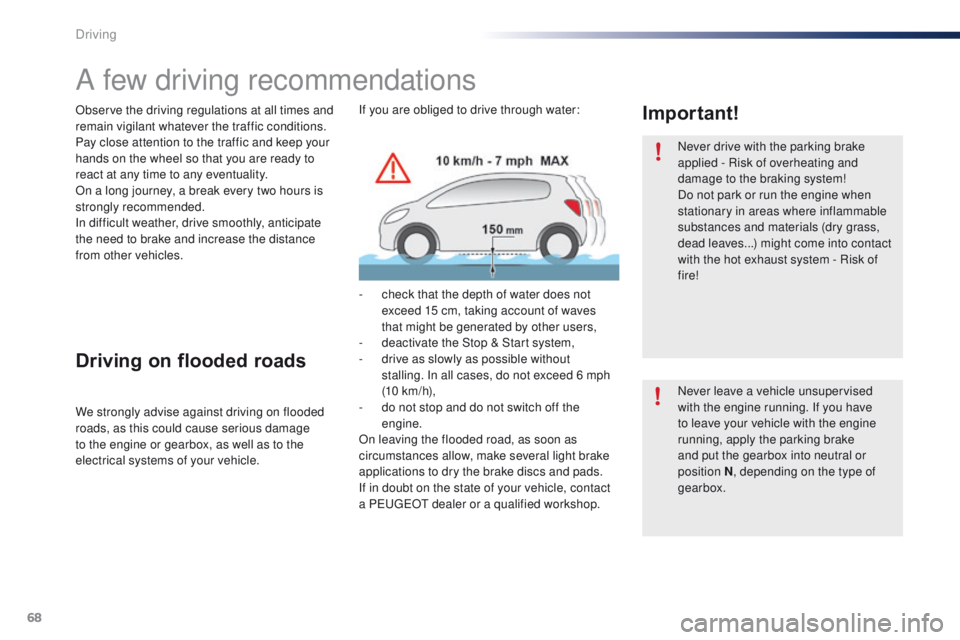
Important!If you are obliged to drive through water:
-
c
heck that the depth of water does not
exceed 15 cm, taking account of waves
that might be generated by other users,
-
d
eactivate the Stop & Start system,
-
d
rive as slowly as possible without
stalling. In all cases, do not exceed 6 mph
(10
km/h),
-
d
o not stop and do not switch off the
engine.
On leaving the flooded road, as soon as
circumstances allow, make several light brake
applications to dry the brake discs and pads.
If in doubt on the state of your vehicle, contact
a P
e
uge
Ot
dealer or a qualified workshop.
Driving
Page 71 of 271
69
108_en_Chap05_conduite_ed01-2015
Starting - switching off the engine with the key
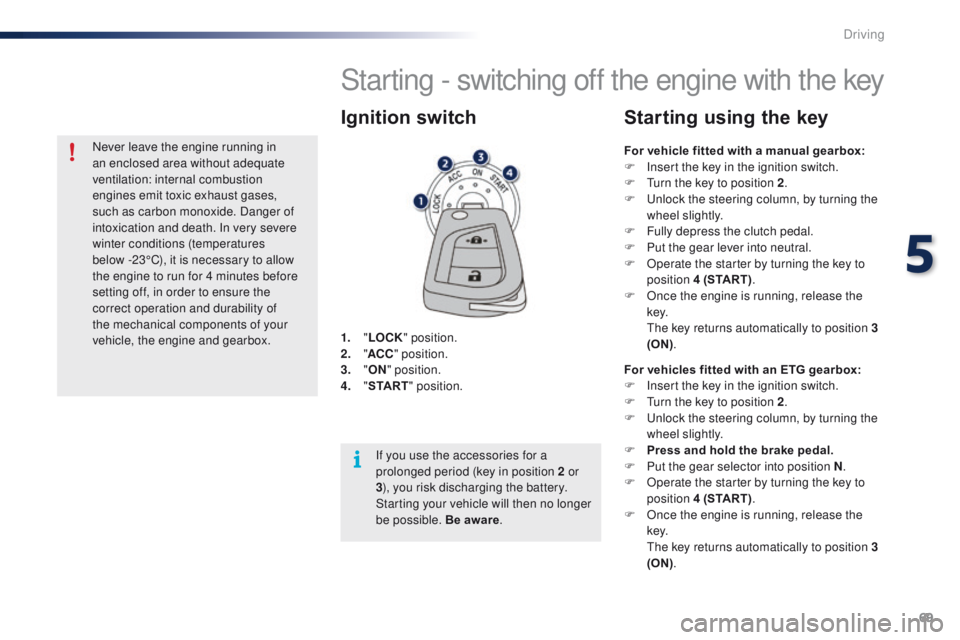
1. "LOCK " position.
2. " AC
C" position.
3.
"ON " position.
4.
" S
TA R T" position.
Ignition switch
For vehicle fitted with a manual gearbox:
F
I nsert the key in the ignition switch.
F
t
u
rn the key to position 2 .
F
u
n
lock the steering column, by turning the
wheel slightly.
F
F
ully depress the clutch pedal.
F
P
ut the gear lever into neutral.
F
O
perate the starter by turning the key to
position 4 (START) .
F
O
nce the engine is running, release the
key.
t
h
e key returns automatically to position 3
(ON) .
Starting using the key
For vehicles fitted with an ETG gearbox:
F
I nsert the key in the ignition switch.
F
t
u
rn the key to position 2 .
F
u
n
lock the steering column, by turning the
wheel slightly.
F
P
ress and hold the brake pedal.
F
P
ut the gear selector into position N .
F
O
perate the starter by turning the key to
position 4 (START) .
F
O
nce the engine is running, release the
key.
t
h
e key returns automatically to position 3
(ON) .
If you use the accessories for a
prolonged period (key in position 2 or
3
), you risk discharging the battery.
Starting your vehicle will then no longer
be possible. Be aware .
Never leave the engine running in
an enclosed area without adequate
ventilation: internal combustion
engines emit toxic exhaust gases,
such as carbon monoxide. Danger of
intoxication and death. In very severe
winter conditions (temperatures
below
-23°C), it is necessary to allow
the engine to run for 4 minutes before
setting off, in order to ensure the
correct operation and durability of
the mechanical components of your
vehicle, the engine and gearbox.
5
Driving
Page 73 of 271

71
108_en_Chap05_conduite_ed01-2015
Starting using
the electronic key
With the first press on the " S TA R T/
STOP " button, this indicator lamp
flashes slowly in the instrument panel. Depending on the ambient temperature,
each attempt at starting can take up to
around 30 seconds. During this period,
do not press the "
START/STOP" button
again, or release the clutch pedal or
brake pedal (depending on the type of
gearbox).
After this period, if the engine has not
started, press the " START/STOP"
button again for another attempt at
starting. If one of the starting conditions is
not met, the "Keyless
e
n
try and
Starting" system indicator lamp flashes
in the instrument panel. In some
circumstances, it is necessary to
turn the steering wheel slightly while
pressing the " START/STOP " button to
assist unlocking of the steering.
For vehicles fitted with a manual gearbox:
F
W
ith the electronic key inside the vehicle,
put the gear lever into neutral and fully
depress the clutch pedal.th e presence of the electronic key in
the vehicle is essential for switching
on the ignition and starting only. Once
the engine has started,
make sure
that the electronic key remains with
the vehicle until the end of the journey:
other wise you would not be able to lock
the vehicle.
F
P
ress and release the " S TA R T/
STOP " button.
th
is indicator lamp comes on in the
instrument panel. For vehicles fitted with an ETG gearbox
:
F
W
ith the electronic key inside the vehicle,
put the gear selector at N and press the
brake pedal.
th
is indicator lamp comes on in the
instrument panel.
F
P
ress and release the "
S TA R T/
STOP " button.
5
Driving
Page 76 of 271
74
108_en_Chap05_conduite_ed01-2015
Manual parking brake
Applying
F Pull the parking brake lever up to immobilise your vehicle.
When the vehicle is being driven, if
the parking brake is still on or has
not been fully released, this warning
lamp comes on accompanied by an
audible signal.
Releasing
F Pull the parking brake lever up gently, press the release button then lower the
lever fully.
5-speed manual
gearbox
Engaging reverse gear
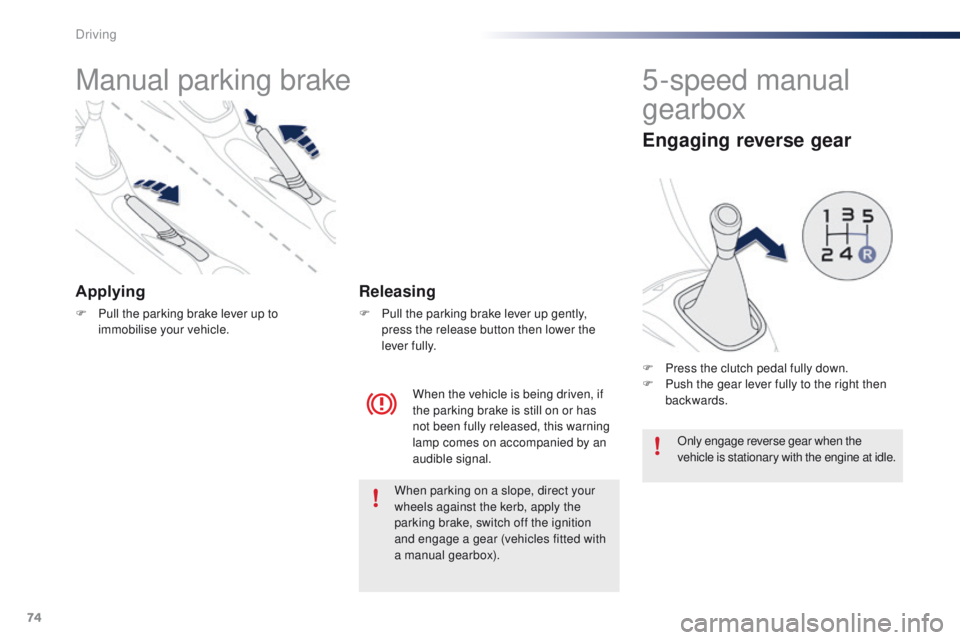
F Press the clutch pedal fully down.
F P ush the gear lever fully to the right then
backwards.
Only engage reverse gear when the
vehicle is stationary with the engine at idle.
When parking on a slope, direct your
wheels against the kerb, apply the
parking brake, switch off the ignition
and engage a gear (vehicles fitted with
a manual gearbox).
Driving
Page 86 of 271
84
108_en_Chap05_conduite_ed01-2015
the speed limiter cannot, in any
circumstances, replace the need to
observe speed limits, nor can it replace the
need for vigilance on the part of the driver.
Speed limiter (Puretech 82 engine)
the speed limiter is switched on manually:
this can be done whatever the speed of the
vehicle. However, if you are driving at less than
20 mph (30 km/h), the programmed speed will
be fixed at 20 mph (30 km/h).
th
e speed limiter is paused by operation of the
control.
th
e programmed speed can be exceeded
temporarily by pressing the accelerator firmly
beyond the point of resistance.
to r
eturn to the programmed speed, simply
release the accelerator pedal until the vehicle
returns to the programmed speed limit. System which prevents the vehicle from exceeding the speed programmed by the driver.Steering mounted controls
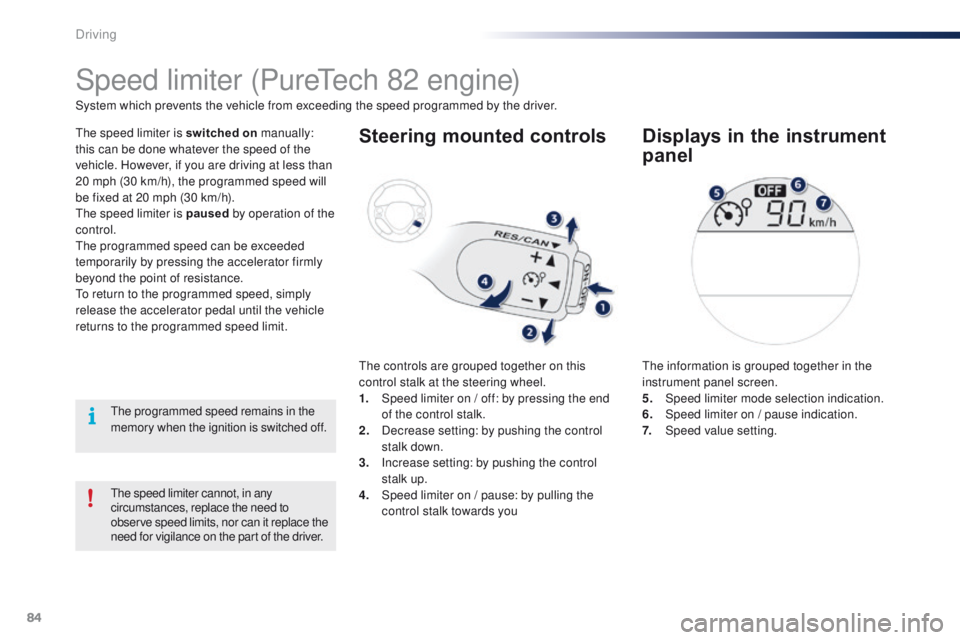
the controls are grouped together on this
control stalk at the steering wheel.
1.
S
peed limiter on / off: by pressing the end
of the control stalk.
2.
D
ecrease setting: by pushing the control
stalk down.
3.
I
ncrease setting: by pushing the control
stalk up.
4.
S
peed limiter on / pause: by pulling the
control stalk towards you
Displays in the instrument
panel
the information is grouped together in the
instrument panel screen.
5.
Spe
ed limiter mode selection indication.
6.
S
peed limiter on / pause indication.
7.
Spe
ed value setting.
th
e programmed speed remains in the
memory when the ignition is switched off.
Driving
Page 89 of 271
87
108_en_Chap05_conduite_ed01-2015
Speed limiter (Vti 68 engine)
System which prevents the vehicle from exceeding the speed programmed by the driver.
th
e speed limiter is switched on manually:
this can be done whatever the speed of the
vehicle. However, if you are driving at less than
20 mph (30 km/h), the programmed speed will
be fixed at 20 mph (30 km/h).
th
e speed limiter is paused by operation of the
control.
th
e programmed speed can be exceeded
temporarily by pressing the accelerator firmly
beyond the point of resistance.
to r
eturn to the programmed speed, simply
release the accelerator pedal until the vehicle
returns to the programmed speed limit.
th
e programmed limit speed is erased
when switching off the ignition.
Steering mounted controls
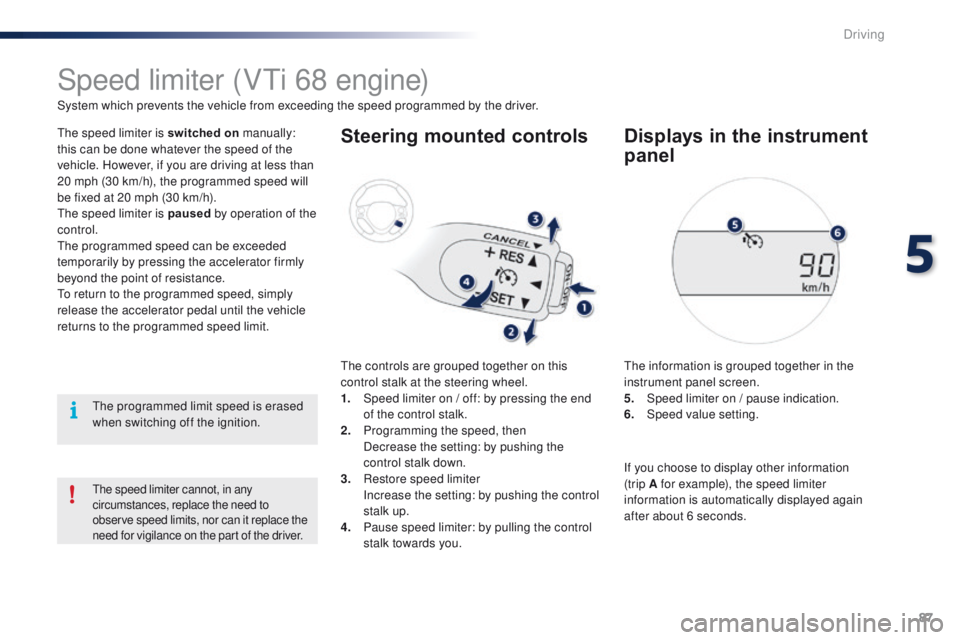
the controls are grouped together on this
control stalk at the steering wheel.
1.
S
peed limiter on / off: by pressing the end
of the control stalk.
2.
P
rogramming the speed, then
D
ecrease the setting: by pushing the
control stalk down.
3.
R
estore speed limiter
I
ncrease the setting: by pushing the control
stalk up.
4.
P
ause speed limiter: by pulling the control
stalk towards you.
Displays in the instrument
panel
the information is grouped together in the
instrument panel screen.
5.
S
peed limiter on / pause indication.
6.
Spe
ed value setting.
the speed limiter cannot, in any
circumstances, replace the need to
observe speed limits, nor can it replace the
need for vigilance on the part of the driver.
If you choose to display other information
(trip A for example), the speed limiter
information is automatically displayed again
after about 6 seconds.
5
Driving
Page 93 of 271
91
108_en_Chap05_conduite_ed01-2015
Lane departure warning system
System which detects the unintended crossing of longitudinal traffic lane markings on the ground, using a camera that recognises both solid and
broken lines.
to i
mprove your safety, the camera analyses the image and then triggers a warning if the vehicle wanders over a lane marking (speed higher than
30
mph (50 km/h)).
th
is system is particularly suitable for motorways and dual carriageways.
th
e lane departure warning system
cannot in any circumstances replace
the need for vigilance on the part of the
driver.
It is necessary to observe driving
regulations and take a break every
two
hours.
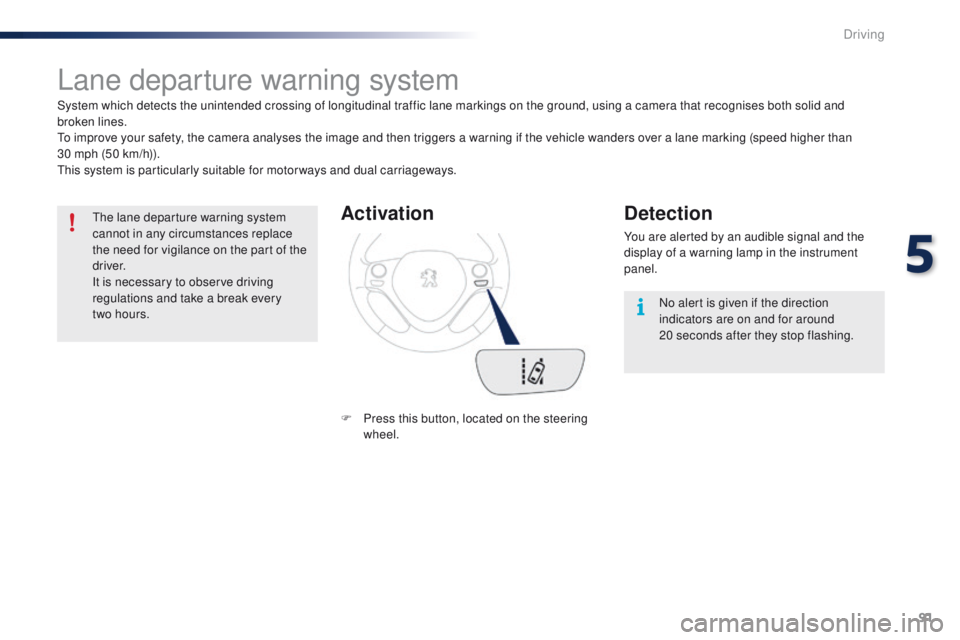
Activation
F Press this button, located on the steering wheel.
Detection
You are alerted by an audible signal and the
display of a warning lamp in the instrument
panel.
No alert is given if the direction
indicators are on and for around
20
seconds after they stop flashing.
5
Driving
Page 103 of 271
101
108_en_Chap07_securite_ed01-2015
Direction indicators
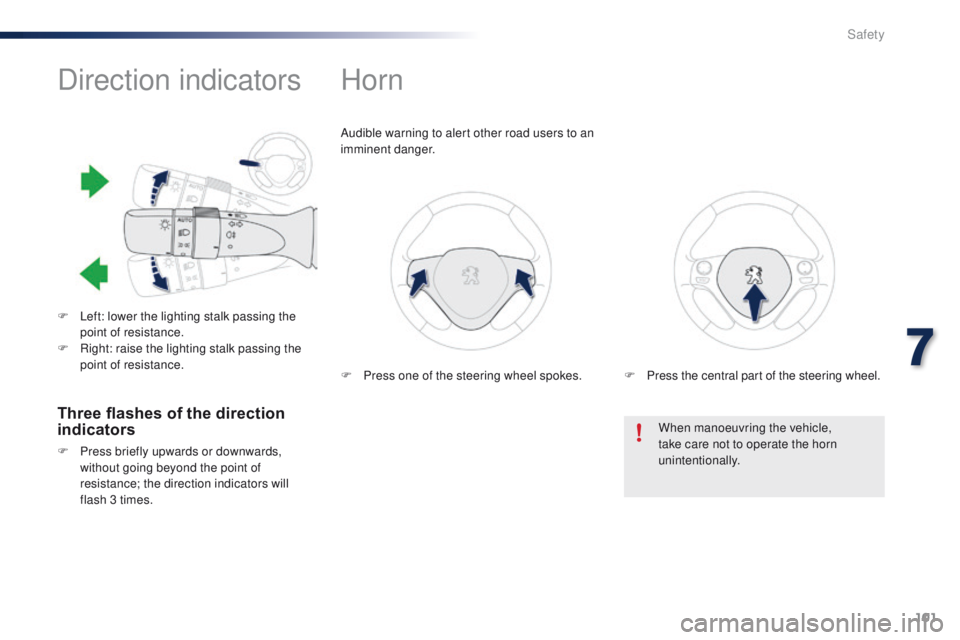
F Left: lower the lighting stalk passing the point of resistance.
F
R
ight: raise the lighting stalk passing the
point of resistance.
Horn
Audible warning to alert other road users to an
imminent danger.
When manoeuvring the vehicle,
take care not to operate the horn
unintentionally.
Three flashes of the direction
indicators
F Press briefly upwards or downwards, without going beyond the point of
resistance; the direction indicators will
flash 3 times. F
P
ress one of the steering wheel spokes.
F
P
ress the central part of the steering wheel.
7
Safety