2015 NISSAN XTERRA ad blue
[x] Cancel search: ad bluePage 154 of 396
NISSAN Voice Recognition System
(if so equipped).................................. 4-91
Using the system .............................. 4-91
System features ............................... 4-93
Bluetooth® Hands-Free Phone System
voice commands .............................. 4-93Navigation System voice commands
.............4-94
Audio system voice commands ..................4-95
Information voice commands ....................4-95
My Apps Voice Commands .....................4-95
Help voice commands ......................... 4-95
Troubleshooting guide ......................... 4-96
Page 156 of 396
9. CAMERA button
10. NAV button*
* For additional information, refer to the separate
Navigation System Owner’s Manual regarding
the Navigation system control buttons.
** For additional information, refer to the
“Bluetooth® Hands-Free Phone System with
navigation system” or “Bluetooth® Hands-Free
Phone System without navigation system” re-
garding Bluetooth® Hands-Free Phone System
control button in this section.
When you use this system, make sure the engine
is running.
If you use the system with the engine not
running (ignition ON or ACC) for a long
time, it will discharge the battery, and the
engine will not start.
Reference symbols:
“Example” — Words marked in quotes refer to a
key shown only on the display. These keys can be
selected by touching the screen.HOW TO USE THE TOUCH-
SCREEN
CAUTION
● The glass display screen may break if it
is hit with a hard or sharp object. If the
glass screen breaks, do not touch it.
Doing so could result in an injury.
● To clean the display, never use a rough
cloth, alcohol, benzine, thinner or any
kind of solvent or paper towel with a
chemical cleaning agent. They will
scratch or deteriorate the panel.
● Do not splash any liquid such as water
or car fragrance on the display. Contact
with liquid will cause the system to
malfunction.
To help ensure safe driving, some functions can-
not be operated while driving.
The on-screen functions that are not available
while driving will be grayed out or muted.
Park the vehicle in a safe location and then oper-
ate the navigation system.
WARNING
● ALWAYS give your full attention to
driving.
● Avoid using vehicle features that could
distract you. If distracted, you could
lose control of your vehicle and cause
an accident.
Monitor, climate, audio, phone and voice recognition systems4-5
Page 159 of 396
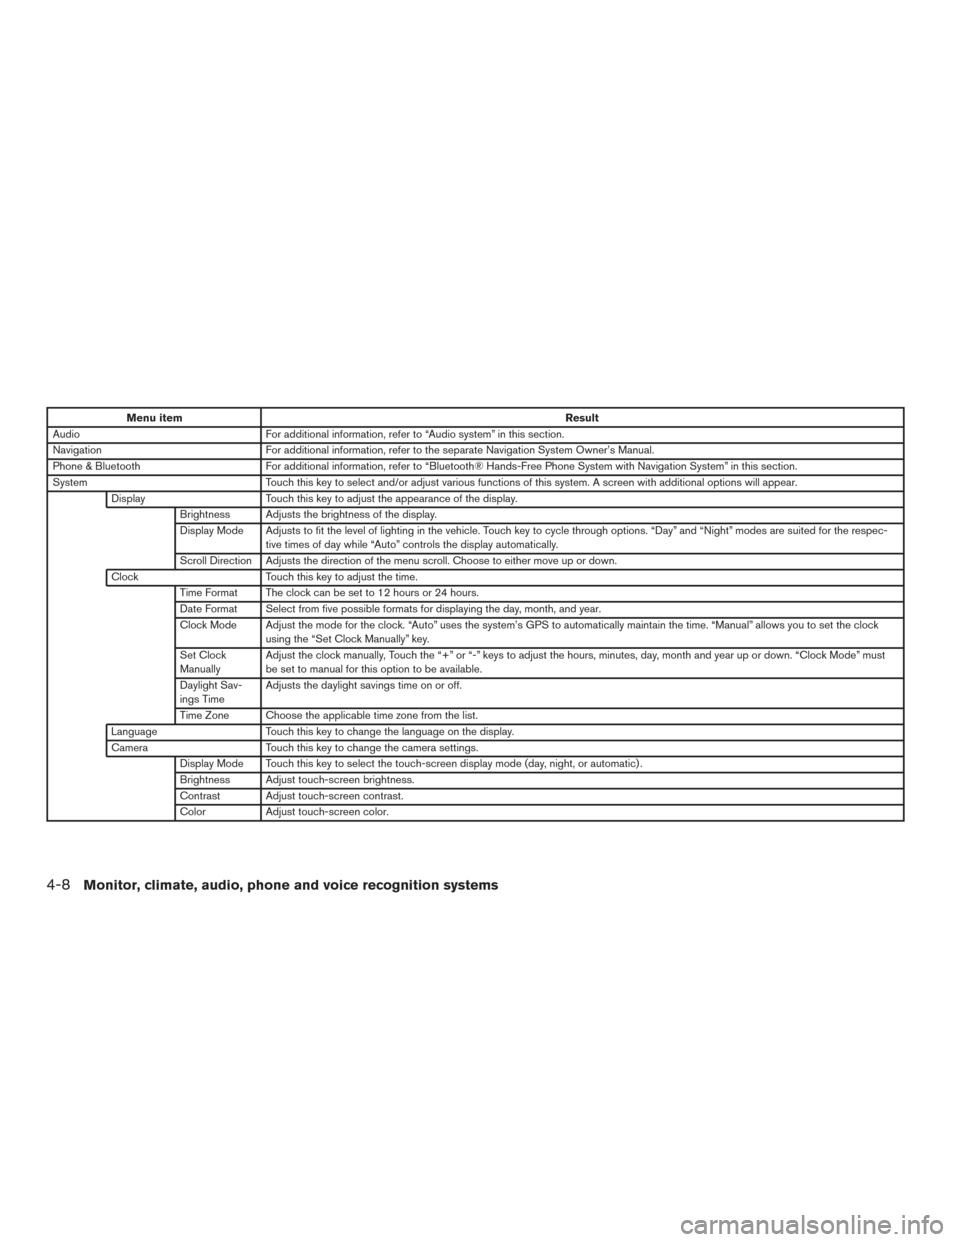
Menu itemResult
Audio For additional information, refer to “Audio system” in this section.
Navigation For additional information, refer to the separate Navigation System Owner’s Manual.
Phone & Bluetooth For additional information, refer to “Bluetooth® Hands-Free Phone System with Navigation System” in this section.
System Touch this key to select and/or adjust various functions of this system. A screen with additional options will appear.
Display Touch this key to adjust the appearance of the display.
Brightness Adjusts the brightness of the display.
Display Mode Adjusts to fit the level of lighting in the vehicle. Touch key to cycle through options. “Day” and “Night” modes are suited for the respec- tive times of day while “Auto” controls the display automatically.
Scroll Direction Adjusts the direction of the menu scroll. Choose to either move up or down.
Clock Touch this key to adjust the time.
Time Format The clock can be set to 12 hours or 24 hours.
Date Format Select from five possible formats for displaying the day, month, and year.
Clock Mode Adjust the mode for the clock. “Auto” uses the system’s GPS to automatically maintain the time. “Manual” allows you to set the clock using the “Set Clock Manually” key.
Set Clock
Manually Adjust the clock manually, Touch the “+” or “-” keys to adjust the hours, minutes, day, month and year up or down. “Clock Mode” must
be set to manual for this option to be available.
Daylight Sav-
ings Time Adjusts the daylight savings time on or off.
Time Zone Choose the applicable time zone from the list.
Language Touch this key to change the language on the display.
Camera Touch this key to change the camera settings.
Display Mode Touch this key to select the touch-screen display mode (day, night, or automatic) .
Brightness Adjust touch-screen brightness.
Contrast Adjust touch-screen contrast.
Color Adjust touch-screen color.
4-8Monitor, climate, audio, phone and voice recognition systems
Page 181 of 396
Bluetooth® streaming audio (if so
equipped)
●Some Bluetooth® audio devices may not be
recognized by the in-vehicle audio system.
● It is necessary to set up the wireless con-
nection between a compatible Bluetooth®
audio device and the in-vehicle Bluetooth®
module before using the Bluetooth® audio.
● Operating procedure of the Bluetooth® au-
dio will vary depending on the devices. Make
sure how to operate your audio device be-
fore using it with this system.
● The Bluetooth® audio may be stopped un-
der the following conditions:
● Receiving a call on the Hands-Free
Phone System.
● Checking the connection to the hands-
free phone.
● Do not place the Bluetooth® audio device in
an area surrounded by metal or far away from
the in-vehicle Bluetooth® module to prevent
tone quality degradation and wireless con-
nection disruption. ●
While an audio device is connected through
the Bluetooth® wireless connection, the
battery power of the device may discharge
quicker than usual.
● This system supports the Bluetooth® Audio
Distribution Profile (A2DP, AVRCP) .
BLUETOOTH® is a
trademark owned by
Bluetooth SIG, Inc.
and licensed to
Visteon and Bosch.
4-30
Monitor, climate, audio, phone and voice recognition systems
Page 186 of 396
FM/AM/SAT RADIO WITH
COMPACT DISC (CD) PLAYER (Type
A) (if so equipped)For additional information, refer to, “Audio opera-
tion precautions” regarding all operation precau-
tions in this section.1.
CD eject button
2. RPT (repeat) button 3. RDM (random) button
4. Display screen
5. SCAN button
6.
SEEK and CAT button
7. Apps button
8.
BACK button
9. ENTER/SETTING button / TUNE/SCROLL knob
10. Station select (1 - 6) buttons
11.
(power) button / VOL (volume) knob
12. DISP (display) button
13. MEDIA button
14. XM button
15. FM•AM button
Audio main operation
(power) button / VOL (volume)
Place the ignition switch in the ACC or ON
position and press the
(power) button
while the system is off to call up the mode (radio,
CD, AUX, Bluetooth® audio, USB or iPod®) that
was playing immediately before the system was
turned off.
LHA3017
Monitor, climate, audio, phone and voice recognition systems4-35
Page 187 of 396
To turn the system off, press the(power)
button.
Turn the VOL (volume) control knob to adjust the
volume.
This vehicle may be equipped with Speed Sen-
sitive Volume. When this feature is active, the
audio volume changes as the driving speed
changes. ENTER/SETTING button
Press the ENTER/SETTING button to show the
Settings screen on the display. Turn the
TUNE/SCROLL knob to navigate the options
and then press the ENTER/SETTING button to
make a selection.
Audio
Bluetooth Connect phone and adjust Bluetooth® settings. For additional information, refer to the “Bluetooth® Hands-
Free Phone System Without Navigation System” in this section.
Bass Adjusts the bass to the desired level.
Treble Adjusts the treble to the desired level.
Balance Adjusts the balance to the desired level. Balance adjusts the sound level between the left and right speakers.
Fade Adjusts the fade to the desired level. Fade adjusts the sound level between the front and rear speakers.
Brightness Adjust the brightness to adjust the appearance of the display screen.
Contrast Adjust the contrast to adjust the appearance of the display screen.
Clock adjust Press the ENTER/SETTING button to highlight the hours or minutes and then use the TUNE/SCROLL knob to
adjust the value. Press the ENTER/SETTING button again to set the value.
On-Screen Clock Toggles ON or OFF the clock display on the upper right corner of the display screen.
RDS Display Toggles ON or OFF the RDS information displayed on the screen while the radio is playing.
Speed Sens Vol. (Speed Sensitive Volume) Adjusts the speed sensitive volume function, which increases the volume of the audio system as the speed of
the vehicle increases. Set to “OFF” to disable the feature. The higher the setting, the more the volume in-
creases in relation to vehicle speed.
AUX Vol. Choose a setting from 0 to +3 to control the boost of incoming auxiliary device volume. A setting of 0 provides
no additional boost in volume. A setting of +3 provides the greatest boost in volume.
Language Select Select the desired language for the system from the available options.
4-36Monitor, climate, audio, phone and voice recognition systems
Page 188 of 396
Bass, treble, balance and fade can also be ad-
justed by pressing the ENTER/SETTING button
and turning the TUNE/SCROLL knob to select
the item to adjust. When the desired item is
shown on the display, turn the tuning to adjust
and then press the ENTER/SETTING button until
the display returns to the main audio screen. If the
button is not pressed for approximately 10 sec-
onds, the radio or CD display will automatically
reappear.
APPS button
Press the APPS button to launch the Smart-
phone Integration Mode. For additional informa-
tion, refer to “NissanConnect™ APP Smartphone
Integration” in this section regarding this feature.
For additional information, refer to “Bluetooth®
Hands-Free Phone system without Navigation” in
this section regarding connecting your phone.
FM/AM radio operation
FM·AM button
Press the FM·AM button to change the band as
follows:
AM→FM1 →FM2 →AM
If another audio source is playing when the
FM·AM button is pressed, the audio source play-
ing will automatically be turned off and the last
radio station played will begin playing. The FM stereo indicator (STEREO) is shown on
the screen during FM stereo reception. When the
stereo broadcast signal is weak, the radio auto-
matically changes from stereo to monaural re-
ception.
TUNE/SCROLL knob (Tuning)
Turn the TUNE/SCROLL knob to the left or right
for manual tuning.
SEEK tuning
Press the
orSEEK buttons to tune
from low to high or high to low frequencies and to
stop at the next broadcasting station.
SCAN tuning
Press the SCAN button to stop at each broad-
casting station for 5 seconds. SCAN will appear
on the screen while the radio is scan tuning.
Pressing the button again during this 5 second
period will stop SCAN tuning and the radio will
remain tuned to that station. If the SCAN button is
not pressed within 5 seconds, SCAN tuning
moves to the next station.
1 to 6 Station memory operations
Six stations can be set for the AM band. Twelve
stations can be set for the FM band (six for FM1,
six for FM2) . 1. Choose the radio band AM, FM1 or FM2
using the FM·AM select button.
2. Tune to the desired station using the
SEEK button or theTRACK button.
Press and hold any of the desired station
memory buttons (1 – 6) until the preset
number is updated on the display and the
sound is briefly muted.
3. The channel indicator will then come on and the sound will resume. Programming is now
complete.
4. Other buttons can be set in the same man- ner.
If the battery cable is disconnected, or if the fuse
opens, the radio memory will be canceled. In that
case, reset the desired stations.
Compact disc (CD) player operation
If the radio is already operating, it automatically
turns off and the compact disc begins to play.
MEDIA button
With a CD loaded, press the MEDIA button until
the CD mode is displayed on the screen.
Monitor, climate, audio, phone and voice recognition systems4-37
Page 191 of 396
3. AUX button
4. CD insert slot
5.
Backward seek button andForward seek button
6. BACK button
7. AUDIO button / TUNE knob
8. Display screen
9. ON-OFF button / VOL (volume) control knob
10. CD button
11. SXM button* *No satellite radio reception is available when the
SXM button is pressed to access satellite radio
stations unless optional satellite receiver and an-
tenna are installed and an SiriusXM® Satellite
Radio service subscription is active. Satellite ra-
dio is not available in Alaska, Hawaii and Guam.
Audio main operation
ON-OFF button / VOL (volume) control
knob
Place the ignition switch in the ACC or ON
position and press the ON-OFF button while the
system is off to call up the mode (radio, CD, AUX,
Bluetooth® audio, USB or iPod®) that was play-
ing immediately before the system was turned off.To turn the system off, press the ON-OFF button.
Turn the VOL (volume) control knob to adjust the
volume.
This vehicle may be equipped with Speed Sen-
sitive Volume. When this feature is active, the
audio volume changes as the driving speed
changes.
ENTER/SETTING button
Press the AUDIO button to show the Settings
screen on the display. Turn the TUNE knob to
navigate the options and then press the AUDIO
button to make a selection.
Audio
Bass Adjusts the bass to the desired level.
Treble Adjusts the treble to the desired level.
Balance Adjusts the balance to the desired level. Balance adjusts the sound level between the left and right speakers.
Fade Adjusts the fade to the desired level. Fade adjusts the sound level between the front and rear speakers.
Speed Sens Vol. (Speed Sensitive Volume) Adjusts the speed sensitive volume function, which increases the volume of the audio system as the speed of
the vehicle increases. Set to “OFF” to disable the feature. The higher the setting, the more the volume in-
creases in relation to vehicle speed.
AUX Vol. Choose a setting from 0 to +3 to control the boost of incoming auxiliary device volume. A setting of 0 provides
no additional boost in volume. A setting of +3 provides the greatest boost in volume.
Bass, treble, balance and fade can also be adjusted by pressing the AUDIO button and turning the TUNE knob to select the item to adjust. When the desired
item is shown on the display, turn the tuning to adjust and then press the AUDIO button until the display returns to the main audio screen. If the button is not
pressed for approximately 10 seconds, the radio or CD display will automatically reappear.
4-40Monitor, climate, audio, phone and voice recognition systems