Page 127 of 396

WARNING
●Properly secure all cargo to help pre-
vent it from sliding or shifting. Do not
place cargo higher than the seatbacks.
In a sudden stop or collision, unsecured
c")
CARGO NETS (if so equipped)
WARNING
●Properly secure all cargo to help pre-
vent it from sliding or shifting. Do not
place cargo higher than the seatbacks.
In a sudden stop or collision, unsecured
cargo could cause personal injury.
● Be sure to secure all 4 hooks into the
retainers. The cargo restrained in the
net must not exceed 30 lbs. (13.6 kg) or
the net may not stay secured. The cargo nets help keep packages in the cargo
area from moving around while the vehicle is in
motion.
To install the large cargo net (if so equipped) ,
attach the hooks to the retainers.
To remove the large cargo net, detach the hooks
from the cargo net retainers.
The right-hand luggage side net is not removable.
WARNING
●
The cargo restrained in the luggage
side nets must not exceed 8.5 lb (3.9 kg)
for each net or the net may not stay
secured.
● Do not place sharp objects in the lug-
gage side nets. Such objects may be-
come dangerous projectiles and cause
injury when the vehicle is moving or if
the vehicle is involved in a collision.
Cargo net (if so equipped)
LIC0876
Right-hand luggage side net
LIC0866
2-44Instruments and controls
Page 129 of 396

WARNING
●Drive extra carefully when the vehicle is
loaded at or near the cargo carrying
capacity, especially if the significant
portion of that load is carried on the
roof rack.
● Heavy loading of the roof rack has the
potential to affect the vehicle stability
and handling during sudden or abnor-
mal handling maneuvers.
● Roof rack load should be evenly
distributed.
● Do not exceed maximum roof rack load
weight capacity.
● Properly secure all cargo with ropes or
straps to help prevent it from sliding or
shifting. In a sudden stop or collision,
unsecured cargo could cause personal
injury.
CAUTION
Use care when placing or removing items
from the roof rack. If you cannot comfort-
ably lift the items onto the roof rack from
the ground, use a ladder or stool.
Always evenly distribute the cargo on the roof
rack. The maximum total load including the gear basket is 150 lb (68 kg) evenly distrib-
uted. The maximum total load for the gear
basket is 30 lb (13 kg) evenly distributed.
Be
careful that your vehicle does not exceed the
Gross Vehicle Weight Rating (GVWR) or the
Gross Axle Weight Ratings (GAWR front and
rear) . The GVWR and GAWR are located on the
F.M.V.S.S. label (located on the driver’s side door
jamb pillar) . For additional information regarding
GVWR and GAWR, refer to “Vehicle loading
information” in the “Technical and consumer in-
formation” section in this manual.
The crossbars (if so equipped)can be adjusted or
removed. Use the Torx® driver provided in the
tool kit (located under the 2nd row seats)to
loosen both crossbar adjusting screws.
To adjust:
1. Loosen the adjusting screws with the Torx® driver
�1by turning counterclockwise�A.
2. When the clamp is loosened, move the crossbar so the cargo can be positioned on
the crossbar
�B.
3. Tighten the crossbar adjusting screws with the Torx® driver by turning clockwise.
4. Secure the cargo with rope.
5. Always check the tightness of the crossbar adjusting screws. To remove:
1. Loosen the adjusting screws with the Torx® driver
�1by turning counterclockwise�A.
2. Rotate the clamps
�C.
3. Remove the crossbar.
4. Reverse to install.
5. Always check the tightness of the crossbar adjusting screws.
2-46Instruments and controls
Page 130 of 396
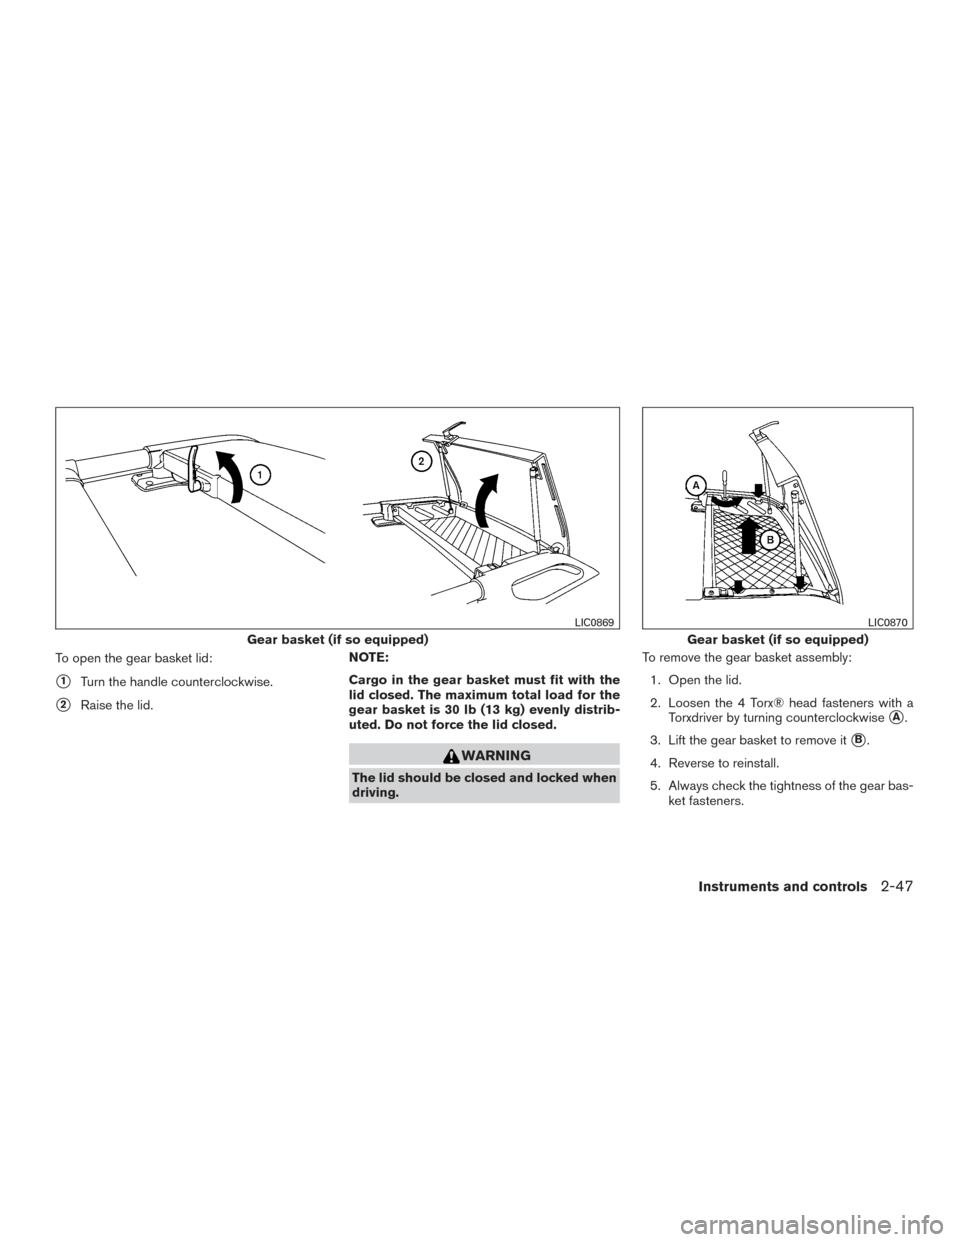
To open the gear basket lid:
�1Turn the handle counterclockwise.
�2Raise the lid.NOTE:
Cargo in the gear basket must fit with the
lid closed. The maximum total load for the
gear basket is 30 lb (13 kg) evenly distrib-
uted. Do not force the lid closed.
WARNING
The lid should be closed and locked when
driving. To remove the gear basket assembly:
1. Open the lid.
2. Loosen the 4 Torx® head fasteners with a Torxdriver by turning counterclockwise
�A.
3. Lift the gear basket to remove it
�B.
4. Reverse to reinstall.
5. Always check the tightness of the gear bas- ket fasteners.
Gear basket (if so equipped)
LIC0869
Gear basket (if so equipped)
LIC0870
Instruments and controls2-47
Page 131 of 396

POWER WINDOWS
WARNING
●Make sure that all passengers have
their hands, etc. inside the vehicle while
it is in motion and before closing the
windows. Use the window lock switch to
prevent unexpected use of the power
windows.
● Do not leave children unattended inside
the vehicle. They could unknowingly ac-
tivate switches or controls and become
trapped in a window. Unattended chil-
dren could become involved in serious
accidents.
The power windows operate when the ignition
switch is placed in the ON position, or for a
period of time after the ignition switch is placed in
the OFF position. If the driver’s or passenger’s
door is opened during this period of time, the
power to the windows is canceled.
1. Window lock button
2. Power door lock switch
3. Front passenger’s side window switch
4. Right rear passenger’s window switch
5. Left rear passenger’s window switch
6. Driver’s side automatic switch
Driver’s side power window switch
The driver’s side control panel is equipped with
switches to open or close the front and rear
passenger windows.
To open a window, push the switch and hold it
down. To close a window, pull the switch and
hold it up. To stop the opening or closing function
at any time, simply release the switch.
WIC1100
WINDOWS
2-48Instruments and controls
Page 138 of 396

When the doors are locked using one of the
following methods, the doors cannot be opened
using the inside or outside door handles. The
doors must be unlocked to open the doors.
WARNING
●Always have the doors locked while
driving. Along with the use of seat belts,
this provides greater safety in the event
of an accident by helping to prevent
persons from being thrown from the
vehicle. This also helps keep children
and others from unintentionally open-
ing the doors, and will help keep out
intruders.
● Before opening any door, always look
for and avoid oncoming traffic.
● Do not leave children unattended inside
the vehicle. They could unknowingly ac-
tivate switches or controls. Unattended
children could become involved in seri-
ous accidents.
LOCKING WITH KEY Manual
To lock a door, turn the key toward the front of the
vehicle
�1. To unlock, turn the key toward the rear
�2.
Power
The power door lock system allows you to lock or
unlock all doors at the same time.
Turning the key toward the front
�1of the vehicle
locks all doors.
Turning the key one time toward the rear
�2of the
vehicle unlocks that door. From that position,
returning the key to neutral
�3(where the key can
only be removed and inserted) and turning it
toward the rear again
�4within 5 seconds un-
locks all doors.
Driver’s side
WPD0311
Driver’s side
LPD0240
DOORS
Pre-driving checks and adjustments3-3
Page 141 of 396

WARNING
The remote keyless entry keyfob trans-
mits radio waves when the buttons are
pushed. The FAA advises radio waves may
affect aircraft navigation and communica-
tion systems. Do not operate the remote
keyless entry keyfob while on an airplane.
Make sure the buttons are not operated
unintentionally when the unit is stored for
a flight.
It is possible to lock/unlock all doors, turn the
interior light on, and activate the panic alarm by
using the keyfob from outside the vehicle.
Be sure to remove the key from the vehicle
before locking the doors.
The keyfob can operate at a distance of approxi-
mately 33 ft (10 m) from the vehicle. The effective
distance depends upon the conditions around
the vehicle.
As many as 5 keyfobs can be used with one
vehicle. For information concerning the purchase
and use of additional keyfobs, contact a NISSAN
dealer.
The keyfob will not function when: ● the battery is discharged ●
the distance between the vehicle and the
keyfob is over 33 ft (10 m)
The panic alarm will not activate when the
key is in the ignition switch.
CAUTION
Listed below are conditions or occur-
rences which will damage the keyfob:
● Do not allow the keyfob, which contains
electrical components, to come into
contact with water or salt water. This
could affect the system function.
● Do not drop the keyfob.
● Do not strike the keyfob sharply against
another object.
● Do not change or modify the keyfob.
● Wetting may damage the keyfob. If the
keyfob gets wet, immediately wipe until
it is completely dry.
● Do not place the keyfob for an extended
period in an area where temperatures
exceed 140°F (60°C) .
● Do not attach the keyfob with a key
holder that contains a magnet. ●
Do not place the keyfob near equipment
that produces a magnetic field, such as
a TV, audio equipment and personal
computers.
If a keyfob is lost or stolen, NISSAN rec-
ommends erasing the ID code of that key-
fob. This will prevent the keyfob from un-
authorized use to unlock the vehicle. For
information regarding the erasing proce-
dure, please contact a NISSAN dealer.
REMOTE KEYLESS ENTRY SYSTEM
3-6Pre-driving checks and adjustments
Page 142 of 396

HOW TO USE REMOTE KEYLESS
ENTRY SYSTEM
Locking doors
1. Close all windows.
2. Remove the key from the ignition switch.
3. Close the hood and all doors.
4. Press the
button on the keyfob. All
the doors lock. The hazard warning lights
flash twice and the horn beeps once to
indicate all doors are locked. ●
When the
button is pressed with
all doors locked, the hazard warning lights
flash twice and the horn beeps once as a
reminder that the doors are already
locked.
● If a door is open and you press
the
button, the doors will lock
but the horn will not beep and the hazard
lights will not flash.
The horn may or may not beep. For additional
information, refer to “Silencing the horn beep
feature” in this section.
Unlocking doors
Press thebutton on the keyfob once.
● Only the driver’s door unlocks.
● The hazard warning lights flash once if all
doors are completely closed with the ignition
switch in any position except the ON posi-
tion.
● The interior lights illuminate for a period of
time when the interior light switch is in the
normal operation position.
Press the
button on the keyfob again
within 5 seconds.
LPD0209LPD0210
Pre-driving checks and adjustments3-7
Page 143 of 396

●All doors unlock.
● The hazard warning lights flash once if all
doors are completely closed.
The interior lights can be turned off without wait-
ing by inserting the key into the ignition switch
and placing the ignition switch in the ON or
START position, locking the doors with the key-
fob or pushing the interior light switch to the OFF
position.
Auto relock
When thebutton on the keyfob is pressed,
all doors will lock automatically within 1 minute
unless one of the following operations is per-
formed:
● Any door is opened.
● A key is inserted into the ignition switch and
the switch is cycled from OFF to ON.
Using the panic alarm
If you are near your vehicle and feel threatened,
you may activate the panic alarm to call attention
by pressing and holding the
button on the
keyfob for longer than 0.5 seconds.
The panic alarm and headlights will stay on for a
period of time. The panic alarm stops when:
● it has run for a period of time, or
● any button is pressed on the keyfob.
Using the interior lights
Press thebutton on the keyfob once to
turn on the interior lights.
For additional information, refer to “Interior lights”
in the “Instruments and controls” section of this
manual.
LPD0211
3-8Pre-driving checks and adjustments