2015 NISSAN VERSA NOTE steering
[x] Cancel search: steeringPage 2 of 24
*See your Owner’s Manual for information.
1
3
2
4
5
9
15
13
6
14
7
8
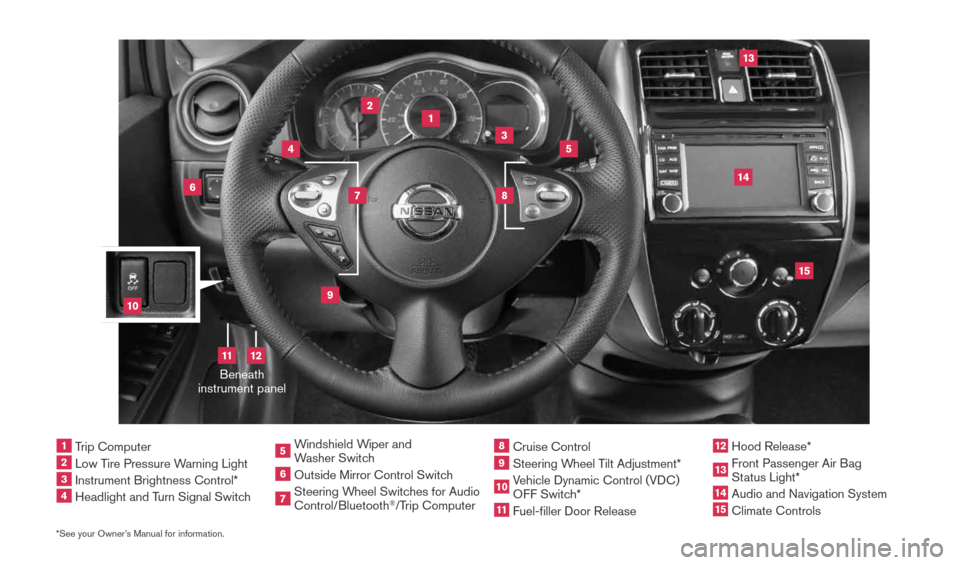
1 Trip Computer2 Low Tire Pressure Warning Light3 Instrument Brightness Control*4 Headlight and Turn Signal Switch
5 Windshield Wiper and
Washer Switch6 Outside Mirror Control Switch7 Steering Wheel Switches for Audio
Control/Bluetooth
®/Trip Computer
8 Cruise Control9 Steering Wheel Tilt Adjustment*10 Vehicle Dynamic Control (VDC)
OFF Switch*11 Fuel-filler Door Release
12 Hood Release* 13 Front Passenger Air Bag
Status Light*14 Audio and Navigation System15 Climate Controls
10
Beneath
instrument panel
12
11
1921699_15c_Versa_Note_QRG_031615.indd 33/16/15 3:21 PM
Page 5 of 24
3
USB (Universal Serial Bus) CONNECTION PORT/AUX JACK
AND iPOD® INTERFACE (if so equipped)
The USB port/AUX jack 1 is located on the
center console.
When a compatible USB memory device, iPod®
or auxiliary device is plugged into the USB port/
AUX jack, compatible audio files stored on the
device can be played through the vehicle’s
audio system.
For more information, refer to the “Monitor, climate, audio, phone and voice recognition systems (section 4)” of
your Owner’s Manual.
1
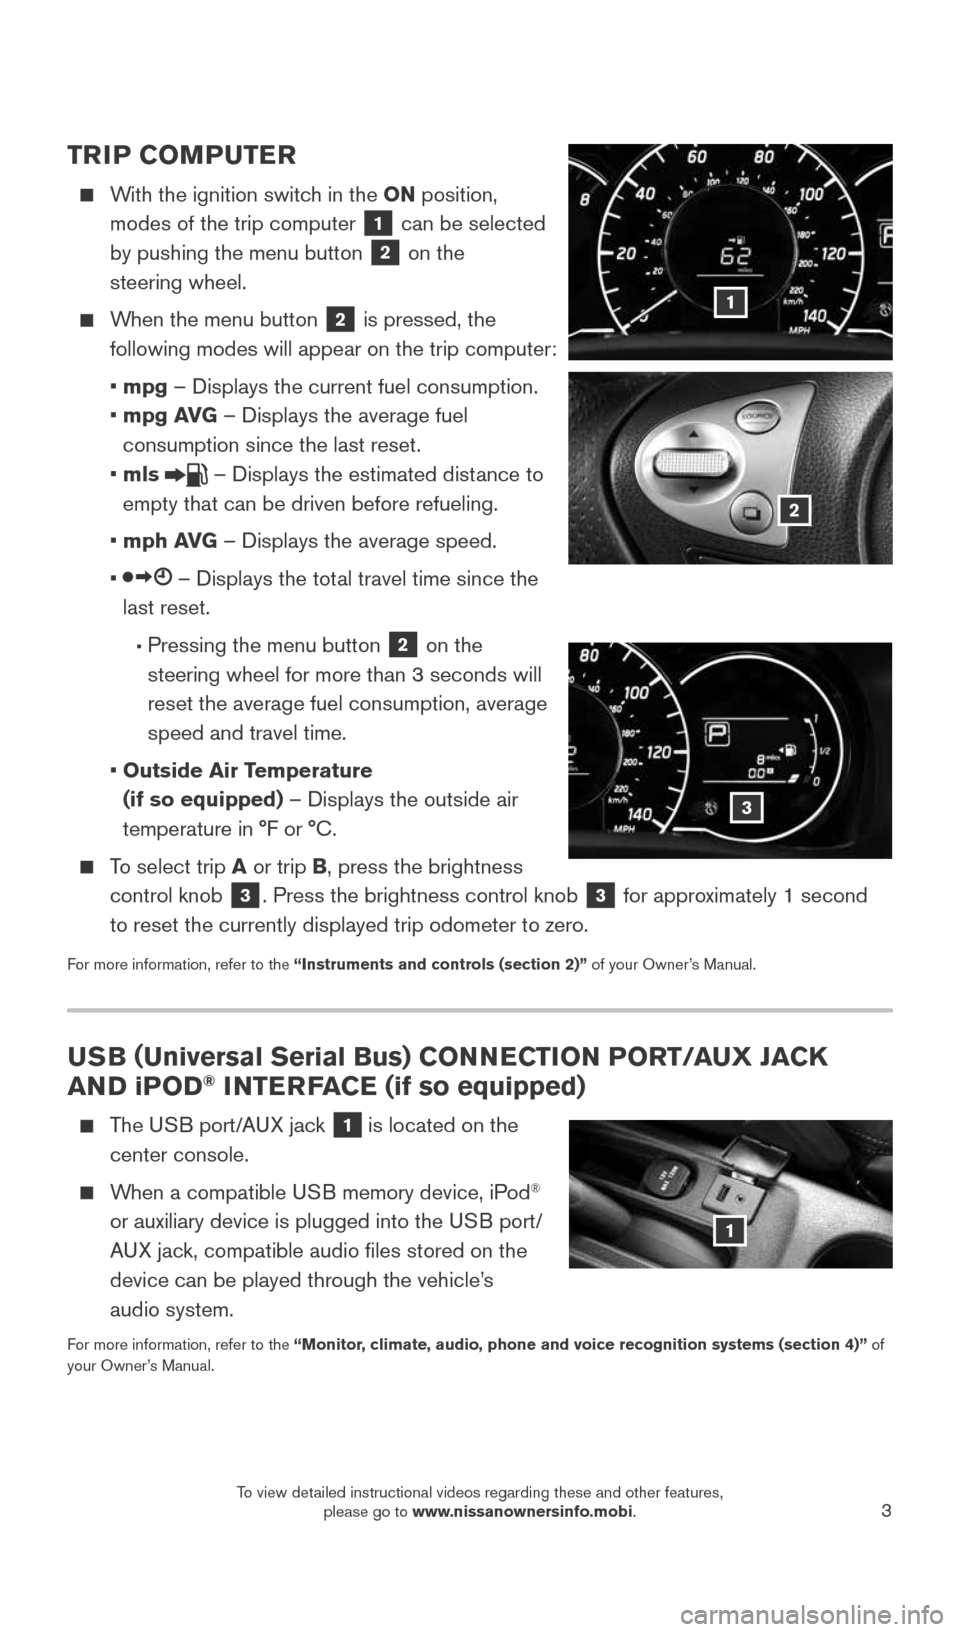
TRIP COMPUTER
With the ignition switch in the ON position,
modes of the trip computer
1 can be selected
by pushing the menu button 2 on the
steering wheel.
When the menu button 2 is pressed, the
following modes will appear on the trip computer:
• mpg – Displays the current fuel consumption.
• mpg AVG – Displays the average fuel
consumption since the last reset.
• mls
– Displays the estimated distance to
empty that can be driven before refueling.
• mph AVG – Displays the average speed.
•
– Displays the total travel time since the
last reset.
• Pressing the menu button 2 on the
steering wheel for more than 3 seconds will
reset the average fuel consumption, average
speed and travel time.
• Outside Air Temperature
(if so equipped) – Displays the outside air
temperature in °F or °C.
To select trip A or trip B, press the brightness
control knob
3. Press the brightness control knob 3 for approximately 1 second
to reset the currently displayed trip odometer to zero.
For more information, refer to the “Instruments and controls (section 2)” of your Owner’s Manual.
1
2
3
1921699_15c_Versa_Note_QRG_031615.indd 33/16/15 3:21 PM
To view detailed instructional videos regarding these and other features, please go to www.nissanownersinfo.mobi.
Page 8 of 24
6
ESSE NTIAL I N FOR MATION
LOOSE FUEL CAP
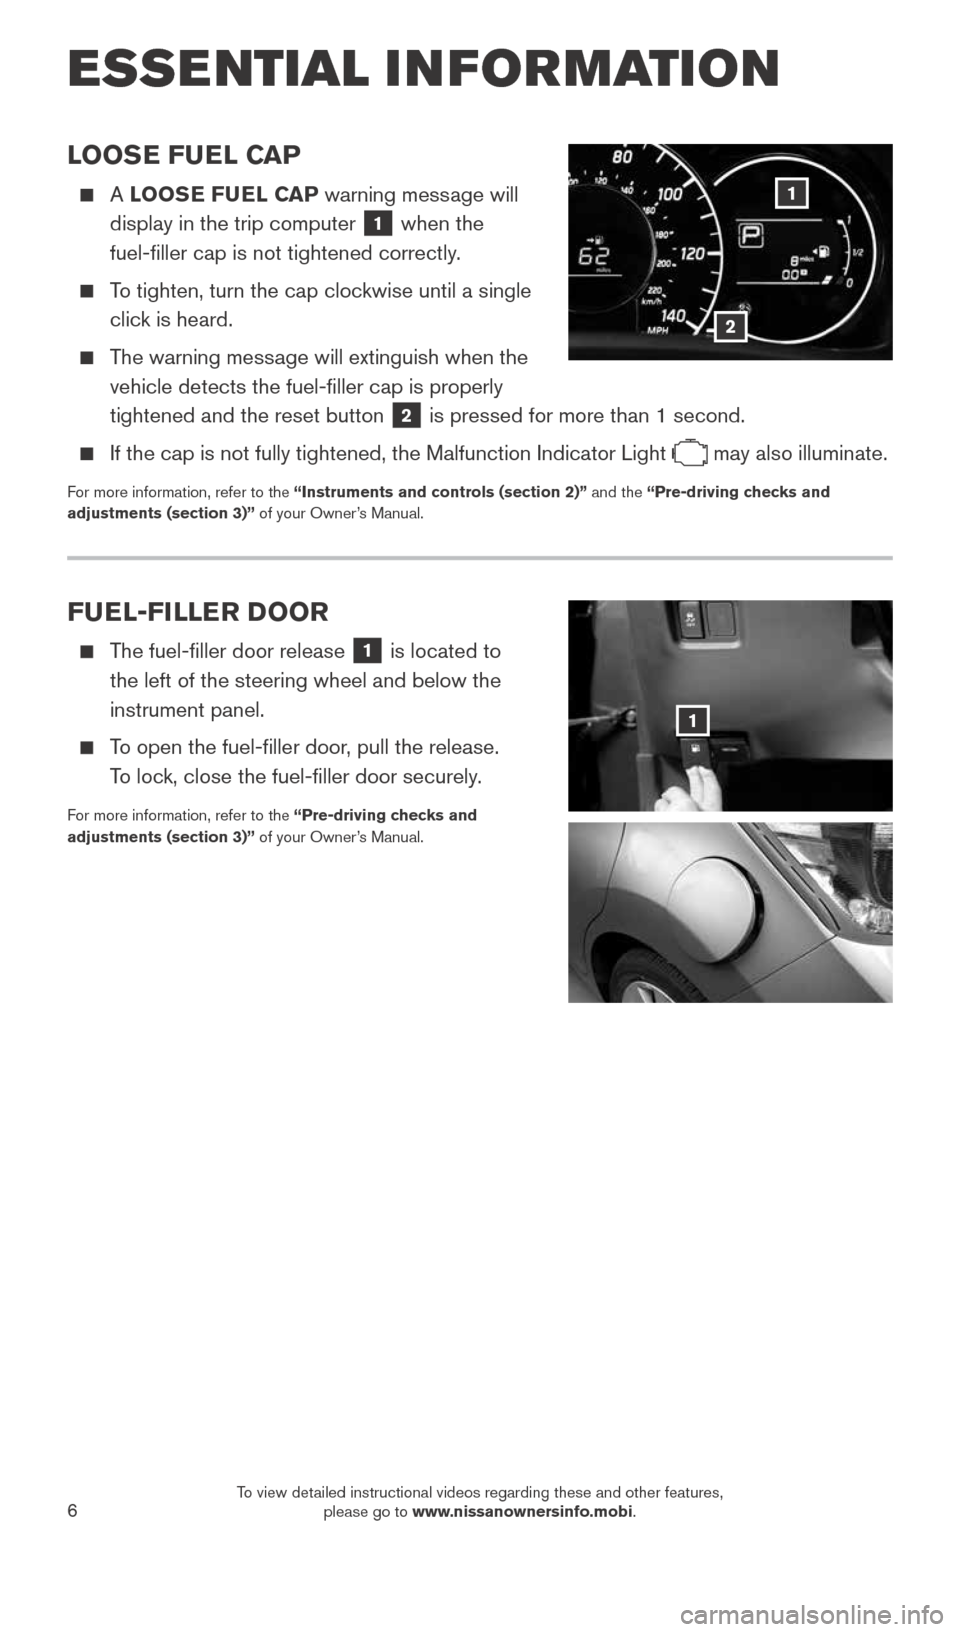
A LOOSE FUEL CAP warning message will
display in the trip computer
1 when the
fuel-filler cap is not tightened correctly.
To tighten, turn the cap clockwise until a single
click is heard.
The warning message will extinguish when the
vehicle detects the fuel-filler cap is properly
tightened and the reset button
2 is pressed for more than 1 second.
If the cap is not fully tightened, the Malfunction Indicator Light
may also illuminate.
For more information, refer to the “Instruments and controls (section 2)” and the “Pre-driving checks and
adjustments (section 3)” of your Owner’s Manual.
FUEL-FILLER DOOR
The fuel-filler door release
1 is located to
the left of the steering wheel and below the
instrument panel.
To open the fuel-filler door, pull the release.
To lock, close the fuel-filler door securely.
For more information, refer to the “Pre-driving checks and
adjustments (section 3)” of your Owner’s Manual.
1
2
1
1921699_15c_Versa_Note_QRG_031615.indd 63/16/15 3:21 PM
To view detailed instructional videos regarding these and other features, please go to www.nissanownersinfo.mobi.
Page 18 of 24
16
SYSTEM GUIDE
BLUETOOTH® HANDS-FREE PHONE SYSTEM
A cellular telephone should not be used while
driving so full attention may be given to
vehicle operation.*
SYSTEM OPERATING TIPS
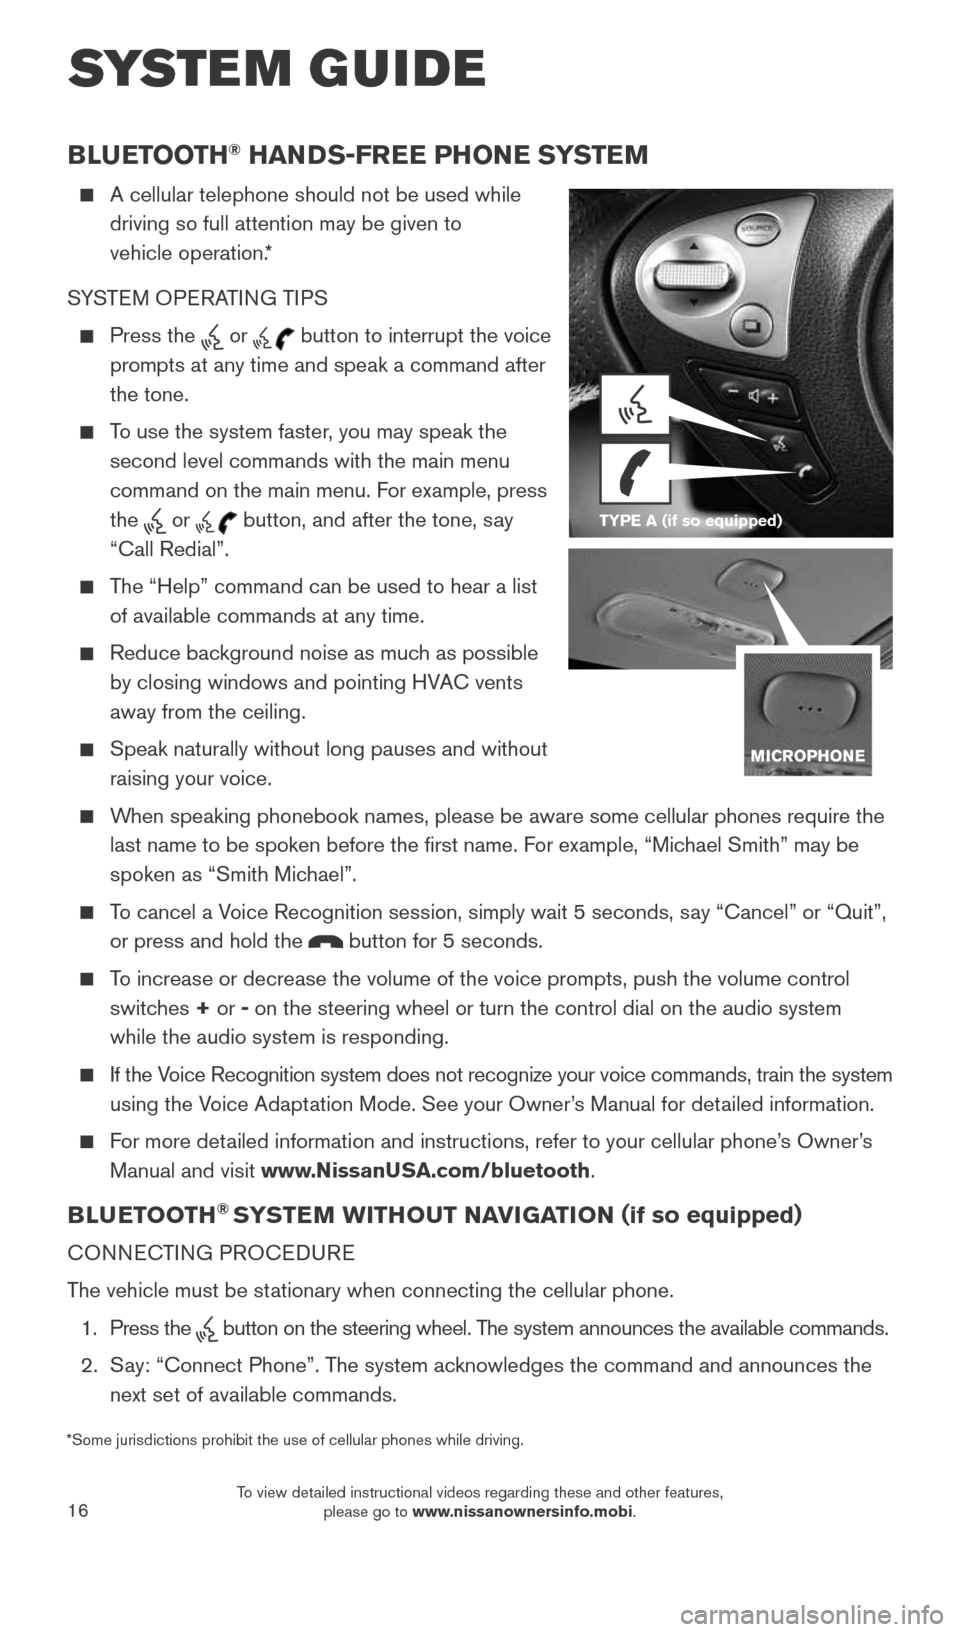
Press the or button to interrupt the voice
prompts at any time and speak a command after
the tone.
To use the system faster, you may speak the
second level commands with the main menu
command on the main menu. For example, press
the
or button, and after the tone, say
“Call Redial”.
The “Help” command can be used to hear a list
of available commands at any time.
Reduce background noise as much as possible
by closing windows and pointing HVAC vents
away from the ceiling.
Speak naturally without long pauses and without
raising your voice.
When speaking phonebook names, please be aware some cellular phones requi\
re the
last name to be spoken before the first name. For example, “Michael Smith” may be
spoken as “Smith Michael”.
To cancel a Voice Recognition session, simply wait 5 seconds, say “Cancel” or “Quit”,
or press and hold the
button for 5 seconds.
To increase or decrease the volume of the voice prompts, push the volume \
control
switches + or -
on the steering wheel or turn the control dial on the audio system
while the audio system is responding.
If the Voice Recognition system does not recognize your voice commands, train th\
e system
using the Voice Adaptation Mode. See your Owner’s Manual for detailed information.
For more detailed information and instructions, refer to your cellular phone’s Owner’s
Manual and visit www.NissanUSA.com/bluetooth.
BLUETOOTH® SYSTEM WITHOUT NAVIGATION ( if so equipped)
CONNECTING PROCEDURE
The vehicle must be stationary when connecting the cellular phone.
1. Press the
button on the steering wheel. The system announces the available commands.
2. Say: “Connect Phone”. The system acknowledges the command and announces the
next set of available commands.
*Some jurisdictions prohibit the use of cellular phones while driving. TYPE A (if so equipped)
1921699_15c_Versa_Note_QRG_031615.indd 163/16/15 3:22 PM
To view detailed instructional videos regarding these and other features, please go to www.nissanownersinfo.mobi.
Page 19 of 24
17
3. Say: “Add Phone”. The system acknowledges the command and asks you to initiate
connecting from the phone handset.
4. Initiate connecting from the cellular phone:
The connecting procedure varies according to each cellular phone model.
For detailed connecting instructions and compatible cellular phones, please vis\
it
www.NissanUSA.com/bluetooth.
When prompted for a PIN code, enter “1234” from the handset. (The PIN code is
assigned by NISSAN and cannot be changed.)
5. Say a name for the cellular phone when the system asks you to provide one\
. You can
give the cellular phone a name of your choice.
PHONEBOOK SETUP
The phonebook stores up to 1,000 entries for each phone paired with the system.
Depending on your cellular phone, the system may automatically download \
your
cellular phone’s entire phonebook to the vehicle’s Bluetooth® system.
If the phonebook does not download automatically, entries can be
individually downloaded.
To manually download entries:
1. Push the
button on the steering wheel.
2. After the tone, say “Phonebook”.
3. After the next tone, say “Transfer Entry”. The system acknowledges the command
and asks you to initiate the transfer from the phone handset. The new contact
phone number will be transferred from the cellular phone to the vehicle.\
• The transfer procedure varies according to each cellular phone. See your
cellular phone’s Owner’s Manual for details. You can also visit
www.NissanUSA.com/bluetooth for instructions on transferring
phone numbers from NISSAN-recommended cellular phones.
4. The system repeats the number and prompts you for the next command. When you
have finished entering numbers or transferring an entry, choose “Store”.
5. The system confirms the name, location and number.
MAKING A CALL FROM THE PHONEBOOK
In some cases, names stored using all UPPERCASE letters may not be recognized by the
Voice Recognition system.
1. Press the
button.
2. After waiting for the tone, say “Call”.
3. After the next tone, speak the name of a phonebook entry. For example,
“Michael Smith”.
4. Confirm the correct name is recognized by saying “Dial” after the tone.
1921699_15c_Versa_Note_QRG_031615.indd 173/16/15 3:22 PM
To view detailed instructional videos regarding these and other features, please go to www.nissanownersinfo.mobi.
Page 21 of 24
19
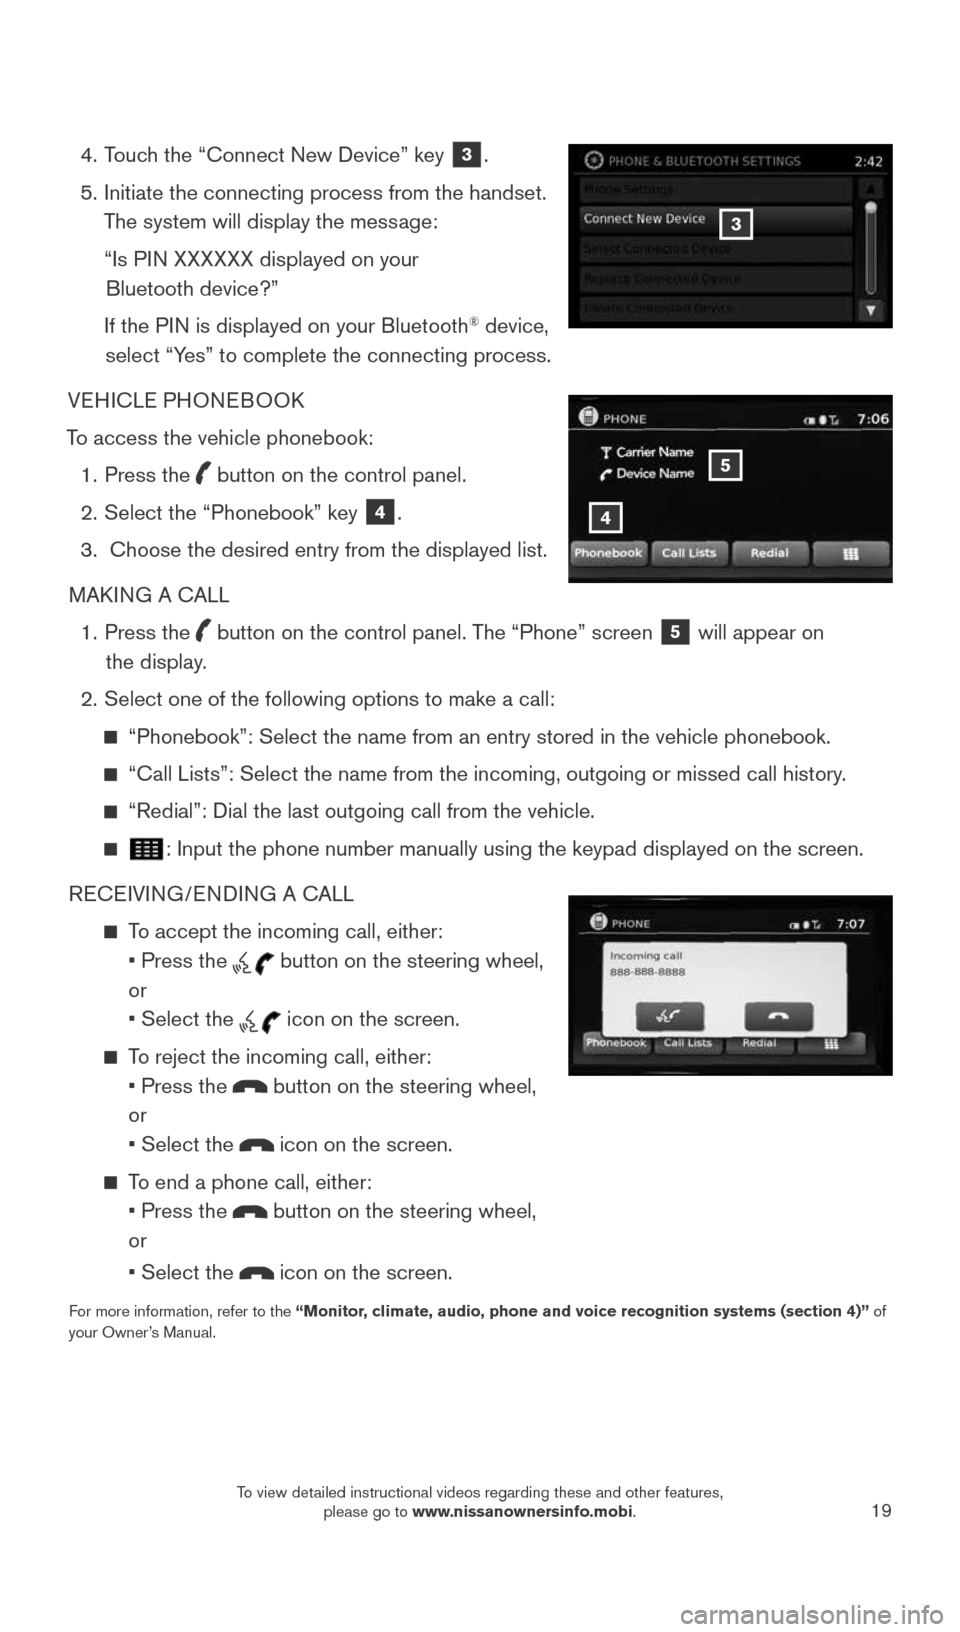
4. Touch the “Connect New Device” key
3.
5. Initiate the connecting process from the handset.
The system will display the message:
“Is PIN XXXXXX displayed on your
Bluetooth device?”
If the PIN is displayed on your Bluetooth
® device,
select “Yes” to complete the connecting process.
VEHICLE PHONEBOOK
To access the vehicle phonebook: 1. Press the
button on the control panel.
2. Select the “Phonebook” key
4.
3. Choose the desired entry from the displayed list.
MAKING A CALL
1. Press the
button on the control panel. The “Phone” screen
5 will appear on
the display.
2. Select one of the following options to make a call:
“Phonebook”: Select the name from an entry stored in the vehicle p\
honebook.
“Call Lists”: Select the name from the incoming, outgoing or misse\
d call history.
“Redial”: Dial the last outgoing call from the vehicle.
: Input the phone number manually using the keypad displayed on the scre\
en.
RECEIVING/ENDING A CALL
To accept the incoming call, either:
• Press the
button on the steering wheel,
or
• Select the
icon on the screen.
To reject the incoming call, either:
• Press the
button on the steering wheel,
or
• Select the
icon on the screen.
To end a phone call, either:
• Press the
button on the steering wheel,
or
• Select the
icon on the screen.
For more information, refer to the “Monitor, climate, audio, phone and voice recognition systems (section 4)” of
your Owner’s Manual.
3
4
5
1921699_15c_Versa_Note_QRG_031615.indd 193/16/15 3:22 PM
To view detailed instructional videos regarding these and other features, please go to www.nissanownersinfo.mobi.