Page 115 of 457
HOW TO USE THE VEHICLE
INFORMATION DISPLAY
Press the vehicle information display INFO but-
ton
�1located on the instrument panel to toggle
through the following modes:
● Fuel economy (if so equipped)
● Driving averages
● Current trip information
● Range
● Outside temperature (if so equipped)
● Settings ●
Alerts
Rotate the INFO button
�2to highlight the de-
sired menu option within the selected mode.
Press the INFO button
�1to enter the high-
lighted menu.
The icons at the bottom of the display screen
show the options available:
ENTER — Press the INFO button to select
a highlighted option.
NEXT — Rotate the INFO button to high-
light an option.
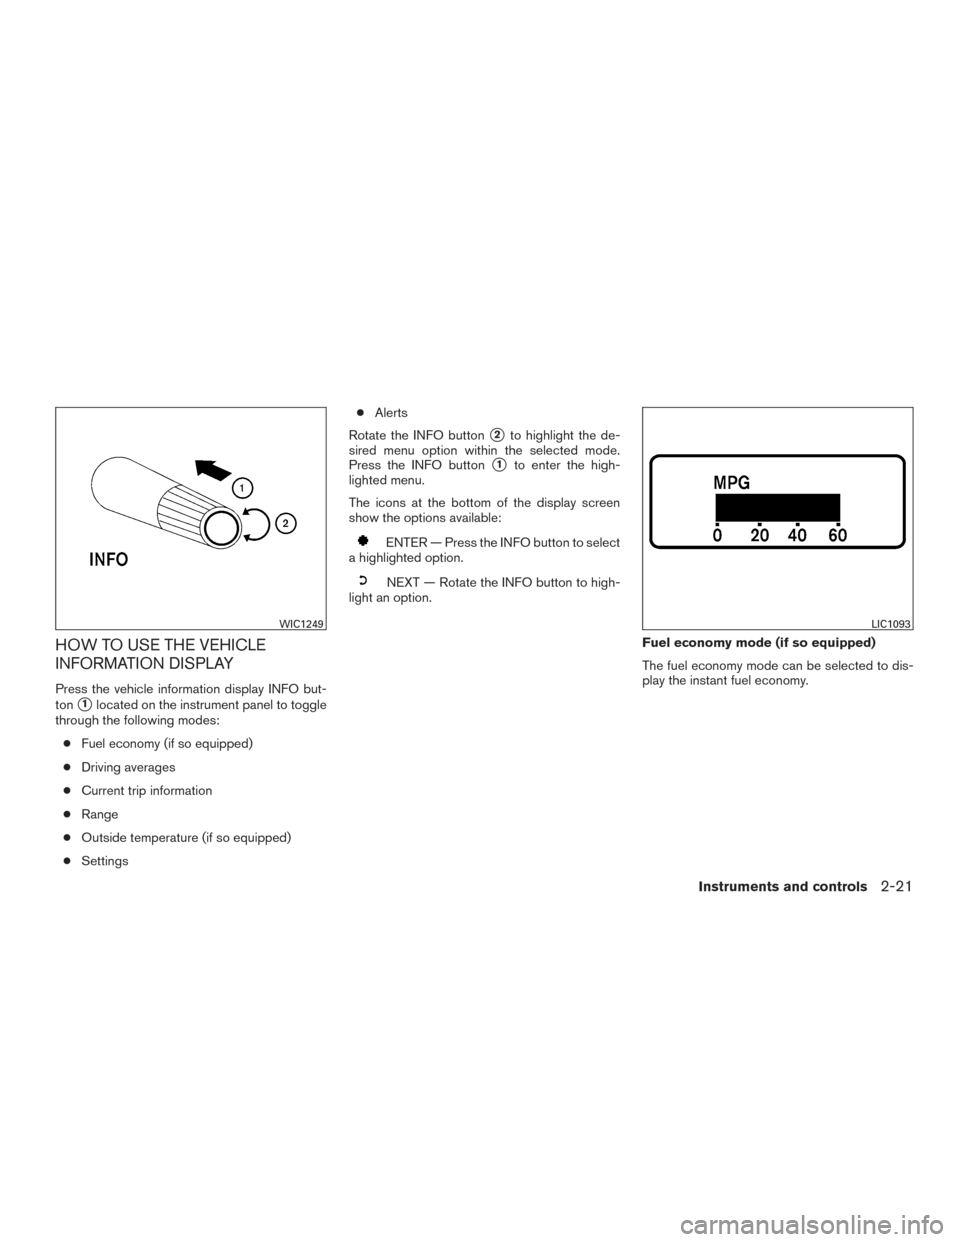
Fuel economy mode (if so equipped)
The fuel economy mode can be selected to dis-
play the instant fuel economy.
WIC1249LIC1093
Instruments and controls2-21
Page 116 of 457
Average driving information mode
The average driving information mode can be
selected to display the average miles per gallon
and miles per hour since the last reset.Current trip information mode
The current trip information mode can be se-
lected to show the time and distance driven since
the last reset.Range mode
The range mode can be selected to give you an
estimation of the distance that can be driven
before refueling. The range is constantly calcu-
lated based on the amount of fuel in the fuel tank
and the actual fuel consumption.
LIC1097WIC1266LIC2598
2-22Instruments and controls
Page 117 of 457
Exterior temperature mode (if so
equipped)
The exterior temperature mode can be selected
to provide you with the temperature outside of
your vehicle.Settings mode
The settings mode allows you to set reminders or
preferences for alerts, maintenance intervals, lan-
guage, and units.
In the settings mode screen, rotate the INFO
button to move to:
● Alert
● Maintenance
● Display
and press the INFO button to select the menu. Alert mode
The alert mode allows you to set alerts notifying
you of time to rest or icy conditions.
The time to rest alert is a timer that can be set to
remind the driver when the selected amount of
time has passed.
The icy alert notifies you that icy driving condi-
tions may exist.
LIC1096LIC2594LIC2595
Instruments and controls2-23
Page 118 of 457

Maintenance mode
The maintenance mode allows you to set alerts
for the reminding of maintenance intervals for the
following:● engine oil
● oil filter
● tires
● other
Set a desired interval by rotating the INFO button
to highlight the maintenance field, then press the
INFO button to select. The reset mode will open
up and allow you to enter the desired distance. Display mode
Rotate the INFO button to highlight the desired
mode, then press the INFO button to select.
Language: English or French
Unit: US — mile, °F, MPG
Metric — km, °C, L/100 km
The settings are automatically saved when you
exit the menu by pressing the BACK button or
any other mode button. Warning mode
The warning mode can be selected to view any
warnings that may be present. Once the screen is
selected you have the option of skipping the
warning or viewing it in detail.
Warnings can be present for issues such as an
open door or low fuel. For additional information
about potential warnings, refer to “Vehicle infor-
mation display warnings and indicators” in this
section.
WIC1164WIC1165LIC1098
2-24Instruments and controls
Page 119 of 457
Vehicle information display warnings
and indicators
1. Door open warning
2. Low fuel warning (if so equipped)
3. Low windshield-washer fluid warning4. Parking brake warning
5.
Cruise main switch indicator (if so equipped)
6. Cruise set switch indicator (if so equipped)
7. Transfer 4LO position indicator (
model)
8. 4WD shift indicator (
model)
9. Automatic transmission position indicator
10. Loose fuel cap warning
11. Check tire pressure warning
LIC2603
Instruments and controls2-25
Page 170 of 457
 .
For additional information, refer to “Interior light”
in the “In")
Using the interior lights
Press thebutton on the key fob once to
turn on the interior lights and puddle lights (if so
equipped) .
For additional information, refer to “Interior light”
in the “Instruments and controls” section of this
manual.
Silencing the horn beep feature
If desired, the horn beep feature can be deacti-
vated using the key fob.
NOTE:
If you change the horn beep and light flash
feature with the key fob, the display screen
(if so equipped) will not show the current
mode and cannot be used to change the
mode. Use the key fob to return to the
previous mode and re-enable the display
screen control. To deactivate:
Press and hold the
andbuttonsfor at least 2 seconds.
The hazard warning lights will flash three times to
confirm that the horn beep feature is deactivated.
To activate: Press and hold the
andbuttonsfor at least 2 seconds once
more.
The hazard warning lights will flash once and the
horn will sound once to confirm that the horn
beep feature reactivated.
Deactivating the horn beep feature does not si-
lence the horn if the alarm is triggered.
LPD0262
3-10Pre-driving checks and adjustments
Page 172 of 457

●Do not attempt to top off the fuel tank
after the fuel pump nozzle shuts off
automatically. Continued refueling may
cause fuel overflow, resulting in fuel
spray and possibly a fire.
● Use only an original equipment type
fuel-filler cap as a replacement. It has a
built-in safety valve needed for proper
operation of the fuel system and emis-
sion control system. An incorrect cap
can result in a serious malfunction and
possible injury. It could also cause
the
Malfunction Indicator Light
(MIL) to come on.
● Never pour fuel into the throttle body to
attempt to start your vehicle.
● Do not fill a portable fuel container on a
truck bed liner, rubber truck bed mat, or
other insulating material. Static elec-
tricity can cause an explosion of flam-
mable liquid, vapor or gas in any vehicle
or trailer. To reduce the risk of serious
injury or death when filling portable fuel
containers:
– Always place the container on the ground when filling.
– Do not use electronic devices when filling. – Keep the pump nozzle in contact
with the container while you are fill-
ing it.
– Use only approved portable fuel con- tainers for flammable liquid.
CAUTION
●Only vehicles with the E-85 filler door
label can operate on up to E-85 fuel.
Fuel system or other damage can occur
if up to E-85 fuel is used in vehicles that
are not designed to run on E-85 fuel. For
additional information, refer to “Fuel
Recommendation” in the “Technical
and consumer information” section of
this manual.
● The LOOSE FUEL CAP warning will ap-
pear if the fuel-filler cap is not properly
tightened. It may take a few driving trips
for the message to be displayed. Failure
to tighten the fuel-filler cap properly
after the LOOSE FUEL CAP warning ap-
pears may cause the
Malfunction
Indicator Light (MIL) to illuminate. ●
Failure to tighten the fuel-filler cap
properly may cause the
Malfunc-
tion Indicator Light (MIL) to illuminate.
If the
light illuminates because
the fuel-filler cap is loose or missing,
tighten or install the cap and continue
to drive the vehicle. The
light
should turn off after a few driving trips.
If the
light does not turn off after a
few driving trips, have the vehicle in-
spected by a NISSAN dealer.
● For additional information, refer to
“Malfunction Indicator Light (MIL)” in
the “Instruments and Controls” section
in this manual.
● If fuel is spilled on the vehicle body,
flush it away with water to avoid paint
damage.
For additional information, refer to “Fuel recom-
mendation (without Flexible Fuel Vehicle option)”
and “Flexible fuel vehicle (FFV) fuel recommen-
dation” in the “Technical and consumer informa-
tion” section in this manual.
3-12Pre-driving checks and adjustments
Page 173 of 457

To remove the fuel-filler cap:1. Turn the fuel-filler cap counterclockwise to remove.
2. Loop the tether strap around the hook
�1
while refueling.
To install the fuel-filler cap: 1. Insert the fuel-filler cap straight into the fuel- filler tube.
2. Turn the fuel-filler cap clockwise until a single click is heard.
Loose Fuel Cap warning
The LOOSE FUEL CAP warning appears in the
odometer when the fuel-filler cap is not tightened
correctly after the vehicle has been refueled. It
may take a few driving trips for the message to be
displayed. To turn off the warning, perform the
following:
1. Remove and install the fuel-filler cap as pre- viously described as soon as possible.
2. Tighten the fuel-filler cap until it clicks. 3. Press the loose fuel cap warning reset but-
ton
�Aon the instrument panel located be-
hind the steering wheel for about 1 second
to turn off the LOOSE FUEL CAP warning
�Bafter tightening the fuel-filler cap.
LPD0325LRS2005
Pre-driving checks and adjustments3-13


The exterior temperature mode can be selected
to provide you with the temperature outside of
your vehicle.Settings mode
The settings mode allows you to set r")

3. Low windshield-washer fluid warning4. Parking brake warning
5.
Cruise main switch indic")