2015 NISSAN SENTRA steering
[x] Cancel search: steeringPage 2 of 24

*See your Owner’s Manual for information.
2
1
3
10
15
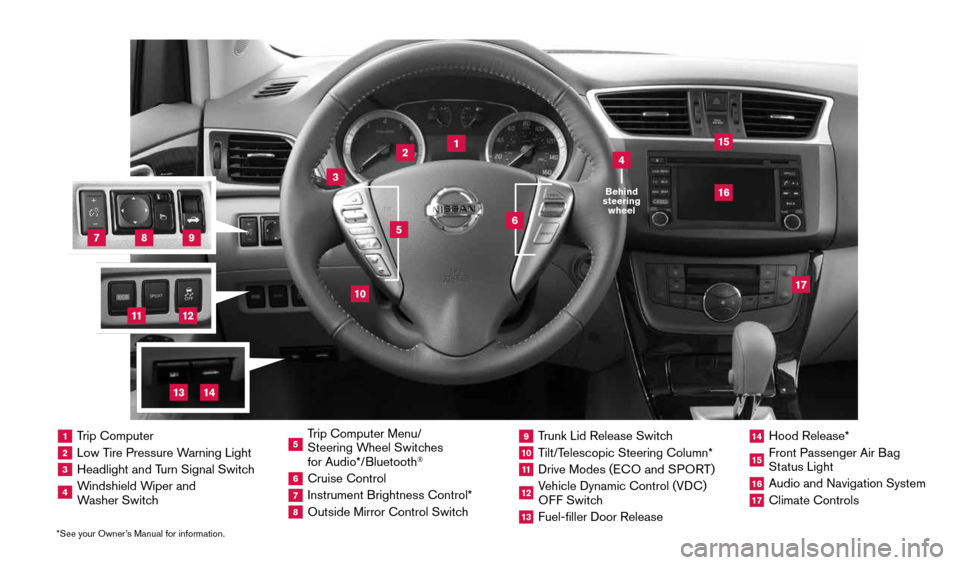
1 Trip Computer2 Low Tire Pressure Warning Light3 Headlight and Turn Signal Switch4 Windshield Wiper and
Washer Switch
5 Trip Computer Menu/
Steering Wheel Switches
for Audio*/Bluetooth
®
6 Cruise Control7 Instrument Brightness Control*8 Outside Mirror Control Switch
9 Trunk Lid Release Switch10 Tilt/Telescopic Steering Column*11 Drive Modes ( ECO and SPORT )12 Vehicle Dynamic Control (VDC)
OFF Switch13 Fuel-filler Door Release
14 Hood Release*15 Front Passenger Air Bag
Status Light16 Audio and Navigation System17 Climate Controls
6
5
16
17
4Behind
steering wheel
8
7
9
11
12
14
13
1911994_15c_Sentra_QRG_060815.indd 36/8/15 2:39 PM
Page 7 of 24

5
LOOSE FUEL CAP
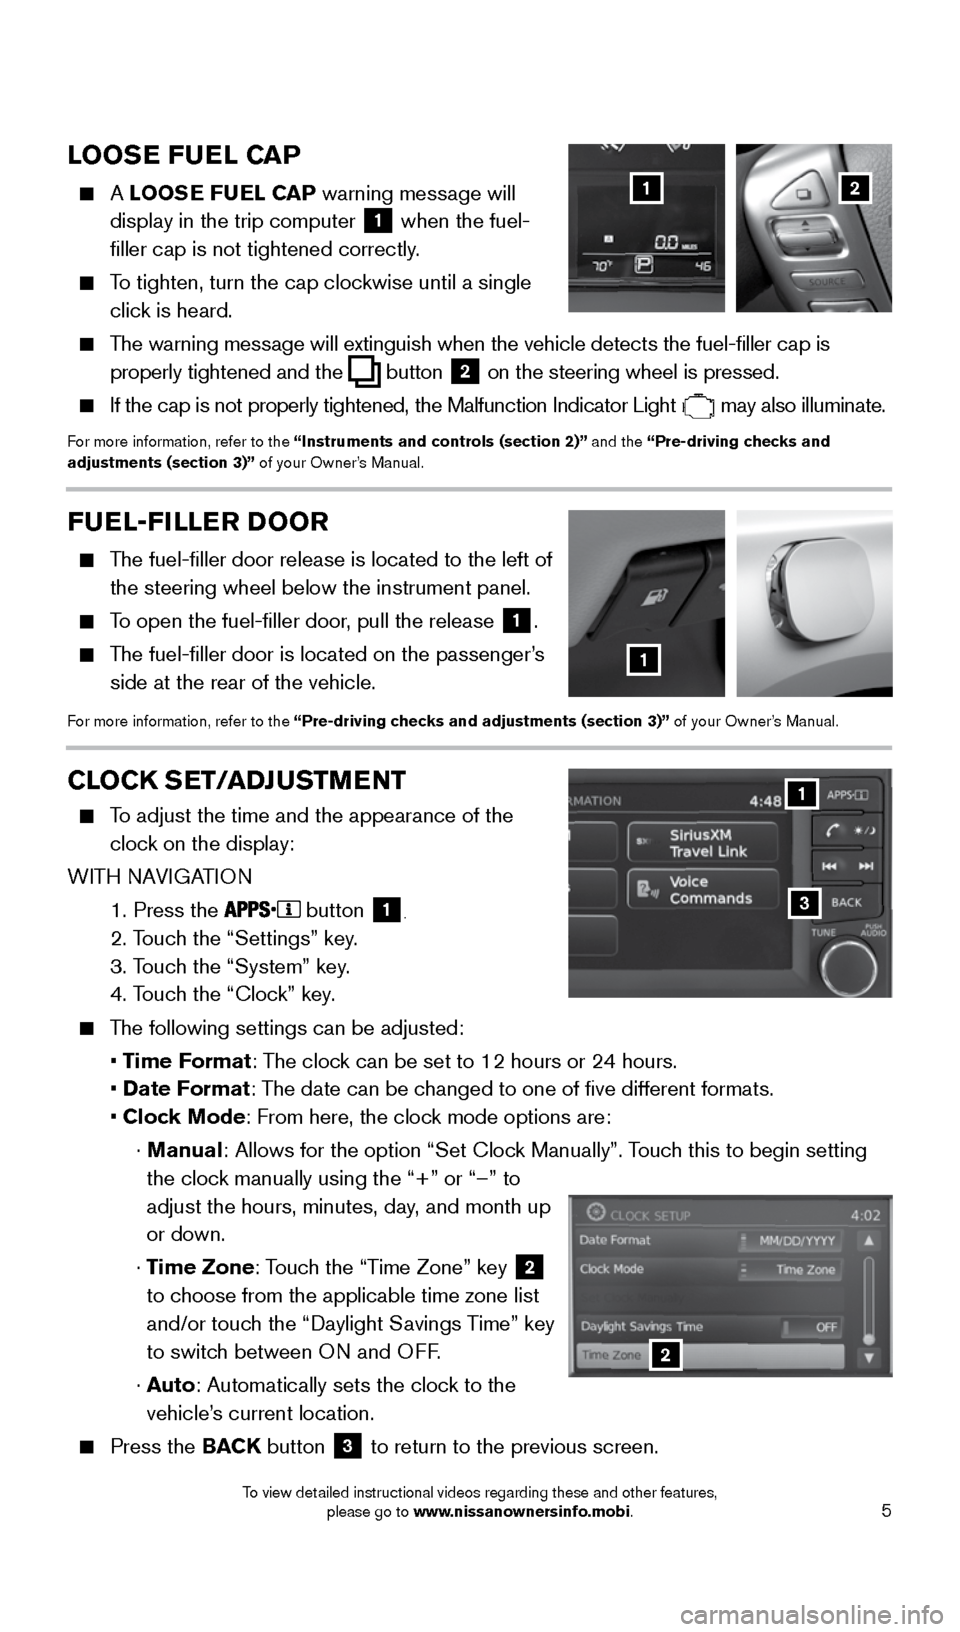
A LOOSE FUEL CAP warning message will
display in the trip computer
1 when the fuel-
filler cap is not tightened correctly.
To tighten, turn the cap clockwise until a single
click is heard.
The warning message will extinguish when the vehicle detects the fuel-filler cap is
properly tightened and the
button 2 on the steering wheel
is pressed.
If the cap is not properly tightened, the Malfunction Indicator Light
may also illuminate.
For more information, refer to the “Instruments and controls (section 2)” and the “Pre-driving checks and
adjustments (section 3)” of your Owner’s Manual.
12
FUEL-FILLER DOOR
The fuel-filler door release is located to the left of
the steering wheel below the instrument panel.
To open the fuel-filler door, pull the release
1.
The fuel-filler door is located on the passenger’s
side at the rear of the vehicle.
For more information, refer to the “Pre-driving checks and adjustments (section 3)” of your Owner’s Manual.
1
CLOCK SET/ADJUSTMENT
To adjust the time and the appearance of the
clock on the display:
WITH NAVIGATION
1. Press the
button 1.
2. Touch the “Settings” key.
3. Touch the “System” key.
4. Touch the “Clock” key.
The following settings can be adjusted:
• Time Format: The clock can be set to 12 hours or 24 hours.
• Date Format: The date can be changed to one of five different formats.
• Clock Mode: From here, the clock mode options are:
· Manual: Allows for the option “Set Clock Manually”. Touch this to begin setting
the clock manually using the “+” or “–” to
adjust the hours, minutes, day, and month up
or down.
· Time Zone: Touch the “Time Zone” key
2
to choose from the applicable time zone list
and/or touch the “Daylight Savings Time” key
to switch between ON and OFF.
· Auto: Automatically sets the clock to the
vehicle’s current location.
Press the BACK button
3 to return to the previous screen.
3
1
2
1911994_15c_Sentra_QRG_060815.indd 56/8/15 2:39 PM
To view detailed instructional videos regarding these and other features, please go to www.nissanownersinfo.mobi.
Page 9 of 24

7
TRUNK LID RELEASE SWITCH
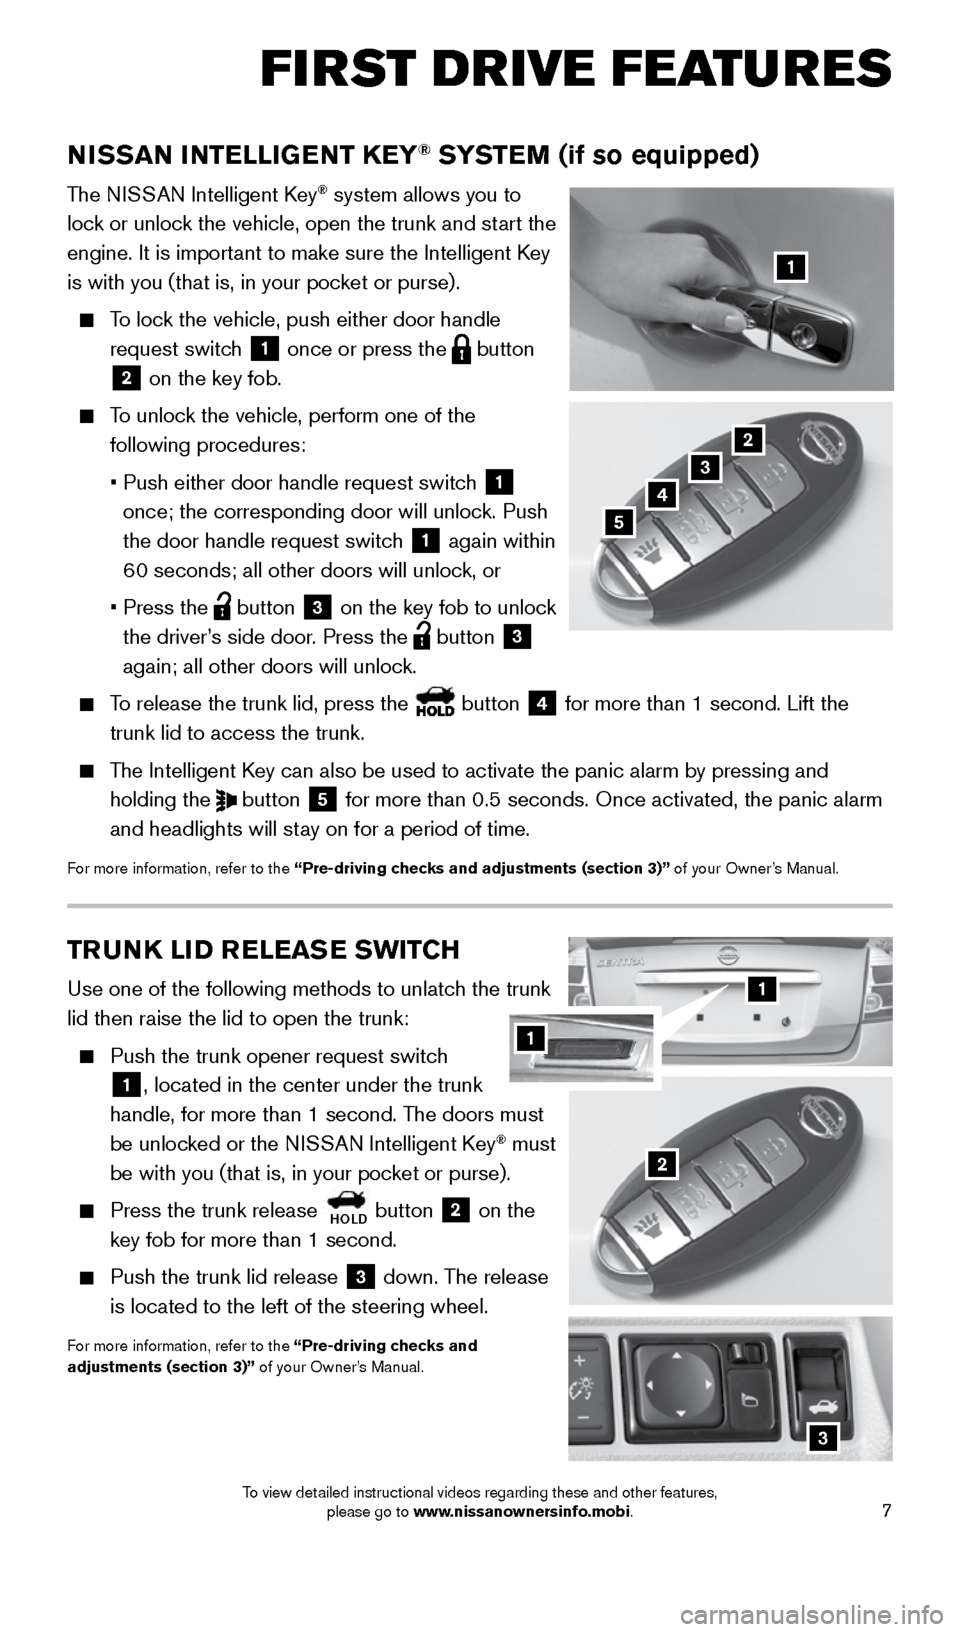
Use one of the following methods to unlatch the trunk
lid then raise the lid to open the trunk:
Push the trunk opener request switch
1, located in the center under the trunk
handle, for more than 1 second. The doors must
be unlocked or the NISSAN Intelligent Key
® must
be with you (that is, in your pocket or purse).
Press the trunk release
HOLD button
2 on the
key fob for more than 1 second.
Push the trunk lid release
3 down. The release
is located to the left of the steering wheel.
For more information, refer to the “Pre-driving checks and
adjustments (section 3)” of your Owner’s Manual.
3
NISSAN INTELLIGENT KEY® SYSTEM (if so equipped)
The NISSAN Intelligent Key® system allows you to
lock or unlock the vehicle, open the trunk and start the
engine. It is important to make sure the Intelligent Key
is with you (that is, in your pocket or purse).
To lock the vehicle, push either door handle
request switch
1 once or press the
button
2 on the key fob.
To unlock the vehicle, perform one of the
following procedures:
• Push either door handle request switch
1
once; the corresponding door will unlock. Push
the door handle request switch
1 again within
60 seconds; all other doors will unlock, or
• Press the
button
3 on the key fob to unlock
the driver’s side door. Press the button 3
again; all other doors will unlock.
To release the trunk lid, press the button
4 for more than 1 second. Lift the
trunk lid to access the trunk.
The Intelligent Key can also be used to activate the panic alarm by pressing and
holding the
button
5 for more than 0.5 seconds. Once activated, the panic alarm
and headlights will stay on for a period of time.
For more information, refer to the “Pre-driving checks and adjustments (section 3)” of your Owner’s Manual.
1
2
3
4
2
5
1
FI RST DR IVE FEATU R ES
1
1911994_15c_Sentra_QRG_060815.indd 76/8/15 2:39 PM
To view detailed instructional videos regarding these and other features, please go to www.nissanownersinfo.mobi.
Page 17 of 24

15
SYSTEM GUIDE
TRIP COMPUTER
With the ignition switch in the ON position, trip
computer
modes
can be selected by pressing the
button
2 on the steering wheel.
The following modes can be selected in the
vehicle information display
1:
• Odometer (shown at all times) – records the
total distance the vehicle has been driven.
• Trip A – measures the distance of one
specific trip.
• Trip B – measures the distance of a second
specific trip.
• Eco Pedal Indicator – displays the recommended accelerator pedal position to
optimize fuel consumption.
• MPG – displays the instant fuel consumption.
• AVG/mpg – displays the average fuel consumption since the last reset.
• AVG/mph – displays the average vehicle speed since the last reset.
• dte – displays the estimated distance to empty (dte) the vehicle can be driven
before refueling.
To reset Trip A, Trip B, AVG/mpg or AVG/mph, go to the desired mode on the trip
computer and hold the
button 2 for more than 3 seconds.
For more information, refer to the “Instruments and controls (section 2)” of your Owner’s Manual.
1
2
TEXT MESSAGING
* (if so equipped)
This system allows for sending and receiving text
messages through the vehicle’s interface.
Using predefined or custom messages, send a
text to a name or phone number stored in your
Bluetooth
® Hands-free Phone System.
Once enabled, the text message, sender and
delivery time are shown on the control panel display screen.
Text messages have the option of being read aloud.
Text messages are only displayed on the control panel display if the vehicle spee\
d is
less than 5 mph (8 km/h).
Many cellular phones may require special permission to enable text messaging. Check
the cellular phone’s screen during Bluetooth® pairing. For some cellular phones, you
may need to enable ‘Notifications’ in the phone’s Bluetooth® menu for text messages
to appear on the touch-screen display. For more detailed information and instructions,
refer to your cellular phone’s Owner’s Manual.
*Laws in some jurisdictions may restrict the use of “Text-to-Speech”. Some of the applications and features, such as social
networking and texting, may also be restricted. Check local regulations for any requirements before using these features.
1911994_15c_Sentra_QRG_060815.indd 156/8/15 2:40 PM
To view detailed instructional videos regarding these and other features, please go to www.nissanownersinfo.mobi.
Page 19 of 24

17
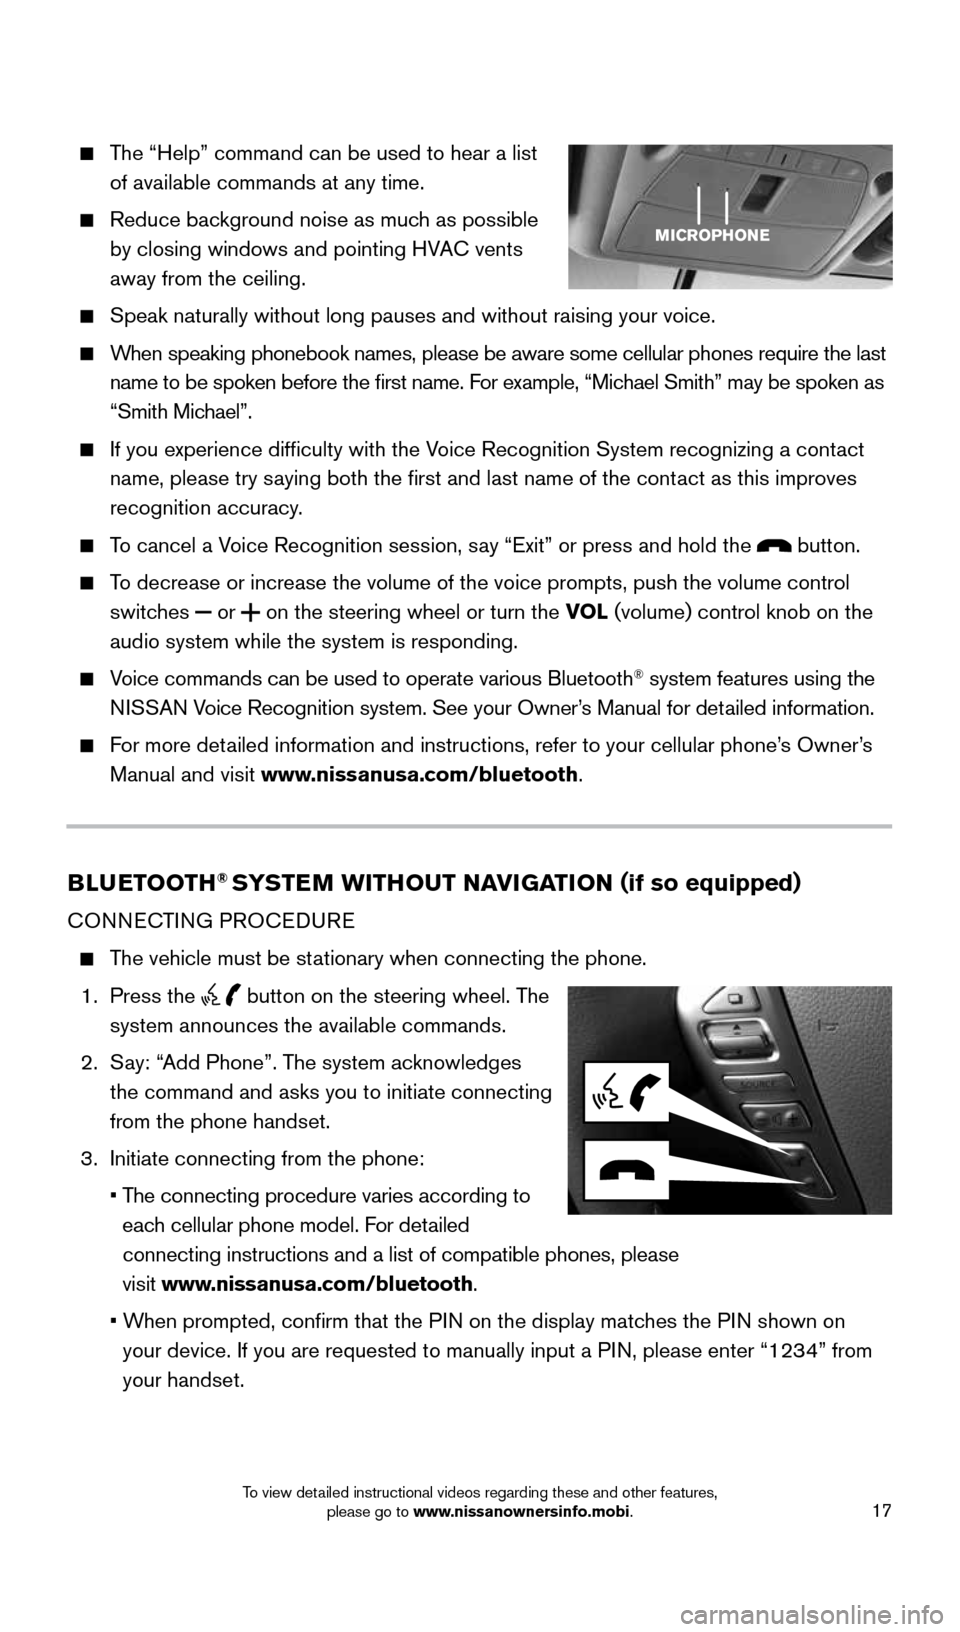
The “Help” command can be used to hear a list
of available commands at any time.
Reduce background noise as much as possible
by closing windows and pointing HVAC vents
away from the ceiling.
Speak naturally without long pauses and without raising your voice.
When speaking phonebook names, please be aware some cellular phones requi\
re the last
name to be spoken before the first name. For example, “Michael Smith” may be spoken as
“Smith Michael”.
If you experience difficulty with the Voice Recognition System recognizing a contact
name, please try saying both the first and last name of the contact as this improves
recognition accuracy.
To cancel a Voice Recognition session, say “Exit” or press and hold the button.
To decrease or increase the volume of the voice prompts, push the volume \
control
switches
or
on the steering wheel or turn the VOL (volume) control knob on the
audio system while the system is responding.
Voice commands can be used to operate various Bluetooth® system features using the
NISSAN Voice Recognition system. See your Owner’s Manual for detailed information.
For more detailed information and instructions, refer to your cellular phone’s Owner’s
Manual and visit www.nissanusa.com/bluetooth.
BLUETOOTH® SYSTEM WITHOUT NAVIGATION ( if so equipped)
CONNECTING PROCEDURE
The vehicle must be stationary when connecting the phone.
1. Press the
button on the steering wheel. The
system announces the available commands.
2. Say: “Add Phone”. The system acknowledges
the command and asks you to initiate connecting
from the phone handset.
3. Initiate connecting from the phone:
• The connecting procedure varies according to
each cellular phone model. For detailed
connecting instructions and a list of compatible phones, please
visit www.nissanusa.com/bluetooth.
• When prompted, confirm that the PIN on the display matches the PIN shown on
your device. If you are requested to manually input a PIN, please enter “1234” from
your handset.
1911994_15c_Sentra_QRG_060815.indd 176/8/15 2:40 PM
To view detailed instructional videos regarding these and other features, please go to www.nissanownersinfo.mobi.
Page 22 of 24

20
SYSTEM GUIDE
MAKING A CALL
1. Press the
button on the instrument panel. The “Phone” menu
5 will appear on
the display.
2. Select one of the following options to make a call:
“Phonebook”: Select the name from an entry stored in the vehicle’\
s phonebook.
“Call Lists”: Select the name from the incoming, outgoing or misse\
d call history.
“Redial”: Dial the last outgoing call from the vehicle.
: Input the phone number manually using the keypad displayed on the scree\
n.
RECEIVING A CALL
To accept the incoming call, either:
• Press the
button on the steering wheel,
or
• Select the
icon on the screen.
To reject the incoming call, either:
• Press the
button on the steering wheel,
or
• Select the
icon on the screen.
To end a phone call, either:
• Press the
button on the steering wheel,
or
• Select the
icon on the screen.
For more information, refer to the “Monitor, climate, audio, phone and voice recognition systems (section 4)” of
your Owner’s Manual.
1911994_15c_Sentra_QRG_060815.indd 206/8/15 2:40 PM
To view detailed instructional videos regarding these and other features, please go to www.nissanownersinfo.mobi.