Page 1 of 24
QUICK REFERENCE GUIDE
2015
SENTRA
1911994_15c_Sentra_QRG_060815.indd 26/8/15 2:39 PM
Page 2 of 24
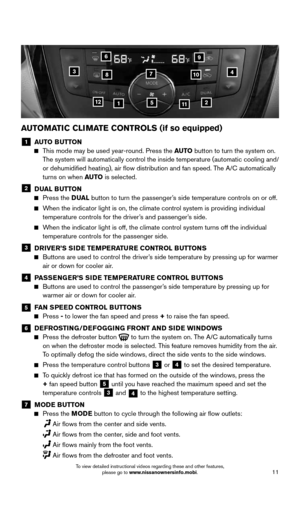
*See your Owner’s Manual for information.
2
1
3
10
15
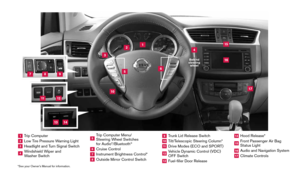
1 Trip Computer2 Low Tire Pressure Warning Light3 Headlight and Turn Signal Switch4 Windshield Wiper and
Washer Switch
5 Trip Computer Menu/
Steering Wheel Switches
for Audio*/Bluetooth
®
6 Cruise Control7 Instrument Brightness Control*8 Outside Mirror Control Switch
9 Trunk Lid Release Switch10 Tilt/Telescopic Steering Column*11 Drive Modes ( ECO and SPORT )12 Vehicle Dynamic Control (VDC)
OFF Switch13 Fuel-filler Door Release
14 Hood Release*15 Front Passenger Air Bag
Status Light16 Audio and Navigation System17 Climate Controls
6
5
16
17
4Behind
steering wheel
8
7
9
11
12
14
13
1911994_15c_Sentra_QRG_060815.indd 36/8/15 2:39 PM
Page 3 of 24
 .................................................. 2
SiriusXM Tr")
NEW SYSTEM FEATURES
Drive Modes ....................................................................2
RearView Monitor (if so equipped) .................................................. 2
SiriusXM Travel Link and SiriusXM Traffic (if so equipped) .............................. 3
ESSENTIAL INFORMATION
Tire Pressure Monitoring System (TPMS) with Easy Fill Tire Alert (if so equipped)...........4
Loose Fuel Cap .................................................................. 5
Fuel-filler Door ................................................................... 5
Clock Set/Adjustment ............................................................ 5
FIRST DRIVE FEATURES
NISSAN Intelligent Key® System (if so equipped) .....................................7
Trunk Lid Release Switch ......................................................... 7
Seat Adjustments ............................................................... 8
Outside Mirror Control Switch ..................................................... 8
Starting/Stopping the Engine ...................................................... 8
Headlight Control Switch ......................................................... 9
Windshield Wiper and Washer Switch .............................................. 10
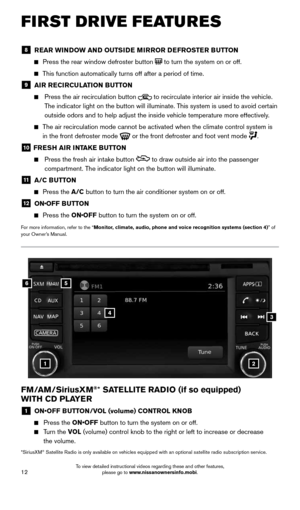
Automatic Climate Controls (if so equipped) ........................................ 11
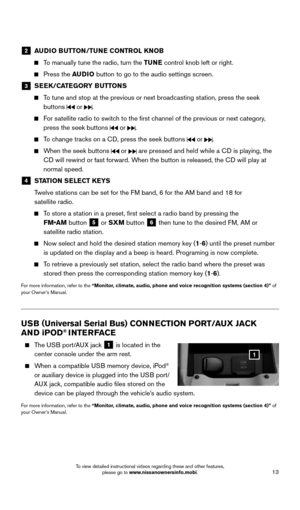
FM/AM/SiriusXM
® Satellite Radio (if so equipped) with CD Player ..................... 12
USB (Universal Serial Bus) Connection Port/Aux Jack and iPod® Interface (if so equipped) .13
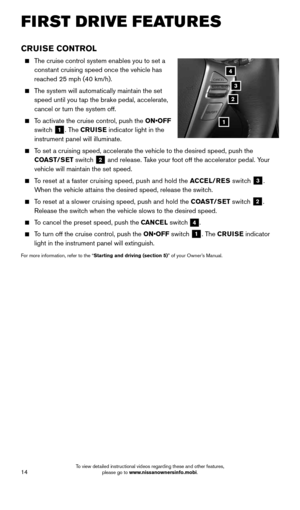
Cruise Control ................................................................. 14
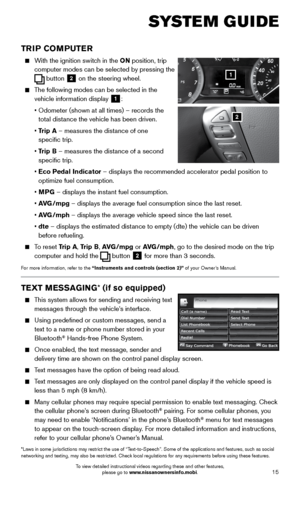
SYSTEM GUIDE
Trip Computer ................................................................ 15
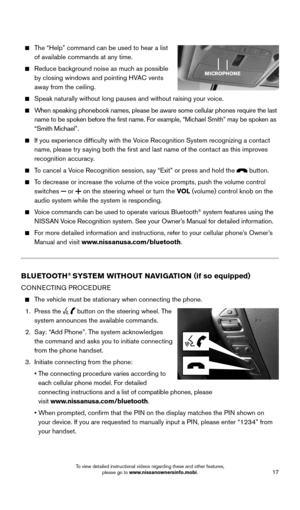
Text Messaging (if so equipped) .................................................. 15
NissanConnect
sm mobile Apps (if so equipped) ..................................... 16
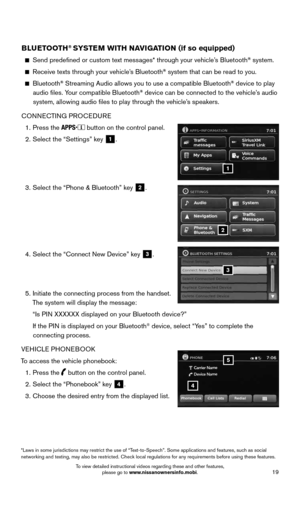
Bluetooth
Page 4 of 24

2
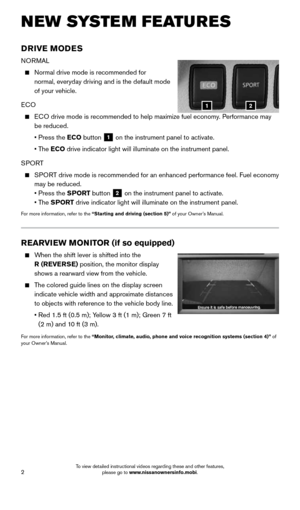
DRIVE MODES
NORMAL
Normal drive mode is recommended for
normal, everyday driving and is the default mode
of your vehicle.
ECO
ECO drive mode is recommended to help maximize fuel economy. Performance may
be reduced.
• Press the ECO button
1 on the instrument panel to activate.
• The ECO drive indicator light will illuminate on the instrument panel.
SPORT
SPORT drive mode is recommended for an enhanced performance feel. Fuel econ\
omy
may be reduced.
• Press the SPORT button
2 on the instrument panel to activate.
• The SPORT drive indicator light will illuminate on the instrument panel.
For more information, refer to the “Starting and driving (section 5)” of your Owner’s Manual.
NEW SYSTEM FEATURES
REARVIEW MONITOR (if so equipped)
When the shift lever is shifted into the
R (REVERSE) position, the monitor display
shows a rearward view from the vehicle.
The colored guide lines on the display screen
indicate vehicle width and approximate distances
to objects with reference to the vehicle body line.
• Red 1.5 ft (0.5 m); Yellow 3 ft (1 m); Green 7 ft
(2 m) and 10 ft (3 m).
For more information, refer to the “Monitor, climate, audio, phone and voice recognition systems (section 4)” of
your Owner’s Manual.
12
1911994_15c_Sentra_QRG_060815.indd 26/8/15 2:39 PM
To view detailed instructional videos regarding these and other features, please go to www.nissanownersinfo.mobi.
Page 5 of 24

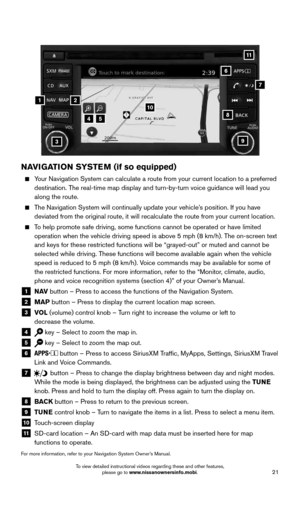
Your vehicle’s Navigation System is equipped
with SiriusXM Travel Link and SiriusXM
Traffic capabilities.
SiriusXM Trav")
3
SiriusXM TRAVEL LINK* AND SiriusXM TRAFFIC*
(if so equipped)
Your vehicle’s Navigation System is equipped
with SiriusXM Travel Link and SiriusXM
Traffic capabilities.
SiriusXM Travel Link provides access to real-
time weather information and forecasts, nearby
fuel prices, movie listings, and stock quotes.
SiriusXM Traffic provides information that may
help to avoid delays due to traffic incidents.
Traffic jams, roadwork, road closures around the
current location, etc., are represented graphically
on the map by icons depicting the nature of the
event. Incidents on the route are automatically
displayed when they are approached.
*These features, SiriusXM® Satellite Radio, Travel Link and Traffic, require an active subscription. Multiple subscriptions
may be necessary to activate the various features.
For more information, refer to the “Navigation (section 4)” and the “General system information (section 6)” of
your Navigation System Owner’s Manual.
1911994_15c_Sentra_QRG_060815.indd 36/8/15 2:39 PM
To view detailed instructional videos regarding these and other features, please go to www.nissanownersinfo.mobi.
Page 6 of 24
 WITH
EASY FILL TIRE ALERT (if so equipped)
A CHECK TIRE PRES warning message will
appear in the trip computer
1 and the low")
4
ESSE NTIAL I N FOR MATION
TIRE PRESSURE MONITORING SYSTEM (TPMS) WITH
EASY FILL TIRE ALERT (if so equipped)
A CHECK TIRE PRES warning message will
appear in the trip computer
1 and the low tire
pressure warning light 2 will illuminate when
one or more tires are low in pressure and air
is needed.
• The tire pressures should be checked when
the tires are cold. The tires are considered cold
after the vehicle has been parked for 3 hours
or more or driven less than 1 mi (1.6 km) at
moderate speeds.
After tire pressures are adjusted, drive the vehicle at speeds above
16 mph (25 km/h). The CHECK TIRE PRES warning message and low tire pressure
warning light will extinguish.
When adding air to an under-inflated tire, the TPMS with Easy Fill Tire Alert provides
visual and audible signals to help you inflate the tire to the recomme\
nded COLD
tire pressure.
To use the Easy Fill Tire Alert system (if so equipped):
1. Move the shift lever to the P (PARK) position and apply the parking brake.
2. Place the ignition switch in the ON position. Do not start the engine.
3. Add air to the under-inflated tire, and within a few seconds, the haza\
rd warning
lights will start flashing.
4. When the designated tire pressure is reached, the horn will beep once and the
hazard warning lights will stop flashing.
5. Repeat this procedure for any additional under-inflated tires.
When the low tire pressure warning light
flashes for approximately 1 minute and then
remains on, the TPMS is not functioning properly. Have the system checked by a
NISSAN dealer.
Tire pressure rises and falls depending on the heat caused by the vehicle\
’s operation
and the outside temperature. Low outside temperature can lower the tempe\
rature of
the air inside the tire, which can cause a lower tire inflation pressure. This may cause
the low tire pressure warning light to illuminate. If the warning light \
illuminates, check
the tire pressure in your tires.
• Check the tire pressures (including the spare tire) often and always prior\
to long
distance trips.
The Tire and Loading Information label contains valuable information. Please refer to
the “Technical and consumer information (section 9)” in your Owner’s Manual for the
location of the Tire and Loading Information label.
For more information, refer to the “Instruments and controls (section 2)”, the “Starting and driving (section 5)”
and the “Maintenance and do-it-yourself (section 8)” of your Owner’s Manual.
1
CHECK
TIRE PRES
2
1911994_15c_Sentra_QRG_060815.indd 46/8/15 2:39 PM
To view detailed instructional videos regarding these and other features, please go to www.nissanownersinfo.mobi.
Page 7 of 24

5
LOOSE FUEL CAP
A LOOSE FUEL CAP warning message will
display in the trip computer
1 when the fuel-
filler cap is not tightened correctly.
To tighten, turn the cap clockwise until a single
click is heard.
The warning message will extinguish when the vehicle detects the fuel-filler cap is
properly tightened and the
button 2 on the steering wheel
is pressed.
If the cap is not properly tightened, the Malfunction Indicator Light
may also illuminate.
For more information, refer to the “Instruments and controls (section 2)” and the “Pre-driving checks and
adjustments (section 3)” of your Owner’s Manual.
12
FUEL-FILLER DOOR
The fuel-filler door release is located to the left of
the steering wheel below the instrument panel.
To open the fuel-filler door, pull the release
1.
The fuel-filler door is located on the passenger’s
side at the rear of the vehicle.
For more information, refer to the “Pre-driving checks and adjustments (section 3)” of your Owner’s Manual.
1
CLOCK SET/ADJUSTMENT
To adjust the time and the appearance of the
clock on the display:
WITH NAVIGATION
1. Press the
button 1.
2. Touch the “Settings” key.
3. Touch the “System” key.
4. Touch the “Clock” key.
The following settings can be adjusted:
• Time Format: The clock can be set to 12 hours or 24 hours.
• Date Format: The date can be changed to one of five different formats.
• Clock Mode: From here, the clock mode options are:
· Manual: Allows for the option “Set Clock Manually”. Touch this to begin setting
the clock manually using the “+” or “–” to
adjust the hours, minutes, day, and month up
or down.
· Time Zone: Touch the “Time Zone” key
2
to choose from the applicable time zone list
and/or touch the “Daylight Savings Time” key
to switch between ON and OFF.
· Auto: Automatically sets the clock to the
vehicle’s current location.
Press the BACK button
3 to return to the previous screen.
3
1
2
1911994_15c_Sentra_QRG_060815.indd 56/8/15 2:39 PM
To view detailed instructional videos regarding these and other features, please go to www.nissanownersinfo.mobi.
Page 8 of 24

6
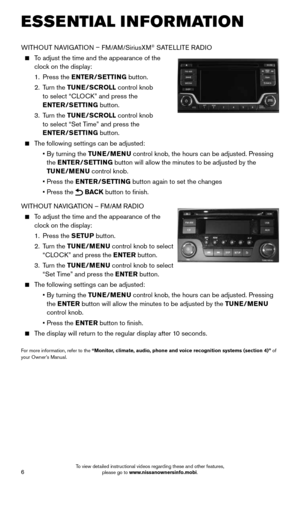
WITHOUT NAVIGATION – FM/AM/SiriusXM® SATELLITE RADIO
To adjust the time and the appearance of the
clock on the display:
1. Press the ENTER/SETTING button.
2. Turn the TUNE/SCROLL control knob
to select “CLOCK” and press the
ENTER/SETTING button.
3. Turn the TUNE/SCROLL control knob
to select “Set Time” and press the
ENTER/SETTING button.
The following settings can be adjusted:
• By turning the TUNE/MENU control knob, the hours can be adjusted. Pressing
the ENTER/SETTING button will allow the minutes to be adjusted by the
TUNE/MENU control knob.
• Press the ENTER/SETTING button again to set the changes
• Press the
BACK button to finish.
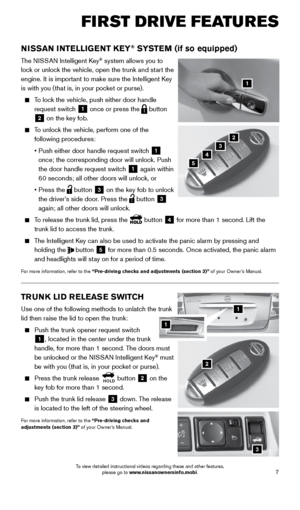
WITHOUT NAVIGATION – FM/AM RADIO
To adjust the time and the appearance of the
clock on the display:
1. Press the SETUP button.
2. Turn the TUNE/MENU control knob to select
“CLOCK” and press the ENTER button.
3. Turn the TUNE/MENU control knob to select
“Set Time” and press the ENTER button.
The following settings can be adjusted:
• By turning the TUNE/MENU control knob, the hours can be adjusted. Pressing
the ENTER button will allow the minutes to be adjusted by the TUNE/MENU
control knob.
• Press the ENTER button to finish.
The display will return to the regular display after 10 seconds.
For more information, refer to the “Monitor, climate, audio, phone and voice recognition systems (section 4)” of
your Owner’s Manual.
ESSE NTIAL I N FOR MATION
1911994_15c_Sentra_QRG_060815.indd 66/8/15 2:39 PM
To view detailed instructional videos regarding these and other features, please go to www.nissanownersinfo.mobi.