2015 NISSAN ROGUE SELECT light
[x] Cancel search: lightPage 141 of 322

4-6Heater, air conditioner, audio, phone and voice recognition systems
course.
JVH0642X
HOW TO ADJUST THE SCREEN
To set up the RearView Monitor to your
preferred settings, push the ENTER/SETTING
button
*2while the RearView Monitor screen is
displayed. Each time the ENTER/SETTING
button
*2is pushed, the next setting item is
selected. Turn the TUNE·SCROLL control knob
*1to adjust each item.
Available setting items:
. Brightness
. Contrast
. Language*
The setting items will disappear and the display
will return to the original screen if ENTER/ SETTING button is pushed when the last setting
item is selected or if the screen is left without
operation for some time.
*: Only the language of the warning messages
on the camera screen can be switched.
OPERATING TIPS
.
When the shift lever is shifted to the R
(Reverse) position, the monitor screen auto-
matically changes to the RearView Monitor
mode. However, the radio can be heard.
. When the temperature is extremely high or
low, the screen may not clearly display
objects. This is not a malfunction.
. When strong light is directly coming on the
camera, objects may not be displayed
clearly. This is not a malfunction.
. Vertical lines may be seen in objects on the
screen. This is due to strong reflected light
from the bumper. This is not a malfunction.
. The screen may flicker under fluorescent
light. This is not a malfunction.
. The colors of objects on the RearView
Monitor may differ somewhat from the actual
color of objects. This is not a malfunction.
. Objects on the monitor may not be clear in a
dark environment. This is not a malfunction.
. If dirt, rain or snow accumulates on the
camera, the RearView Monitor may not
Page 144 of 322
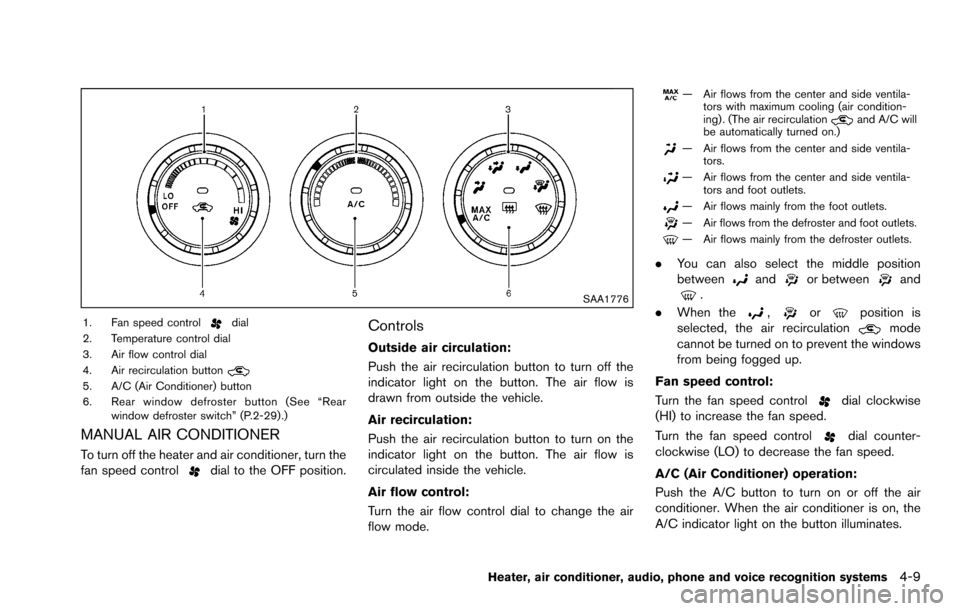
SAA1776
1. Fan speed controldial
2. Temperature control dial
3. Air flow control dial
4. Air recirculation button
5. A/C (Air Conditioner) button
6. Rear window defroster button (See “Rear window defroster switch” (P.2-29) .)
MANUAL AIR CONDITIONER
To turn off the heater and air conditioner, turn the
fan speed controldial to the OFF position.
Controls
Outside air circulation:
Push the air recirculation button to turn off the
indicator light on the button. The air flow is
drawn from outside the vehicle.
Air recirculation:
Push the air recirculation button to turn on the
indicator light on the button. The air flow is
circulated inside the vehicle.
Air flow control:
Turn the air flow control dial to change the air
flow mode.
— Air flows from the center and side ventila-tors with maximum cooling (air condition-
ing) . (The air recirculation
and A/C will
be automatically turned on.)
— Air flows from the center and side ventila- tors.
— Air flows from the center and side ventila-tors and foot outlets.
— Air flows mainly from the foot outlets.
— Air flows from the defroster and foot outlets.
— Air flows mainly from the defroster outlets.
.You can also select the middle position
betweenandor betweenand.
. When the
,orposition is
selected, the air recirculationmode
cannot be turned on to prevent the windows
from being fogged up.
Fan speed control:
Turn the fan speed control
dial clockwise
(HI) to increase the fan speed.
Turn the fan speed control
dial counter-
clockwise (LO) to decrease the fan speed.
A/C (Air Conditioner) operation:
Push the A/C button to turn on or off the air
conditioner. When the air conditioner is on, the
A/C indicator light on the button illuminates.
Heater, air conditioner, audio, phone and voice recognition systems4-9
Page 145 of 322
4-10Heater, air conditioner, audio, phone and voice recognition systems
Temperature control:
Turn the temperature control dial to set the
desired temperature. Turn the dial between the
middle and the right position to select the hot
temperature. Turn the dial between the middle
and the left position to select the cool tempera-
ture.
Heater operation
Heating:
This mode is used to direct heated air to the foot
outlets.
1. Push the air recirculation button
to the
OFF position. (The indicator light turns off.)
2. Turn the air flow control dial to the
position.
3. Turn the fan speed control
dial to the
desired position.
4. Turn the temperature control dial to the desired position between the middle and the
hot (right) position.
Ventilation:
This mode directs outside air to the side and
center ventilators.
1. Push the air recirculation button
to the
OFF position. (The indicator light turns off.) 2. Turn the air flow control dial to the
position.
3. Turn the fan speed control
dial to the
desired position.
4. Turn the temperature control dial to the desired position.
Defrosting or defogging:
This mode directs the air to the defroster outlets
to defrost/defog the windows.
1. Turn the air flow control dial to the
position.
2. Turn the fan speed control
dial to the
desired position.
3. Turn the temperature control dial to the desired position between the middle and the
hot (right) position.
. To remove frost from the outside surface of
the windshield quickly, turn the temperature
control dial to the maximum hot position and
the fan speed control
dial to maximum
(HI) position.
. If it is difficult to defog the windshield, turn
the A/C button on.
Bi-level heating:
This mode directs cool air from the side and
center vents and warm air from the foot outlets.
When the temperature control dial is turned to the maximum hot or cool position, the air
between the ventilators and the foot outlets is
the same temperature.
1. Push the air recirculation button
to the
OFF position. (The indicator light turns off.)
2. Turn the air flow control dial to the
position.
3. Turn the fan speed control
dial to the
desired position.
4. Turn the temperature control dial to the desired position.
Heating and defogging:
This mode heats the interior and defogs the
windows.
1. Turn the air flow control dial to the
position.
2. Turn the fan speed control
dial to the
desired position.
3. Turn the temperature control dial to the desired position.
Page 146 of 322
Air conditioner operation
The air conditioner system should be operated
for approximately 10 minutes at least once a
month. This helps prevent damage to the air
conditioner system due to the lack of lubrication.
Cooling:
This mode is used to cool and dehumidify the air.
1. Push the air recirculation button
to the
OFF position. (The indicator light turns off.)
2. Turn the air flow control dial to the
position.
3. Turn the fan speed control
dial to the
desired position.
4. Push the A/C button on. (The A/C indicator light will illuminate.)
5. Turn the temperature control dial to the desired position between the middle and the
cool (left) position.
. For quick cooling when the outside tem-
perature is high, push the air recirculation
button
to the ON position. Be sure to
push the air recirculation button to the OFF
position for normal cooling.
. A visible mist may be seen coming from the
ventilators in hot, humid conditions as the air
is cooled rapidly. This does not indicate a
malfunction. Dehumidified heating:
This mode is used to heat and dehumidify the
air.
1. Push the air recirculation button
to the
OFF position. (The indicator light turns off.)
2. Turn the air flow control dial to the
position.
3. Turn the fan speed control
dial to the
desired position.
4. Push the A/C button on. (The A/C indicator light will illuminate.)
5. Turn the temperature control dial to the desired position between the middle and the
hot (right) position.
Dehumidified defogging:
This mode is used to defog the windows and
dehumidify the air.
1. Turn the air flow control dial to the
position.
2. Turn the fan speed control
dial to the
desired position.
3. Push the A/C button on. (The A/C indicator light will illuminate.)
4. Turn the temperature control dial to the desired position.
IN-CABIN MICROFILTER
The air conditioning system is equipped with an
in-cabin microfilter which collects dirt, pollen,
dust, etc. To make sure the air conditioner heats,
defogs, and ventilates efficiently, replace the
filter according to the specified maintenance log
shown in the NISSAN Service and Maintenance
Guide. To replace the filter, contact a NISSAN
dealer.
The filter should be replaced if the air flow
decreases significantly or if windows fog up
easily when operating the heater or air con-
ditioning system.
SERVICING AIR CONDITIONER
The air conditioner system in your NISSAN is
charged with a refrigerant designed with the
environment in mind. This refrigerant will not
harm the earth’s ozone layer. Special char-
ging equipment and lubricant are required when
servicing your NISSAN air conditioner. Using
improper refrigerants or lubricants will cause
severe damage to your air conditioner system.
(See “Capacities and recommended fluids/
lubricants” (P.9-2) .)
A NISSAN dealer will be able to service your
environmentally friendly air conditioner system.
Heater, air conditioner, audio, phone and voice recognition systems4-11
Page 148 of 322
SAA0306
FM radio reception:
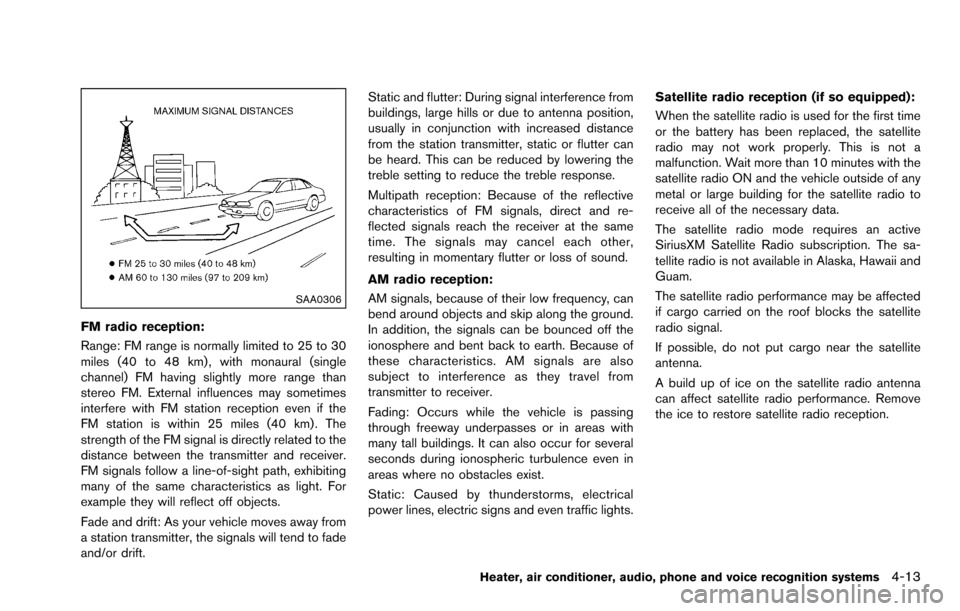
Range: FM range is normally limited to 25 to 30
miles (40 to 48 km) , with monaural (single
channel) FM having slightly more range than
stereo FM. External influences may sometimes
interfere with FM station reception even if the
FM station is within 25 miles (40 km). The
strength of the FM signal is directly related to the
distance between the transmitter and receiver.
FM signals follow a line-of-sight path, exhibiting
many of the same characteristics as light. For
example they will reflect off objects.
Fade and drift: As your vehicle moves away from
a station transmitter, the signals will tend to fade
and/or drift.Static and flutter: During signal interference from
buildings, large hills or due to antenna position,
usually in conjunction with increased distance
from the station transmitter, static or flutter can
be heard. This can be reduced by lowering the
treble setting to reduce the treble response.
Multipath reception: Because of the reflective
characteristics of FM signals, direct and re-
flected signals reach the receiver at the same
time. The signals may cancel each other,
resulting in momentary flutter or loss of sound.
AM radio reception:
AM signals, because of their low frequency, can
bend around objects and skip along the ground.
In addition, the signals can be bounced off the
ionosphere and bent back to earth. Because of
these characteristics. AM signals are also
subject to interference as they travel from
transmitter to receiver.
Fading: Occurs while the vehicle is passing
through freeway underpasses or in areas with
many tall buildings. It can also occur for several
seconds during ionospheric turbulence even in
areas where no obstacles exist.
Static: Caused by thunderstorms, electrical
power lines, electric signs and even traffic lights.
Satellite radio reception (if so equipped):
When the satellite radio is used for the first time
or the battery has been replaced, the satellite
radio may not work properly. This is not a
malfunction. Wait more than 10 minutes with the
satellite radio ON and the vehicle outside of any
metal or large building for the satellite radio to
receive all of the necessary data.
The satellite radio mode requires an active
SiriusXM Satellite Radio subscription. The sa-
tellite radio is not available in Alaska, Hawaii and
Guam.
The satellite radio performance may be affected
if cargo carried on the roof blocks the satellite
radio signal.
If possible, do not put cargo near the satellite
antenna.
A build up of ice on the satellite radio antenna
can affect satellite radio performance. Remove
the ice to restore satellite radio reception.
Heater, air conditioner, audio, phone and voice recognition systems4-13
Page 149 of 322
4-14Heater, air conditioner, audio, phone and voice recognition systems
SAA0480
Compact Disc (CD) player
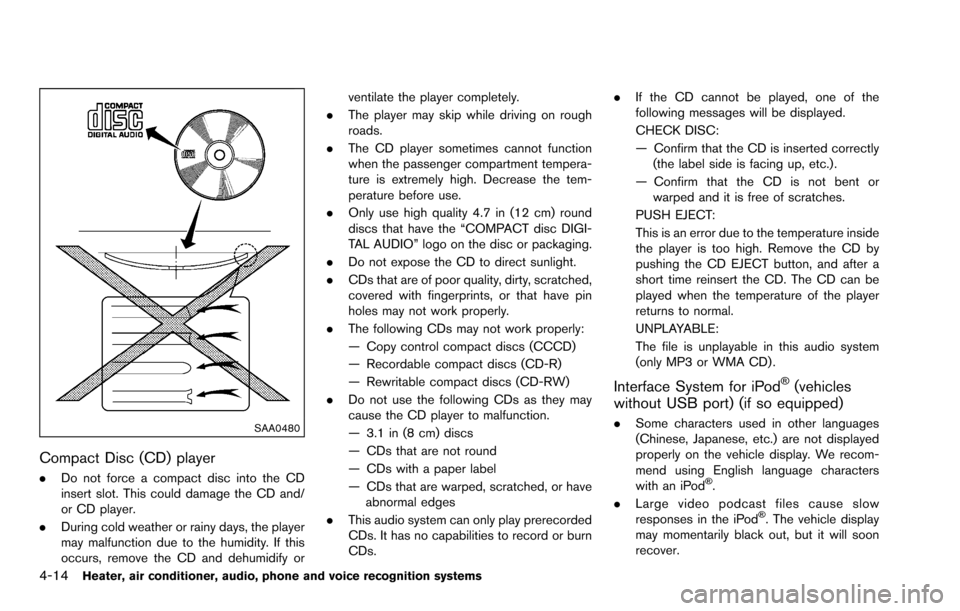
.Do not force a compact disc into the CD
insert slot. This could damage the CD and/
or CD player.
. During cold weather or rainy days, the player
may malfunction due to the humidity. If this
occurs, remove the CD and dehumidify or ventilate the player completely.
. The player may skip while driving on rough
roads.
. The CD player sometimes cannot function
when the passenger compartment tempera-
ture is extremely high. Decrease the tem-
perature before use.
. Only use high quality 4.7 in (12 cm) round
discs that have the “COMPACT disc DIGI-
TAL AUDIO” logo on the disc or packaging.
. Do not expose the CD to direct sunlight.
. CDs that are of poor quality, dirty, scratched,
covered with fingerprints, or that have pin
holes may not work properly.
. The following CDs may not work properly:
— Copy control compact discs (CCCD)
— Recordable compact discs (CD-R)
— Rewritable compact discs (CD-RW)
. Do not use the following CDs as they may
cause the CD player to malfunction.
— 3.1 in (8 cm) discs
— CDs that are not round
— CDs with a paper label
— CDs that are warped, scratched, or have
abnormal edges
. This audio system can only play prerecorded
CDs. It has no capabilities to record or burn
CDs. .
If the CD cannot be played, one of the
following messages will be displayed.
CHECK DISC:
— Confirm that the CD is inserted correctly
(the label side is facing up, etc.) .
— Confirm that the CD is not bent or warped and it is free of scratches.
PUSH EJECT:
This is an error due to the temperature inside
the player is too high. Remove the CD by
pushing the CD EJECT button, and after a
short time reinsert the CD. The CD can be
played when the temperature of the player
returns to normal.
UNPLAYABLE:
The file is unplayable in this audio system
(only MP3 or WMA CD) .
Interface System for iPod�Š(vehicles
without USB port) (if so equipped)
. Some characters used in other languages
(Chinese, Japanese, etc.) are not displayed
properly on the vehicle display. We recom-
mend using English language characters
with an iPod
�Š.
. Large video podcast files cause slow
responses in the iPod
�Š. The vehicle display
may momentarily black out, but it will soon
recover.
Page 172 of 322
SAA0451
CD/DVD/USB MEMORY CARE AND
CLEANING
CD/DVD
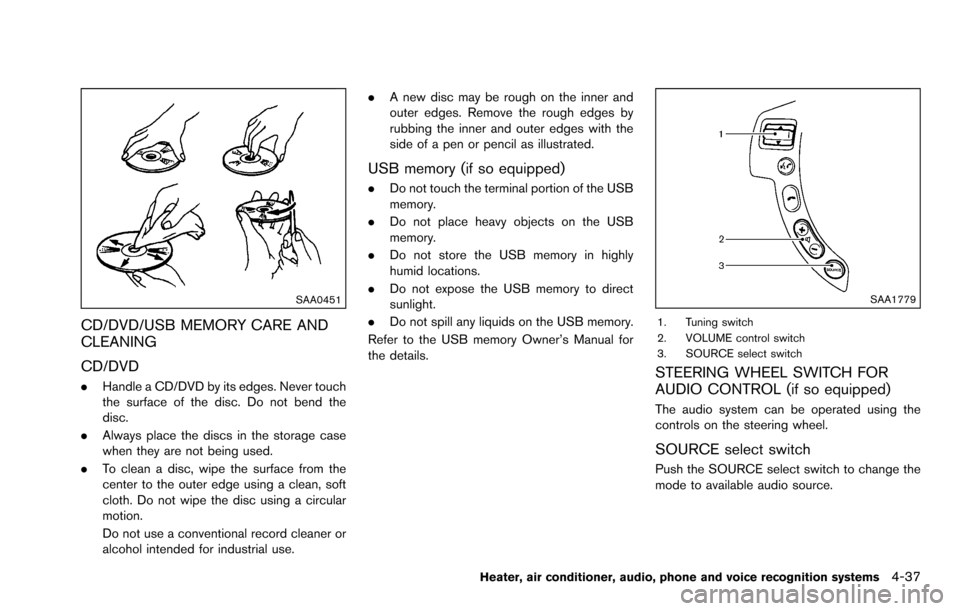
.Handle a CD/DVD by its edges. Never touch
the surface of the disc. Do not bend the
disc.
. Always place the discs in the storage case
when they are not being used.
. To clean a disc, wipe the surface from the
center to the outer edge using a clean, soft
cloth. Do not wipe the disc using a circular
motion.
Do not use a conventional record cleaner or
alcohol intended for industrial use. .
A new disc may be rough on the inner and
outer edges. Remove the rough edges by
rubbing the inner and outer edges with the
side of a pen or pencil as illustrated.
USB memory (if so equipped)
.Do not touch the terminal portion of the USB
memory.
. Do not place heavy objects on the USB
memory.
. Do not store the USB memory in highly
humid locations.
. Do not expose the USB memory to direct
sunlight.
. Do not spill any liquids on the USB memory.
Refer to the USB memory Owner’s Manual for
the details.
SAA1779
1. Tuning switch
2. VOLUME control switch
3. SOURCE select switch
STEERING WHEEL SWITCH FOR
AUDIO CONTROL (if so equipped)
The audio system can be operated using the
controls on the steering wheel.
SOURCE select switch
Push the SOURCE select switch to change the
mode to available audio source.
Heater, air conditioner, audio, phone and voice recognition systems4-37
Page 188 of 322
5 Starting and driving
Precautions when starting and driving ................................ 5-2Exhaust gas (carbon monoxide) ...................................... 5-2
Three-way catalyst .............................................................. 5-3
Tire Pressure Monitoring System (TPMS) .................... 5-3
Avoiding collision and rollover ......................................... 5-5
On-pavement and off-road driving precautions .......... 5-6
Off-road recovery ................................................................ 5-6
Rapid air pressure loss ...................................................... 5-6
Drinking alcohol/drugs and driving ................................. 5-7
Driving safety precautions ................................................. 5-7
Ignition switch ........................................................................\
.... 5-9 Continuously Variable Transmission (CVT) ................... 5-9
Key positions ..................................................................... 5-10
Before starting the engine ................................................... 5-10
Starting the engine ................................................................ 5-11
Driving the vehicle ................................................................. 5-12 Continuously Variable Transmission (CVT) ................ 5-12
Parking brake ........................................................................\
.. 5-16
Cruise control (if so equipped) .......................................... 5-17 Precautions on cruise control ....................................... 5-17
Cruise control operations ............................................... 5-18 Break-in schedule ................................................................. 5-19
Fuel efficient driving tips ..................................................... 5-19
Increasing fuel economy ...................................................... 5-20
All-Wheel Drive (AWD) (if so equipped) ........................ 5-20
All-Wheel Drive (AWD) lock switch operations ..... 5-21
AWD warning light ........................................................ 5-22
Parking/parking on hills ........................................................ 5-23
Electric power steering system ......................................... 5-24
Brake system ........................................................................\
.. 5-25 Braking precautions ...................................................... 5-25
Parking brake break-in .................................................. 5-25
Anti-lock Braking System (ABS) ............................... 5-25
Vehicle Dynamic Control (VDC) system ......................... 5-27
Cold weather driving ............................................................ 5-28 Freeing a frozen door lock ........................................... 5-28
Anti-freeze ........................................................................\
5-28
Battery ........................................................................\
....... 5-28
Draining of coolant water ............................................. 5-28
Tire equipment ................................................................ 5-29
Special winter equipment ............................................ 5-29
Driving on snow or ice ................................................. 5-29