2015 NISSAN ROGUE SELECT fuel
[x] Cancel search: fuelPage 131 of 322
3-12Pre-driving checks and adjustments
.Do not fill a portable fuel container
in the vehicle or trailer. Static elec-
tricity can cause an explosion of
flammable liquid, vapor or gas in
any vehicle or trailer. To reduce the
risk of serious injury or death when
filling portable fuel containers:
— Always place the container on
the ground when filling.
— Do not use electronic devices when filling.
— Keep the pump nozzle in contact with the container while you are
filling it.
— Use only approved portable fuel containers for flammable liquid.
CAUTION
. If fuel is spilled on the vehicle body,
flush it away with water to avoid
paint damage.
. Insert the cap straight into the fuel-
filler tube, then tighten until the
fuel-filler cap clicks. Failure to tight-
en the fuel-filler cap properly may cause the
malfunction indicator
light (MIL) to illuminate. If the
light illuminates because the fuel-
filler cap is loose or missing, tighten
or install the cap and continue to
drive the vehicle. The
light
should turn off after a few driving
trips. If the
light does not turn
off after a few driving trips, have the
vehicle inspected by a NISSAN deal-
er.
For additional information, see
“Malfunction Indicator Light (MIL)”
(P.2-15) .
. The LOOSE FUEL CAP warning will
appear if the fuel-filler cap is not
properly tightened. It may take a few
driving trips for the message to be
displayed. Failure to tighten the
fuel-filler cap properly after the
LOOSE FUEL CAP warning appears
may cause the Malfunction Indicator
Light (MIL) to illuminate.
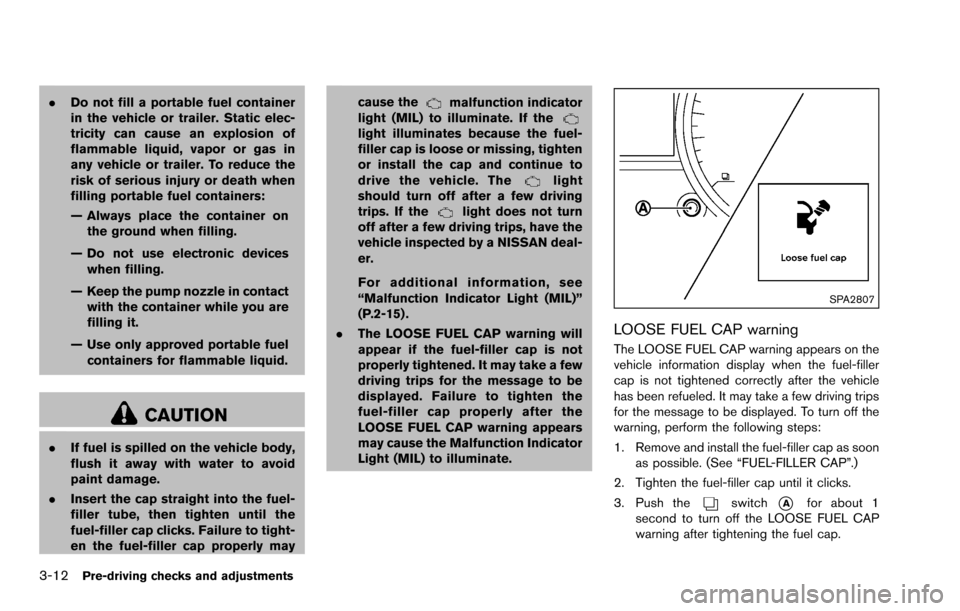
SPA2807
LOOSE FUEL CAP warning
The LOOSE FUEL CAP warning appears on the
vehicle information display when the fuel-filler
cap is not tightened correctly after the vehicle
has been refueled. It may take a few driving trips
for the message to be displayed. To turn off the
warning, perform the following steps:
1. Remove and install the fuel-filler cap as soon
as possible. (See “FUEL-FILLER CAP”.)
2. Tighten the fuel-filler cap until it clicks.
3. Push the
switch*Afor about 1
second to turn off the LOOSE FUEL CAP
warning after tightening the fuel cap.
Page 188 of 322
5 Starting and driving
Precautions when starting and driving ................................ 5-2Exhaust gas (carbon monoxide) ...................................... 5-2
Three-way catalyst .............................................................. 5-3
Tire Pressure Monitoring System (TPMS) .................... 5-3
Avoiding collision and rollover ......................................... 5-5
On-pavement and off-road driving precautions .......... 5-6
Off-road recovery ................................................................ 5-6
Rapid air pressure loss ...................................................... 5-6
Drinking alcohol/drugs and driving ................................. 5-7
Driving safety precautions ................................................. 5-7
Ignition switch ........................................................................\
.... 5-9 Continuously Variable Transmission (CVT) ................... 5-9
Key positions ..................................................................... 5-10
Before starting the engine ................................................... 5-10
Starting the engine ................................................................ 5-11
Driving the vehicle ................................................................. 5-12 Continuously Variable Transmission (CVT) ................ 5-12
Parking brake ........................................................................\
.. 5-16
Cruise control (if so equipped) .......................................... 5-17 Precautions on cruise control ....................................... 5-17
Cruise control operations ............................................... 5-18 Break-in schedule ................................................................. 5-19
Fuel efficient driving tips ..................................................... 5-19
Increasing fuel economy ...................................................... 5-20
All-Wheel Drive (AWD) (if so equipped) ........................ 5-20
All-Wheel Drive (AWD) lock switch operations ..... 5-21
AWD warning light ........................................................ 5-22
Parking/parking on hills ........................................................ 5-23
Electric power steering system ......................................... 5-24
Brake system ........................................................................\
.. 5-25 Braking precautions ...................................................... 5-25
Parking brake break-in .................................................. 5-25
Anti-lock Braking System (ABS) ............................... 5-25
Vehicle Dynamic Control (VDC) system ......................... 5-27
Cold weather driving ............................................................ 5-28 Freeing a frozen door lock ........................................... 5-28
Anti-freeze ........................................................................\
5-28
Battery ........................................................................\
....... 5-28
Draining of coolant water ............................................. 5-28
Tire equipment ................................................................ 5-29
Special winter equipment ............................................ 5-29
Driving on snow or ice ................................................. 5-29
Page 190 of 322
system, underbody, or rear of
the vehicle.
THREE-WAY CATALYST
The three-way catalyst is an emission control
device installed in the exhaust system. Exhaust
gases in the three-way catalyst are burned at
high temperatures to help reduce pollutants.
WARNING
.The exhaust gas and the exhaust
system are very hot. Keep people,
animals or flammable materials
away from the exhaust system com-
ponents.
. Do not stop or park the vehicle over
flammable materials such as dry
grass, waste paper or rags. They
may ignite and cause a fire.
CAUTION
.Do not use leaded gasoline. Depos-
its from leaded gasoline will ser-
iously reduce the three-way
catalyst’s ability to help reduce ex- haust pollutants.
. Keep your engine tuned up. Mal-
functions in the ignition, fuel injec-
tion, or electrical systems can cause
overrich fuel flow into the three-way
catalyst, causing it to overheat. Do
not keep driving if the engine mis-
fires, or if noticeable loss of perfor-
mance or other unusual operating
conditions are detected. Have the
vehicle inspected promptly by a
NISSAN dealer.
. Avoid driving with an extremely low
fuel level. Running out of fuel could
cause the engine to misfire, dama-
ging the three-way catalyst.
. Do not race the engine while warm-
ing it up.
. Do not push or tow your vehicle to
start the engine.
TIRE PRESSURE MONITORING SYS-
TEM (TPMS)
Each tire, including the spare (if provided) ,
should be checked monthly when cold and
inflated to the inflation pressure recommended
by the vehicle manufacturer on the vehicle
placard or tire inflation pressure label. (If your vehicle has tires of a different size than the size
indicated on the vehicle placard or tire inflation
pressure label, you should determine the proper
tire inflation pressure for those tires.)
As an added safety feature, your vehicle has
been equipped with a Tire Pressure Monitoring
System (TPMS) that illuminates a low tire
pressure telltale when one or more of your tires
is significantly under-inflated. Accordingly, when
the low tire pressure telltale illuminates, you
should stop and check your tires as soon as
possible, and inflate them to the proper pres-
sure. Driving on a significantly under-inflated tire
causes the tire to overheat and can lead to tire
failure. Under-inflation also reduces fuel effi-
ciency and tire tread life, and may affect the
vehicle’s handling and stopping ability.
Please note that the TPMS is not a substitute for
proper tire maintenance, and it is the driver’s
responsibility to maintain correct tire pressure,
even if under-inflation has not reached the level
to trigger illumination of the TPMS low tire
pressure telltale.
Your vehicle has also been equipped with a
TPMS malfunction indicator to indicate when the
system is not operating properly. The TPMS
malfunction indicator is combined with the low
tire pressure telltale. When the system detects a
malfunction, the telltale will flash for approxi-
Starting and driving5-3
Page 197 of 322
5-10Starting and driving
When the ignition switch cannot be turned to
the LOCK position:
1. Move the shift lever to the P (Park) position.
2. Turn the ignition switch slightly in the ONdirection.
3. Turn the ignition switch to the LOCK position.
4. Remove the key.
If the ignition switch is turned to the LOCK
position, the shift lever cannot be moved from
the P (Park) position. The shift lever can be
moved if the ignition switch is in the ON position
with the foot brake pedal depressed.
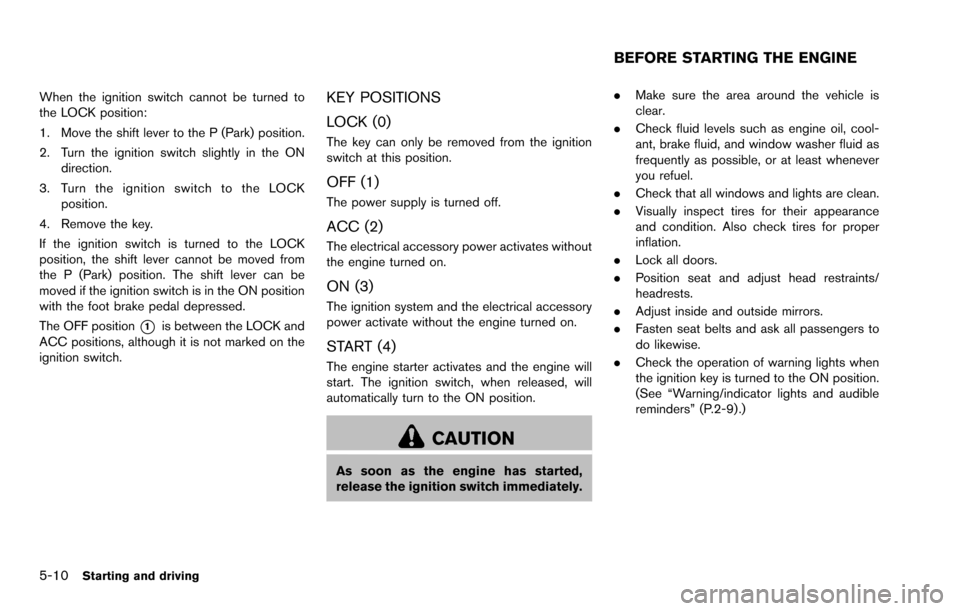
The OFF position
*1is between the LOCK and
ACC positions, although it is not marked on the
ignition switch.
KEY POSITIONS
LOCK (0)
The key can only be removed from the ignition
switch at this position.
OFF (1)
The power supply is turned off.
ACC (2)
The electrical accessory power activates without
the engine turned on.
ON (3)
The ignition system and the electrical accessory
power activate without the engine turned on.
START (4)
The engine starter activates and the engine will
start. The ignition switch, when released, will
automatically turn to the ON position.
CAUTION
As soon as the engine has started,
release the ignition switch immediately. .
Make sure the area around the vehicle is
clear.
. Check fluid levels such as engine oil, cool-
ant, brake fluid, and window washer fluid as
frequently as possible, or at least whenever
you refuel.
. Check that all windows and lights are clean.
. Visually inspect tires for their appearance
and condition. Also check tires for proper
inflation.
. Lock all doors.
. Position seat and adjust head restraints/
headrests.
. Adjust inside and outside mirrors.
. Fasten seat belts and ask all passengers to
do likewise.
. Check the operation of warning lights when
the ignition key is turned to the ON position.
(See “Warning/indicator lights and audible
reminders” (P.2-9).)
BEFORE STARTING THE ENGINE
Page 201 of 322
5-14Starting and driving
may shift to N (Neutral) and restart a stalled
engine while the vehicle is moving.
D (Drive):
Use this position for all normal forward driving.
L (Low):
Use this position for maximum engine braking on
steep downhill gradients/climbing steep slopes
and whenever approaching sharp bends. Do not
use the L position in any other circumstances.
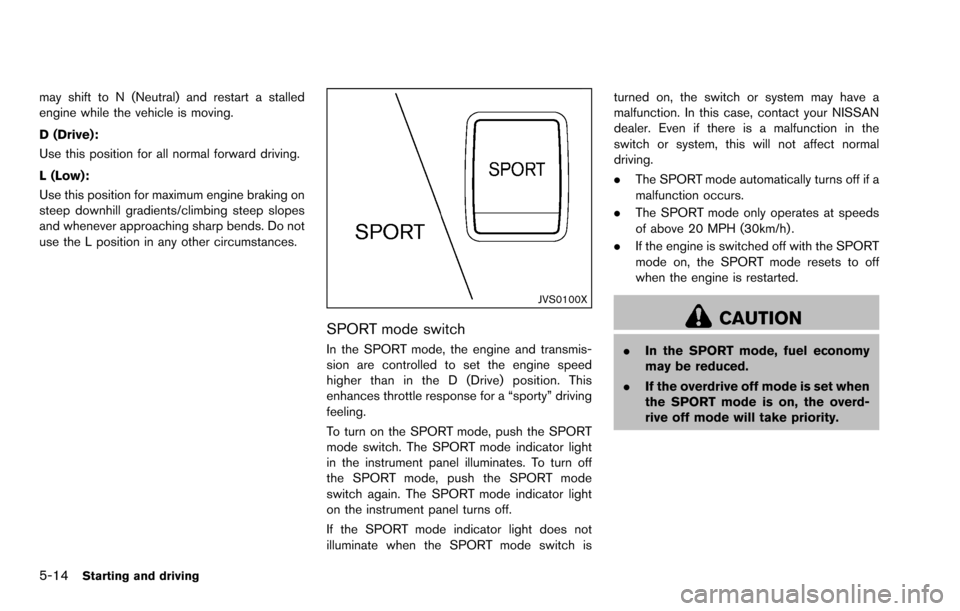
JVS0100X
SPORT mode switch
In the SPORT mode, the engine and transmis-
sion are controlled to set the engine speed
higher than in the D (Drive) position. This
enhances throttle response for a “sporty” driving
feeling.
To turn on the SPORT mode, push the SPORT
mode switch. The SPORT mode indicator light
in the instrument panel illuminates. To turn off
the SPORT mode, push the SPORT mode
switch again. The SPORT mode indicator light
on the instrument panel turns off.
If the SPORT mode indicator light does not
illuminate when the SPORT mode switch isturned on, the switch or system may have a
malfunction. In this case, contact your NISSAN
dealer. Even if there is a malfunction in the
switch or system, this will not affect normal
driving.
.
The SPORT mode automatically turns off if a
malfunction occurs.
. The SPORT mode only operates at speeds
of above 20 MPH (30km/h) .
. If the engine is switched off with the SPORT
mode on, the SPORT mode resets to off
when the engine is restarted.
CAUTION
.In the SPORT mode, fuel economy
may be reduced.
. If the overdrive off mode is set when
the SPORT mode is on, the overd-
rive off mode will take priority.
Page 206 of 322
CAUTION
During the first 1,200 miles (2,000 km) ,
follow these recommendations to ob-
tain maximum engine performance and
ensure the future reliability and econo-
my of your new vehicle. Failure to
follow these recommendations may
result in shortened engine life and
reduced engine performance.
. Avoid driving for long periods at constant
speed, either fast or slow. Do not run the
engine over 4,000 rpm.
. Do not accelerate at full throttle in any gear.
. Avoid quick starts.
. Avoid hard braking as much as possible.
. Do not tow a trailer for the first 500 miles
(800 km) . Your engine, axle or other parts
could be damaged. Follow these easy-to-use Fuel Efficient Driving
Tips to help you achieve the most fuel economy
from your vehicle.
1. Use smooth accelerator and brake pedal
application.
.Avoid rapid starts and stops..Use smooth, gentle accelerator andbrake application whenever possible.
.Maintain constant speed while commut-
ing and coast whenever possible.
2. Maintain constant speed.
.Look ahead to try and anticipate and minimize stops.
.Synchronizing your speed with traffic
lights allows you to reduce your number
of stops.
.Maintaining a steady speed can minimize red light stops and improve fuel effi-
ciency.
3. Use air conditioning (A/C) at higher vehicle speeds.
.Below 40 MPH (64 km/h) , it is moreefficient to open windows to cool the
vehicle due to reduced engine load.
.Above 40 MPH (64 km/h) , it is moreefficient to use A/C to cool the vehicle
due to increased aerodynamic drag.
.Recirculating the cool air in the cabinwhen the A/C is on reduces cooling load.
4. Drive at economical speeds and distances.
.Observing the speed limit and not ex- ceeding 60 MPH (97 km/h) (where
legally allowed) can improve fuel effi-
ciency due to reduced aerodynamic
drag.
.Maintaining a safe following distancebehind other vehicles reduces unneces-
sary braking.
.Safely monitoring traffic to anticipatechanges in speed permits reduced brak-
ing and smooth acceleration changes.
.Select a gear range suitable to road conditions.
5. Use cruise control.
.Using cruise control during highway driving helps maintain a steady speed.
.Cruise control is particularly effective in providing fuel savings when driving on
flat terrains.
6. Plan for the shortest route.
.Utilize a map or navigation system to determine the best route to save time.
7. Avoid idling.
.Shutting off your engine when safe for stops exceeding 30-60 seconds saves
Starting and driving5-19
BREAK-IN SCHEDULE FUEL EFFICIENT DRIVING TIPS
Page 207 of 322
5-20Starting and driving
fuel and reduces emissions.
8. Buy an automated pass for toll roads.
.Automated passes permit drivers to use special lanes to maintain cruising speed
through the toll and avoid stopping and
starting.
9. Winter warm up.
.Limit idling time to minimize impact to fuel economy.
.Vehicles typically need no more than 30seconds of idling at start-up to effectively
circulate the engine oil before driving.
.Your vehicle will reach its ideal operatingtemperature more quickly while driving
versus idling.
10. Keeping your vehicle cool.
.Park your vehicle in a covered parking area or in the shade whenever possible.
.When entering a hot vehicle, opening thewindows will help to reduce the inside
temperature faster, resulting in reduced
demand on your A/C system. .
Keep your engine tuned up.
. Follow the recommended scheduled main-
tenance.
. Keep the tires inflated to the correct
pressure. Low tire pressure increases tire
wear and lowers fuel economy.
. Keep the wheels in correct alignment.
Improper alignment increases tire wear and
lowers fuel economy.
. Use the recommended viscosity engine oil.
(See “Engine oil and oil filter recommenda-
tion” (P.9-5) .)
WARNING
.For AWD equipped vehicles, do not
attempt to raise two wheels off the
ground and shift the transmission to
any drive or reverse position with
the engine running. Doing so may
result in drivetrain damage or un-
expected vehicle movement which
could result in serious vehicle da-
mage or personal injury.
. Do not attempt to test an AWD
equipped vehicle on a 2-wheel dy-
namometer (such as the dynam-
ometers used by some states for
emissions testing) or similar equip-
ment even if the other two wheels
are raised off the ground. Make sure
that you inform the test facility
personnel that your vehicle is
equipped with AWD before it is
placed on a dynamometer. Using
the wrong test equipment may re-
sult in drivetrain damage or unex-
pected vehicle movement which
could result in serious vehicle da-
mage or personal injury.
INCREASING FUEL ECONOMY ALL-WHEEL DRIVE (AWD) (if so
equipped)
Page 240 of 322
Remove dirt with a vacuum cleaner.
. Never allow water or other liquids to
come in contact with electronic
components inside the vehicle as
this may damage them.
Chemicals used for road surface deicing are
extremely corrosive. They accelerate corrosion
and deterioration of underbody components
such as the exhaust system, fuel and brake
lines, brake cables, floor pan and fenders.
In winter, the underbody must be cleaned
periodically.
For additional protection against rust and
corrosion, which may be required in some areas,
consult a NISSAN dealer.
Appearance and care7-7