2015 NISSAN PATHFINDER steering
[x] Cancel search: steeringPage 2 of 32
11
2
12
212220
23
24
3
4
9
5
10
16
1
6
7
19
8
17
18
Behind
Steering
Wheel
13
14
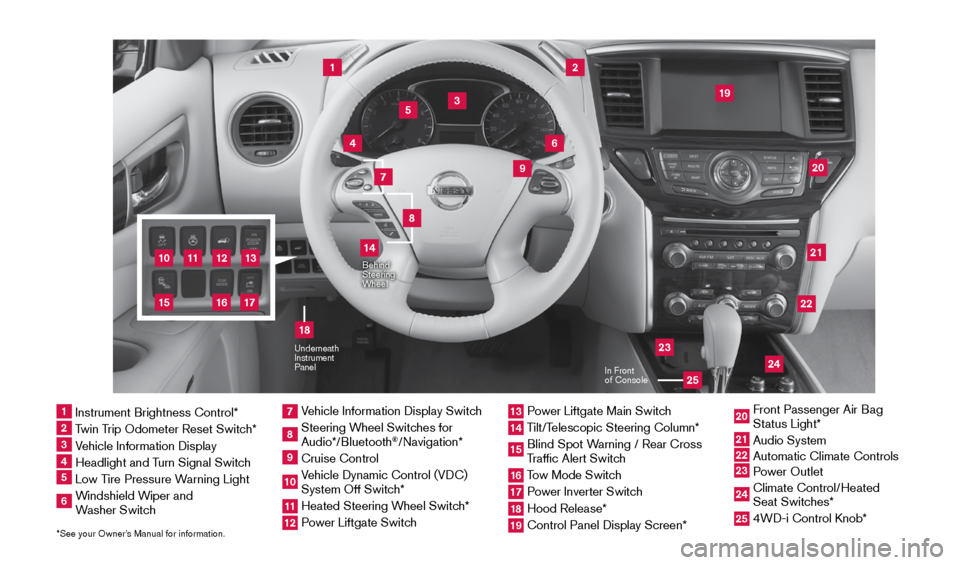
1 Instrument Brightness Control*2 Twin Trip Odometer Reset Switch*3 Vehicle Information Display4 Headlight and Turn Signal Switch5 Low Tire Pressure Warning Light6 Windshield Wiper and
Washer Switch
7 Vehicle Information Display Switch8 Steering Wheel Switches for
Audio*/Bluetooth
®/Navigation*
9 Cruise Control10 Vehicle Dynamic Control (VDC)
System Off Switch* 11 Heated Steering Wheel Switch*12 Power Liftgate Switch
13 Power Liftgate Main Switch14 Tilt/Telescopic Steering Column*15 Blind Spot Warning / Rear Cross
Traffic Alert Switch16 Tow Mode Switch17 Power Inverter Switch18 Hood Release*19 Control Panel Display Screen*
20 Front Passenger Air Bag
Status Light*21 Audio System22
Automatic Climate Controls23
Power Outlet 24 Climate Control/Heated
Seat Switches*25 4WD-i Control Knob*
*See your Owner’s Manual for information.
Underneath
Instrument
Panel
In Front
of Console
25
15
1904703_15c_Pathfinder_QRG_031315.indd 43/13/15 12:51 PM
Page 6 of 32
4
NEW SYSTEM FEATURES
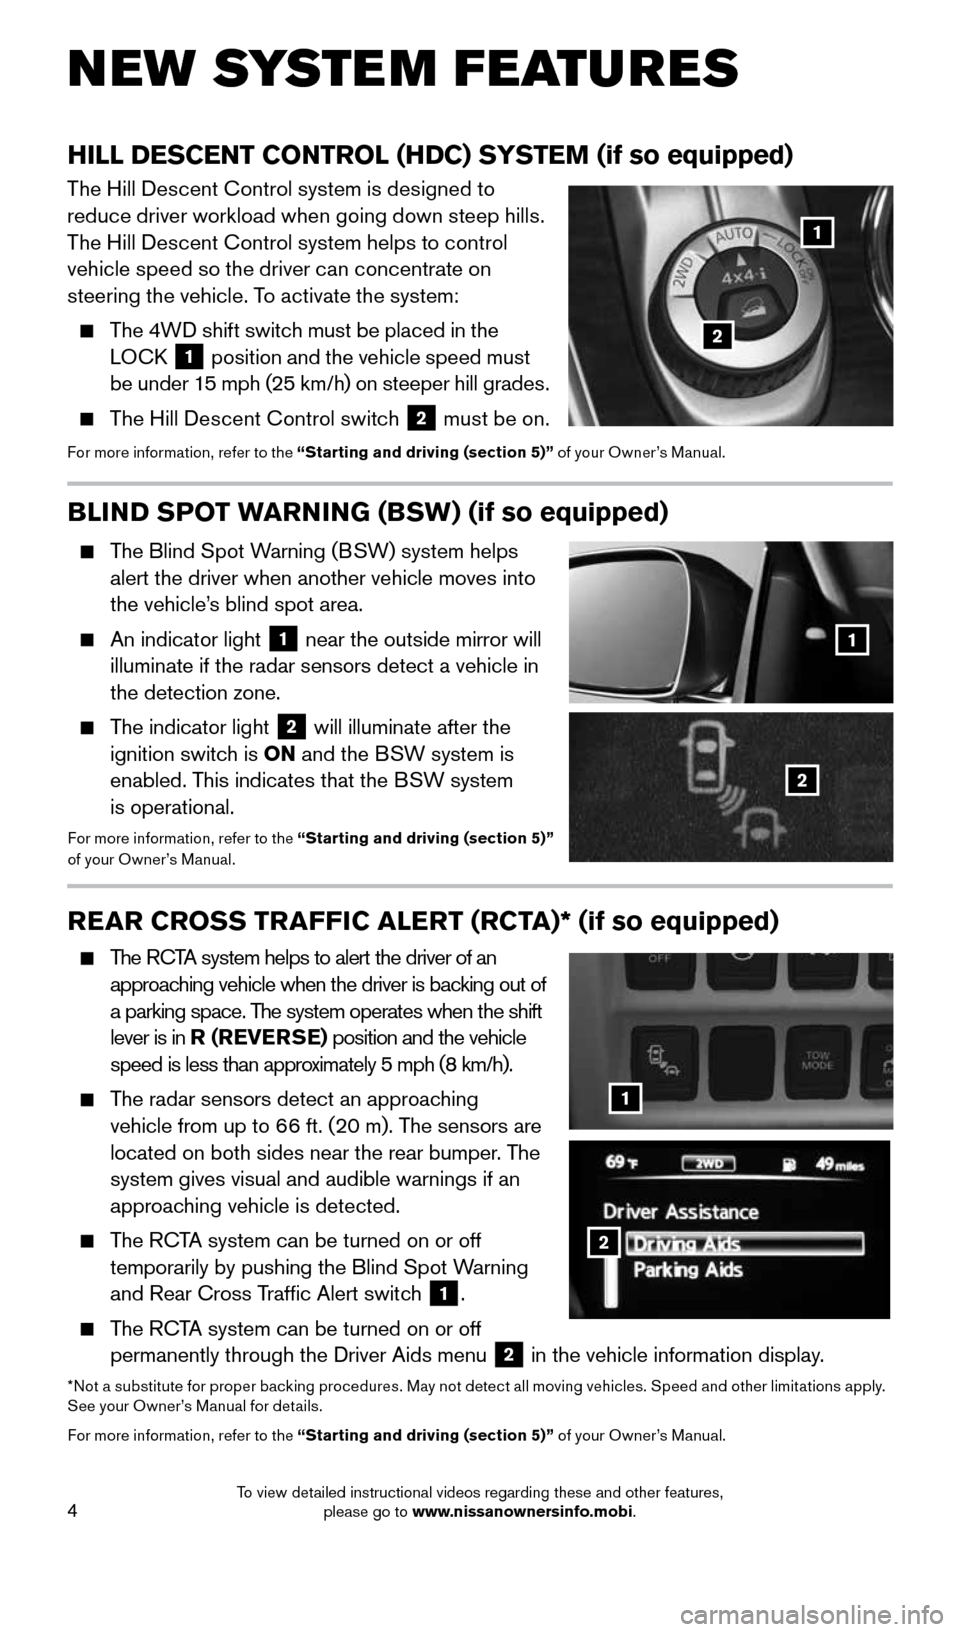
BLIND SPOT WARNING (BSW) (if so equipped)
The Blind Spot Warning (BSW) system helps alert the driver when another vehicle moves into
the vehicle’s blind spot area.
An indicator light 1 near the outside mirror will
illuminate if the radar sensors detect a vehicle in
the detection zone.
The indicator light 2 will illuminate after the
ignition switch is ON and the BSW system is
enabled. This indicates that the BSW system
is operational.
For more information, refer to the “Starting and driving (section 5)”
of your Owner’s Manual.
REAR CROSS TRAFFIC ALERT (RCTA)* (if so equipped)
The RCTA system helps to alert the driver of an
approaching vehicle when the driver is backing out of
a parking space. The system operates when the shift
lever is in R (REVERSE) position and the vehicle
speed is less than approximately 5 mph (8 km/h).
The radar sensors detect an approaching
vehicle from up to 66 ft. (20 m). The sensors are
located on both sides near the rear bumper. The
system gives visual and audible warnings if an
approaching vehicle is detected.
The RCTA system can be turned on or off
temporarily by pushing the Blind Spot Warning
and Rear Cross Traffic Alert switch
1.
The RCTA system can be turned on or off
permanently through the Driver Aids menu 2 in the vehicle information display.
*No t a substitute for proper backing procedures. May not detect all moving vehicles. Speed and other limitations apply.
See your Owner’s Manual for details.
For more information, refer to the “Starting and driving (section 5)” of your Owner’s Manual.
HILL DESCENT CONTROL (HDC) SYSTEM (if so equipped)
The Hill Descent Control system is designed to
reduce driver workload when going down steep hills.
The Hill Descent Control system helps to control
vehicle speed so the driver can concentrate on
steering the vehicle. To activate the system:
The 4WD shift switch must be placed in the
LOCK 1 position and the vehicle speed must
be under 15 mph (25 km/h) on steeper hill grades.
The Hill Descent Control switch 2 must be on.For more information, refer to the “Starting and driving (section 5)” of your Owner’s Manual.
1
1
2
2
2
1
1904703_15c_Pathfinder_QRG_031315.indd 43/13/15 12:52 PM
To view detailed instructional videos regarding these and other features, please go to www.nissanownersinfo.mobi.
Page 13 of 32
11
3RD ROW SEATS
To recline the seatback, pull up on the latch 1
located on the outside corner of each seatback.
Lean back until the desired angle is obtained.
To bring the seatback forward again, pull up on
the latch
1 and move your body forward. The
seatback will move forward.
For more information, refer to the “Safety—Seats, seat belts and supplemental restraint system (sect\
ion 1)” of your
Owner’s Manual.
1
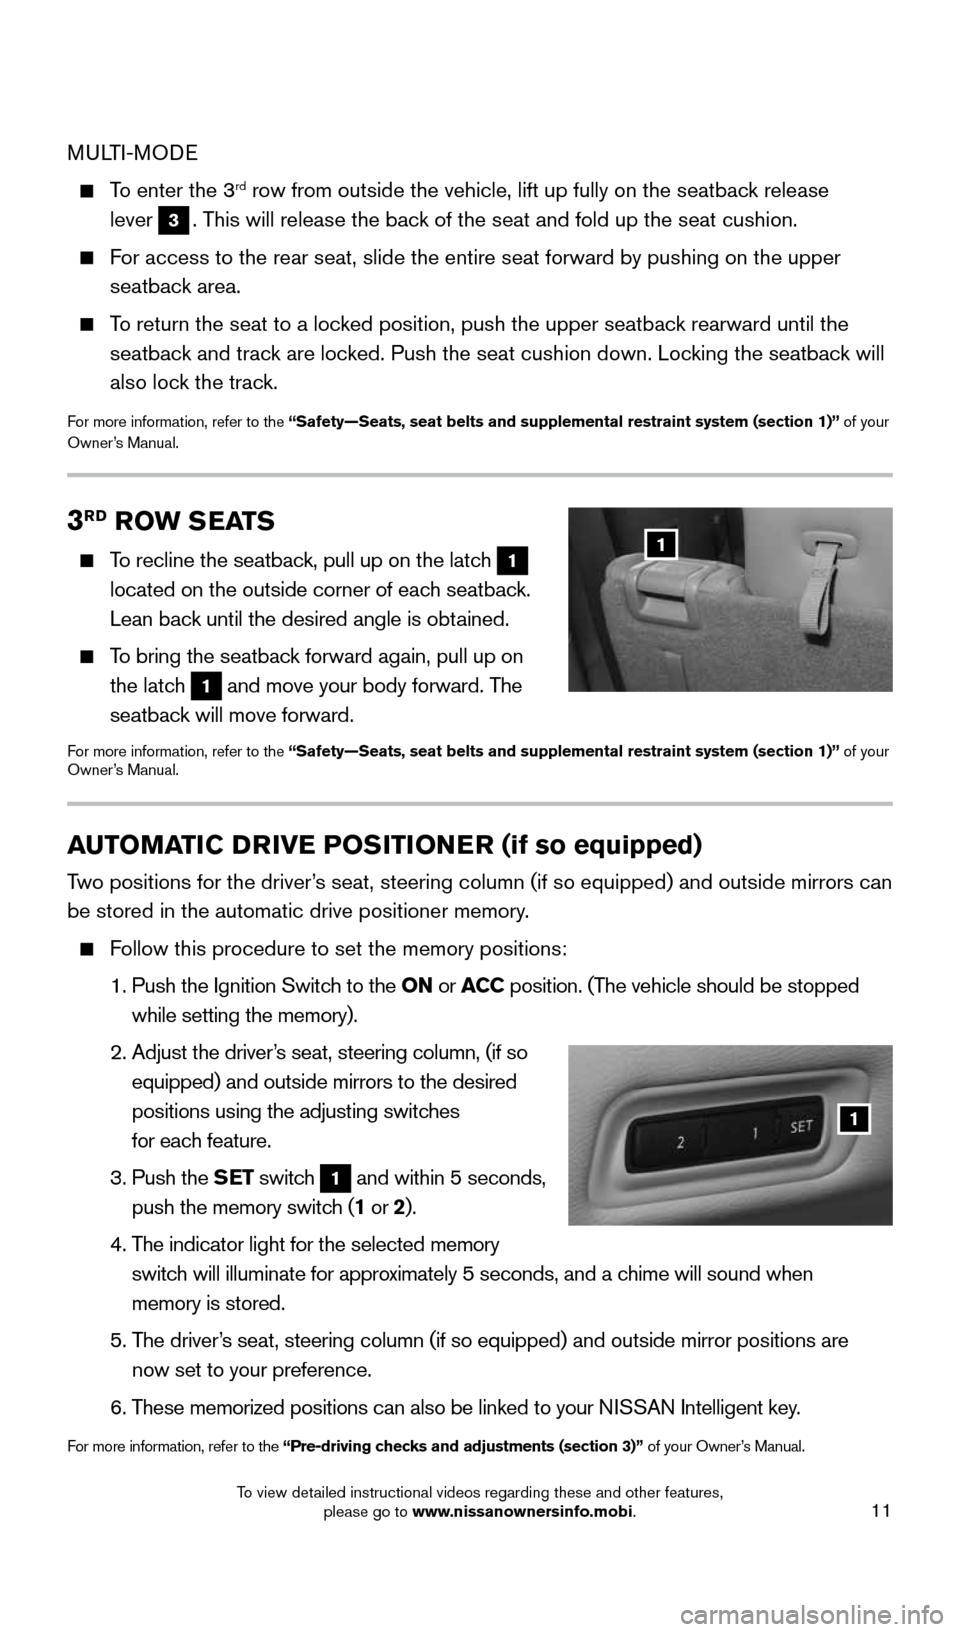
AUTOMATIC DRIVE POSITIONER (if so equipped)
Two positions for the driver’s seat, steering column (if so equipped) and outside mirrors can
be stored in the automatic drive positioner memory.
Follow this procedure to set the memory positions:
1. Push the Ignition Switch to the ON or ACC position. (The vehicle should be stopped
while setting the memory).
2. Adjust the driver’s seat, steering column, (if so
equipped) and outside mirrors to the desired
positions using the adjusting switches
for each feature.
3. Push the SET switch
1 and within 5 seconds,
push the memory switch (1 or 2).
4. The indicator light for the selected memory
switch will illuminate for approximately 5 seconds, and a chime will sound when
memory is stored.
5. The driver’s seat, steering column (if so equipped) and outside mirror positions \
are
now set to your preference.
6. These memorized positions can also be linked to your NISSAN Intelligent key.
For more information, refer to the “Pre-driving checks and adjustments (section 3)” of your Owner’s Manual.
1
MULTI-MODE
To enter the 3rd row from outside the vehicle, lift up fully on the seatback release
lever
3. This will release the back of the seat and fold up the seat cushion.
For access to the rear seat, slide the entire seat forward by pushing on \
the upper
seatback area.
To return the seat to a locked position, push the upper seatback rearward until the
seatback and track are locked. Push the seat cushion down. Locking the seatback will
also lock the track.
For more information, refer to the “Safety—Seats, seat belts and supplemental restraint system (sect\
ion 1)” of your
Owner’s Manual.
1904703_15c_Pathfinder_QRG_031315.indd 113/13/15 12:52 PM
To view detailed instructional videos regarding these and other features, please go to www.nissanownersinfo.mobi.
Page 22 of 32
20
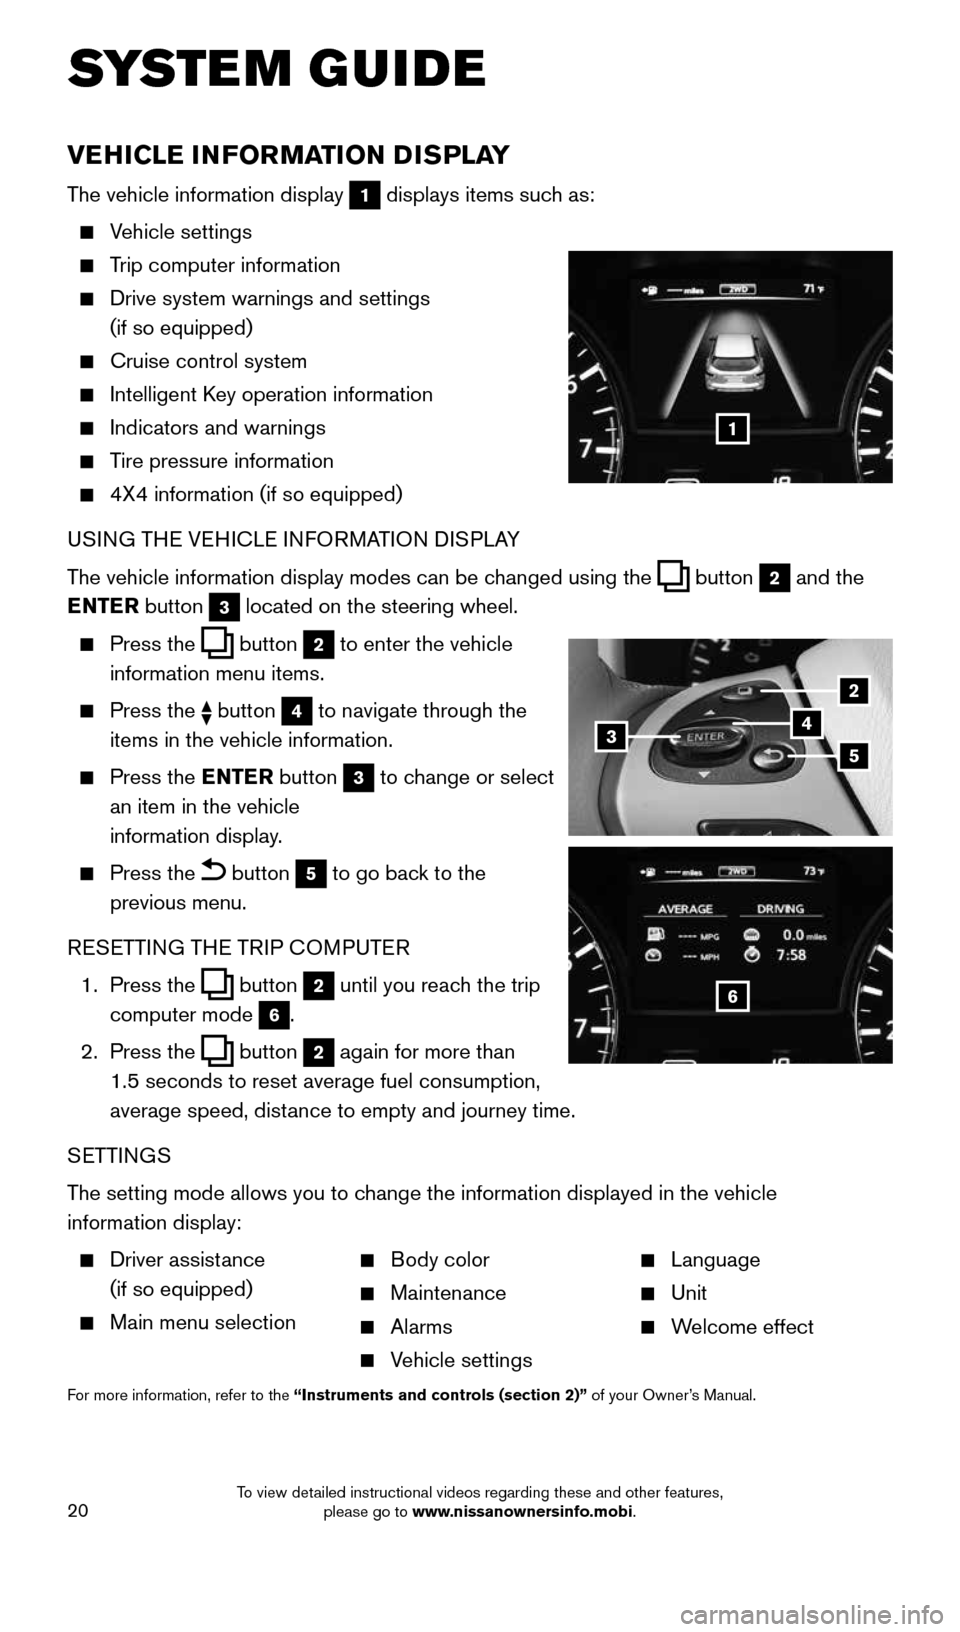
VEHICLE INFORMATION DISPLAY
The vehicle information display 1 displays items such as:
Vehicle settings
Trip computer information
Drive system warnings and settings
(if so equipped)
Cruise control system
Intelligent Key operation information
Indicators and warnings
Tire pressure information
4X4 information (if so equipped)
USING THE VEHICLE INFORMATION DISPLAY
The vehicle information display modes can be changed using the
button 2 and the
ENTER button 3 located on the steering wheel.
Press the button 2 to enter the vehicle
information menu items.
Press the button 4 to navigate through the
items in the vehicle information.
Press the ENTER button 3 to change or select
an item in the vehicle
information display.
Press the button 5 to go back to the
previous menu.
RESETTING THE TRIP COMPUTER
1. Press the
button 2 until you reach the trip
computer mode 6.
2. Press the
button 2 again for more than
1.5 seconds to reset average fuel consumption,
average speed, distance to empty and journey time.
SETTINGS
The setting mode allows you to change the information displayed in the vehicle
information display:
Driver assistance
(if so equipped)
Main menu selection
Body color
Maintenance
Alarms
Vehicle settings
Language
Unit
Welcome effect
For more information, refer to the “Instruments and controls (section 2)” of your Owner’s Manual.
SYSTEM GUIDE
1
2
435
6
1904703_15c_Pathfinder_QRG_031315.indd 203/13/15 12:52 PM
To view detailed instructional videos regarding these and other features, please go to www.nissanownersinfo.mobi.
Page 26 of 32
24
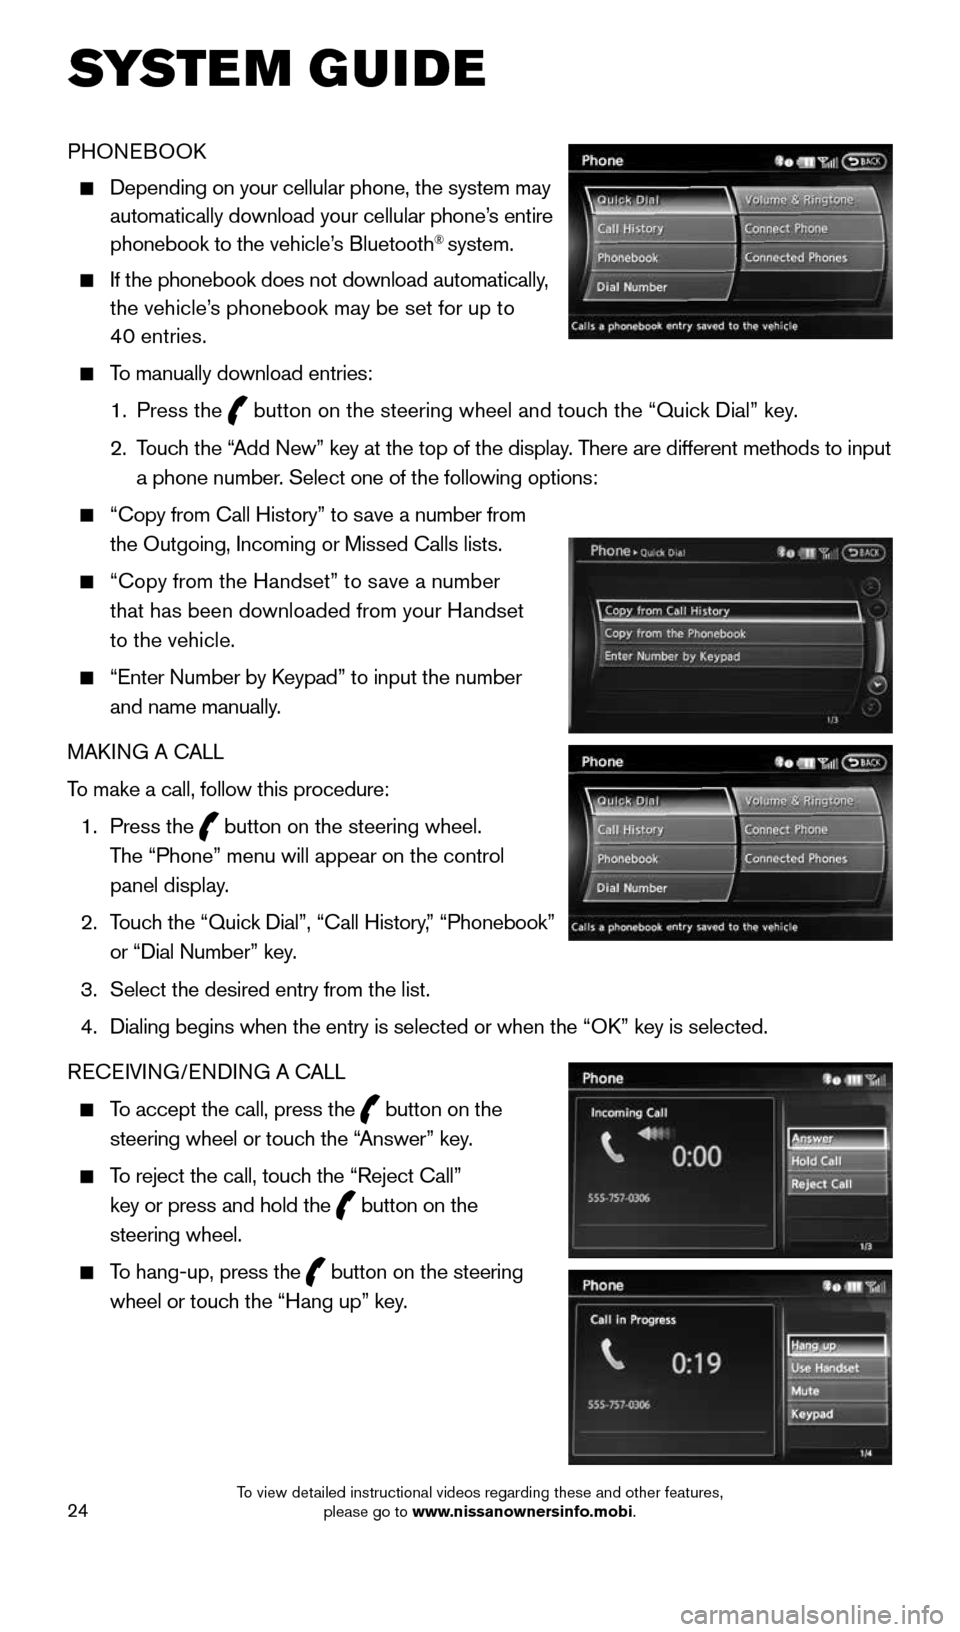
PHONEBOOK
Depending on your cellular phone, the system may
automatically download your cellular phone’s entire
phonebook to the vehicle’s Bluetooth
® system.
If the phonebook does not download automatically,
the vehicle’s phonebook may be set for up to
40 entries.
To manually download entries:
1. Press the
button on the steering wheel and touch the “Quick Dial” key.
2. Touch the “Add New” key at the top of the display. There are different methods to input
a phone number. Select one of the following options:
“Copy from Call History” to save a number from
the Outgoing, Incoming or Missed Calls lists.
“Copy from the Handset” to save a number
that has been downloaded from your Handset
to the vehicle.
“Enter Number by Keypad” to input the number
and name manually.
MAKING A CALL
To make a call, follow this procedure:
1. Press the
button on the steering wheel.
The “Phone” menu will appear on the control
panel display.
2. Touch the “Quick Dial”, “Call History,” “Phonebook”
or “Dial Number” key.
3. Select the desired entry from the list.
4. Dialing begins when the entry is selected or when the “OK” key is selected.
RECEIVING/ENDING A CALL
To accept the call, press the button on the
steering wheel or touch the “Answer” key.
To reject the call, touch the “Reject Call”
key or press and hold the
button on the
steering wheel.
To hang-up, press the button on the steering
wheel or touch the “Hang up” key.
SYSTEM GUIDE
1904703_15c_Pathfinder_QRG_031315.indd 243/13/15 12:52 PM
To view detailed instructional videos regarding these and other features, please go to www.nissanownersinfo.mobi.
Page 27 of 32
25
BLUETOOTH® SYSTEM WITHOUT NAVIGATION (if so equipped)
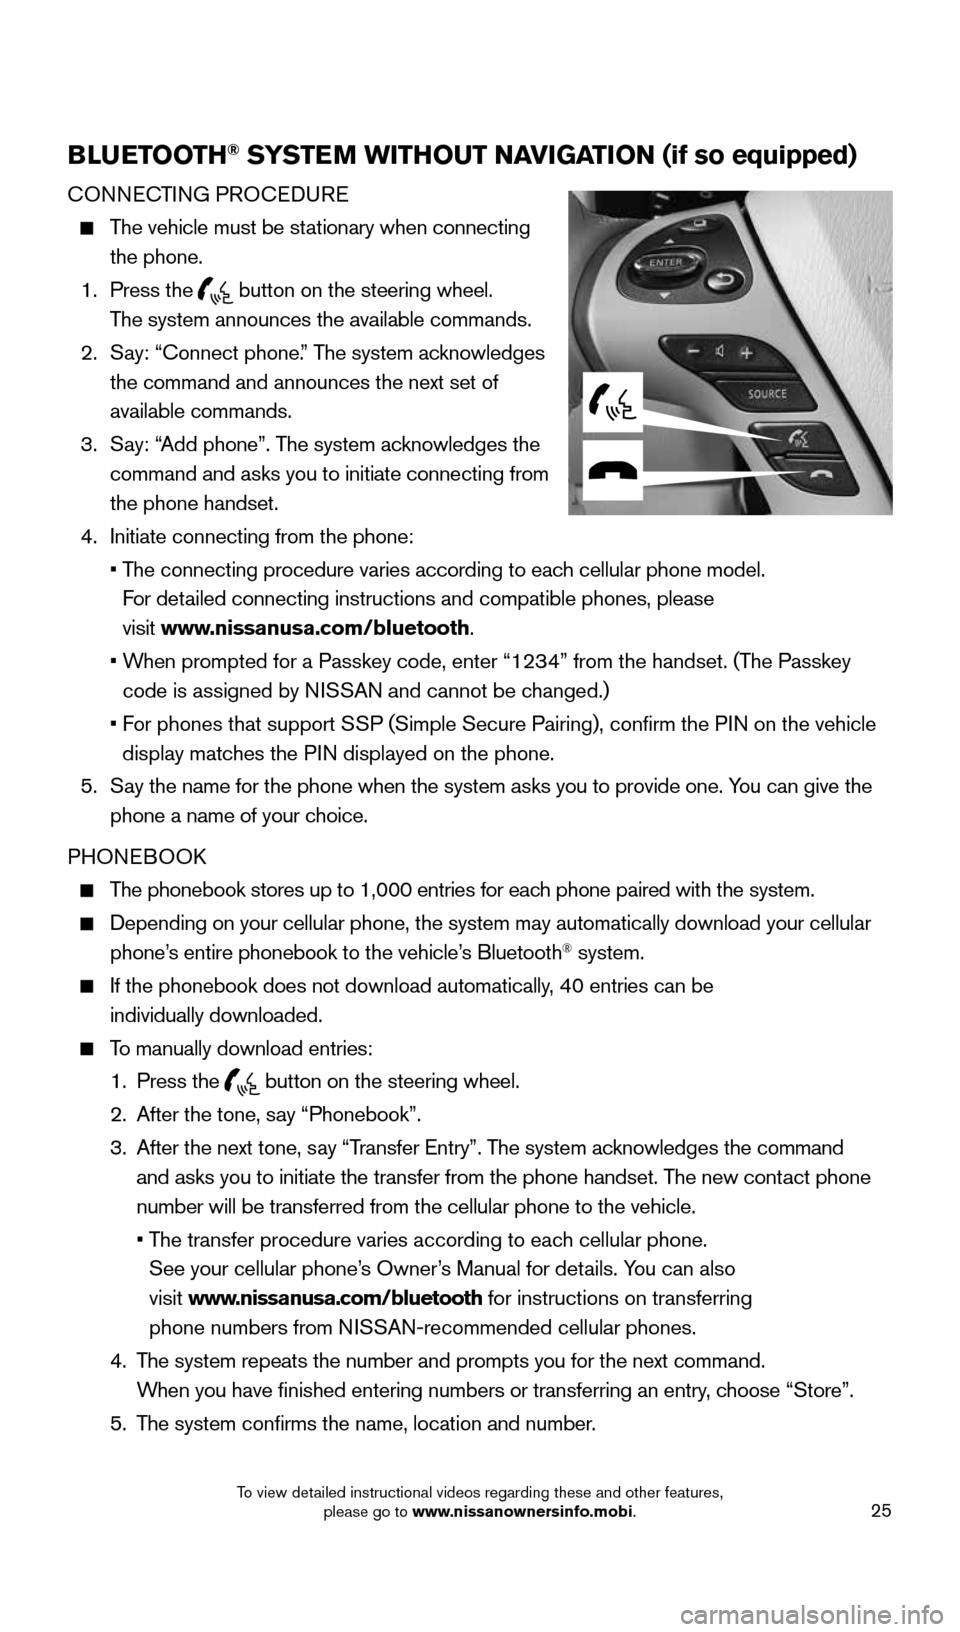
CONNECTING PROCEDURE
The vehicle must be stationary when connecting
the phone.
1. Press the
button on the steering wheel.
The system announces the available commands.
2. Say: “Connect phone.” The system acknowledges
the command and announces the next set of
available commands.
3. Say: “Add phone”. The system acknowledges the
command and asks you to initiate connecting from
the phone handset.
4. Initiate connecting from the phone:
• The connecting procedure varies according to each cellular phone model.
For detailed connecting instructions and compatible phones, please
visit www.nissanusa.com/bluetooth.
• When prompted for a Passkey code, enter “1234” from the handset. (The Passkey
code is assigned by NISSAN and cannot be changed.)
• For phones that support SSP (Simple Secure Pairing), confirm the PIN on the vehicle
display matches the PIN displayed on the phone.
5. Say the name for the phone when the system asks you to provide one. You can give the
phone a name of your choice.
PHONEBOOK
The phonebook stores up to 1,000 entries for each phone paired with the system.
Depending on your cellular phone, the system may automatically download \
your cellular
phone’s entire phonebook to the vehicle’s Bluetooth® system.
If the phonebook does not download automatically, 40 entries can be
individually downloaded.
To manually download entries:
1. Press the
button on the steering wheel.
2. After the tone, say “Phonebook”.
3. After the next tone, say “Transfer Entry”. The system acknowledges the command
and asks you to initiate the transfer from the phone handset. The new contact phone
number will be transferred from the cellular phone to the vehicle.
• The transfer procedure varies according to each cellular phone.
See your cellular phone’s Owner’s Manual for details. You can also
visit www.nissanusa.com/bluetooth for instructions on transferring
phone numbers from NISSAN-recommended cellular phones.
4. The system repeats the number and prompts you for the next command.
When you have finished entering numbers or transferring an entry, choose “Store”.
5. The system confirms the name, location and number.
1904703_15c_Pathfinder_QRG_031315.indd 253/13/15 12:52 PM
To view detailed instructional videos regarding these and other features, please go to www.nissanownersinfo.mobi.
Page 28 of 32

26
MAKING A CALL FROM THE PHONEBOOK
In some cases, names stored in all UPPERCASE letters may not be recognized by the
Voice Recognition system.
1. Press the
button on the steering wheel.
2. After waiting for the tone, say “Call.”
3. After the next tone, speak the name of a phonebook entry. For example, “Michael Smith.”
4. Confirm the correct name is recognized by saying “Dial” after the tone.
MAKING A CALL BY PHONE NUMBER
1. Press the
button on the steering wheel. A tone will sound.
2. Say: “Call.” The system acknowledges the command and announces the next set of
available commands.
3. Say: “Phone Number.” The system acknowledges the command and announces the next
set of available commands.
4. Say the number you wish to call, starting with the area code in single digit format.
5. When you have finished speaking the phone number, the system repeats it back and
announces the available commands.
6. Say: “Dial.” The system acknowledges the command and makes the call.
RECEIVING/ENDING A CALL
When you receive a phone call, a ring tone sounds through the audio syste\
m.
To accept the call, press the button on the steering wheel.
To reject the call, press the button on the steering wheel.
To hang-up the phone at the end of a call or to disconnect during call pl\
acement, press
the
button on the steering wheel.
For more information, refer to the “Monitor, climate, audio, phone and voice recognition systems (section 4)” of your
Owner’s Manual.
SYSTEM GUIDE
1904703_15c_Pathfinder_QRG_031315.indd 263/13/15 12:52 PM
To view detailed instructional videos regarding these and other features, please go to www.nissanownersinfo.mobi.