Page 26 of 524
1. Front view camera (if so equipped)
(P. 4-28)
2. Engine hood (P. 3-22)
3. Windshield wiper and washer switch,
wiper blades (P. 2-33, 8-20)
4. Windshield (P. 8-20)
5. Compass display (if so equipped)
(P. 2-6)
6. Power windows (P. 2-55)
7. Door locks, NISSAN Intelligent Key®,
remote engine start (if so equipped) ,
keys (P. 3-5, 3-2, 3-2)
8. Mirrors (P. 3-33)
9. Side view camera (if so equipped)
(P. 4-28)
10. Tire pressure monitoring system
(P. 8-30)
11. Flat tire (P. 6-3)
12. Tire chains (P. 8-37)
13. Fog light switch (P. 2-36)
14. Replacing bulbs (P. 8-26)
15. Headlight and turn signal switch
(P. 2-36)
See the page number indicated in paren-
theses for operating details.
LII2082
EXTERIOR FRONT
Illustrated table of contents0-3
Page 103 of 524

2 Instruments and controls
Instrument panel...................................2-2
Meters and gauges................................2-3
Speedometer and odometer.....................2-4
Tachometer....................................2-5
Fuel gauge....................................2-5
Assist Charge Gauge...........................2-6
Compass display (if so equipped)...................2-6
Zone variation change procedure.................2-7
Warning/indicator lights and audible reminders.......2-9
Checking bulbs...............................2-10
Warning lights................................2-10
Indicator lights................................2-15
Audible reminders.............................2-18
Vehicle Information Display........................2-18
How to use the vehicle information display.......2-19
Startup display................................2-19
Settings......................................2-19
Vehicle information display warnings and
indicators.....................................2-27
Security systems.................................2-31
Vehicle security system.........................2-31
NISSAN vehicle immobilizer system.............2-32
Windshield wiper and washer switch...............2-33Switch operation..............................2-34
Rear window wiper and washer switch..............2-35
Rear window and outside mirror defroster switch.....2-36
Headlight and turn signal switch....................2-36
Headlight control switch........................2-37
Daytime running light system (Canada only)......2-39
Instrument brightness control...................2-39
Turn signal switch.............................2-39
Fog light switch...............................2-40
Horn............................................2-41
Heated seats (if so equipped)......................2-41
Heated 2nd row seats (if so equipped)..............2-42
Climate controlled seat switch (if so equipped)......2-43
Heated steering wheel (if so equipped).............2-44
Vehicle Dynamic Control (VDC) off switch
...........2-45
Power inverter switch (if so equipped)..............2-45
Tow mode switch.................................2-46
Power outlets....................................2-46
12v outlets...................................2-46
120v outlet (if so equipped)....................2-48
Storage.........................................2-48
Map pockets..................................2-48
Seatback pocket..............................2-49
Page 111 of 524
CAUTION
●Do not install a ski rack, antenna, etc.,
which are attached to the vehicle by
means of a magnet. They affect the op-
eration of the compass.
●When cleaning the mirror, use a paper
towel or similar material dampened
with glass cleaner. Do not spray glass
cleaner directly on the mirror as it may
cause the liquid cleaner to enter the
mirror housing.
2-8Instruments and controls
Page 139 of 524
To defrost the rear window glass and outside
mirrors (if so equipped) , start the engine and
push the rear window defroster switch on. The
rear window defroster indicator light on the
switch comes on. Push the switch again to turn
the defroster off.
The rear window defroster automatically turns off
after approximately 15 minutes.
CAUTION
When cleaning the inner side of the rear
window, be careful not to scratch or dam-
age the rear window defroster.NOTE:
The top and bottom few rows of wires on
the rear window are not part of the rear
window defroster system. These wires
make up the antenna for the audio system.
Type A (if so equipped)
WIC1554
Type B (if so equipped)
WIC1460
Type A (if so equipped)
WIC1435
REAR WINDOW AND OUTSIDE
MIRROR DEFROSTER SWITCHHEADLIGHT AND TURN SIGNAL
SWITCH
2-36Instruments and controls
Page 172 of 524

3 Pre-driving checks and adjustments
Keys .............................................3-2
NISSAN Intelligent Key® ........................3-2
NISSAN Vehicle Immobilizer System keys.........3-4
Doors............................................3-5
Locking with key................................3-5
Locking with inside lock knob....................3-6
Locking with power door lock switch . . ...........3-6
Automatic door locks...........................3-6
Child safety rear door lock.......................3-7
NISSAN Intelligent Key®...........................3-7
Operating range................................3-9
Door locks/unlocks precaution..................3-10
NISSAN Intelligent Key® Operation.............3-10
How to use the remote keyless entry
function......................................3-14
Warning signals...............................3-17
Troubleshooting guide.........................3-18
Remote Engine Start (if so equipped)...............3-20
Remote engine start operating range . . ..........3-20
Remote starting the vehicle.....................3-20
Extending engine run time......................3-21
Canceling a remote start.......................3-21
Conditions the remote start will not work.........3-21
Hood...........................................3-22Liftgate..........................................3-23
Operating the manual liftgate
(if so equipped)...............................3-23
Operating the power liftgate (if so equipped).....3-23
Power liftgate main switch......................3-27
Liftgate release................................3-27
Liftgate position setting........................3-28
Fuel-filler door...................................3-28
Opening the fuel-filler door.....................3-28
Fuel-filler cap.................................3-29
Tilt/telescopic steering............................3-31
Manual operation (if so equipped)...............3-31
Automatic operation (if so equipped).............3-31
Sun visors.......................................3-32
Vanity mirrors.................................3-33
Mirrors..........................................
3-33
Automatic anti-glare rearview mirror.............3-33
Outside mirrors...............................3-35
Automatic drive positioner (if so equipped)..........3-36
Memory storage function.......................3-36
Entry/exit function.............................3-38
Setting memory function........................3-39
System operation..............................3-39
Page 204 of 524

�1To block glare from the front, swing down the
sun visor.
�2To block glare from the side, remove the sun
visor from the center mount and swing the
visor to the side.
�3Slide the extension sun visor in or out as
needed.
CAUTION
●Do not store the sun visor before return-
ing the extension to its original
position.
●Do not pull the extension sun visor forc-
ibly downward.
VANITY MIRRORS
To access the vanity mirror, pull the sun visor
down and flip open the mirror cover. The vanity
mirror will illuminate when the mirror cover is
open.
AUTOMATIC ANTI-GLARE
REARVIEW MIRROR
The inside mirror is designed so that it automati-
cally dims according to the intensity of the head-
lights of the vehicle following you. The automatic
anti-glare feature operates only when the ignition
switch is in the ON position.
The indicator light
�1will illuminate when the
automatic anti-glare feature is operating.
To turn off the automatic anti-glare feature, press
the
button. The indicator light will turn off.
To turn on the automatic anti-glare feature, press
the
button again. The indicator light will
turn on.
NOTE:
Do not hang any objects over the sensors
�2or apply glass cleaner to the sensors.
Doing so will reduce the sensitivity of the
sensors, resulting in improper operation.
LPD2067
MIRRORS
Pre-driving checks and adjustments3-33
Page 205 of 524
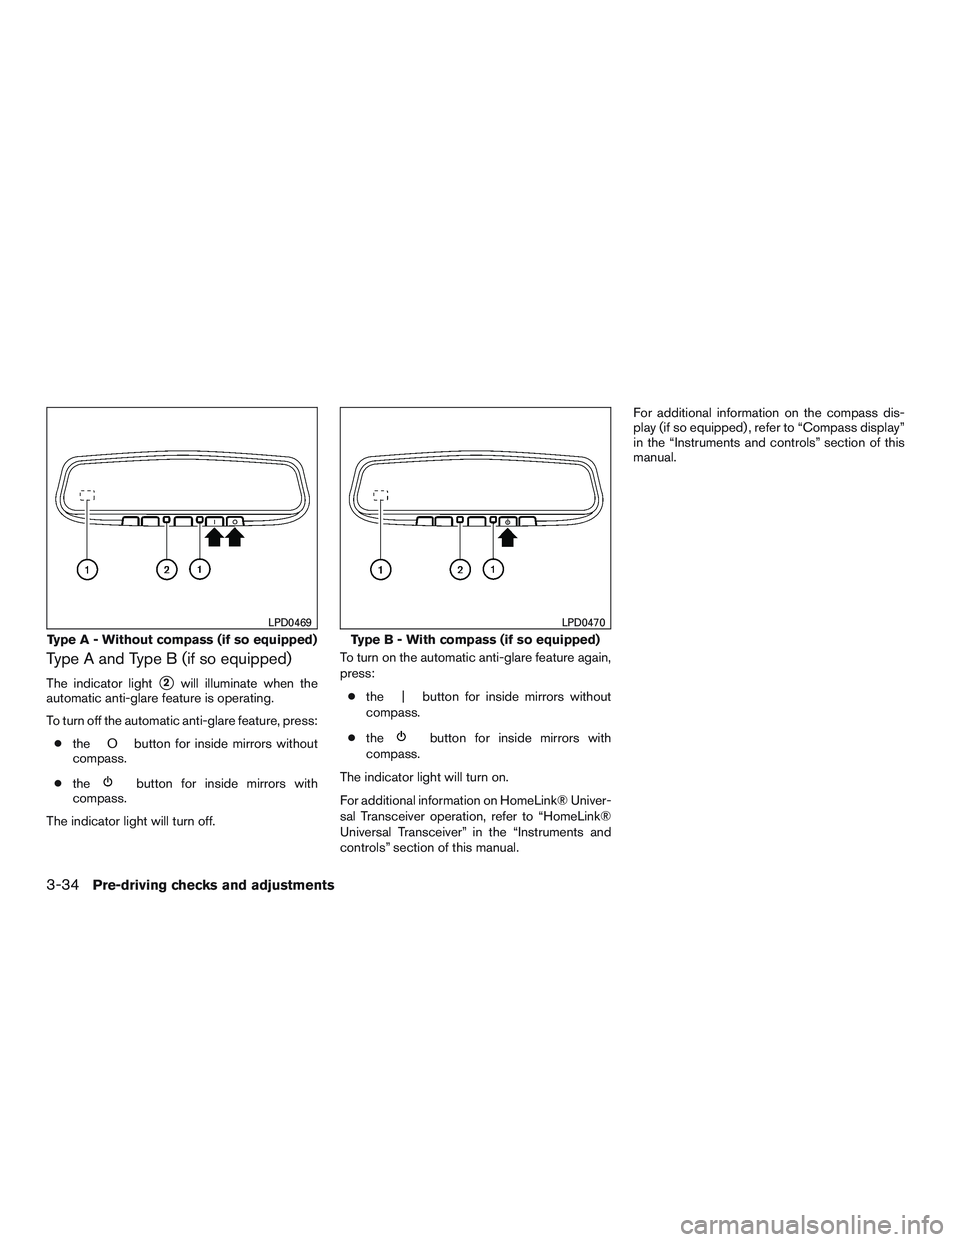
Type A and Type B (if so equipped)
The indicator light�2will illuminate when the
automatic anti-glare feature is operating.
To turn off the automatic anti-glare feature, press:
●the O button for inside mirrors without
compass.
●the
button for inside mirrors with
compass.
The indicator light will turn off.To turn on the automatic anti-glare feature again,
press:
●the | button for inside mirrors without
compass.
●the
button for inside mirrors with
compass.
The indicator light will turn on.
For additional information on HomeLink® Univer-
sal Transceiver operation, refer to “HomeLink®
Universal Transceiver” in the “Instruments and
controls” section of this manual.For additional information on the compass dis-
play (if so equipped) , refer to “Compass display”
in the “Instruments and controls” section of this
manual.
Type A - Without compass (if so equipped)
LPD0469
Type B - With compass (if so equipped)
LPD0470
3-34Pre-driving checks and adjustments
Page 206 of 524

OUTSIDE MIRRORS
The outside mirror remote control will operate
only when the ignition switch is in the ACC or ON
position.
Move the small switch
�1to select the left or right
mirror. Adjust each mirror to the desired position
using the large switch
�2.
WARNING
●Objects viewed in the outside mirror on
the passenger side are closer than they
appear. Be careful when moving to the
right. Using only this mirror could cause
an accident. Use the inside mirror or
glance over your shoulder to properly
judge distances to other objects.
●Do not adjust the mirrors while driving.
You could lose control of your vehicle
and cause an accident.
Manual folding outside mirrors
Pull the outside mirror toward the door to fold it.
Reverse tilt-down feature (if so
equipped)
The reverse tilt-down feature will turn the outside
mirror surface downward to provide better rear
visibility close to the vehicle.
When the ignition switch is in the ON position,
turn the outside mirror control switch to the left or
right position. Only one mirror can be selected at
a time.
SPA2739LPD2112
Pre-driving checks and adjustments3-35

(P. 4-28)
2. Engine hood (P. 3-22)
3. Windshield wiper and washer switch,
wiper blades (P. 2-33, 8-20)
4. Windshield (P. 8-20)
5. Compass display (if so equipped)")

 , start the engine and
push the rear window defroster switch on. The
rear window defroster indicator light on the
switch comes on.")