Page 209 of 524

The seat synchronization function operates under
the following conditions:
●The ignition switch is in the ON position.
●The shift lever is in the P (Park) position.
If the outside mirrors or the steering wheel
reaches its maximum adjustment, the function is
automatically disabled. Restart the function by
selecting a previously stored seat memory posi-
tion using the memory switches (1 or 2) . An
Intelligent Key that was previously linked to the
stored seat memory can also be used to restart
the function.
If a seat position was not previously stored in the
seat memory, restart the function by adjusting the
steering wheel and outside mirrors manually for
your best driving position and then drive the
vehicle above 4 MPH (7 km/h).
Cancel or activate seat synchronization
function
The shift lever must be in the P (Park) position
with the ignition switch placed in the ACC posi-
tion.Confirming memory storage
●Place the ignition switch in the ON position
and push the SET switch. If the main memory
has not been stored, the indicator light will
come on for approximately 0.5 seconds.
When the memory has stored the position,
the indicator light will stay on for approxi-
mately 5 seconds.
●If the battery cable is disconnected, or if the
fuse opens, the memory storage function will
be canceled and must be restarted before a
stored memory position can be set again.
Drive the vehicle over 25 MPH (40 km/h) to
restart the memory storage function. You
can also restart the memory storage function
using the following procedure.
1. Connect the battery cable or replace the
fuse.
2. Open and close the driver’s door more than
two times with the ignition switch in the
LOCK position.
Once the memory storage function has been
restarted, you can store a memory position.
For additional information, refer to “Memory
storage function” in this section.
Selecting the memorized position
Set the shift lever to the P (Park) position, then:
●Within 45 seconds of opening the driver’s
door, push the memory switch (1 or 2) or
●Place the ignition switch in the ON position
and push the memory switch (1 or 2) .
The driver’s seat, steering column, and outside
mirrors will move to the memorized position with
the indicator light blinking, and then the light will
stay on for approximately 5 seconds.
ENTRY/EXIT FUNCTION
This system is designed so that the driver’s seat
and automatic operation steering column will au-
tomatically move when the shift lever is in the P
(Park) position. This allows the driver to get into
and out of the driver’s seat more easily.
The driver’s seat will slide backward and the
steering column will move up:
●When the driver’s door is opened with the
ignition switch placed in the LOCK position.
●When the ignition switch is turned from
ACC to LOCK with the driver’s door open.
3-38Pre-driving checks and adjustments
Page 210 of 524

The driver’s seat and steering wheel will return to
the previous position:
●When the driver’s door is closed with the
ignition switch placed in the LOCK position.
●When the ignition switch is turned from
ACC to ON while the shift lever is in the P
(Park) position.
The entry/exit function can be adjusted or can-
celed through the Vehicle Settings in the vehicle
information display by performing the following:
●Switch the Exit Seat Slide from ON to OFF.
●Switch the Exit Steering UP from ON to
OFF.
Restarting the entry/exit function
If the battery cable is disconnected or if the fuse
opens, the entry/exit function will be disabled.
Drive the vehicle over 25 MPH (40 km/h) to
restart the entry/exit function. You can also restart
the entry/exit function using the following proce-
dure.
1. Connect the battery cable or replace the
fuse.
2. Open and close the driver’s door more than
two times with the ignition switch in the
LOCK position.
The entry/exit function should now work properly.
SETTING MEMORY FUNCTION
The position of the following settings can be
linked to the Intelligent Key and the memorized
settings can be available for each Intelligent Key.
●Climate control system
●Navigation system (if so equipped)
●Audio system
To use the memory function, set the climate,
navigation and audio systems to the driver’s pre-
ferred settings. Lock the doors with the Intelligent
Key. Each Intelligent Key may be set with the
driver’s individual preferences. When a new In-
telligent Key is used, “Connection with the key
has been done” will be displayed on the screen
and the memorized settings are available.
To engage the memorized settings, perform the
following:
1. Carry the Intelligent Key that is linked to the
memorized settings.
2. Unlock the doors by pushing the driver’s
door handle request switch or the
UNLOCK
button on the Intelligent
Key.
3. Place the ignition switch in the “ON” posi-
tion. The settings linked to the Intelligent Key
will start.For additional information on using the Climate
control system refer to “Heater and air condi-
tioner (automatic)” in the “Monitor, climate, audio,
phone and voice recognition systems” section of
this manual.
For additional information on using the Naviga-
tion System, refer to the separate Navigation
System Owner’s Manual.
For additional information on using the Audio
system, refer to “Audio system” in the “Monitor,
climate, audio, phone and voice recognition sys-
tems” section of this manual.
SYSTEM OPERATION
The automatic drive positioner system will not
work or will stop operating under the following
conditions:
●When the vehicle speed is above 4 MPH
(7 km/h).
●When any of the memory switches are
pushed while the automatic drive positioner
is operating.
●When the adjusting switch for the driver’s
seat and steering column is turned on while
the automatic drive positioner is operating.
●When the seat has already been moved to
the memorized position.
Pre-driving checks and adjustments3-39
Page 211 of 524
●When no seat position is stored in the
memory switch.
●When the shift lever is moved from P (Park)
to any other position.
●When the driver’s door remains open more
than 45 seconds and the ignition switch is
not in the ON position.
●The seat synchronization function is auto-
matically disabled if the outside mirrors or
steering wheel reaches its maximum adjust-
ment.
●The seat synchronization function will not
operate if the seat is adjusted over one of the
following maximum thresholds:
– Seat sliding: 3.0 in (76 mm)
– Seatback reclining: 9.1 degrees
– Seat lifter (rear side): 0.8 in (20 mm)
The entry/exit function can be adjusted or can-
celed through the Vehicle Settings in the vehicle
information display by performing the following:
●Switch the Exit Seat Slide from ON to OFF.
●Switch the Exit Steering UP from ON to
OFF.
3-40Pre-driving checks and adjustments
Page 212 of 524

4 Monitor, climate, audio, phone and voice
recognition systems
Control panel buttons — color screen without
Navigation System (if so equipped)..................4-4
How to use the NISSAN controller...............4-5
How to select menus on the screen..............4-6
How to use the STATUS button..................4-6
How to use the INFO button.....................4-6
How to use the SETTING button.................4-8
OFF button..............................4-9
Control panel buttons — color screen with
Navigation System (if so equipped).................4-10
How to use the NISSAN controller..............4-11
How to use the touch-screen . ..................4-11
How to select menus on the screen.............4-13
How to use the STATUS button.................4-13
How to use the INFO button....................4-14
How to use the SETTING button................4-16
OFF button.............................4-18
Image viewer (if so equipped)......................4-19
Using the image viewer........................4-19
RearView Monitor (if so equipped)..................4-21
How to read the displayed lines.................4-22
How to park with predicted course lines..........4-22Difference between predicted and actual
distances.....................................4-23
Predicted course line settings...................4-26
How to adjust the screen.......................4-26
Parking Sensor / Rear Center Sonar.............4-26
Operating tips.................................4-28
Around View® Monitor (if so equipped).............4-28
Available views................................4-30
Difference between predictive and actual
distances.....................................4-35
How to switch the display......................4-37
Parking Sensor / Rear Center Sonar.............4-38
How to adjust the screen view..................4-40
View malfunction..............................4-40
Operating tips.................................4-40
Vents...........................................4-41
Heater and air conditioner (automatic)..............4-42
Automatic operation...........................4-43
Manual operation..............................4-44
Operating tips.................................4-46
Servicing air conditioner...........................4-47
Audio system....................................4-47
Page 213 of 524

Radio........................................4-47
FM radio reception............................4-47
AM radio reception............................4-48
Satellite radio reception (if so equipped).........4-48
Audio operation precautions....................4-48
FM/AM/SAT radio with compact disc (CD)
player (if so equipped).........................4-63
FM/AM/SAT radio with CD/DVD player
(if so equipped)...............................4-70
Digital Versatile Disc (DVD) Player
Operation (models with Navigation System)......4-76
USB (Universal Serial Bus) Connection Port
(models without Navigation System)
(if so equipped)...............................4-79
USB (Universal Serial Bus) Connection Port
(models with Navigation System)
(if so equipped)...............................4-80
iPod®* player operation without Navigation
System (if so equipped)........................4-84
iPod®* player operation with Navigation
System (if so equipped)........................4-86
Bluetooth® streaming audio (if so equipped).....4-90
CD care and cleaning..........................4-93
Steering wheel switch for audio control..........4-94Antenna......................................4-95
Dual head restraint/headrest DVD system
(if so equipped)..................................4-96
System components...........................4-97
Before operating dual head restraint/
headrest DVD system.........................4-102
Playing a DVD (Digital Versatile Disc)...........4-103
Operating tips................................4-107
Care and maintenance........................4-108
Car phone or CB radio...........................4-108
Bluetooth® Hands-Free Phone System without
Navigation System (if so equipped)................4-109
Regulatory Information........................4-111
Using the system.............................4-111
Control buttons..............................4-114
Getting started...............................4-114
List of voice commands.......................4-116
Voice Adaptation (VA) mode...................4-120
Manual control . ..............................4-121
Troubleshooting guide........................4-123
Bluetooth® Hands-Free Phone System with
Navigation System (if so equipped)................4-124
Regulatory Information........................4-126
Voice commands.............................4-126
Page 214 of 524

Connecting procedure........................4-127
Vehicle Phonebook...........................4-128
Handset phonebook..........................4-130
Making a call.................................4-131
Receiving a call..............................4-132
During a call.................................4-133
Ending a call.................................4-133
Phone settings...............................4-134
Bluetooth® settings..........................4-135
Call volume . .................................4-136
NISSAN Voice Recognition System
(if so equipped).................................4-137NISSAN Voice Recognition Standard Mode.....4-137
Using the system.............................4-140
Before starting . ..............................4-140
Giving voice commands.......................4-140
NISSAN Voice Recognition Alternate
Command Mode.............................4-145
Using the system.............................4-150
Speaker Adaptation function...................4-152
Troubleshooting guide........................4-153
Page 215 of 524

WARNING
●Positioning of the heating or air condi-
tioning controls and display controls
should not be done while driving in or-
der that full attention may be given to
the driving operation.
●Do not disassemble or modify this sys-
tem. If you do, it may result in accidents,
fire, or electrical shock.
●Do not use this system if you notice any
abnormality, such as a frozen screen or
lack of sound. Continued use of the
system may result in accident, fire or
electric shock.
●In case you notice any foreign object in
the system hardware, spill liquid on it,
or notice smoke or smell coming from it,
stop using the system immediately and
contact your nearest NISSAN dealer. Ig-
noring such conditions may lead to ac-
cidents, fire or electrical shock.
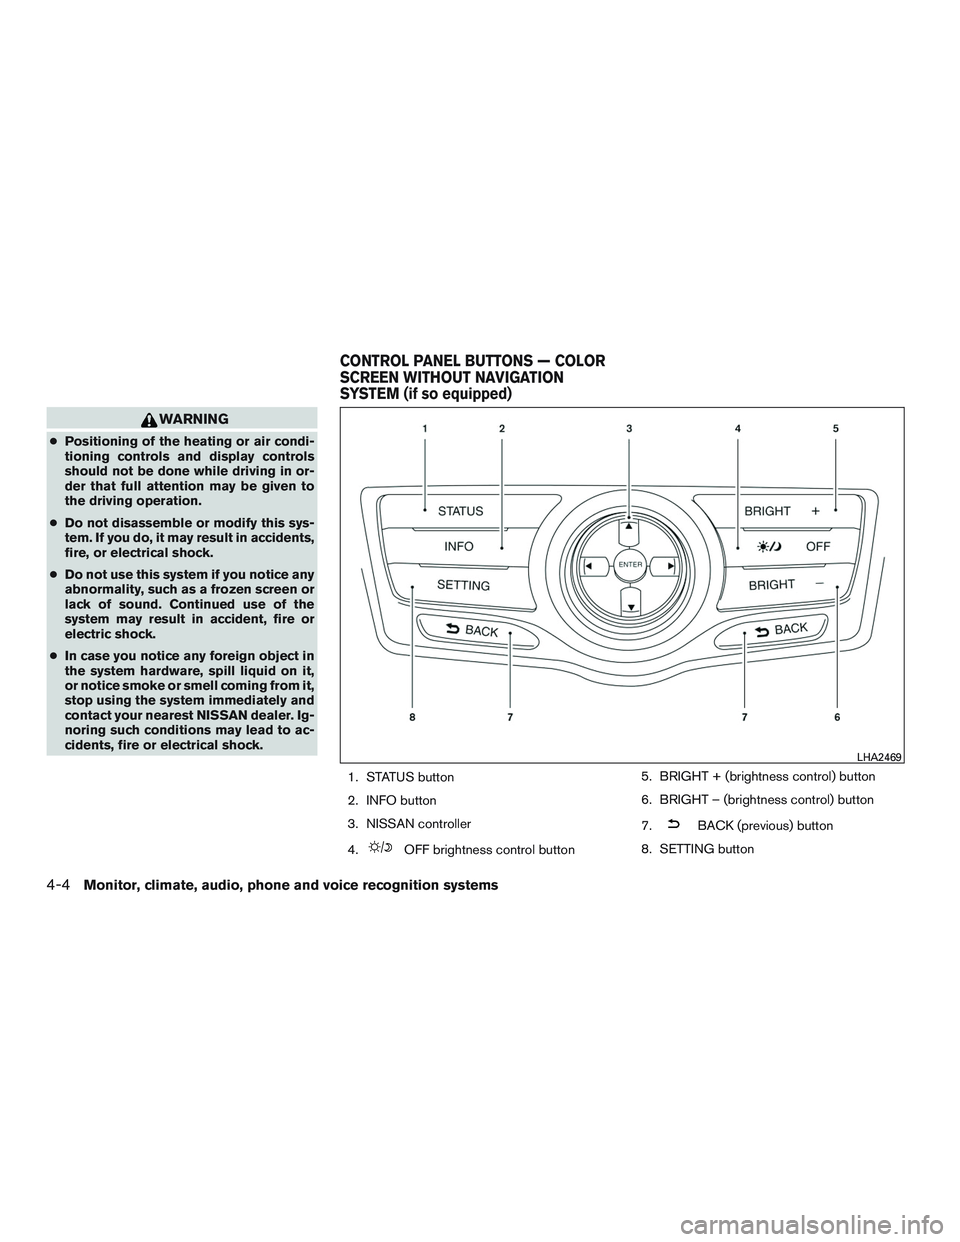
1. STATUS button
2. INFO button
3. NISSAN controller
4.
OFF brightness control button5. BRIGHT + (brightness control) button
6. BRIGHT – (brightness control) button
7.
BACK (previous) button
8. SETTING button
LHA2469
CONTROL PANEL BUTTONS — COLOR
SCREEN WITHOUT NAVIGATION
SYSTEM (if so equipped)
4-4Monitor, climate, audio, phone and voice recognition systems
Page 216 of 524

CAUTION
●The glass display screen may break if it
is hit with a hard or sharp object. If the
glass screen breaks, do not touch it.
Doing so could result in an injury.
●To clean the display, never use a rough
cloth, alcohol, benzine, thinner or any
kind of solvent or paper towel with a
chemical cleaning agent. They will
scratch or deteriorate the panel.
●Do not splash any liquid such as water
or car fragrance on the display. Contact
with liquid will cause the system to
malfunction.
When you use this system, make sure the engine
is running.
If you use the system with the engine not
running (ignition ON or ACC) for a long
time, it will discharge the battery, and the
engine will not start.
Reference symbols:
ENTER button — This is a button on the control
panel.
“Example” — Words marked in quotes refer to a
key shown on the display. These keys can only be
selected using the NISSAN controller.
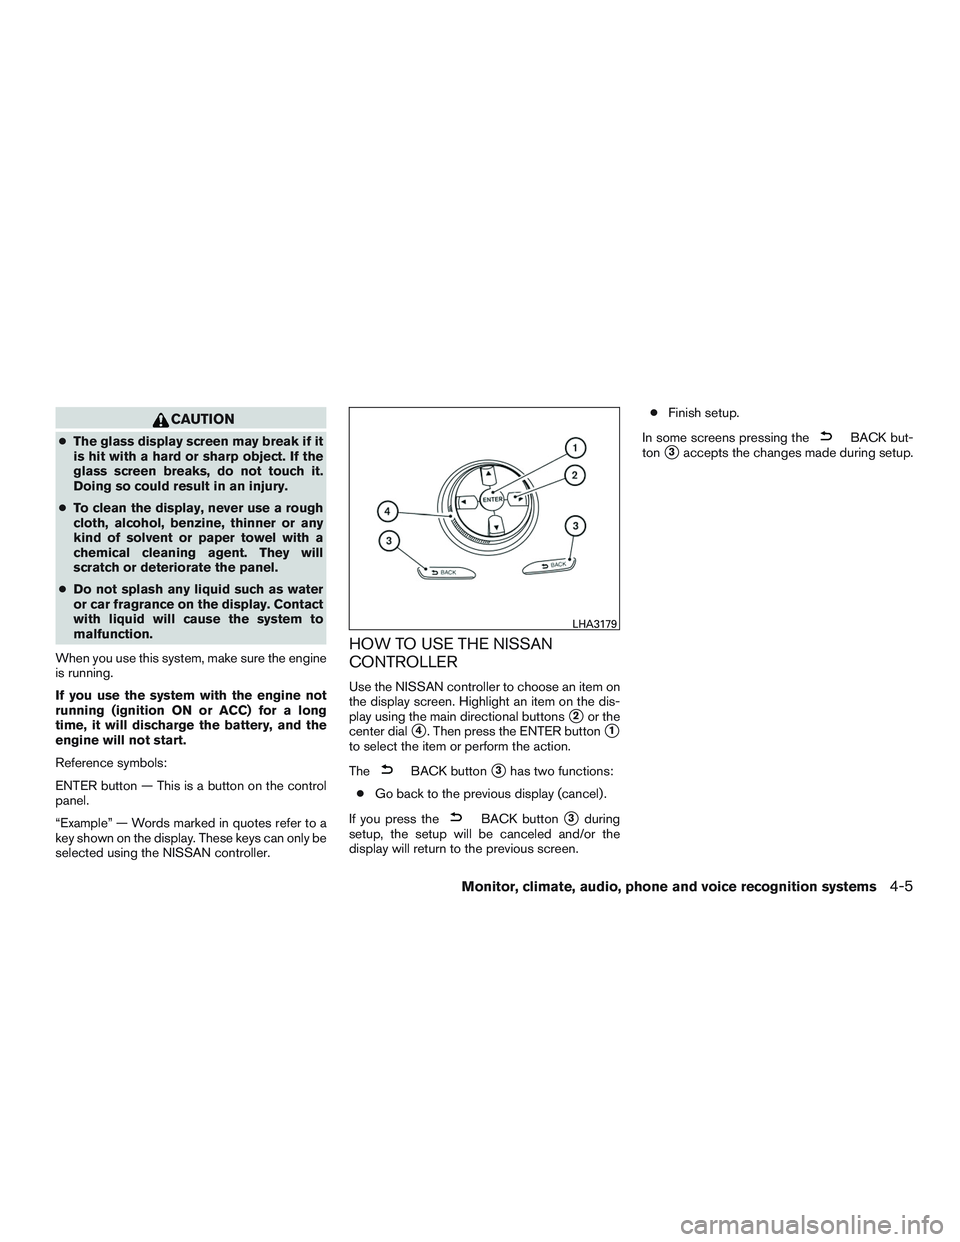
HOW TO USE THE NISSAN
CONTROLLER
Use the NISSAN controller to choose an item on
the display screen. Highlight an item on the dis-
play using the main directional buttons
2or the
center dial
4. Then press the ENTER button1
to select the item or perform the action.
The
BACK button3has two functions:
●Go back to the previous display (cancel) .
If you press the
BACK button3during
setup, the setup will be canceled and/or the
display will return to the previous screen.●Finish setup.
In some screens pressing the
BACK but-
ton
3accepts the changes made during setup.
LHA3179
Monitor, climate, audio, phone and voice recognition systems4-5