Page 94 of 370
WARNING
When the DRL system is active, tail
lights on your vehicle are not on. It is
necessary at dusk to turn on your head-
lights. Failure to do so could cause an
accident injuring yourself and others.
INSTRUMENT BRIGHTNESS
CONTROL
The instrument brightness control oper-
ates when the headlight control switch is in
the
Page 98 of 370
FRONT-DOOR POCKETSUNDER-SEAT STORAGE BIN
To open the drawer, lif t up slightly and pull
to open. To remove the drawer, pull to the
point of resistance and lif t up and pull.
Page 104 of 370
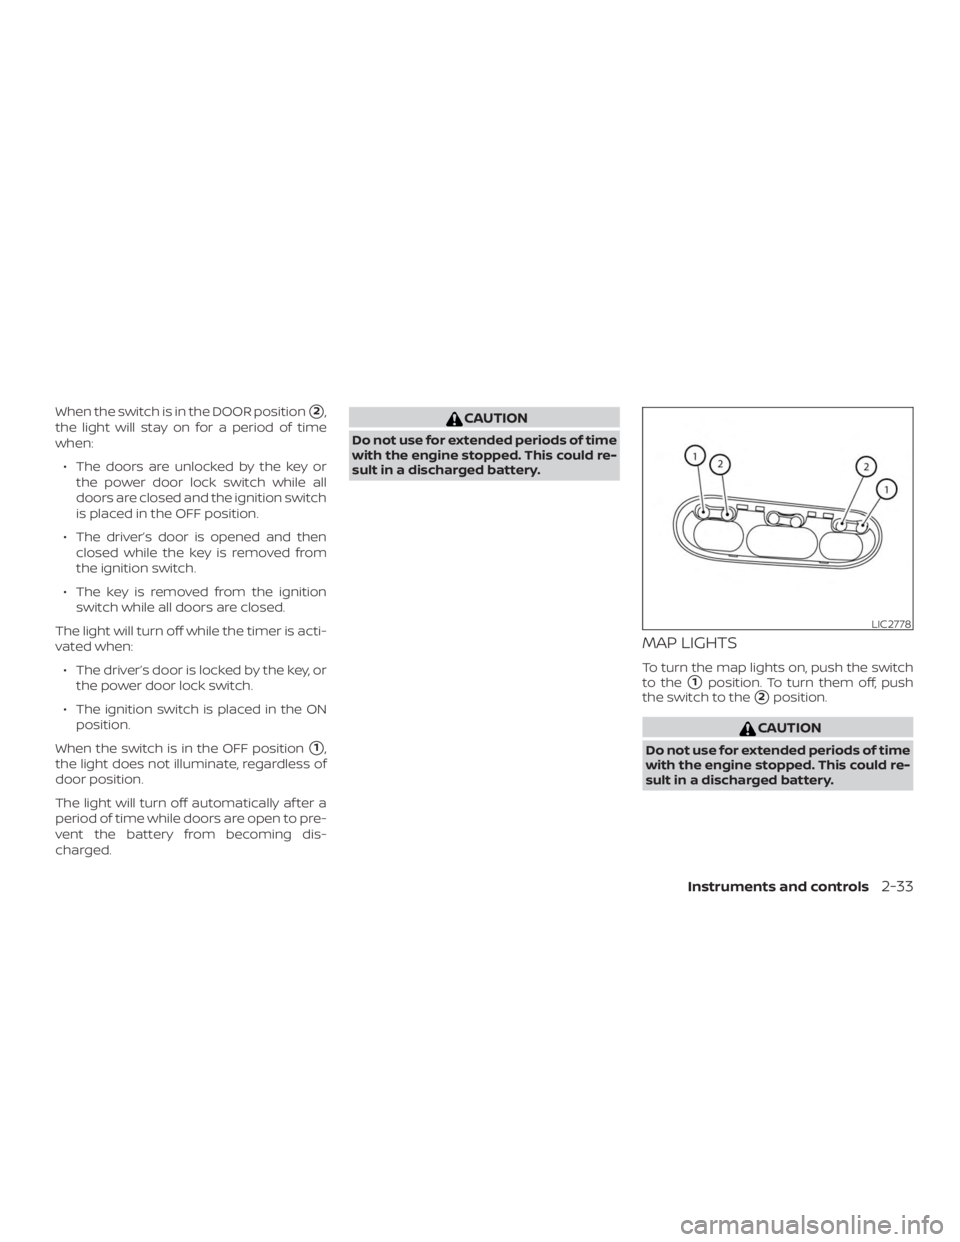
When the switch is in the DOOR position�2,
the light will stay on for a period of time
when:
∙ The doors are unlocked by the key or the power door lock switch while all
doors are closed and the ignition switch
is placed in the OFF position.
∙ The driver’s door is opened and then closed while the key is removed from
the ignition switch.
∙ The key is removed from the ignition switch while all doors are closed.
The light will turn off while the timer is acti-
vated when: ∙ The driver’s door is locked by the key, or the power door lock switch.
∙ The ignition switch is placed in the ON position.
When the switch is in the OFF position
�1,
the light does not illuminate, regardless of
door position.
The light will turn off automatically af ter a
period of time while doors are open to pre-
vent the battery from becoming dis-
charged.
Page 105 of 370
CARGO LIGHT
The cargo light has a two-position switch
and operates regardless of ignition switch
position.
When the switch is in the ON position, the
cargo light illuminates, regardless of door
position. The light will go off af ter a period
of time unless the ignition switch is placed
in the ACC or ON position.
When the switch is in the OFF position, the
cargo light will not illuminate, regardless of
door position.
Page 124 of 370
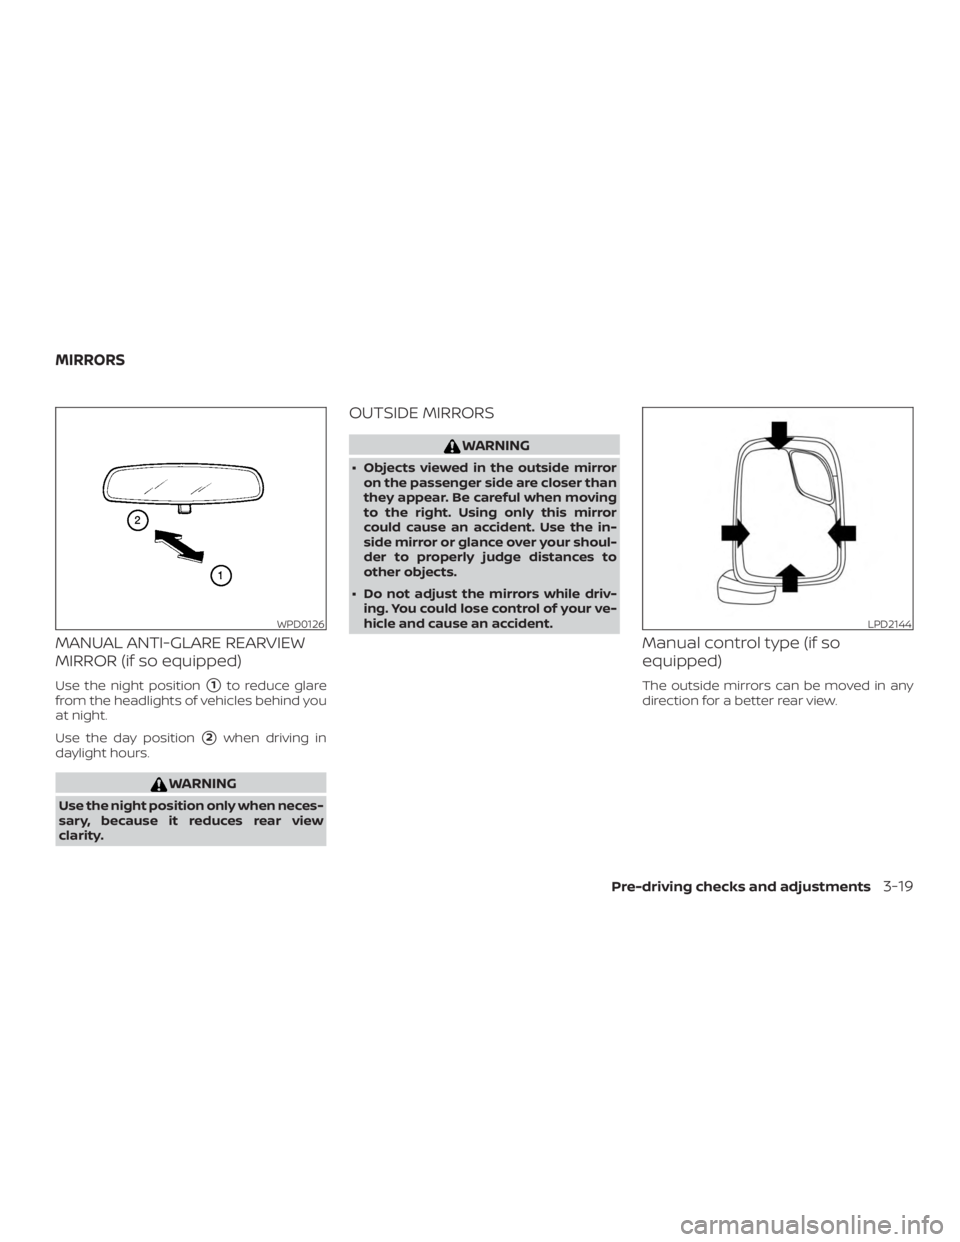
MANUAL ANTI-GLARE REARVIEW
MIRROR (if so equipped)
Use the night position�1to reduce glare
from the headlights of vehicles behind you
at night.
Use the day position
�2when driving in
daylight hours.
Page 142 of 370

∙ Objects viewed in the RearView Moni-tor differ from actual distance be-
cause a wide-angle lens is used.
∙ Objects in the RearView Monitor will appear visually opposite compared to
when viewed in the rearview and out-
side mirrors.
∙ Use the displayed lines as a reference. The lines are highly affected by the
number of occupants, fuel level, ve-
hicle position, road conditions and
road grade.
∙ Make sure that the back door(s) is se- curely closed when backing up.
∙ Do not put anything on the rearview camera. The rearview camera is in-
stalled above the license plate.
∙ When washing the vehicle with high pressure water, be sure not to spray it
around the camera. Otherwise, water
may enter the camera unit causing
water condensation on the lens, a
malfunction, fire or an electric shock.
∙ Do not strike the camera. It is a preci- sion instrument. Otherwise, it may
malfunction or cause damage result-
ing in a fire or an electric shock. The following are operating limitations and
do not represent a system malfunction:
∙ When the temperature is extremely high or low, the screen may not clearly
display objects.
∙ When strong light directly shines on the camera, objects may not be displayed
clearly.
∙ Vertical lines may be seen in objects on the screen. This is due to strong re-
flected light from the bumper.
∙ The screen may flicker under fluores- cent light.
∙ The colors of objects on the RearView Monitor may differ somewhat from the
actual color of objects.
∙ Objects on the monitor may not be clear in a dark environment.
∙ There may be a delay when switching between views.
∙ If dirt, rain or snow accumulate on the camera, RearView Monitor may not dis-
play objects clearly. Clean the camera. ∙ Do not use wax on the camera lens.
Wipe off any wax with a clean cloth
dampened with a diluted mild cleaning
agent, then wipe with a dry cloth.
Monitor, climate, audio, phone and voice recognition systems4-17
Page 221 of 370

Additional information:∙ When replacing a wheel without the TPMS such as the spare tire, the TPMS
does not monitor the tire pressure of
the spare tire.
∙ The TPMS will activate only when the vehicle is driven at speeds above
16 mph (25 km/h). Also, this system may
not detect a sudden drop in tire pres-
sure (for example, a flat tire while driv-
ing).
∙ The low tire pressure warning light does not automatically turn off when the tire
pressure is adjusted for all four tires. Af-
ter all your tires are inflated to the rec-
ommended pressure, the vehicle must
be driven at speeds above 16 mph
(25 km/h) to activate the TPMS and turn
off the low tire pressure warning light.
Use a tire pressure gauge to check the
tire pressure.
∙ The CHECK TIRE PRES (pressure) warn- ing message is displayed in the odom-
eter when the low tire pressure warning
light is illuminated and low tire pressure
is detected. The CHECK TIRE PRES warn-
ing message turns off when the low tire
pressure warning light turns off. ∙ The low tire pressure warning light re-
mains illuminated until the tires are in-
flated to the recommended COLD tire
pressure. The CHECK TIRE PRES warning
message is displayed each time the ig-
nition switch is placed in the ON posi-
tion as long as the low tire pressure
warning light remains illuminated.
∙ The CHECK TIRE PRES warning mes- sage is not displayed if the low tire pres-
sure warning light illuminates to indi-
cate a TPMS malfunction.
∙ Tire pressure rises and falls depending on the heat caused by the vehicle’s op-
eration and the outside temperature.
Do not reduce the tire pressure af ter
driving because the tire pressure rises
af ter driving. Low outside temperature
can lower the temperature of the air
inside the tire which can cause a lower
tire inflation pressure. This may cause
the low tire pressure warning light to
illuminate. If the warning light illumi-
nates, check the tire pressure for all four
tires.
∙ The Tire and Loading Information label is located in the driver’s door opening. For additional information, refer to “Low tire
pressure warning light” in the “Instruments
and controls” section and “Tire Pressure
Monitoring System (TPMS)” in the “In case of
emergency” section of this manual.
Page 222 of 370

∙ If the low tire pressure warning lightilluminates while driving, avoid sud-
den steering maneuvers or abrupt
braking, reduce vehicle speed, pull off
the road to a safe location and stop
the vehicle as soon as possible. Driv-
ing with under-inflated tires may per-
manently damage the tires and in-
crease the likelihood of tire failure.
Serious vehicle damage could occur
and may lead to an accident and could
result in serious personal injury.
Check the tire pressure for all four
tires. Adjust the tire pressure to the
recommended COLD tire pressure
shown on the Tire and Loading Infor-
mation label to turn the low tire pres-
sure warning light off. If you have a flat
tire, replace it with a spare tire as soon
as possible. For additional informa-
tion, refer to “Flat tire” in the “In case of
emergency ” section of this manual. ∙ When replacing a wheel without the
TPMS such as the spare tire, when a
spare tire is mounted or a wheel is
replaced, tire pressure will not be indi-
cated, the TPMS will not function and
the low tire pressure warning light will
flash for approximately 1 minute. The
light will remain on af ter 1 minute.
Have your tires replaced and/or TPMS
system reset as soon as possible. It is
recommended that you visit a NISSAN
dealer for this service.
∙ Replacing tires with those not origi- nally specified by NISSAN could affect
the proper operation of the TPMS.
∙ Do not inject any tire liquid or aerosol tire sealant into the tires, as this may
cause a malfunction of the tire pres-
sure sensors.