2015 NISSAN MURANO light
[x] Cancel search: lightPage 17 of 36
15
HEADLIGHT CONTROL SWITCH
HEADLIGHT CONTROL
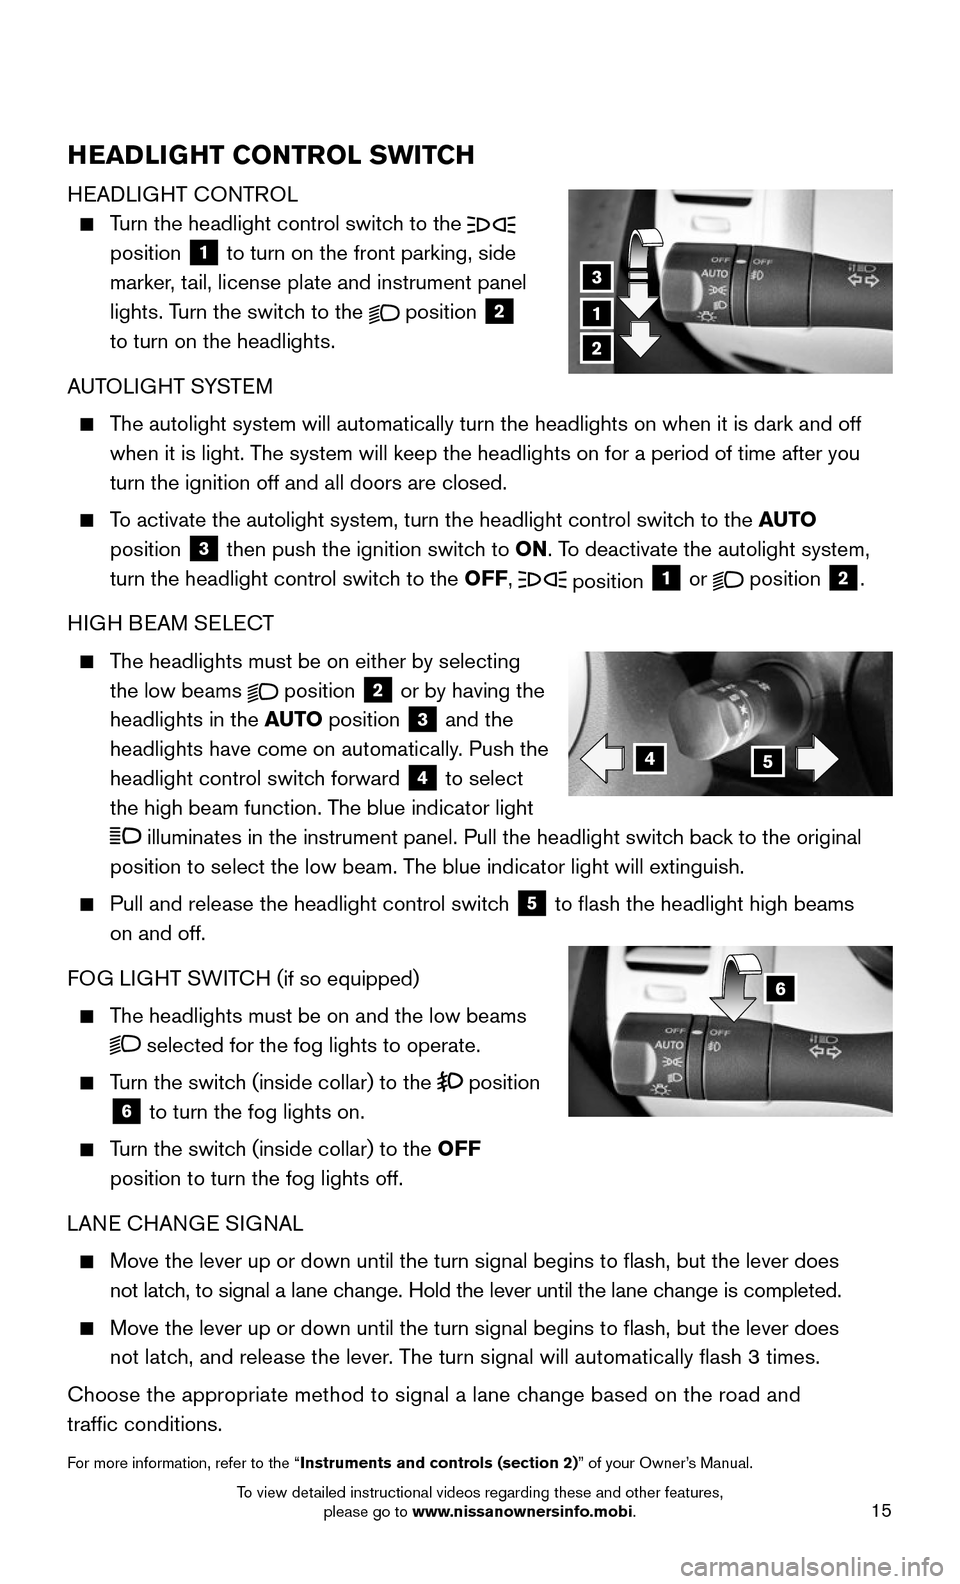
Turn the headlight control switch to the position 1 to turn on the front parking, side
marker, tail, license plate and instrument panel
lights. Turn the switch to the position 2 to turn on the headlights.
AUTOLIGHT SYSTEM
The autolight system will automatically turn the headlights on when it is\
dark and off
when it is light. The system will keep the headlights on for a period of time after you
turn the ignition off and all doors are closed.
To activate the autolight system, turn the headlight control switch to the AUTO
position 3 then push the ignition switch to ON. To deactivate the autolight system,
turn the headlight control switch to the OFF, position 1 or position 2.
HIGH BEAM SELECT
The headlights must be on either by selecting
the low beams position 2 or by having the
headlights in the AUTO position 3 and the
headlights have come on automatically. Push the
headlight control switch forward 4 to select
the high beam function. The blue indicator light
illuminates in the instrument panel. Pull the headlight switch back to the original
position to select the low beam. The blue indicator light will extinguish.
Pull and release the headlight control switch 5 to flash the headlight high beams
on and off.
FOG LIGHT SWITCH (if so equipped)
The headlights must be on and the low beams
selected for the fog lights to operate.
Turn the switch (inside collar) to the position 6 to turn the fog lights on.
Turn the switch (inside collar) to the OFF
position to turn the fog lights off.
LANE CHANGE SIGNAL
Move the lever up or down until the turn signal begins to flash, but t\
he lever does
not latch, to signal a lane change. Hold the lever until the lane change is completed.
Move the lever up or down until the turn signal begins to flash, but t\
he lever does
not latch, and release the lever. The turn signal will automatically flash 3 times.
Choose the appropriate method to signal a lane change based on the road and
traffic conditions.
For more information, refer to the “Instruments and controls (section 2)” of your Owner’s Manual.
1
3
2
45
6
To view detailed instructional videos regarding these and other features, please go to www.nissanownersinfo.mobi.
Page 19 of 36
17
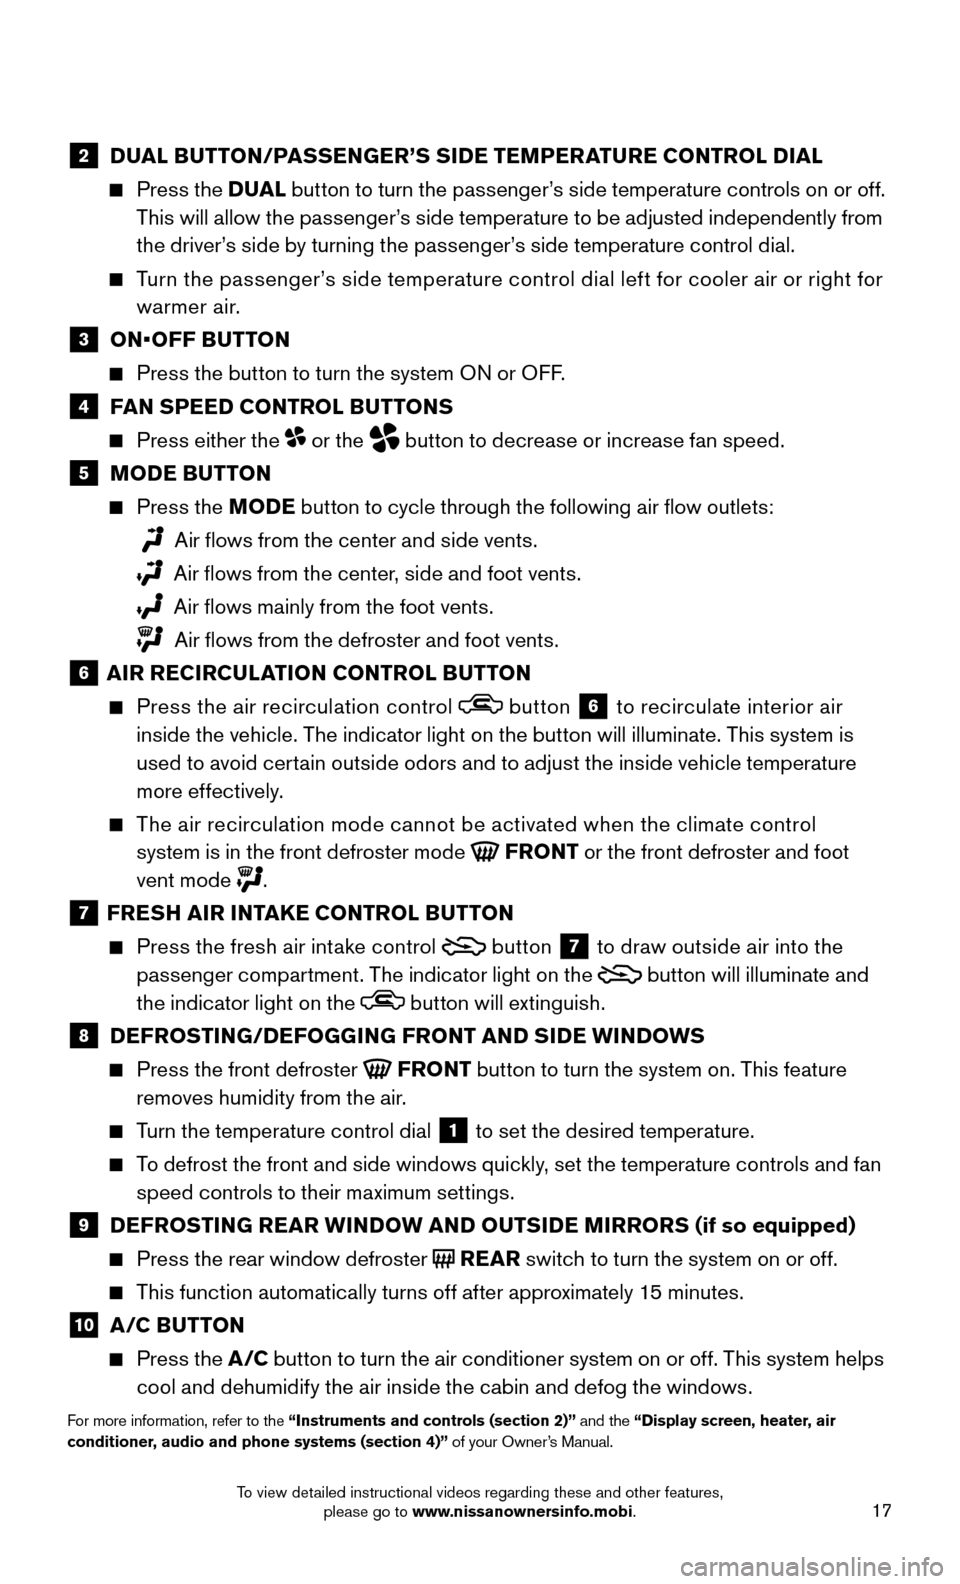
2 DUAL BUTTON/PASSENGER’S SIDE TEMPERATURE CONTROL DIAL
Press the DUAL button to turn the passenger’s side temperature controls on or off.
This will allow the passenger’s side temperature to be adjusted independently from
the driver’s side by turning the passenger’s side temperature control dial.
Turn the passenger’s side temperature control dial left for cooler air or right for
warmer air.
3 ON•OFF BUTTON
Press the button to turn the system ON or OFF.
4 FAN SPEED CONTROL BUTTONS
Press either the or the button to decrease or increase fan speed.
5 MODE BUTTON
Press the MODE button to cycle through the following air flow outlets:
Air flows from the center and side vents.
Air flows from the center, side and foot vents.
Air flows mainly from the foot vents.
Air flows from the defroster and foot vents.
6 AIR RECIRCULATION CONTROL BUTTON
Press the air recirculation control button 6 to recirculate interior air
inside the vehicle. The indicator light on the button will illuminate. This system is
used to avoid certain outside odors and to adjust the inside vehicle temperature
more effectively.
The air recirculation mode cannot be activated when the climate control
system is in the front defroster mode FRONT or the front defroster and foot
vent mode .
7 FRESH AIR INTAKE CONTROL BUTTON
Press the fresh air intake control button 7 to draw outside air into the
passenger compartment. The indicator light on the button will illuminate and
the indicator light on the button will extinguish.
8 DEFROSTING/DEFOGGING FRONT AND SIDE WINDOWS
Press the front defroster FRONT button to turn the system on. This feature
removes humidity from the air.
Turn the temperature control dial 1 to set the desired temperature.
To defrost the front and side windows quickly, set the temperature controls and fan
speed controls to their maximum settings.
9 DEFROSTING REAR WINDOW AND OUTSIDE MIRRORS (if so equipped)
Press the rear window defroster REAR switch to turn the system on or off.
This function automatically turns off after approximately 15 minutes.
10 A/C BUTTON
Press the A /C button to turn the air conditioner system on or off. This system helps
cool and dehumidify the air inside the cabin and defog the windows.
For more information, refer to the “Instruments and controls (section 2)” and the “Display screen, heater, air conditioner, audio and phone systems (section 4)” of your Owner’s Manual.
To view detailed instructional videos regarding these and other features, please go to www.nissanownersinfo.mobi.
Page 22 of 36
20
FIRST DRIVE FEATURES
CRUISE CONTROL (if so equipped)
The cruise control system enables you to set a
constant cruising speed once the vehicle has
reached 25 mph (40 km/h).
The system will automatically maintain the set
speed until you tap the brake pedal, accelerate,
cancel or turn the system off.
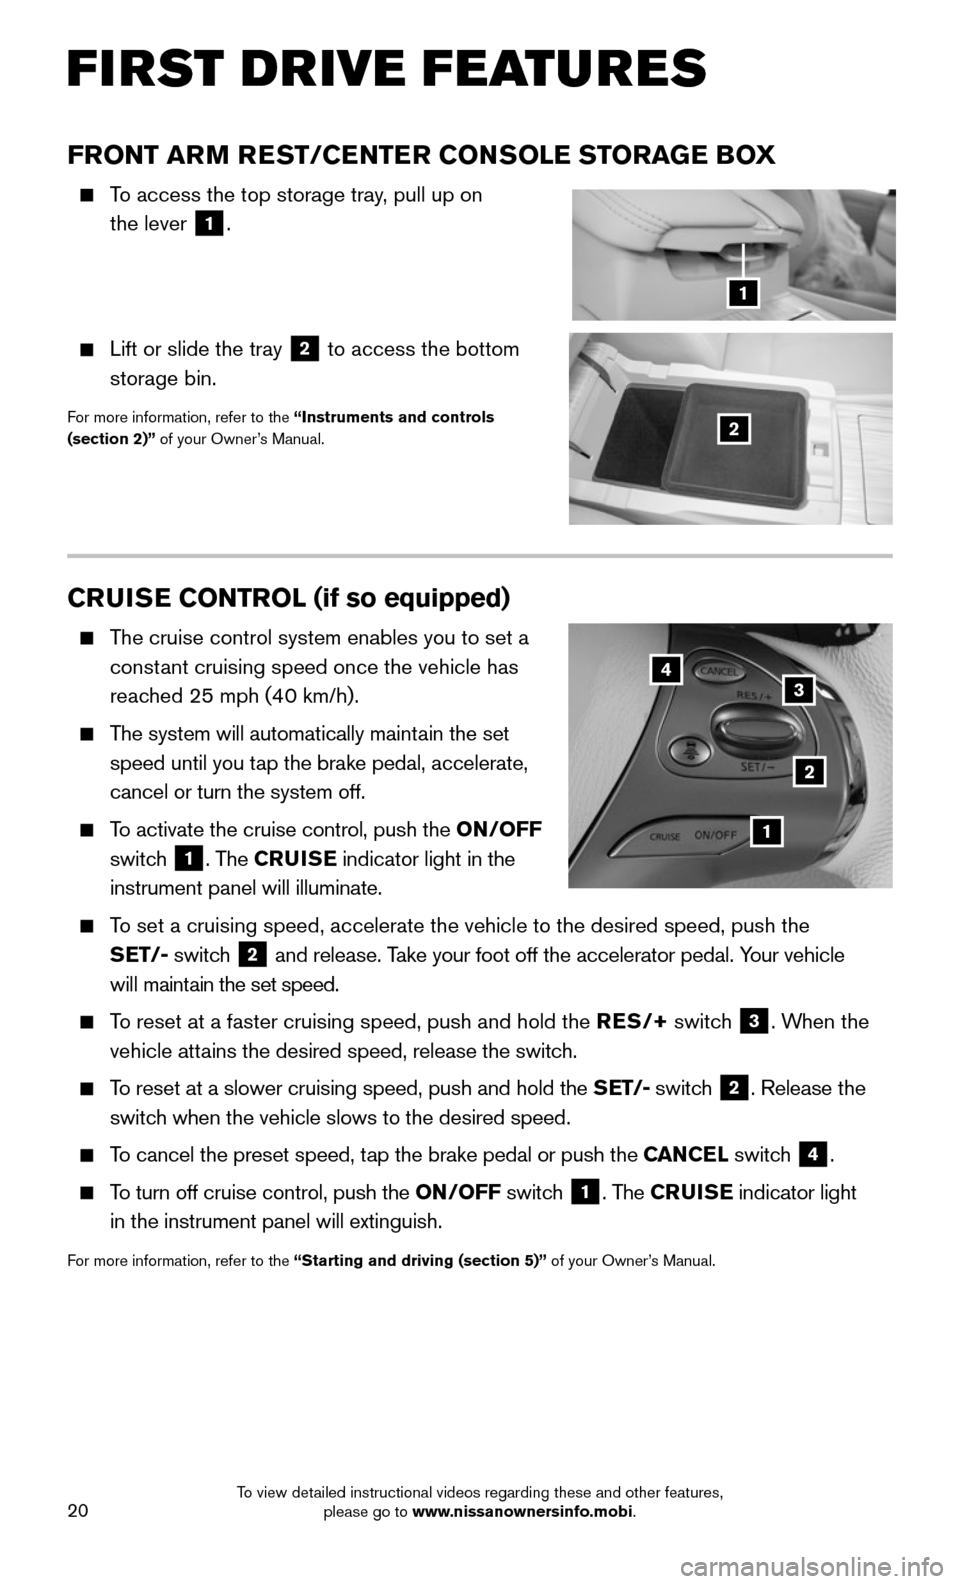
To activate the cruise control, push the ON/OFF
switch 1. The CRUISE indicator light in the
instrument panel will illuminate.
To set a cruising speed, accelerate the vehicle to the desired speed, pus\
h the
SET/- switch 2 and release. Take your foot off the accelerator pedal. Your vehicle
will maintain the set speed.
To reset at a faster cruising speed, push and hold the RES/+ switch 3. When the
vehicle attains the desired speed, release the switch.
To reset at a slower cruising speed, push and hold the SET/- switch 2. Release the
switch when the vehicle slows to the desired speed.
To cancel the preset speed, tap the brake pedal or push the CANCEL switch 4.
To turn off cruise control, push the ON/OFF switch 1. The CRUISE indicator light in the instrument panel will extinguish.
For more information, refer to the “Starting and driving (section 5)” of your Owner’s Manual.
1
2
34
FRONT ARM REST/CENTER CONSOLE STORAGE BOX
To access the top storage tray, pull up on
the lever 1.
Lift or slide the tray 2 to access the bottom
storage bin.
For more information, refer to the “Instruments and controls (section 2)” of your Owner’s Manual.2
1
To view detailed instructional videos regarding these and other features, please go to www.nissanownersinfo.mobi.
Page 23 of 36
21
INTELLIGENT CRUISE CONTROL (ICC) (if so equipped)
VEHICLE-TO-VEHICLE DISTANCE CONTROL MODE
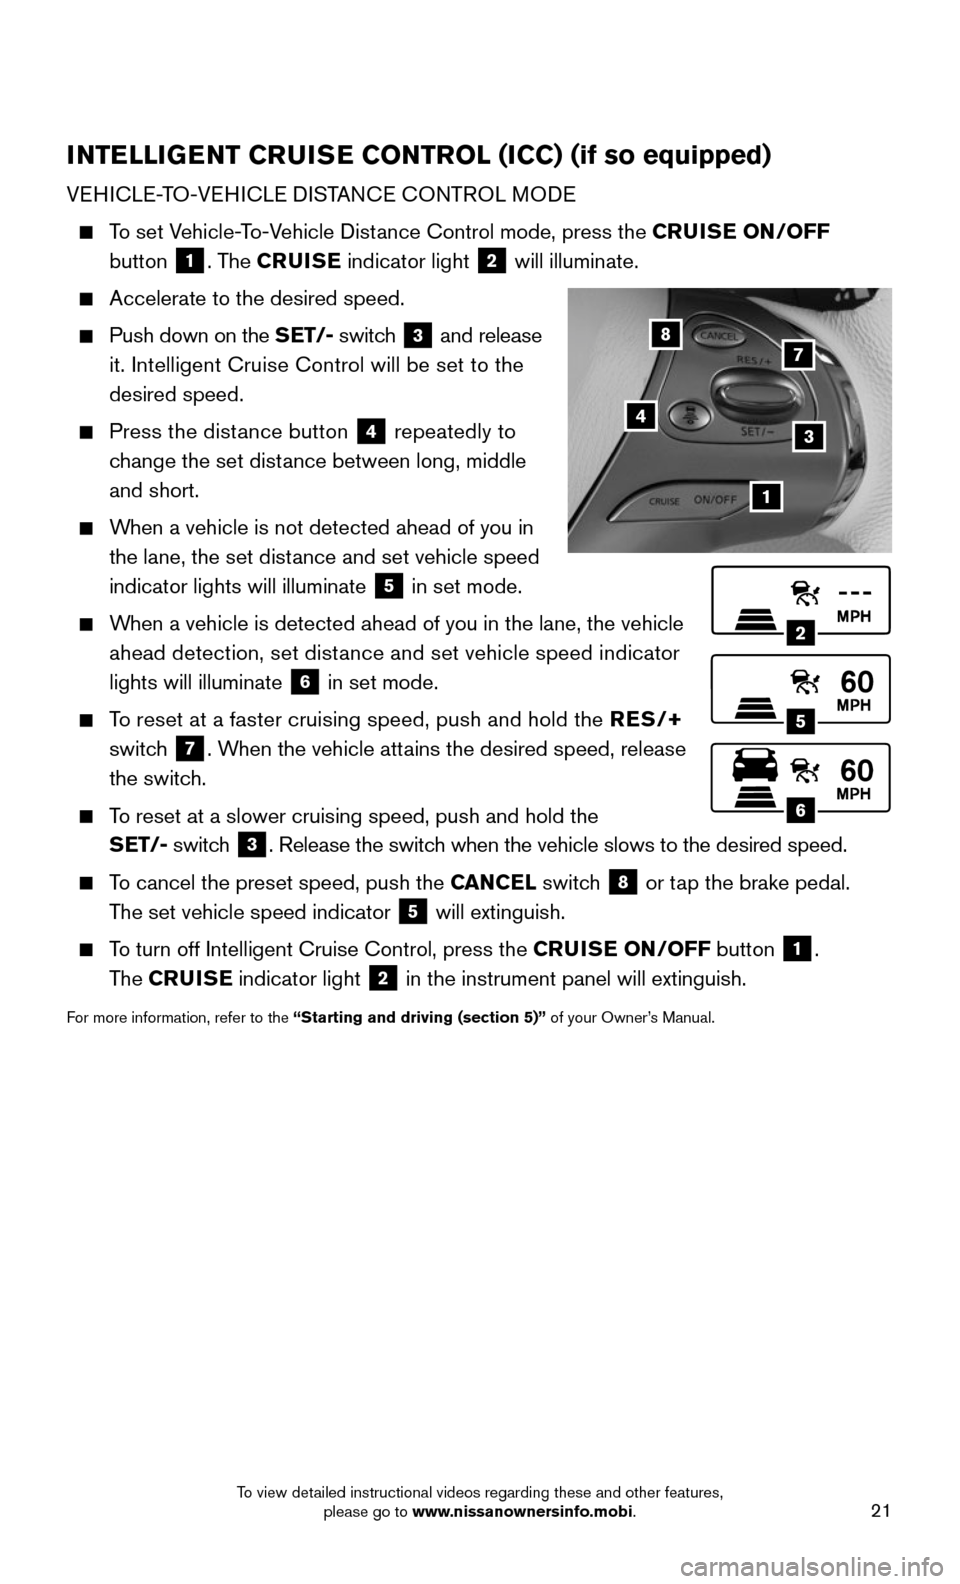
To set Vehicle-To-Vehicle Distance Control mode, press the CRUISE ON/OFF
button 1. The CRUISE indicator light 2 will illuminate.
Accelerate to the desired speed.
Push down on the SET/- switch 3 and release
it. Intelligent Cruise Control will be set to the
desired speed.
Press the distance button 4 repeatedly to
change the set distance between long, middle
and short.
When a vehicle is not detected ahead of you in
the lane, the set distance and set vehicle speed
indicator lights will illuminate 5 in set mode.
When a vehicle is detected ahead of you in the lane, the vehicle
ahead detection, set distance and set vehicle speed indicator
lights will illuminate 6 in set mode.
To reset at a faster cruising speed, push and hold the RES/+
switch 7. When the vehicle attains the desired speed, release
the switch.
To reset at a slower cruising speed, push and hold the
SET/- switch 3. Release the switch when the vehicle slows to the desired speed.
To cancel the preset speed, push the CANCEL switch 8 or tap the brake pedal.
The set vehicle speed indicator 5 will extinguish.
To turn off Intelligent Cruise Control, press the CRUISE ON/OFF button 1.
The CRUISE indicator light 2 in the instrument panel will extinguish.
For more information, refer to the “Starting and driving (section 5)” of your Owner’s Manual.
2
5
6
1
4
87
3
To view detailed instructional videos regarding these and other features, please go to www.nissanownersinfo.mobi.
Page 33 of 36
31
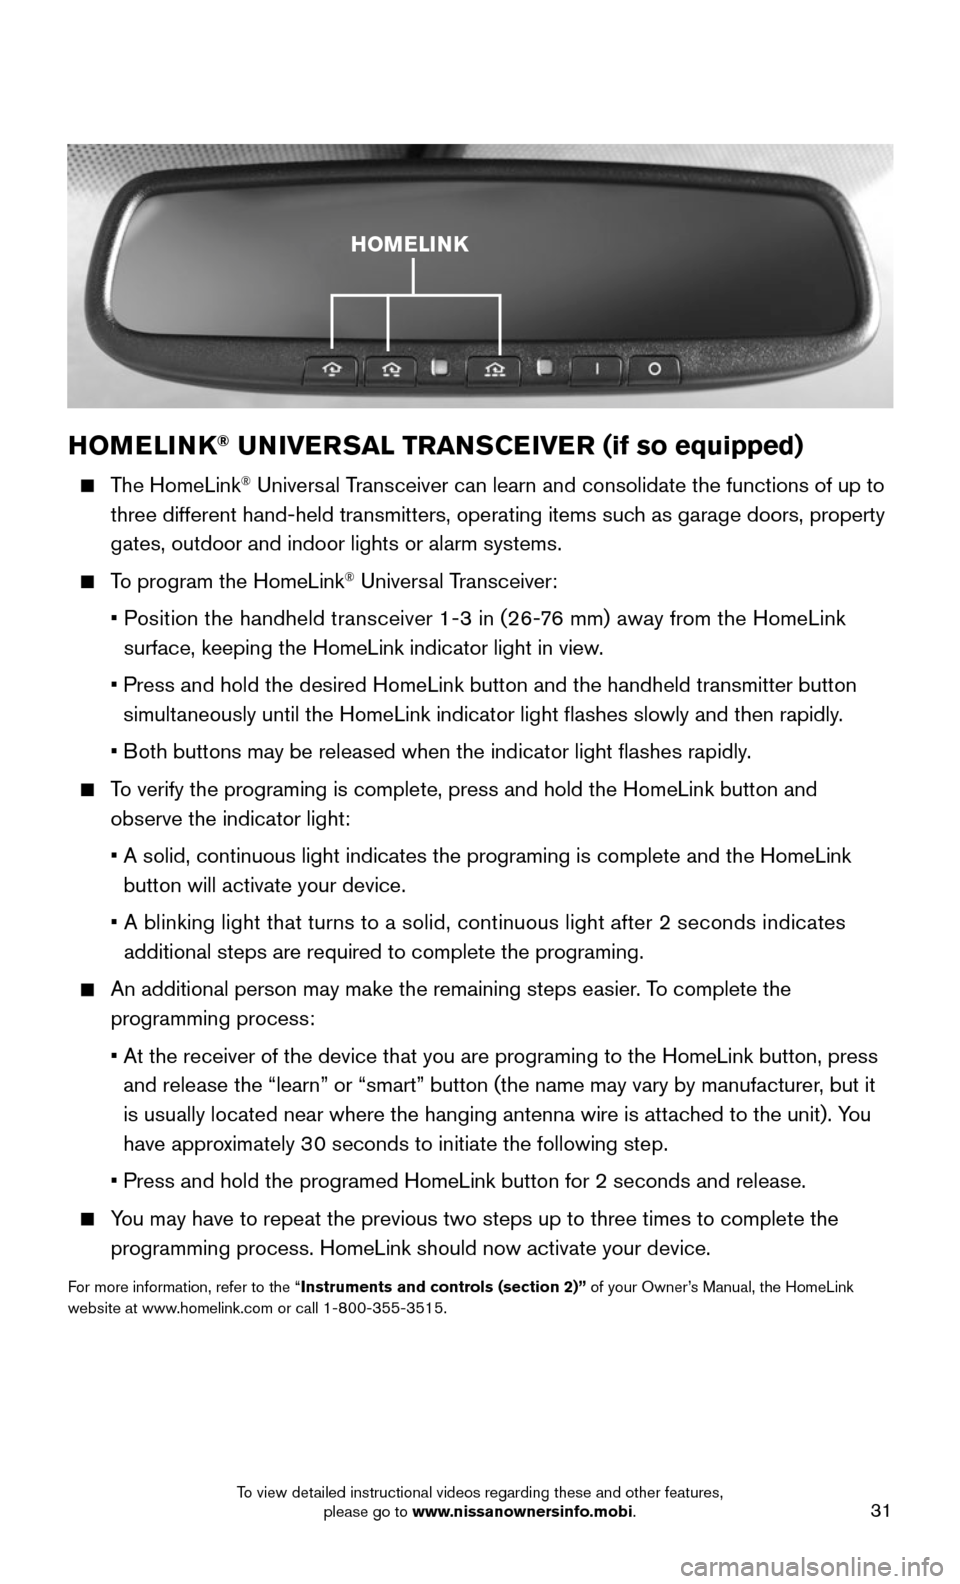
HOMELINK® UNIVERSAL TRANSCEIVER (if so equipped)
The HomeLink® Universal Transceiver can learn and consolidate the functions of up to
three different hand-held transmitters, operating items such as garage doors, property
gates, outdoor and indoor lights or alarm systems.
To program the HomeLink® Universal Transceiver:
• Position the handheld transceiver 1-3 in (26-76 mm) away from the HomeLink
surface, keeping the HomeLink indicator light in view.
• Press and hold the desired HomeLink button and the handheld transmitter \
button
simultaneously until the HomeLink indicator light flashes slowly and then ra\
pidly.
• Both buttons may be released when the indicator light flashes rapidly.
To verify the programing is complete, press and hold the HomeLink button \
and
observe the indicator light:
• A solid, continuous light indicates the programing is complete and the H\
omeLink
button will activate your device.
• A blinking light that turns to a solid, continuous light after 2 seconds\
indicates
additional steps are required to complete the programing.
An additional person may make the remaining steps easier. To complete the
programming process:
• At the receiver of the device that you are programing to the HomeLink bu\
tton, press
and release the “learn” or “smart” button (the name may var\
y by manufacturer, but it
is usually located near where the hanging antenna wire is attached to the unit). You
have approximately 30 seconds to initiate the following step.
• Press and hold the programed HomeLink button for 2 seconds and release.
You may have to repeat the previous two steps up to three times to comple\
te the
programming process. HomeLink should now activate your device.
For more information, refer to the “Instruments and controls (section 2)” of your Owner’s Manual, the HomeLink website at www.homelink.com or call 1-800-355-3515.
HOMELINK
To view detailed instructional videos regarding these and other features, please go to www.nissanownersinfo.mobi.