Page 4 of 424
WARNING
There are some small distances immedi-
ately before the closed position which
cannot be detected. Make sure that all
passengers have their hands, etc., inside
the vehicle before closing the liftgate.Manual Mode:
If power operation is not available, the liftgate
may be operated manually. Power operation may
not be available if the power liftgate main switch
is in the ON position, if multiple obstacles have
been detected in a single power cycle, or if
battery voltage is low.
If the power liftgate opener switch is pushed
during power open or close, the power operation
will be canceled and the liftgate can be operated
manually.
To open the liftgate manually, press the liftgate
opener switch and lift the liftgate.
Page 157 of 424

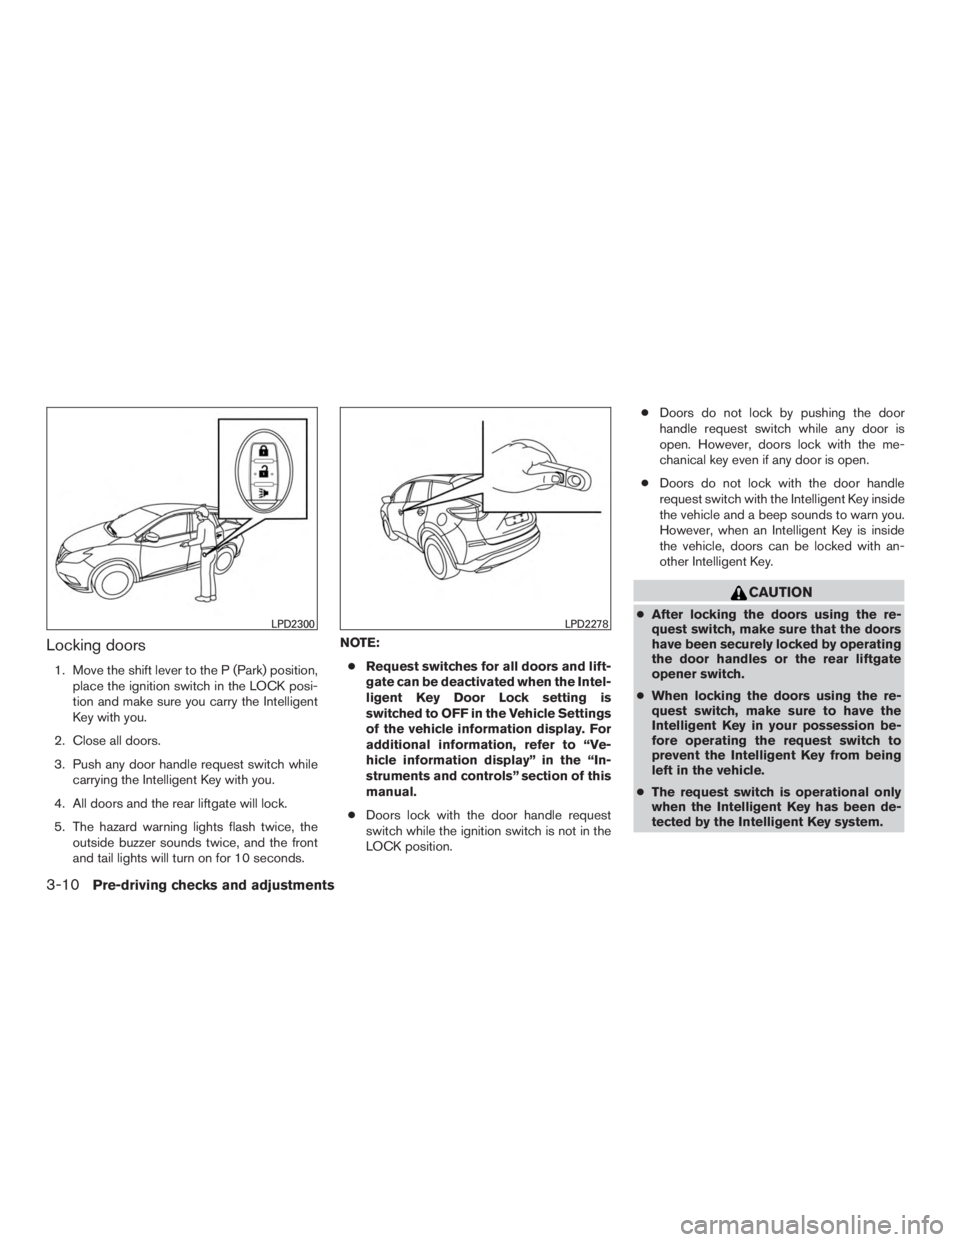
Locking doors
1. Move the shift lever to the P (Park) position,place the ignition switch in the LOCK posi-
tion and make sure you carry the Intelligent
Key with you.
2. Close all doors.
3. Push any door handle request switch while carrying the Intelligent Key with you.
4. All doors and the rear liftgate will lock.
5. The hazard warning lights flash twice, the outside buzzer sounds twice, and the front
and tail lights will turn on for 10 seconds. NOTE:
● Request switches for all doors and lift-
gate can be deactivated when the Intel-
ligent Key Door Lock setting is
switched to OFF in the Vehicle Settings
of the vehicle information display. For
additional information, refer to “Ve-
hicle information display” in the “In-
struments and controls” section of this
manual.
● Doors lock with the door handle request
switch while the ignition switch is not in the
LOCK position. ●
Doors do not lock by pushing the door
handle request switch while any door is
open. However, doors lock with the me-
chanical key even if any door is open.
● Doors do not lock with the door handle
request switch with the Intelligent Key inside
the vehicle and a beep sounds to warn you.
However, when an Intelligent Key is inside
the vehicle, doors can be locked with an-
other Intelligent Key.
Page 159 of 424

NOTE:
Request switches for all doors and liftgate
can be deactivated when the Intelligent Key
Door Lock setting is switched to OFF in the
Vehicle Settings of the vehicle information
display. For additional information, refer to
“Vehicle information display” in the “In-
struments and controls” section of this
manual.
If a door handle is pulled while unlocking the
doors, that door may not be unlocked. Returning
the door handle to its original position will unlock
the door. If the door does not unlock after return-
ing the door handle, push the door handle re-
quest switch to unlock the door.
All doors will be locked automatically unless one
of the following operations is performed within
one minute after pushing the request switch.● Opening any door.
● Pushing the ignition switch.
The interior light timer illuminates for a period of
time when a door is unlocked and the room light
switch is in the DOOR position.
The interior light can be turned off without waiting
by performing one of the following operations: ● Placing the ignition switch in the ON posi-
tion. ●
Locking the doors with the remote control.
● Switching the room light switch to the OFF
position.
● Switching the Auto Room Lamp to the OFF
position in Vehicle Settings of the vehicle
information display. For additional informa-
tion, refer to “Vehicle information display” in
the “Instruments and controls” section.
HOW TO USE THE REMOTE
KEYLESS ENTRY FUNCTION
The remote keyless entry function can operate all
door locks using the remote keyless function of
the Intelligent Key. The remote keyless function
can operate at a distance of 33 ft (10 m) away
from the vehicle. The operating distance de-
pends upon the conditions around the vehicle.
The remote keyless entry function will not func-
tion under the following conditions:
● When the Intelligent Key is not within the
operational range.
● When the Intelligent Key battery is dis-
charged.
Page 170 of 424
OPERATING THE MANUAL
LIFTGATE (if so equipped)
The power door lock system allows you to lock or
unlock all doors including the liftgate simultane-
ously.
To open the liftgate, press the request switch
�A
and pull up on the handle.
To close, lower and push the liftgate down se-
curely.
OPERATING THE POWER LIFTGATE
(if so equipped)** Click HERE to see the "Owner's Manual Supplement" beginning on page 2.
**
Page 172 of 424
open or full close position. If a second obstacle is
detected, the liftgate motion will stop and the
liftgate will enter manual mode.
A pinch strip is mounted on each side of the
liftgate. If an obstacle is detected by a pinch strip
during power close, the liftgate will reverse direc-
tion and return to the full open position.
NOTE:
If the pinch strip is damaged or removed,
the power close function will not operate.** Click HERE to see the "Owner's Manual Supplement" beginning on page 2.
**
Page 173 of 424
POWER LIFTGATE MAIN SWITCH
The power liftgate operation can be turned on or
off by the power liftgate main switch in the glove
box.
When the power liftgate main switch is pushed to
the OFF position, the power operation is not
available by the power liftgate switch on the
liftgate close switch or liftgate open switch
�Aor
�B.
Power operation is available when in the OFF
position by the instrument panel switch and the
key fob button.
LIFTGATE RELEASE
LPD2319
Page 174 of 424
3. Push the liftgate up to open.
NOTE:
If you had to open the liftgate using this
procedure, have your vehicle checked by a
NISSAN dealer as soon as possible.
LIFTGATE POSITION SETTING
The liftgate can be set to open to a specific height
by performing the following: 1. Open the liftgate using the request switch or the Intelligent Key.
2. Pull the liftgate down to the desired position and hold the liftgate (the liftgate will have
some resistance when being manually ad-
justed) .
3. While holding the liftgate in position, press and hold the liftgate switch
Page 188 of 424

WARNING
●Failure to follow the warnings and in-
structions for proper use of the Rear-
View Monitor could result in serious
injury or death.
● The RearView Monitor is a convenience
but it is not a substitute for proper back-
ing. Always turn and look out the win-
dows, and check mirrors to be sure that
it is safe to move before operating the
vehicle. Always back up slowly.
● The system is designed as an aid to the
driver in showing large stationary ob-
jects directly behind the vehicle, to help
avoid damaging the vehicle.
● The system cannot completely elimi-
nate blind spots and may not show ev-
ery object.
● Underneath the bumper and the corner
areas of the bumper cannot be viewed
on the RearView Monitor because of its
monitoring range limitation. The system
will not show small objects below the
bumper, and may not show objects
close to the bumper or on the ground. ●
Objects viewed in the RearView Moni-
tor differ from actual distance because
a wide-angle lens is used.
● Objects in a RearView Monitor will ap-
pear visually opposite than when
viewed in the rearview and outside
mirrors.
● Make sure that the liftgate is securely
close when backing up.
● Do not put anything on the rearview
camera. The rearview camera is in-
stalled above the license plate.
● When washing the vehicle with high
pressure water, be sure not to spray it
around the camera. Otherwise, water
may enter the camera unit causing wa-
ter condensation on the lens, a mal-
function, fire or an electric shock.
● Do not strike the camera. It is a preci-
sion instrument. Otherwise, it may mal-
function or cause damage resulting in a
fire or an electric shock.