2015 NISSAN MURANO buttons
[x] Cancel search: buttonsPage 146 of 424
REPROGRAMMING A SINGLE
HOMELINK® BUTTON
To reprogram a HomeLink® Universal Trans-
ceiver button, complete the following:1. Press and hold the desired HomeLink® but- ton. DO NOT release the button.
2. The indicator light will begin to flash after 20 seconds. Without releasing the
HomeLink® button, proceed with “Pro-
gramming HomeLink®” - Step 1.
For questions or comments, contact HomeLink®
at: www.homelink.com or 1–800–355–3515
(except Mexico) .
The HomeLink® Universal Transceiver button
has now been reprogrammed. The new device
can be activated by pushing the HomeLink®
button that was just programmed. This procedure
will not affect any other programmed HomeLink®
buttons.
IF YOUR VEHICLE IS STOLEN
If your vehicle is stolen, you should change the
codes of any non-rolling code device that has
been programmed into HomeLink®. Consult the
Owner’s Manual of each device or call the manu-
facturer or dealer of those devices for additional
information.
When your vehicle is recovered, you will
need to reprogram the HomeLink® Univer-
sal Transceiver with your new transmitter
information.
FCC Notice:
For USA:
This device complies with Part 15 of the
FCC Rules. Operation is subject to the fol-
lowing two conditions: (1) This device may
not cause harmful interference, and (2) this
device must accept any interference re-
ceived, including interference that may
cause undesired operation.
NOTE:
Changes or modifications not expressly ap-
proved by the party responsible for compli-
ance could void the user’s authority to op-
erate the equipment. For Canada:
This device complies with Industry Canada
license-exempt RSS standard(s) . Opera-
tion is subject to the following two condi-
tions: (1) this device may not cause inter-
ference, and (2) this device must accept any
received, including interference that may
cause undesired operation of the device.
Instruments and controls2-55
Page 154 of 424
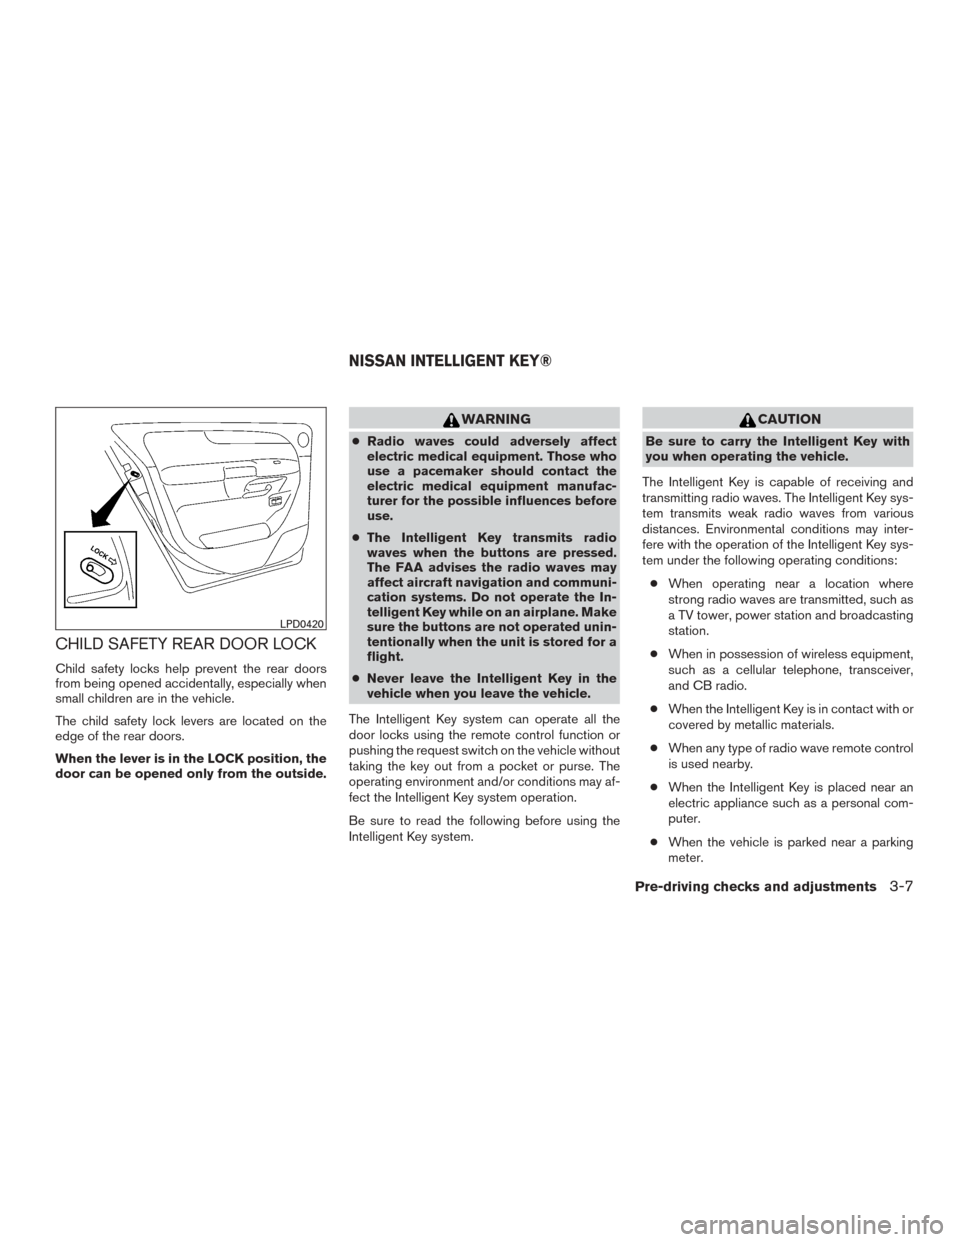
CHILD SAFETY REAR DOOR LOCK
Child safety locks help prevent the rear doors
from being opened accidentally, especially when
small children are in the vehicle.
The child safety lock levers are located on the
edge of the rear doors.
When the lever is in the LOCK position, the
door can be opened only from the outside.
WARNING
●Radio waves could adversely affect
electric medical equipment. Those who
use a pacemaker should contact the
electric medical equipment manufac-
turer for the possible influences before
use.
● The Intelligent Key transmits radio
waves when the buttons are pressed.
The FAA advises the radio waves may
affect aircraft navigation and communi-
cation systems. Do not operate the In-
telligent Key while on an airplane. Make
sure the buttons are not operated unin-
tentionally when the unit is stored for a
flight.
● Never leave the Intelligent Key in the
vehicle when you leave the vehicle.
The Intelligent Key system can operate all the
door locks using the remote control function or
pushing the request switch on the vehicle without
taking the key out from a pocket or purse. The
operating environment and/or conditions may af-
fect the Intelligent Key system operation.
Be sure to read the following before using the
Intelligent Key system.
CAUTION
Be sure to carry the Intelligent Key with
you when operating the vehicle.
The Intelligent Key is capable of receiving and
transmitting radio waves. The Intelligent Key sys-
tem transmits weak radio waves from various
distances. Environmental conditions may inter-
fere with the operation of the Intelligent Key sys-
tem under the following operating conditions: ● When operating near a location where
strong radio waves are transmitted, such as
a TV tower, power station and broadcasting
station.
● When in possession of wireless equipment,
such as a cellular telephone, transceiver,
and CB radio.
● When the Intelligent Key is in contact with or
covered by metallic materials.
● When any type of radio wave remote control
is used nearby.
● When the Intelligent Key is placed near an
electric appliance such as a personal com-
puter.
● When the vehicle is parked near a parking
meter.
LPD0420
NISSAN INTELLIGENT KEY®
Pre-driving checks and adjustments3-7
Page 163 of 424
NOTE:
If you change the answer back horn and
light flash feature with the Intelligent Key,
the vehicle information display screen will
show the current mode after the ignition
switch has been cycled from the OFF to the
ON position. The vehicle information dis-
play screen can also be used to change the
answer back horn mode.
To deactivate:Press and hold the
andbuttonsfor at least 2 seconds.
The hazard warning lights will flash three times to
confirm that the answer back horn feature has
been deactivated.
To activate: Press and hold the
andbuttonsfor at least 2 seconds once
more.
The hazard warning lights will flash once and the
horn will sound once to confirm that the horn
beep feature has been reactivated.
Deactivating the horn beep feature does not si-
lence the horn if the alarm is triggered.
WARNING SIGNALS
To help prevent the vehicle from moving unex-
pectedly by erroneous operation of the Intelligent
Key or to help prevent the vehicle from being
stolen, a chime or buzzer sounds from inside and
outside the vehicle and a warning is displayed in
the instrument panel.
When a chime or beep sounds or a warning is
displayed, be sure to check the vehicle and the
Intelligent Key.
For additional information, refer to the “Trouble-
shooting guide” in this section and “Vehicle infor-
mation display” in the “Instruments and controls”
section of this manual.
3-16Pre-driving checks and adjustments
Page 183 of 424
system” section of this manual, and
“Tilt/Telescopic Steering” and “Outside mir-
rors” in this section.
3. Push the SET switch and, within 5 seconds, push the memory switch (1 or 2) .
4. The indicator light for the pushed memory switch will come on and stay on for approxi-
mately 5 seconds.
5. The chime will sound if the memory has been stored.
NOTE:
If a NEW memory position is stored in the
same memory switch, the previous memory
position will be overwritten by the new
stored position.
Confirming memory storage
Push the SET switch. ● If a memory position has not been stored in
the switch (1 or 2) the indicator light for the
respective switch will come ON for approxi-
mately 0.5 seconds.
● If a memory position has been stored in the
switch (1 or 2) then the indicator light for the
respective switch will stay on for approxi-
mately 5 seconds.
Linking an Intelligent Key to the meter
display (if so equipped)
Each Intelligent Key, up to a maximum of four, can
be linked to the meter display.
1. Make sure to turn ON the “Key Link Set- tings” in the meter to enable the system for
desired Intelligent Key.
2. When the system is enabled, the recognized Intelligent Key is displayed at start up, as well
as within “Key Link Settings”.
3. When the system is active, the meter setting items are memorized for each Intelligent Key
that has been enabled in the system.
4. The auto drive positioner system is memo- rized automatically when the ignition switch
is turned from ON to OFF by the Intelligent
Key with no need to set separate buttons for
recalling and memorizing positions.
5. If two Intelligent Keys are in the vehicle, the system will recognize the Intelligent Key that
was used most recently, such as to
unlock/lock the door.
6. If there is a desire to change to another Intelligent Key while in the vehicle, the user
must turn the ignition OFF and initiate com-
munication from the desired Intelligent Key. a. Ignition from ON position to the OFF
b. Unlock door with the desired Intelligent
Key
c. The desired Intelligent Key number should appear on the meter display.
The system contains a ON/OFF setting for when
the settings are not to be memorized.
ENTRY/EXIT FUNCTION
This system is designed so that the driver’s seat
and automatic operation steering column will au-
tomatically move when the shift lever is in the P
(Park) position. This allows the driver to get into
and out of the driver’s seat more easily.
The driver’s seat will slide backward and the
steering wheel will move up: ● When the driver’s door is opened and the
ignition switch is in the OFF position.
● When the ignition switch is turned from
ACC to OFF with the driver’s door open.
The driver’s seat and steering wheel will return to
the previous position: ● When the ignition switch is turned to ACC or
ON while the shift lever is in the P (Park)
position.
3-36Pre-driving checks and adjustments
Page 186 of 424
Registering NissanConnectSMMobile Apps......4-49
Connect Phone ............................... 4-50
Application Download .......................... 4-50
Car phone or CB radio ............................ 4-50
Bluetooth® Hands-Free Phone System without
Navigation System (if so equipped) .................4-51
Regulatory Information ......................... 4-53
Using the system .............................. 4-53
Control buttons ............................... 4-55Connecting procedure
......................... 4-55
Voice commands .............................. 4-57
Making a call . ................................. 4-58
Receiving a call ............................... 4-59
During a call .................................. 4-59
Ending a call .................................. 4-59
Text messaging (if so equipped) .................4-59
Bluetooth® settings ........................... 4-61
Manual control . . .............................. 4-62
Page 211 of 424
1. Temperature control dial (driver’s side)/AUTO button
2. ON-OFF button
3. Display screen
4. MODE (manual air flow control) button 5. Temperature control dial (passenger’s
side)/DUAL button
6.
Fresh air intake button
7.
Air recirculation button
8. A/C (air conditioner) button 9.
(fan speed control) buttons
10.
REAR (window and outside mirror
(if so equipped) defroster) button
11.
FRONT (defroster) button
WARNING
● The air conditioner cooling function op-
erates only when the engine is running.
● Do not leave children or adults who
would normally require the assistance
of others alone in your vehicle. Pets
should also not be left alone. They
could accidentally injure themselves or
others through inadvertent operation of
the vehicle. Also, on hot, sunny days,
temperatures in a closed vehicle could
quickly become high enough to cause
severe or possibly fatal injuries to
people or animals.
● Do not use the recirculation mode for
long periods as it may cause the interior
air to become stale and the windows to
fog up.
LHA3200
HEATER AND AIR CONDITIONER
(automatic)
4-26Display screen, heater, air conditioner, audio and phone systems
Page 212 of 424
NOTE:● Odors from inside and outside the ve-
hicle can build up in the air conditioner
unit. Odor can enter the passenger
compartment through the vents.
● When parking, set the heater and air
conditioner controls to turn off air re-
circulation to allow fresh air into the
passenger compartment. This should
help reduce odors inside the vehicle.
AUTOMATIC OPERATION
Cooling and/or dehumidified heating
(AUTO)
This mode may be used all year round as the
system automatically works to keep a constant
temperature. Air flow distribution and fan speed
are also controlled automatically.
1. Press the AUTO button on. The indicator on the button will illuminate.
2. Turn the temperature control dial to the left or right to set the desired temperature.
● The temperature of the passenger compart-
ment will be maintained automatically. Air
flow distribution and fan speed are also con-
trolled automatically. ●
A visible mist may be seen coming from the
vents in hot, humid conditions as the air is
cooled rapidly. This does not indicate a mal-
function.
3. You can individually set driver’s and front passenger’s side temperature using each
temperature control dial. When the DUAL
button is pressed or passenger’s side tem-
perature dial is turned, the DUAL indicator
will come on. To turn off the passenger’s
side temperature control, press the DUAL
button.
Heating (A/C OFF)
The air conditioner does not activate. When you
need to heat only, use this mode.
1. Press the AUTO button. The indicator light comes on.
2. Turn the temperature control dial to set the desired temperature.
● The temperature of the passenger compart-
ment will be maintained automatically. Air
flow distribution and fan speed are also con-
trolled automatically.
● Do not set the temperature lower than the
outside air temperature. Otherwise, the sys-
tem may not work properly. ●
Not recommended if windows fog up.
Dehumidified defrosting or defogging
1. Press thefront defroster button on.
The indicator light on the button will come
on.
2. Turn the temperature control dial to set the maximum temperature to aid in defrosting or
defogging.
● To quickly remove ice from the outside of the
windows, use the fan speed control buttons
to set the fan speed to maximum.
● As soon as possible after the windshield is
clean, press the AUTO button to return to
the automatic mode.
Display screen, heater, air conditioner, audio and phone systems4-27
Page 213 of 424
●When thefront defroster button is
pressed, the air conditioner will automati-
cally be turned on at outside temperatures
above 36°F (2°C) . The air recirculate mode
automatically turns off, allowing outside air
to be drawn into the passenger compart-
ment to further improve the defogging per-
formance. When the air recirculate mode
automatically turns off, the air fresh mode will
automatically turn on.
Remote engine start logic (if so
equipped)
Vehicles equipped with automatic climate con-
trols and remote start function may go into auto-
matic heating or cooling mode when remote start
is activated depending on outside and cabin tem-
peratures. Automatic temperature depends on
outside and cabin temperatures. During this pe-
riod, the climate control display and buttons will
be inoperable until ignition switch is turned on.
MANUAL OPERATION
Fan speed control
Press the fan speed control buttonsto
manually control the fan speed.
Press the AUTO button to return to automatic
control of the fan speed.
Air recirculation
Press theair recirculation button to recir-
culate interior air inside the vehicle. The
indicator light on the button will come on.
The air recirculation cannot be activated when
the air conditioner is in the
front defrosting
mode.
Fresh air intake
Press thefresh air intake button to draw
outside air into the passenger compartment.
Air flow control
Pressing the MODE button manually controls air
flow and selects the air outlet:
— Air flows mainly from center and
side vents.
— Air flows mainly from center andside vents and foot outlets.
— Air flows mainly from foot outletsand partly from defroster.
— Air flows mainly from defrosterand foot outlets.
To turn system off
Press the ON-OFF button.
Rear window and outside mirror (if so
equipped) defroster button
For additional information, refer to “Rear window
and outside mirror (if so equipped) defroster
switch” in the “Instruments and controls” section
of this manual.
OPERATING TIPS
●When the engine coolant temperature and
outside air temperature are low, the air flow
from the foot outlets may not operate for a
maximum of 150 seconds. However, this is
not a malfunction. After the coolant tempera-
ture warms up, air flow from the foot outlets
will operate normally.
● Keep the moonroof (if so equipped) closed
while the air conditioner is in operation.
● If you feel that the air flow mode you have
selected and the outlets the air is coming out
do not match, select the
mode.
● When you change the air flow mode, you
may feel air flow from the feet vents for just a
moment. This is not a malfunction.
4-28Display screen, heater, air conditioner, audio and phone systems