2015 NISSAN MICRA CD player
[x] Cancel search: CD playerPage 118 of 293
4 Display screen, heater, air conditioner,
audio and phone systems
RearView Monitor (if so equipped)...................4-2
How to read the displayed lines ..................4-3
Difference between predicted and actual
distances ......................................4-3
Adjusting the screen ............................4-5
Operating tips ..................................4-5
Vents ............................................4-6
Heater and Air Conditioner (manual) (Type A)
(if so equipped) ...................................4-7
Controls .......................................4-8
Heater operation ...............................4-9
Air conditioner operation (if so equipped) ........4-10
Air flow charts ................................. 4-11
Heater and Air Conditioner (manual) (Type B)
(if so equipped) .................................. 4-15
Controls ...................................... 4-16
Heater operation .............................. 4-17
Air conditioner operation .......................4-18
Air flow charts ................................. 4-19
Servicing air conditioner (if so equipped) ............4-23
Audio system .................................... 4-23
Radio ........................................ 4-23FM radio reception
............................ 4-23
AM radio reception ............................ 4-24
Audio operation precautions ....................4-24
FM/AM radio with compact disc (CD) player
(Type A) (if so equipped) .......................4-31
FM/AM radio with compact disc (CD) player
(Type B) (if so equipped) .......................4-35
USB (Universal Serial Bus) connection port
(if so equipped) ............................... 4-40
iPod®* player operation (if so equipped) .........4-42
CD care and cleaning .......................... 4-43
Steering wheel switch for audio control
(if so equipped) ............................... 4-44
Antenna ...................................... 4-45
Car phone or CB radio ............................ 4-45
Bluetooth® Hands-Free Phone System
(if so equipped) .................................. 4-46
Regulatory Information ......................... 4-48
Using the system .............................. 4-48
Control buttons ............................... 4-49
Getting started ................................ 4-50
List
of commands .............................. 4-51
Troubleshooting guide ......................... 4-56
Page 141 of 293
Static and flutter: During signal interference from
buildings, large hills or due to antenna position
(usually in conjunction with increased distance
from the station transmitter) , static or flutter can
be heard. This can be reduced by adjusting the
treble control to reduce treble response.
Multipath reception: Because of the reflective
characteristics of FM signals, direct and reflected
signals reach the receiver at the same time. The
signals may cancel each other, resulting in mo-
mentary flutter or loss of sound.
AM RADIO RECEPTION
AM signals, because of their low frequency, can
bend around objects and skip along the ground.
In addition, the signals can be bounced off the
ionosphere and bent back to earth. Because of
these characteristics, AM signals are also sub-
ject to interference as they travel from transmitter
to receiver.
Fading: Occurs while the vehicle is passing
through freeway underpasses or in areas with
many tall buildings. It can also occur for several
seconds during ionospheric turbulence even in
areas where no obstacles exist.
Static: Caused by thunderstorms, electrical
power lines, electric signs and even traffic lights.
AUDIO OPERATION PRECAUTIONSCompact disc (CD) player
CAUTION
●
Do not force a compact disc into the CD
insert slot. This could damage the CD
and/or CD changer/player.
● Trying to load a CD with the CD door
closed could damage the CD and/or CD
changer.
● Only one CD can be loaded into the CD
player at a time.
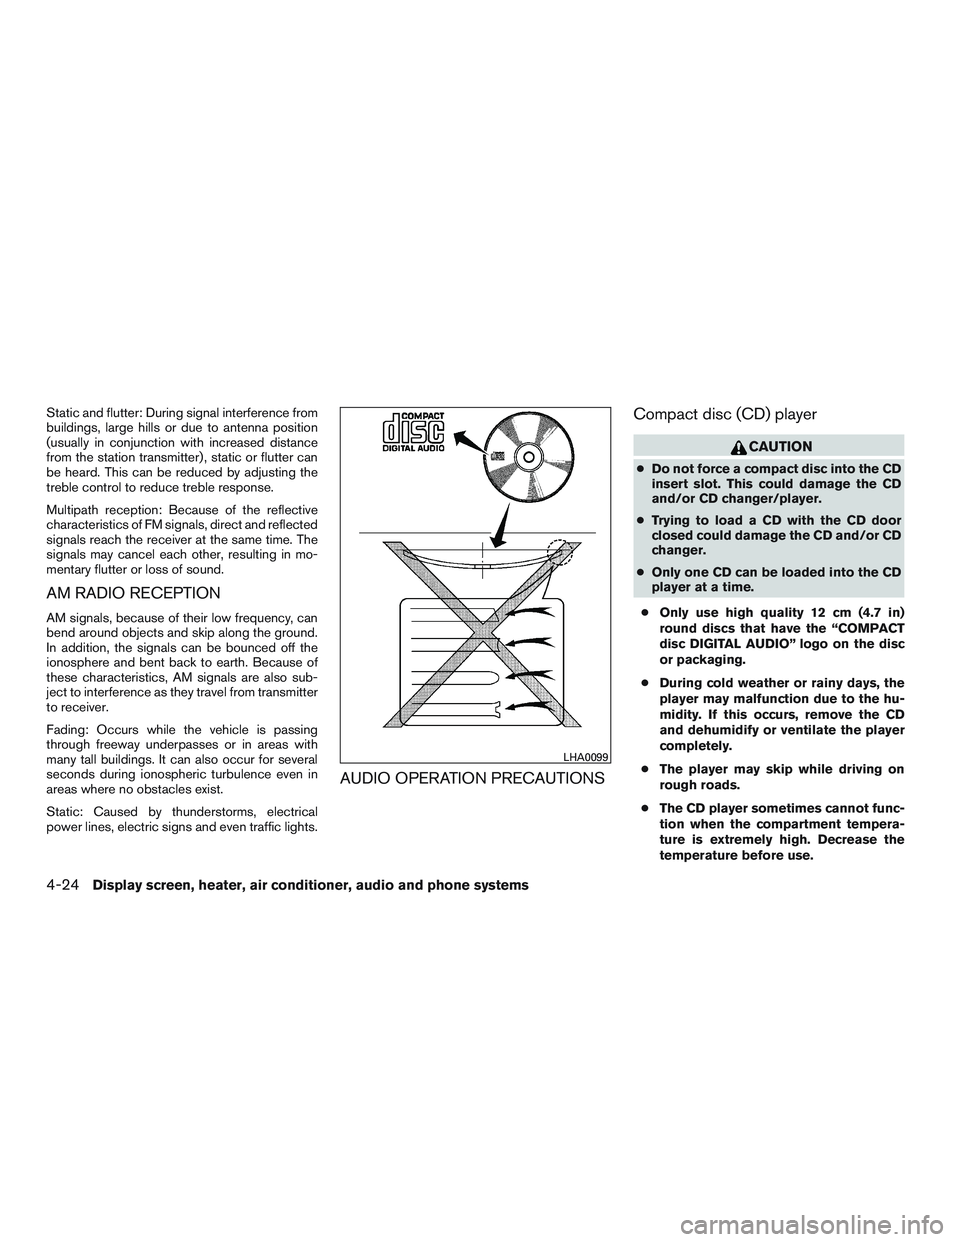
● Only use high quality 12 cm (4.7 in)
round discs that have the “COMPACT
disc DIGITAL AUDIO” logo on the disc
or packaging.
● During cold weather or rainy days, the
player may malfunction due to the hu-
midity. If this occurs, remove the CD
and dehumidify or ventilate the player
completely.
● The player may skip while driving on
rough roads.
● The CD player sometimes cannot func-
tion when the compartment tempera-
ture is extremely high. Decrease the
temperature before use.
LHA0099
4-24Display screen, heater, air conditioner, audio and phone systems
Page 142 of 293

●Do not expose the CD to direct sun-
light.
● CDs that are in poor condition or are
dirty, scratched or covered with finger-
prints may not work properly.
● The following CDs may not work prop-
erly:
● Copy control compact discs (CCCD)
● Recordable compact discs (CD-R)
● Rewritable compact discs (CD-RW)
● Do not use the following CDs as they
may cause the CD player to malfunc-
tion:
● 8 cm (3.1 in) discs with an adapter
● CDs that are not round
● CDs with a paper label
● CDs that are warped, scratched, or
have abnormal edgesCompact disc with MP3
Terms:
● MP3 — MP3 is short for Moving Pictures
Experts Group Audio Layer 3. MP3 is the
most well-known compressed digital audio
file format. This format allows for near “CD
quality” sound, but at a fraction of the size of
normal audio files. MP3 conversion of an
audio track from CD-ROM can reduce the
file size by approximately a 10:1 ratio with
virtually no perceptible loss in quality. MP3
compression removes the redundant and
irrelevant parts of a sound signal that the
human ear does not hear.
● Bit rate — Bit rate denotes the number of
bits per second used by a digital music file.
The size and quality of a compressed digital
audio file are determined by the bit rate used
when encoding the file.
● Sampling frequency — Sampling frequency
is the rate at which the samples of a signal
are converted from analog to digital (A/D
conversion) per second. ●
ID3 tag — The ID3 tag is the part of the
encoded MP3 file that contains information
about the digital music file such as song title,
artist, album title, encoding bit rate, track
time duration, etc. ID3 tag information is
displayed on the Album/Artist/Track title line
on the display.
Display screen, heater, air conditioner, audio and phone systems4-25
Page 145 of 293

Troubleshooting guide:
SymptomCause and Countermeasure
Cannot play Check if the disc was inserted correctly.
Check if the disc is scratched or dirty.
Check if there is condensation inside the player. If there is, wait until the condensation is gone (about 1 hour) before using the player.
If there is a temperature increase error, the CD player will play correctly after it returns to the normal temperature.
Files with extensions other than “.MP3”, “.mp3” or “.wma” cannot be played. In addition, the character codes and number of characters for folder names
and file names should be in compliance with the specifications.
Poor sound quality Check if the disc is scratched or dirty.
Bit rate may be too low.
It takes a relatively long time
before the music starts
playing. If there are many folders or file levels on the MP3 disc or if it is a multi disc, some time may be required before the music starts playing.
Music cuts off or skips The writing software and hardware combination might not match or the writing speed, writing depth, writing width, etc., might not match the
specifications. Try using the slowest writing speed.
Skipping with high bit rate
files Skipping may occur with large quantities of data, such as for high bit rate data.
Moves immediately to the
next song when playing When a non-MP3 file has been given an extension of “.MP3” or “.mp3” or when play is prohibited by copyright protection, there will be approximately
5 seconds of no sound and then the player will skip to the next song.
Songs do not play back in
the desired order The playback order is the order in which the files were written by the writing software. Therefore, the files might not play in the desired order.
4-28Display screen, heater, air conditioner, audio and phone systems
Page 147 of 293
iPod®* player (if so equipped)
●Some characters used in other languages
(Chinese, Japanese, etc.) are not displayed
properly on the vehicle center screen. We
recommend using English or Spanish lan-
guage characters with an iPod®.
● Large video podcast files cause slow re-
sponses in the iPod®. The vehicle center
display may momentarily black out, but it will
soon recover.
● If the iPod® automatically selects large
video podcast files while in the shuffle mode,
the vehicle center display may momentarily
black out, but it will soon recover.
● Improperly plugging in the iPod® may cause
a checkmark to be displayed on and off
(flickering) . Always make sure that the
iPod® is connected properly.
● The iPod® nano (2nd Generation) will con-
tinue to fast forward or rewind if it is discon-
nected during a seek operation.
● An incorrect song title may appear when the
Play Mode is changed while using the iPod®
nano (2nd Generation) .
● Audiobooks may not play in the same order
as they appear on the iPod®. ●
The iPod® nano (1st Generation) may re-
main in fast forward or rewind mode if it is
connected during a seek operation. In this
case, please manually reset the iPod®.
● If you are using an iPod® (3rd Generation
with Dock connector) , do not use very long
names for the song title, album name or artist
name to prevent the iPod® from resetting
itself.
● Be careful not to do the following, or the
cable could be damaged and a loss of func-
tion may occur:
● Bend the cable excessively (40 mm
[1.6 in] radius maximum) .
● Twist the cable excessively (more than
180 degrees) .
● Pull or drop the cable.
● Do not force the iPod® cable connector
into the device port.
● Close the center console lid on the cable
or connectors.
● Store objects with sharp edges in the
storage where the cable is stored.
● Spill liquids on the cable and connectors. ●
Do not connect the cable to the iPod® if the
cable and/or connectors are wet. It may
damage the iPod®.
● If the cable and connectors are exposed to
water, allow the cable and/or connectors to
dry completely before connecting the cable
to the iPod® (wait 24 hours for it to dry) .
● If the connector is exposed to fluids other
than water, evaporative residue may cause a
short between the connector pins. In this
case, replace the cable, otherwise damage
to the iPod® and a loss of function may
occur.
● If the cable is damaged (insulation cut, con-
nectors cracked, contamination such as liq-
uids, dust, dirt, etc., in the connectors) , do
not use the cable and contact a NISSAN
dealer to replace the cable with a new one.
● When not in use for extended periods of
time, store the cable in a clean, dust-free
environment at room temperature and with-
out direct sun exposure.
● Do not use the cable for any other purposes
other than its intended use in the vehicle.
*iPod® is a trademark of Apple Inc., registered in
the U.S. and other countries.
4-30Display screen, heater, air conditioner, audio and phone systems
Page 148 of 293
FM/AM RADIO WITH COMPACT
DISC (CD) PLAYER (Type A) (if so
equipped)
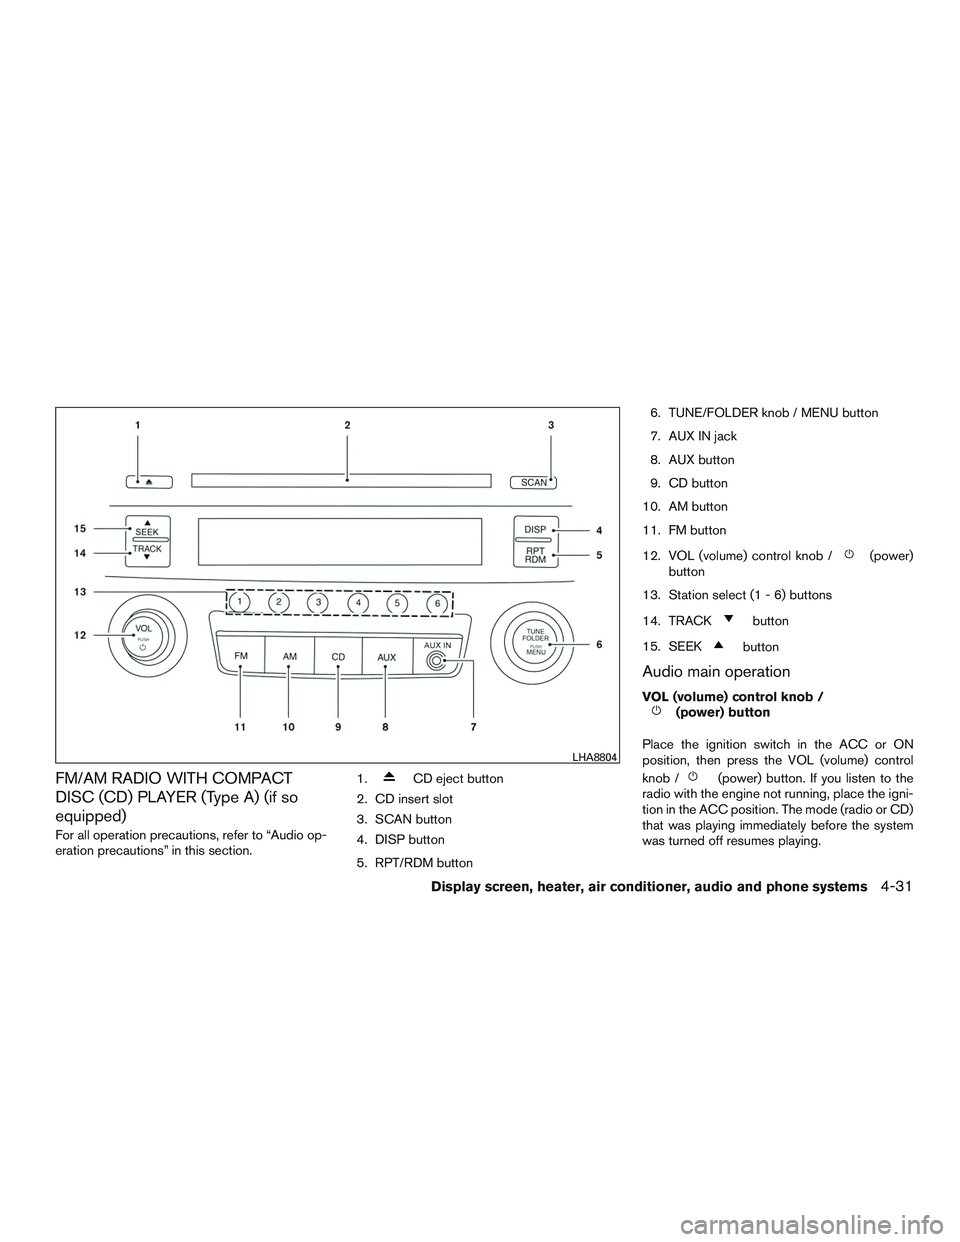
For all operation precautions, refer to “Audio op-
eration precautions” in this section.1.
CD eject button
2. CD insert slot
3. SCAN button
4. DISP button
5. RPT/RDM button 6. TUNE/FOLDER knob / MENU button
7. AUX IN jack
8. AUX button
9. CD button
10. AM button
11. FM button
12. VOL (volume) control knob /
(power)
button
13. Station select (1 - 6) buttons
14. TRACK
button
15. SEEK
button
Audio main operation
VOL (volume) control knob /(power) button
Place the ignition switch in the ACC or ON
position, then press the VOL (volume) control
knob /
(power) button. If you listen to the
radio with the engine not running, place the igni-
tion in the ACC position. The mode (radio or CD)
that was playing immediately before the system
was turned off resumes playing.
LHA8804
Display screen, heater, air conditioner, audio and phone systems4-31
Page 151 of 293

2. Tune to the desired station using manual,SEEK or SCAN tuning. Press and hold any
of the desired station memory buttons (1 –
6) until a beep is heard.
3. The channel indicator will then come on and the sound will resume. Programming is now
complete.
4. Other buttons can be set in the same man- ner.
If the battery cable is disconnected or if the fuse
opens, the radio memory will be canceled. In that
case, reset the desired stations.
Compact disc (CD) player operation
Place the ignition switch in the ACC or ON
position, and carefully insert the compact disc
into the slot with the label side up. The compact
disc is automatically pulled into the slot and starts
to play.
If the radio is already operating, it automatically
turns off and the compact disc begins to play.
CD button
When the CD button is pressed with a compact
disc loaded and the radio playing, the radio turns
off and the last used compact disc starts to play.
SEEK/TRACK (Reverse or Fast Forward) button:
Press and hold the SEEK/TRACK button
orfor 1.5 seconds while the compact disc
is playing to reverse or fast forward the track
being played. The compact disc plays at an in-
creased speed while reversing or fast forwarding.
When the button is released, the compact disc
returns to normal play speed.
SEEK and TRACK
buttons:
When the SEEK button
is pressed while
the compact disc is playing, the next track follow-
ing the present one starts to play from the begin-
ning. Press the SEEK button
several times
to skip several tracks. Each time the button is
pressed, the CD advances one additional track.
The track number appears in the display window.
(When the last track on the compact disc is
skipped, the first track is played.)
When the TRACK button
is pressed, the
track being played returns to the beginning.
Press the TRACK button
several times to
skip back several tracks. Each time the button is
pressed the CD moves back one track. RPT (repeat)/RDM (random) button
Press the RPT/RDM button while a compact disc
is playing to change the play pattern as follows:
CD:
TRACK REPEAT
→DISC RANDOM →DISC
REPEAT
MP3/WMA CD:
FOLDER REPEAT →TRACK REPEAT →DISC
RANDOM →FOLDER RANDOM →DISC RE-
PEAT
TRACK REPEAT: The track that is currently play-
ing will be repeated.
DISC RANDOM: The order of the tracks on the
disc will be mixed during play.
DISC REPEAT: The disc currently playing will be
repeated.
FOLDER REPEAT: The tracks in the current
folder will be repeated.
FOLDER RANDOM: The order of the tracks in
the folder will be mixed during play.
SCAN (CDs) button
Press the SCAN button for less than 1.5 seconds
to scan all tracks of the current disc for 10 sec-
onds per track. The SCAN icon is flashed during
scan mode.
4-34Display screen, heater, air conditioner, audio and phone systems
Page 152 of 293
The scan mode is canceled once it scans through
all tracks on the disc, or if the SCAN button is
pressed during scan mode.
CD EJECT
When the
button is pressed with a com-
pact disc loaded, the compact disc will be
ejected.
When the
button is pressed while the
compact disc is playing, the compact disc will
eject and the system will turn off.
AUX (Auxiliary) button
The AUX IN jack is located on the CD player. The
AUX IN audio input jack accepts any standard
analog audio input such as from a portable cas-
sette tape/CD player, MP3 player or laptop com-
puters.
Press the AUX button to play a compatible device
when it is plugged into the AUX IN jack.
Press the MENU button repeatedly until “AUX IN
Volume” appears on the screen to control the
incoming volume level of the auxiliary input de-
vice. Turn the TUNE/FOLDER knob to adjust the
level between 0 and +3.
FM/AM RADIO WITH COMPACT
DISC (CD) PLAYER (Type B) (if so
equipped)
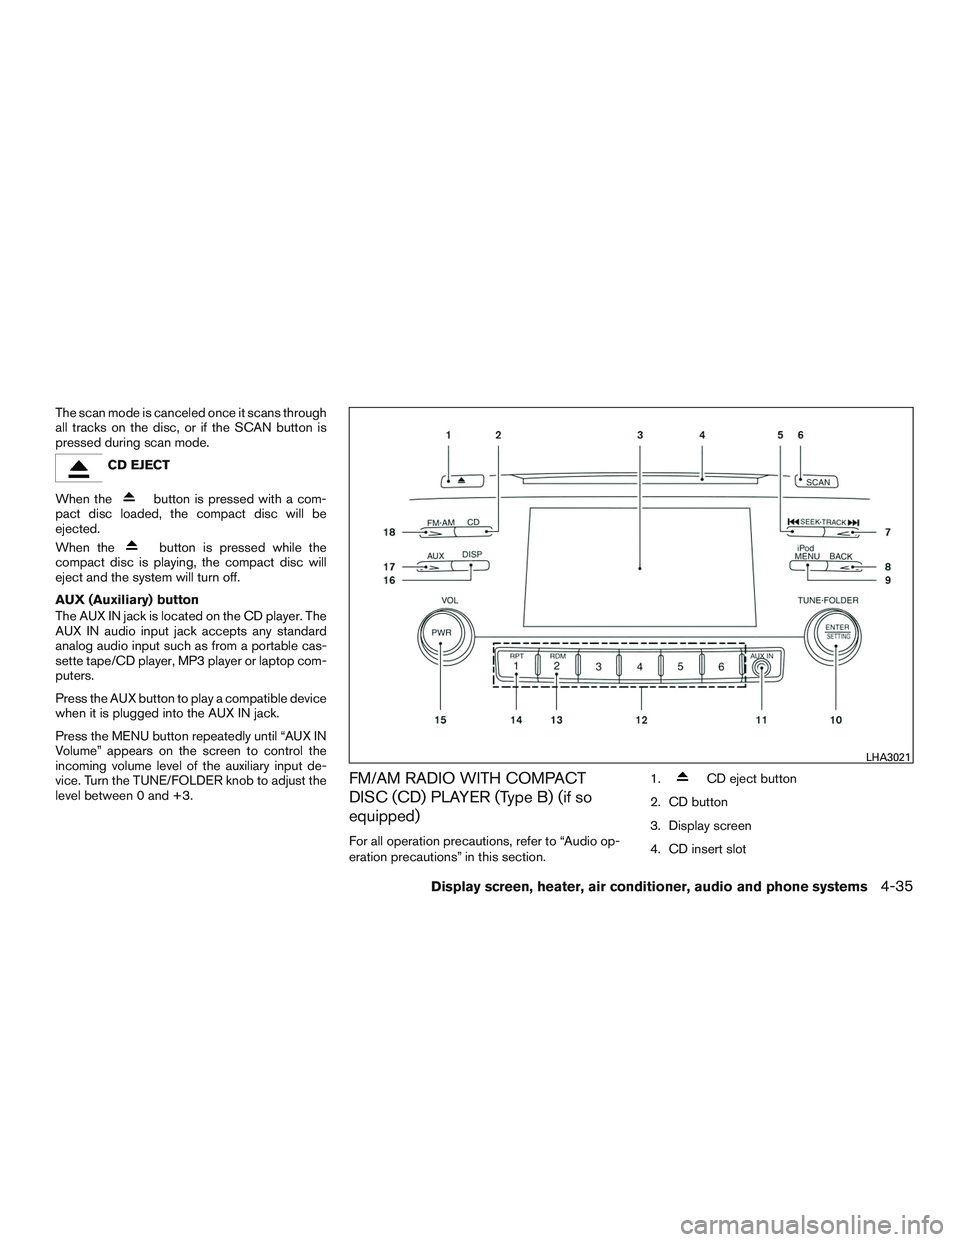
For all operation precautions, refer to “Audio op-
eration precautions” in this section. 1.
CD eject button
2. CD button
3. Display screen
4. CD insert slot
LHA3021
Display screen, heater, air conditioner, audio and phone systems4-35