2015 NISSAN MICRA power steering
[x] Cancel search: power steeringPage 13 of 293
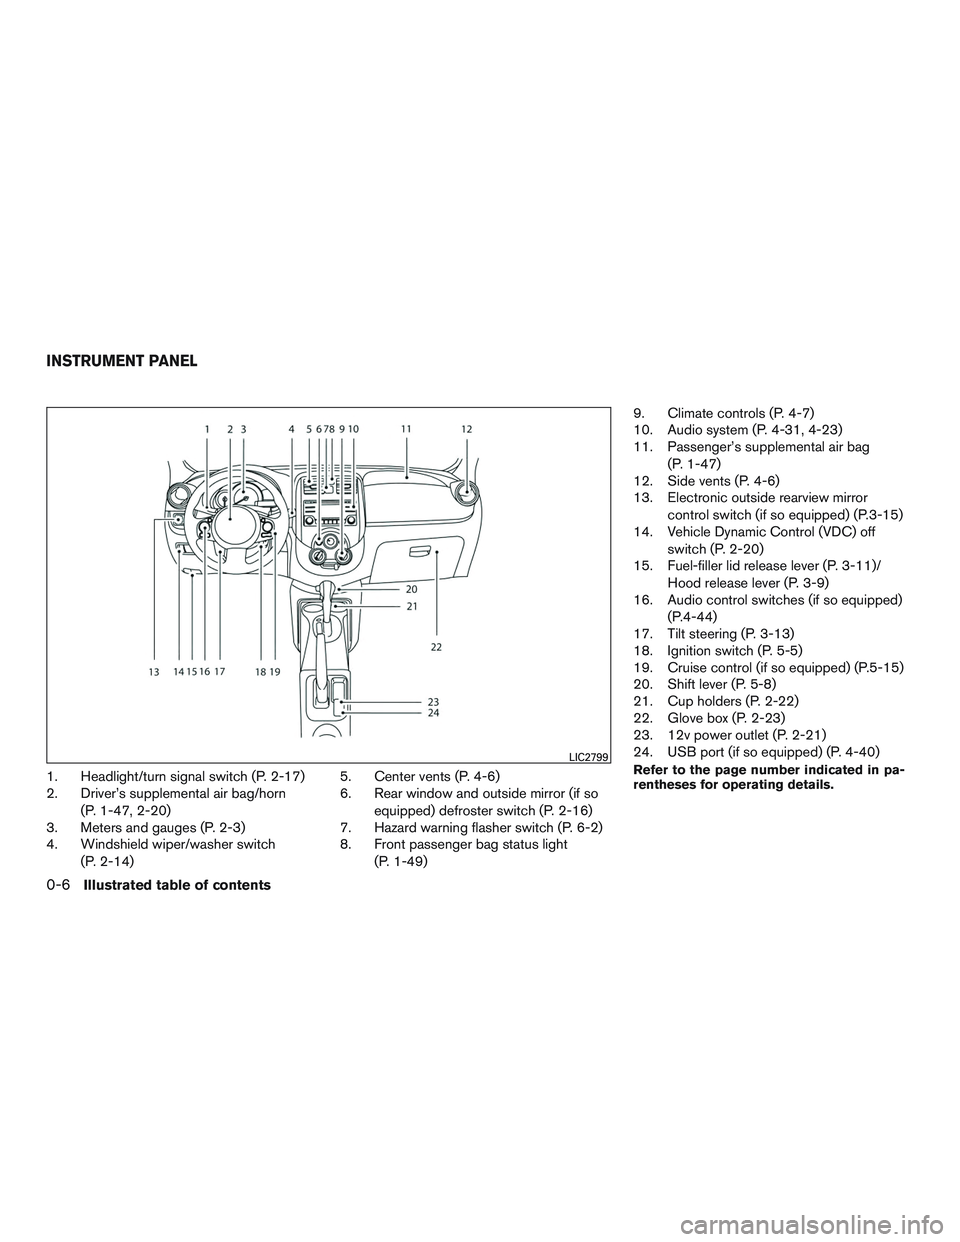
1. Headlight/turn signal switch (P. 2-17)
2. Driver’s supplemental air bag/horn(P. 1-47, 2-20)
3. Meters and gauges (P. 2-3)
4. Windshield wiper/washer switch
(P. 2-14) 5. Center vents (P. 4-6)
6. Rear window and outside mirror (if so
equipped) defroster switch (P. 2-16)
7. Hazard warning flasher switch (P. 6-2)
8. Front passenger bag status light
(P. 1-49) 9. Climate controls (P. 4-7)
10. Audio system (P. 4-31, 4-23)
11. Passenger’s supplemental air bag
(P. 1-47)
12. Side vents (P. 4-6)
13. Electronic outside rearview mirror
control switch (if so equipped) (P.3-15)
14. Vehicle Dynamic Control (VDC) off
switch (P. 2-20)
15. Fuel-filler lid release lever (P. 3-11)/
Hood release lever (P. 3-9)
16. Audio control switches (if so equipped)
(P.4-44)
17. Tilt steering (P. 3-13)
18. Ignition switch (P. 5-5)
19. Cruise control (if so equipped) (P.5-15)
20. Shift lever (P. 5-8)
21. Cup holders (P. 2-22)
22. Glove box (P. 2-23)
23. 12v power outlet (P. 2-21)
24. USB port (if so equipped) (P. 4-40)Refer to the page number indicated in pa-
rentheses for operating details.LIC2799
INSTRUMENT PANEL
0-6Illustrated table of contents
Page 15 of 293
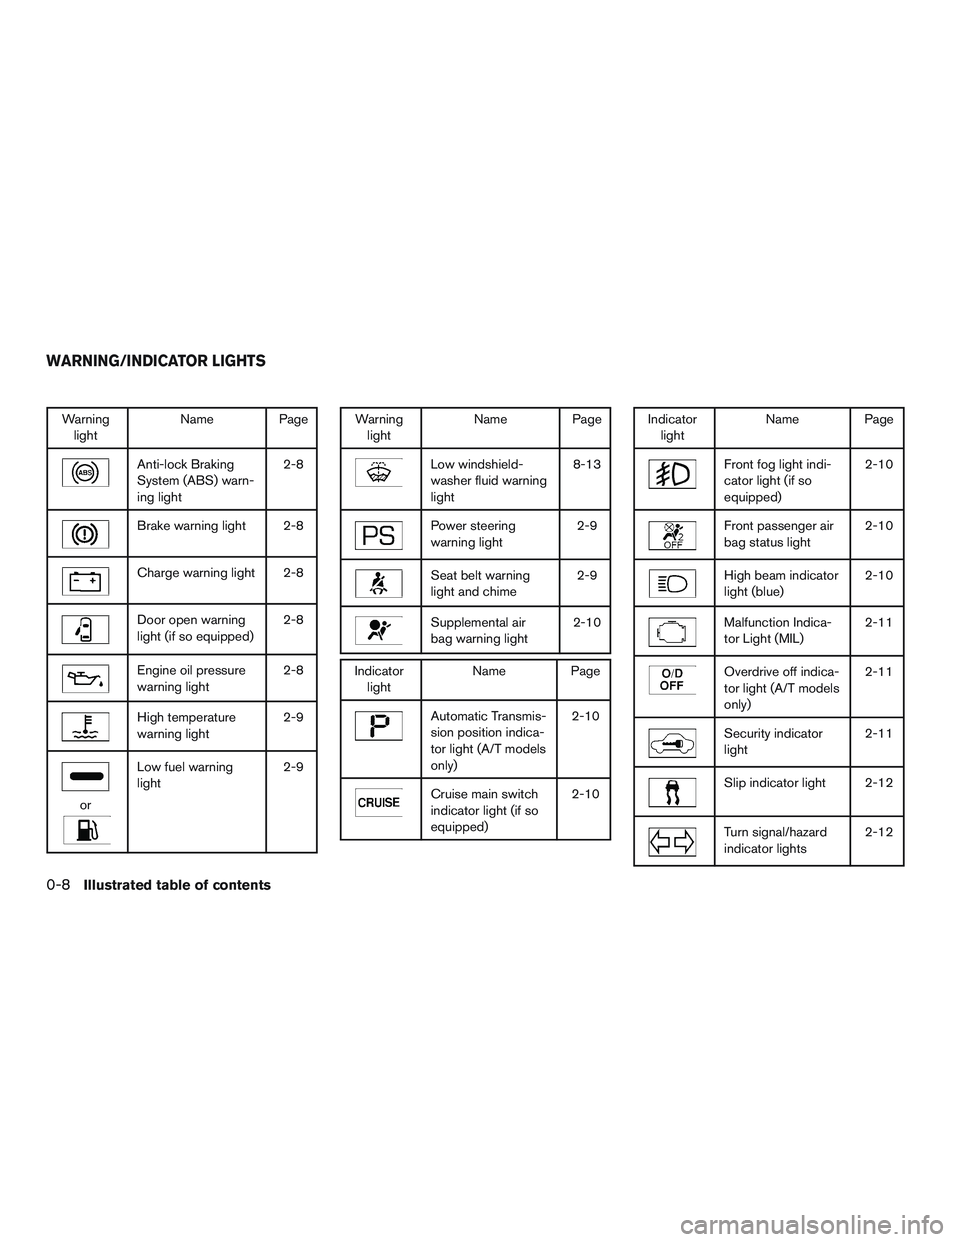
Warninglight Name Page
Anti-lock Braking
System (ABS) warn-
ing light 2-8
Brake warning light 2-8
Charge warning light 2-8
Door open warning
light (if so equipped)
2-8
Engine oil pressure
warning light2-8
High temperature
warning light2-9
or
Low fuel warning
light2-9
Warning
light Name Page
Low windshield-
washer fluid warning
light 8-13
Power steering
warning light
2-9
Seat belt warning
light and chime2-9
Supplemental air
bag warning light2-10
Indicator
light Name Page
Automatic Transmis-
sion position indica-
tor light (A/T models
only) 2-10
Cruise main switch
indicator light (if so
equipped)
2-10
Indicator
light Name Page
Front fog light indi-
cator light (if so
equipped) 2-10
Front passenger air
bag status light
2-10
High beam indicator
light (blue)2-10
Malfunction Indica-
tor Light (MIL)2-11
Overdrive off indica-
tor light (A/T models
only)2-11
Security indicator
light
2-11
Slip indicator light 2-12
Turn signal/hazard
indicator lights2-12
WARNING/INDICATOR LIGHTS
0-8Illustrated table of contents
Page 75 of 293
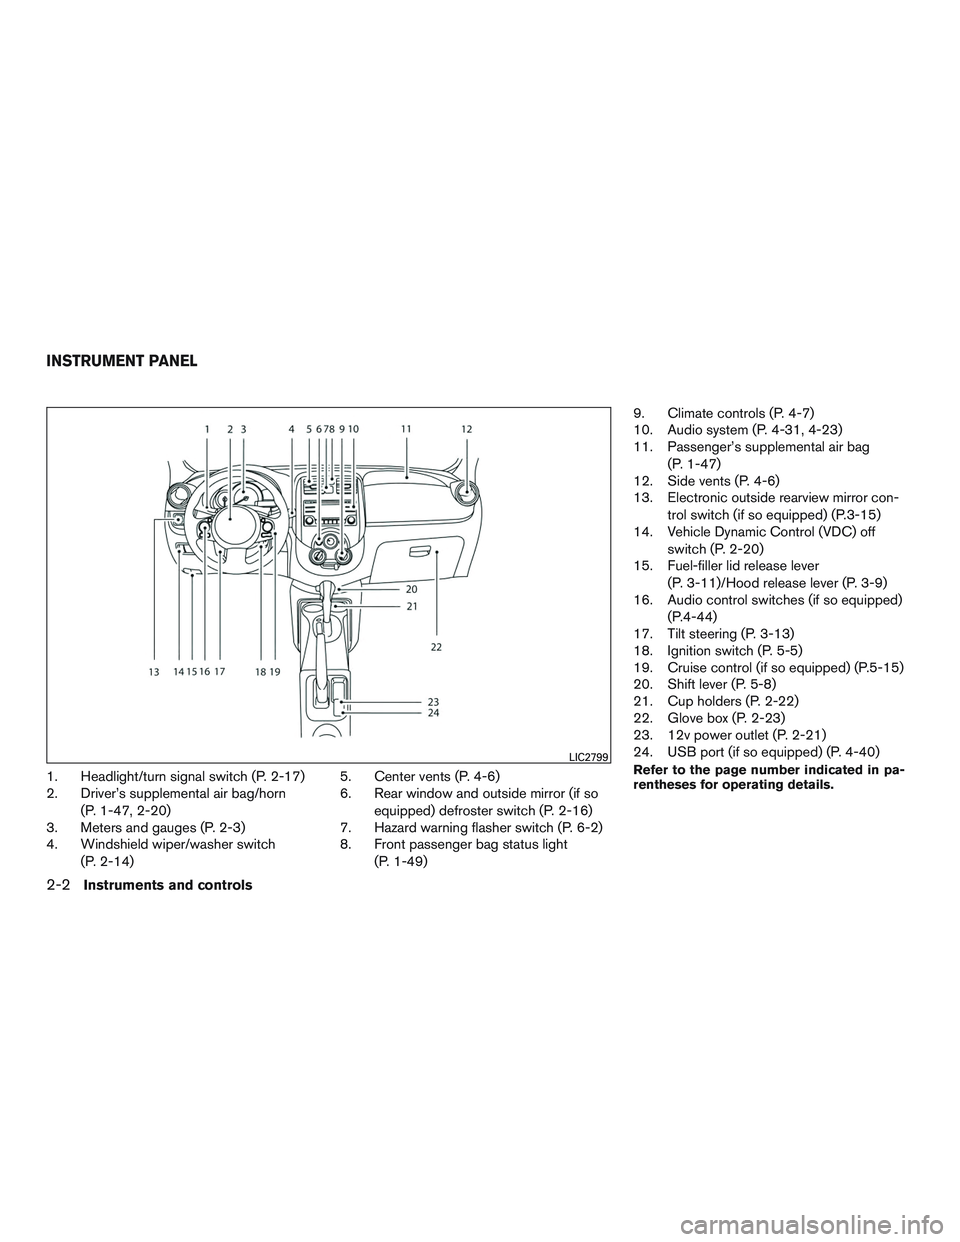
1. Headlight/turn signal switch (P. 2-17)
2. Driver’s supplemental air bag/horn(P. 1-47, 2-20)
3. Meters and gauges (P. 2-3)
4. Windshield wiper/washer switch
(P. 2-14) 5. Center vents (P. 4-6)
6. Rear window and outside mirror (if so
equipped) defroster switch (P. 2-16)
7. Hazard warning flasher switch (P. 6-2)
8. Front passenger bag status light
(P. 1-49) 9. Climate controls (P. 4-7)
10. Audio system (P. 4-31, 4-23)
11. Passenger’s supplemental air bag
(P. 1-47)
12. Side vents (P. 4-6)
13. Electronic outside rearview mirror con-
trol switch (if so equipped) (P.3-15)
14. Vehicle Dynamic Control (VDC) off
switch (P. 2-20)
15. Fuel-filler lid release lever
(P. 3-11)/Hood release lever (P. 3-9)
16. Audio control switches (if so equipped)
(P.4-44)
17. Tilt steering (P. 3-13)
18. Ignition switch (P. 5-5)
19. Cruise control (if so equipped) (P.5-15)
20. Shift lever (P. 5-8)
21. Cup holders (P. 2-22)
22. Glove box (P. 2-23)
23. 12v power outlet (P. 2-21)
24. USB port (if so equipped) (P. 4-40)Refer to the page number indicated in pa-
rentheses for operating details.LIC2799
INSTRUMENT PANEL
2-2Instruments and controls
Page 80 of 293

Anti-lock Braking System (ABS)
warning lightLow windshield-washer fluid
warning lightFront passenger air bag status
lightVehicle Dynamic Control (VDC)
OFF indicator light
Brake warning lightPower steering warning lightHigh beam indicator light (blue)
Charge warning lightSeat belt warning light and
chimeMalfunction Indicator Light
(MIL)
Door open warning light
(if so equipped)Supplemental air bag warning
lightOverdrive OFF indicator light
(A/T models only)
Engine oil pressure warning
lightAutomatic Transmission posi-
tion indicator light (A/T models
only)Security indicator light
High temperature warning lightCruise main switch indicator
light (if so equipped)Slip indicator light
orLow fuel warning
lightFront fog light indicator light
(if so equipped)Turn signal/hazard indicator
lights
CHECKING BULBS
With all doors closed, apply the parking brake
and place the ignition switch the in the ON posi-
tion without starting the engine. The following
lights will come on:,,,,
If equipped, the following lights come on briefly
and then go off:
(red) ,
If any light fails to come on, it may indicate
a burned-out bulb or an open circuit in the
electrical system. Have the system repaired
promptly.
WARNING/INDICATOR LIGHTS AND
AUDIBLE REMINDERS
Instruments and controls2-7
Page 82 of 293

High temperature warning light
When the ignition switch is placed in the ON
position, the high temperature warning light illu-
minates and then turns off. This indicates that the
high temperature sensor in the engine coolant
system is operational.
CAUTION
If the high temperature warning light illu-
minates while the engine is running, it
may indicate the engine temperature is
extremely high. Stop the vehicle safely as
soon as possible. If the vehicle is over-
heated, continuing vehicle operation may
seriously damage the engine. For addi-
tional information, refer to “If your vehicle
overheats” in the “In case of emergency”
section.
orLow fuel warninglight
This light comes on when the fuel level in the fuel
tank is getting low. Refuel as soon as it is conve-
nient, preferably before the fuel gauge reaches E
(Empty) . There will be a small reserve of fuel
in the tank when the fuel gauge reaches E
(Empty) , showing no more fuel bars.
Low windshield-washer fluid
warning light
This light comes on when the windshield-washer
fluid is at a low level. Add windshield-washer
fluid, as necessary. For additional information,
refer to “Windshield-washer fluid” in the “Mainte-
nance and do-it-yourself” section of this manual.
Power steering warning light
WARNING
● If the engine is not running or is turned
off while driving, the power assist for
the steering will not work. Steering will
be harder to operate.
● When the power steering warning light
illuminates with the engine running,
there will be no power assist for the
steering. You will still have control of
the vehicle but the steering will be
harder to operate. Have the power
steering system checked by a NISSAN
dealer.
When the ignition switch is placed in the ON
position, the power steering warning light illumi-
nates. After starting the engine, the power steer-
ing warning light turns off. This indicates the
power steering system is operational. If the power steering warning light illuminates
while the engine is running, it may indicate the
power steering system is not functioning properly
and may need servicing. Have the power steering
system checked by a NISSAN dealer.
When the power steering warning light illumi-
nates with the engine running, there will be no
power assist for the steering but you will still have
control of the vehicle. At this time, greater steer-
ing effort is required to operate the steering
wheel, especially in sharp turns and at low
speeds.
For additional information, refer to “Power steer-
ing” in the “Starting and driving” section.
Seat belt warning light and
chime
The light and chime remind you to fasten your
seat belts. The light illuminates whenever the
ignition switch is placed in the ON or START
position and remains illuminated until the driver’s
seat belt is fastened. At the same time, the chime
sounds for about 6 seconds unless the driver’s
seat belt is securely fastened.
The seat belt warning light may also illuminate if
the front passenger’s seat belt is not fastened
when the front passenger’s seat is occupied . For
7 seconds after the ignition switch is placed in
Instruments and controls2-9
Page 93 of 293
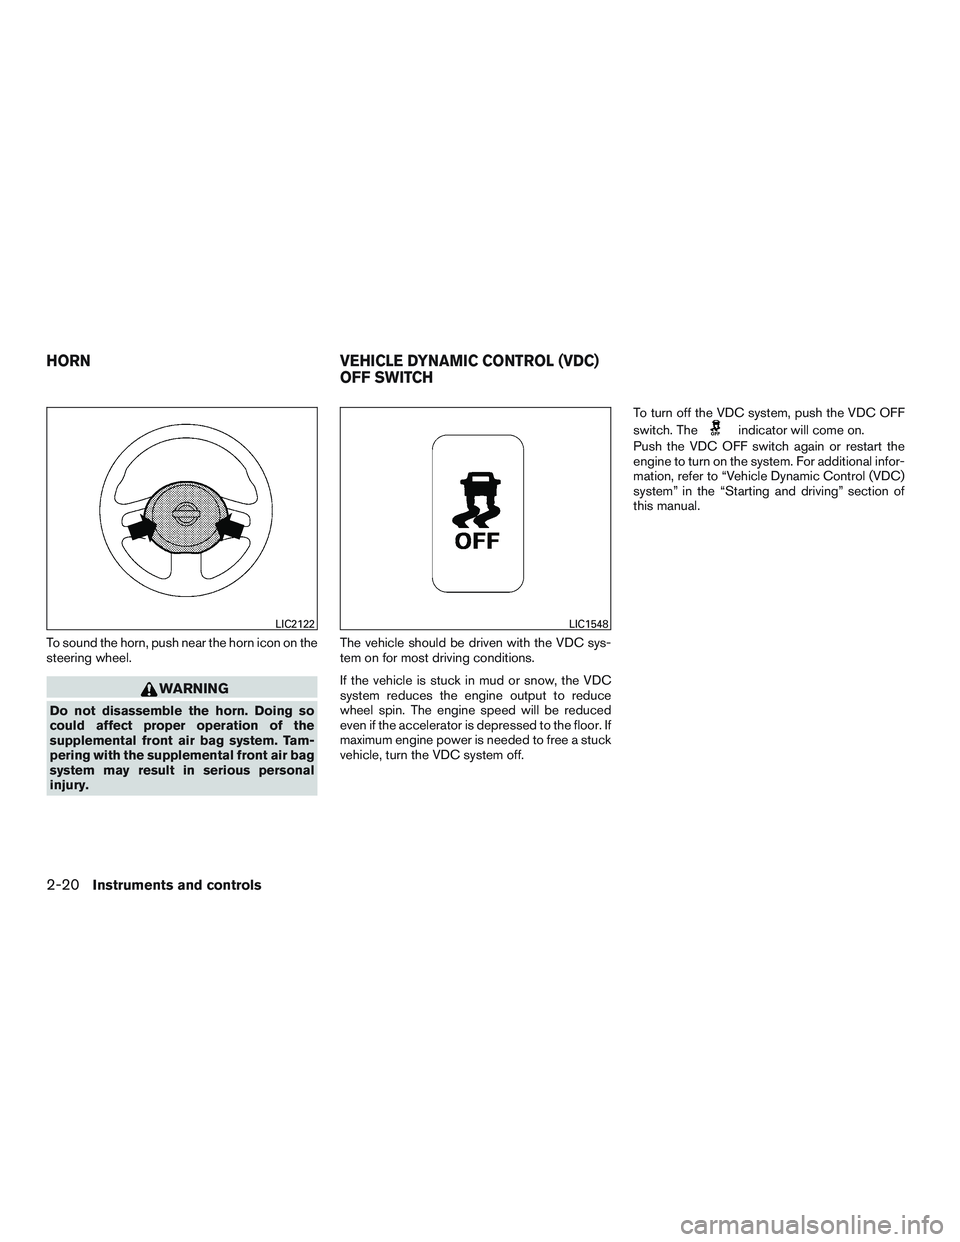
To sound the horn, push near the horn icon on the
steering wheel.
WARNING
Do not disassemble the horn. Doing so
could affect proper operation of the
supplemental front air bag system. Tam-
pering with the supplemental front air bag
system may result in serious personal
injury.The vehicle should be driven with the VDC sys-
tem on for most driving conditions.
If the vehicle is stuck in mud or snow, the VDC
system reduces the engine output to reduce
wheel spin. The engine speed will be reduced
even if the accelerator is depressed to the floor. If
maximum engine power is needed to free a stuck
vehicle, turn the VDC system off. To turn off the VDC system, push the VDC OFF
switch. The
indicator will come on.
Push the VDC OFF switch again or restart the
engine to turn on the system. For additional infor-
mation, refer to “Vehicle Dynamic Control (VDC)
system” in the “Starting and driving” section of
this manual.
LIC2122LIC1548
HORN VEHICLE DYNAMIC CONTROL (VDC)
OFF SWITCH
2-20Instruments and controls
Page 102 of 293
3 Pre-driving checks and adjustments
Keys .............................................3-2NISSAN vehicle immobilizer system keys ..........3-2
Doors ............................................3-3
Locking with key ................................3-3
Locking with inside lock knob ....................3-4
Locking with power door lock switch
(if so equipped) ................................3-4
Automatic door locks (if so equipped). . . ..........3-5
Child safety rear door lock .......................3-5
Remote keyless entry system (if so equipped) .........3-6
How to use remote keyless entry system ..........3-7
Hood ............................................3-9
Rear hatch (Hatchback) ........................... 3-10Opening the rear hatch
......................... 3-10
Fuel-filler lid ...................................... 3-11
Opener operation .............................. 3-11
Fuel-filler cap ................................. 3-11
Steering wheel ................................... 3-13
Tilt operation .................................. 3-13
Sun visors ....................................... 3-13
Vanity mirrors (if so equipped) ...................3-14
Card holder (driver’s side only – if so
equipped) .................................... 3-14
Mirrors .......................................... 3-14
Rearview mirror ............................... 3-14
Outside mirrors ............................... 3-15
Page 161 of 293
●A new disc may be rough on the inner and
outer edges. Remove the rough edges by
rubbing the inner and outer edges with the
side of a pen or pencil as illustrated.
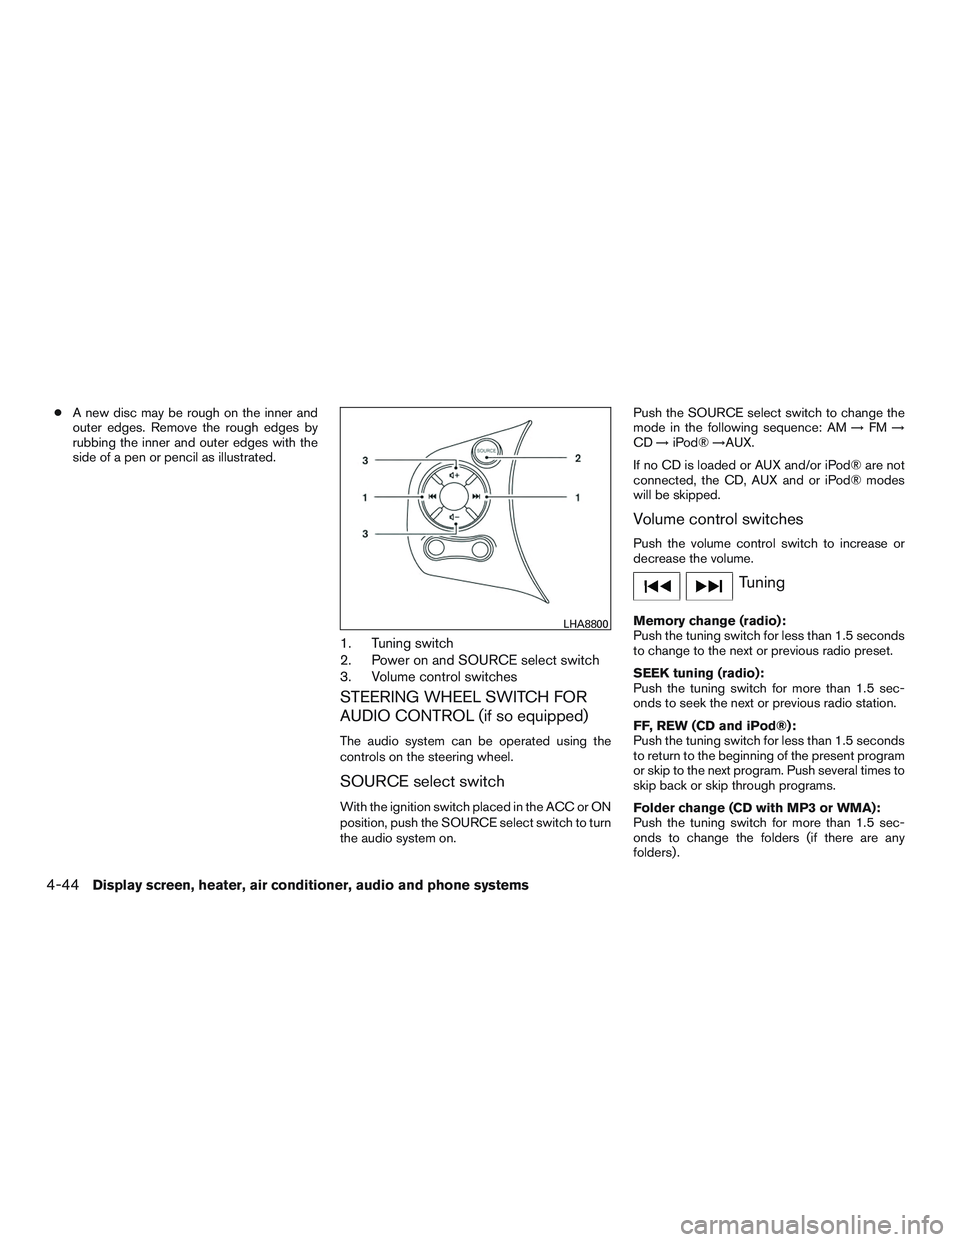
1. Tuning switch
2. Power on and SOURCE select switch
3. Volume control switches
STEERING WHEEL SWITCH FOR
AUDIO CONTROL (if so equipped)
The audio system can be operated using the
controls on the steering wheel.
SOURCE select switch
With the ignition switch placed in the ACC or ON
position, push the SOURCE select switch to turn
the audio system on. Push the SOURCE select switch to change the
mode in the following sequence: AM
→FM →
CD →iPod® →AUX.
If no CD is loaded or AUX and/or iPod® are not
connected, the CD, AUX and or iPod® modes
will be skipped.
Volume control switches
Push the volume control switch to increase or
decrease the volume.
Tuning
Memory change (radio):
Push the tuning switch for less than 1.5 seconds
to change to the next or previous radio preset.
SEEK tuning (radio):
Push the tuning switch for more than 1.5 sec-
onds to seek the next or previous radio station.
FF, REW (CD and iPod®):
Push the tuning switch for less than 1.5 seconds
to return to the beginning of the present program
or skip to the next program. Push several times to
skip back or skip through programs.
Folder change (CD with MP3 or WMA):
Push the tuning switch for more than 1.5 sec-
onds to change the folders (if there are any
folders) .LHA8800
4-44Display screen, heater, air conditioner, audio and phone systems