Page 215 of 412

Locking doors
�1LOCKbutton
�2UNLOCKbutton
�3CHARGE PORT UNLOCK
�4PANICbutton
When you lock or unlock the doors, the hazard
indicator will flash and the horn will sound as a
confirmation. See “Hazard warning indicator
light” and “Horn” in the “Instruments and con-
trols” section. 1. Push the power switch to the OFF position
and make sure you carry the Intelligent Key
with you.*1
2. Carry the Intelligent Key with you.
3. Close all the doors.
4. Push the LOCK
button�1on the
Intelligent Key.
5. All the doors and the rear hatch will lock.
6. The hazard indicator flashes twice and the horn chirps once.
*1: Doors will not lock with the Intelligent Key
while the power switch is in the ACC or ON
position.
Operate the door handles to confirm that the
doors have been securely locked.
Unlocking doors
1. Push the UNLOCKbutton�2on the
Intelligent Key once.
2. The hazard indicator flashes once. The driv- er’s door will unlock.
3. Push the UNLOCK
button on the Intel-
ligent Key again within 1 minute.
4. The hazard indicator flashes once again. All the doors and the rear hatch will unlock. All doors will be locked automatically unless one
of the following operations is performed within 1
minute after pushing the UNLOCK
button
while the doors are locked.
• Opening any door (including the rear hatch) .
• Pushing the power switch.
During this 1-minute time period, if the UNLOCK
button on the Intelligent Key is pushed, all
doors will be locked automatically after another 1
minute.
Opening charge port lid
The charge port lid may be opened by pressing
and holding the charge port unlock
button
�3.
For additional information see �Opening charge
port lid� in this section.
Using panic alarm
If you are near your vehicle and feel threatened,
you may activate the alarm to call attention as
follows:
1. Push the PANIC
button�4on the
Intelligent Key for more than 1 second.
2. The theft warning alarm and headlights will stay on for a period of time.
3-14Pre-driving checks and adjustments
Page 216 of 412
3. The panic alarm stops when:• It has run for a period of time, or
• Any of the buttons on the Intelligent Key ispushed. (Note: The PANIC button must be
pushed for more than 1 second.)
Setting hazard indicator and horn
mode
This vehicle is set in hazard indicator and horn
mode when you first receive the vehicle.
In hazard indicator and horn mode, when the
LOCK
button�1is pushed, the hazard
indicator flashes twice and the horn chirps once.
When the UNLOCK
button�2is pushed,
the hazard indicator flashes once.
If horns are not necessary, the system can be
switched to the hazard indicator mode.
In hazard indicator mode, when the LOCK
button is pushed, the hazard indicator flashes
twice. When the UNLOCK
button is
pushed, neither the hazard indicator nor the horn
operates.
Pre-driving checks and adjustments3-15
Page 217 of 412
Hazard indicator and horn mode:
OperationDOOR LOCK DOOR UNLOCK
Pushing door handle request switch or rear hatch request switch HAZARD -
twice
OUTSIDE CHIME - twiceHAZARD -
once
OUTSIDE CHIME - once
Pushing
orbutton HAZARD -
twice
HORN - once HAZARD -
once
HORN - none
Hazard indicator mode:
Operation DOOR LOCK DOOR UNLOCK
Pushing door handle request switch or rear hatch request switch HAZARD -
twice
OUTSIDE CHIME - none HAZARD - none
OUTSIDE CHIME - none
Pushing
orbutton HAZARD -
twice
HORN - none HAZARD - none
HORN - none
Switching procedure:
To switch the hazard indicator and horn (chime)
operation, push the LOCK
�1and UN-
LOCK
�2buttons on the Intelligent Key
simultaneously for more than 2 seconds.
• When the hazard indicator mode is set, the hazard indicator flashes 3 times.
• When the hazard indicator and horn mode is set, the hazard indicator flashes once and the
horn chirps once.
3-16Pre-driving checks and adjustments
Page 218 of 412

WARNING
• Make sure that the hood is completely closed and latched before driving. Fail-
ure to do so could cause the hood to
open during driving and result in an
accident.
• If steam or smoke is emitting from the motor compartment, do not open the
hood. Doing so could cause an injury. When opening the hood:
1. Securely close the charge port door.
2. Pull the hood release handle
�1located be-
low the instrument panel. The hood will then
spring up slightly.
3. Locate the lever
�2in between the hood and
charge port lid, and push the lever upward
with your fingertips.
4. Raise the hood
�3.
5. Remove the support rod
�4from the hood
and insert it into the slot
�5. Hold the coated part
�Awhen removing or
resetting the support rod. Avoid direct con-
tact with the metal parts because they may
be hot immediately after the EV (Electric
Vehicle) system has been stopped.
When closing the hood:
1. Return the support rod to its original position.
2. Slowly move the hood down to latch the lock.
3. Push the hood down to lock the hood se- curely into place.
HOOD
Pre-driving checks and adjustments3-17
Page 219 of 412
WARNING
• Always make sure that the rear hatch has been closed securely to prevent it
from opening while driving.
• Do not drive with the rear hatch open.
• Make sure that all passengers have their hands, etc. inside the vehicle be-
fore closing the rear hatch.
To open the rear hatch, unlock it and push the
rear hatch opener switch
�A. Pull up the rear
hatch to open. The rear hatch can be unlocked by:
• Pushing the rear hatch request switch (See
“NISSAN Intelligent Key® system” in this
section) .
• Pushing the UNLOCK
button on the
Intelligent Key (See “NISSAN Intelligent Key®
system” in this section) .
• Pushing the UNLOCK
button on the
remote controller (See “NISSAN Intelligent
Key® system” in this section) .
• Pushing the power door lock switch to the “UNLOCK” position.
REAR HATCH
3-18Pre-driving checks and adjustments
Page 220 of 412
SECONDARY REAR HATCH
RELEASE
The secondary rear hatch release mechanism
allows the rear hatch to be opened in the event of
a discharged battery, etc.
Push the lever up to open the rear hatch with a
suitable tool.
If you had to open the rear hatch using this
lever, have the vehicle checked by a
NISSAN certified LEAF dealer as soon as
possible.
OPENING CHARGE PORT LID
CAUTION
Make sure that the charge port lid is
completely closed and latched before
driving. Failure to do so could cause the
lid to open suddenly during driving.
When opening the charge port lid perform one of
the following:
• Push the charge port lid opener switch locatedon the instrument panel, or
• Press and hold the charge port unlock button on the Intelligent Key for more than 1 second.
Switch
CHARGE PORT LID
Pre-driving checks and adjustments3-19
Page 221 of 412
When opening the charge port lid:
1. The charge port lid will then spring up slightly.
2. Put your hand into the under side of the lid andopen until it is in the fully open position.
When closing the charge port lid:
1. Slowly move the lid down.
2. Lock it securely into place.CHARGE PORT CAP
When opening the charge port cap, press the tab
and open the cap.
When the charge port cap is closed to its previ-
ous position, it will lock automatically.
CAUTION
• When charging is finished, be sure to close the charge port cap. If water or
dust gets inside the charge port, this
may cause a malfunction. • Pay particular attention when using
the normal charge port as the charge
port lid can be closed even when the
normal charge port cap is open.
• Close the quick charge (if so equipped) port cap before closing the charging
lid. The quick charge port cap can be
damaged if it is open when closing the
charge port lid.
Button
3-20Pre-driving checks and adjustments
Page 222 of 412
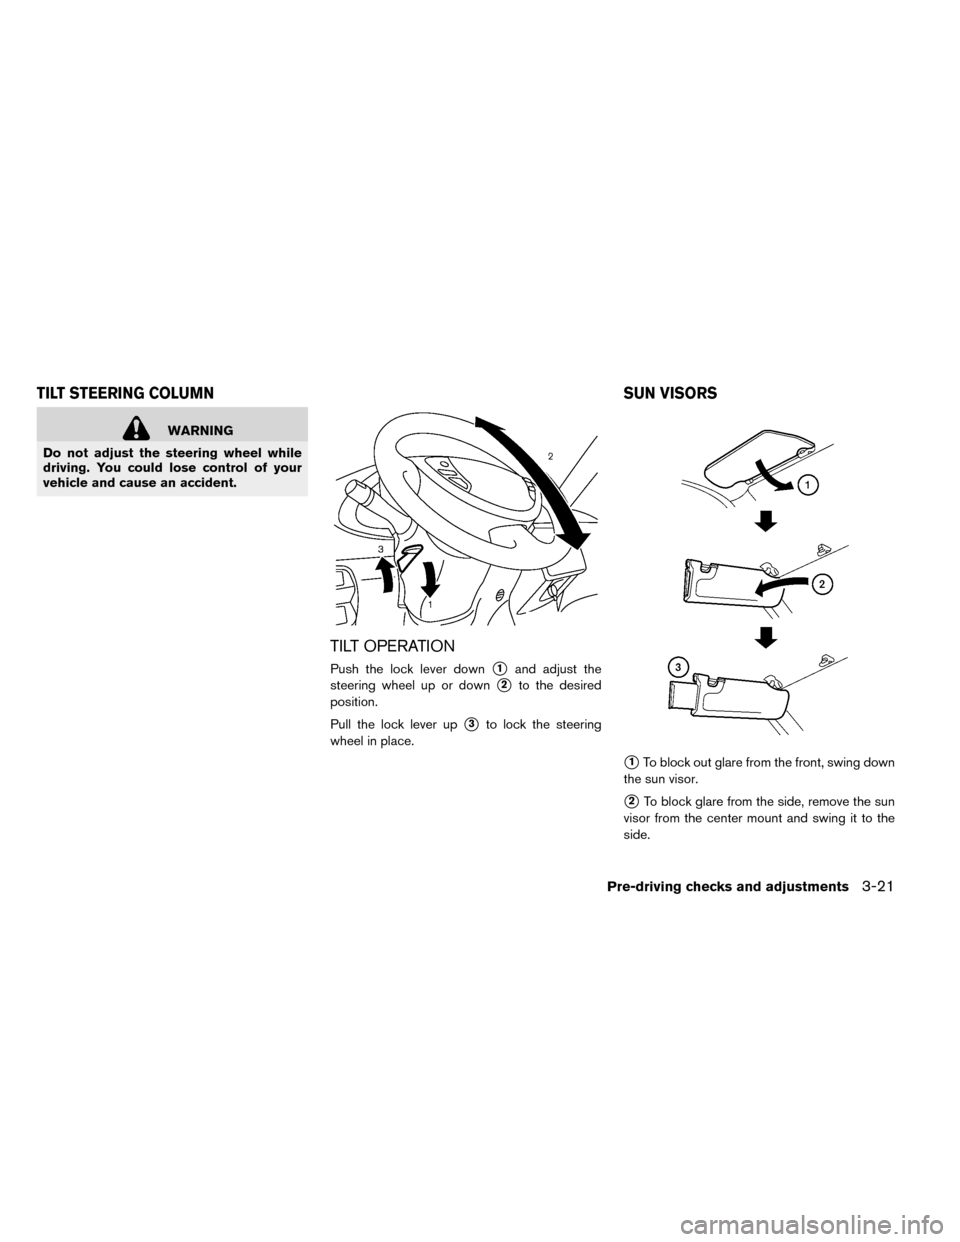
WARNING
Do not adjust the steering wheel while
driving. You could lose control of your
vehicle and cause an accident.
TILT OPERATION
Push the lock lever down�1and adjust the
steering wheel up or down
�2to the desired
position.
Pull the lock lever up
�3to lock the steering
wheel in place.
�1To block out glare from the front, swing down
the sun visor.
�2To block glare from the side, remove the sun
visor from the center mount and swing it to the
side.
TILT STEERING COLUMN SUN VISORS
Pre-driving checks and adjustments3-21

Setting ha")