2015 NISSAN LEAF lock
[x] Cancel search: lockPage 116 of 412
7. Check to make sure the child restraint is prop-erly secured prior to each use. If the child
restraint is loose, repeat steps 1 through 6.
FORWARD-FACING CHILD
RESTRAINT INSTALLATION USING
THE SEAT BELTS
WARNING
The three-point seat belt with Automatic
Locking Retractor (ALR) must be used
when installing a child restraint. Failure
to use the ALR mode will result in the
child restraint not being properly se-
cured. The restraint could tip over or be
loose and cause injury to a child in a
sudden stop or collision. Also, it can
change the operation of the front passen-
ger air bag. See “Front passenger air bag
and status light” in this section. Refer to all Warnings and Cautions in “Child
safety” and “Child restraints” in this section be-
fore installing a child restraint.
NISSAN does not recommend the use of the
lower anchors if the combined weight of the child
and the child restraint exceeds 65 lbs (29.5 kg) . If
the combined weight of the child and the child
restraint is greater than 65 lbs, (29.5 kg) use the
vehicle’s seat belt (in place of not the lower
anchors) to install the child restraint. Be sure to
follow the child restraint manufacturer’s instruc-
tions for installation. Follow these steps to install a forward-facing
child restraint using the vehicle seat belt in the
rear seat or in the front passenger seat:
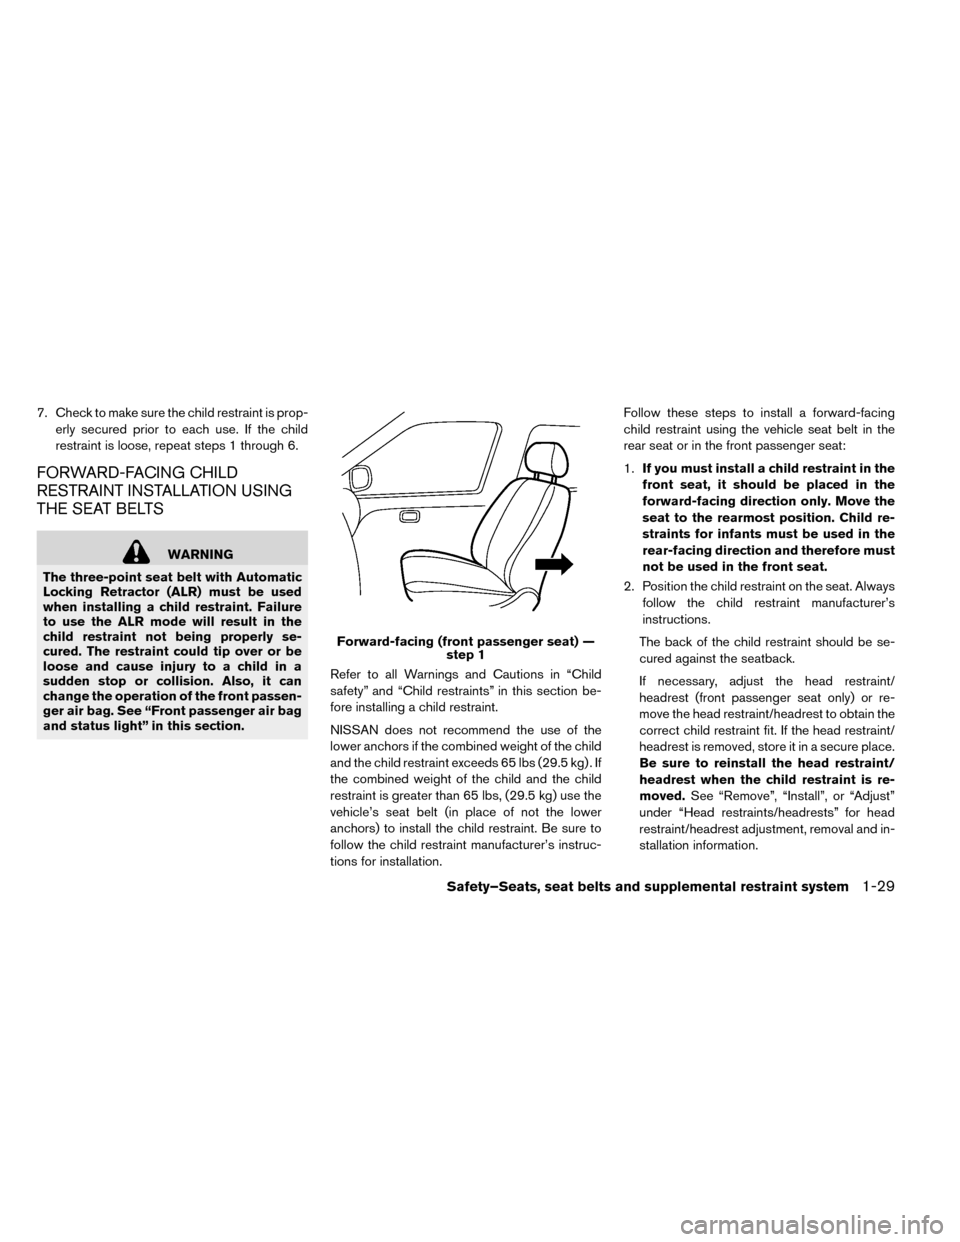
1.
If you must install a child restraint in the
front seat, it should be placed in the
forward-facing direction only. Move the
seat to the rearmost position. Child re-
straints for infants must be used in the
rear-facing direction and therefore must
not be used in the front seat.
2. Position the child restraint on the seat. Always follow the child restraint manufacturer’s
instructions.
The back of the child restraint should be se-
cured against the seatback.
If necessary, adjust the head restraint/
headrest (front passenger seat only) or re-
move the head restraint/headrest to obtain the
correct child restraint fit. If the head restraint/
headrest is removed, store it in a secure place.
Be sure to reinstall the head restraint/
headrest when the child restraint is re-
moved. See “Remove”, “Install”, or “Adjust”
under “Head restraints/headrests” for head
restraint/headrest adjustment, removal and in-
stallation information.
Forward-facing (front passenger seat) — step 1
Safety–Seats, seat belts and supplemental restraint system1-29
Page 117 of 412
If the seating position does not have a remov-
able head restraint/headrest and it is interfer-
ing with the proper child restraint fit, try an-
other seating position or a different child
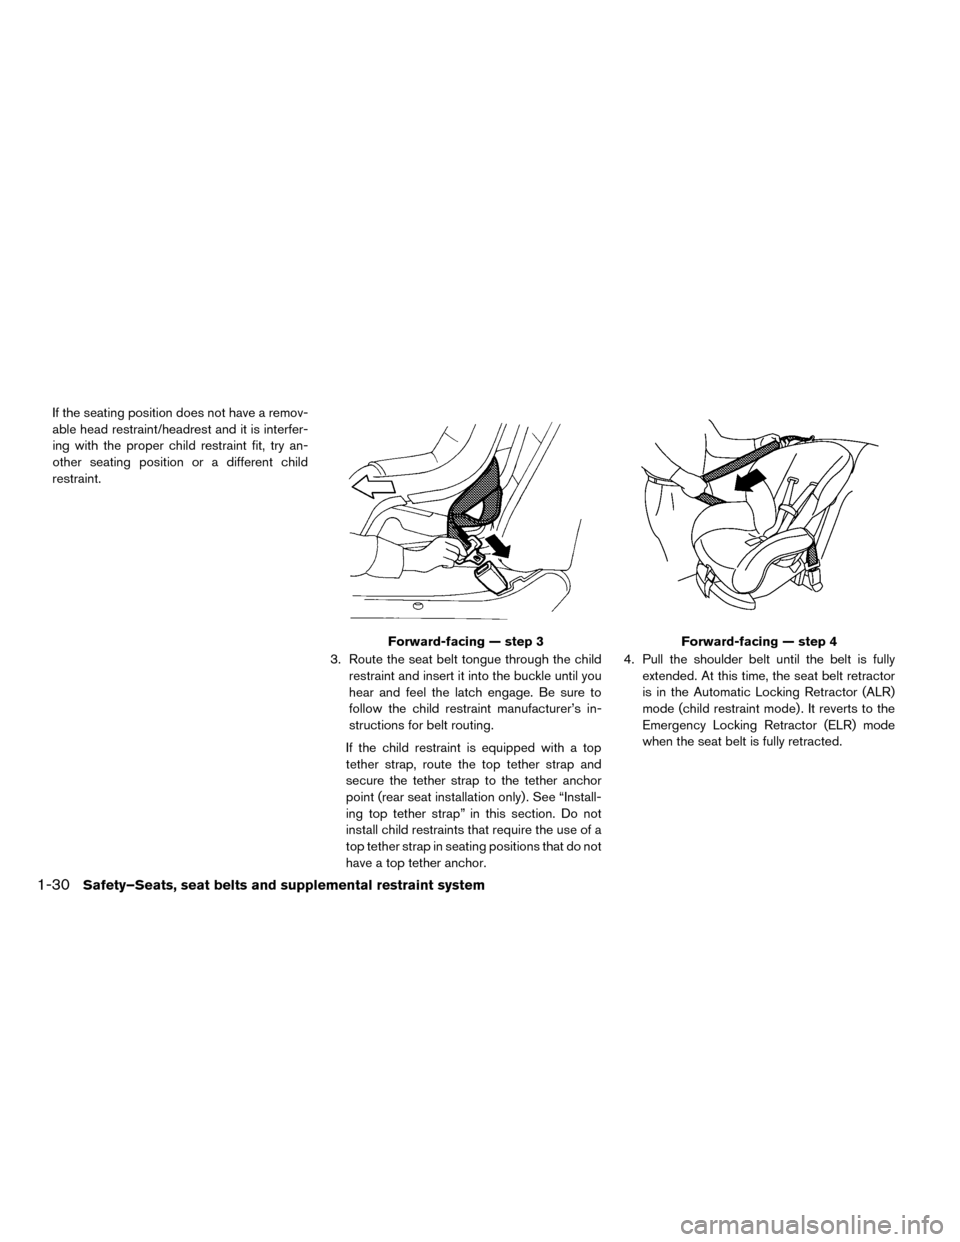
restraint.3. Route the seat belt tongue through the childrestraint and insert it into the buckle until you
hear and feel the latch engage. Be sure to
follow the child restraint manufacturer’s in-
structions for belt routing.
If the child restraint is equipped with a top
tether strap, route the top tether strap and
secure the tether strap to the tether anchor
point (rear seat installation only) . See “Install-
ing top tether strap” in this section. Do not
install child restraints that require the use of a
top tether strap in seating positions that do not
have a top tether anchor. 4. Pull the shoulder belt until the belt is fully
extended. At this time, the seat belt retractor
is in the Automatic Locking Retractor (ALR)
mode (child restraint mode) . It reverts to the
Emergency Locking Retractor (ELR) mode
when the seat belt is fully retracted.
Forward-facing — step 3Forward-facing — step 4
1-30Safety–Seats, seat belts and supplemental restraint system
Page 118 of 412
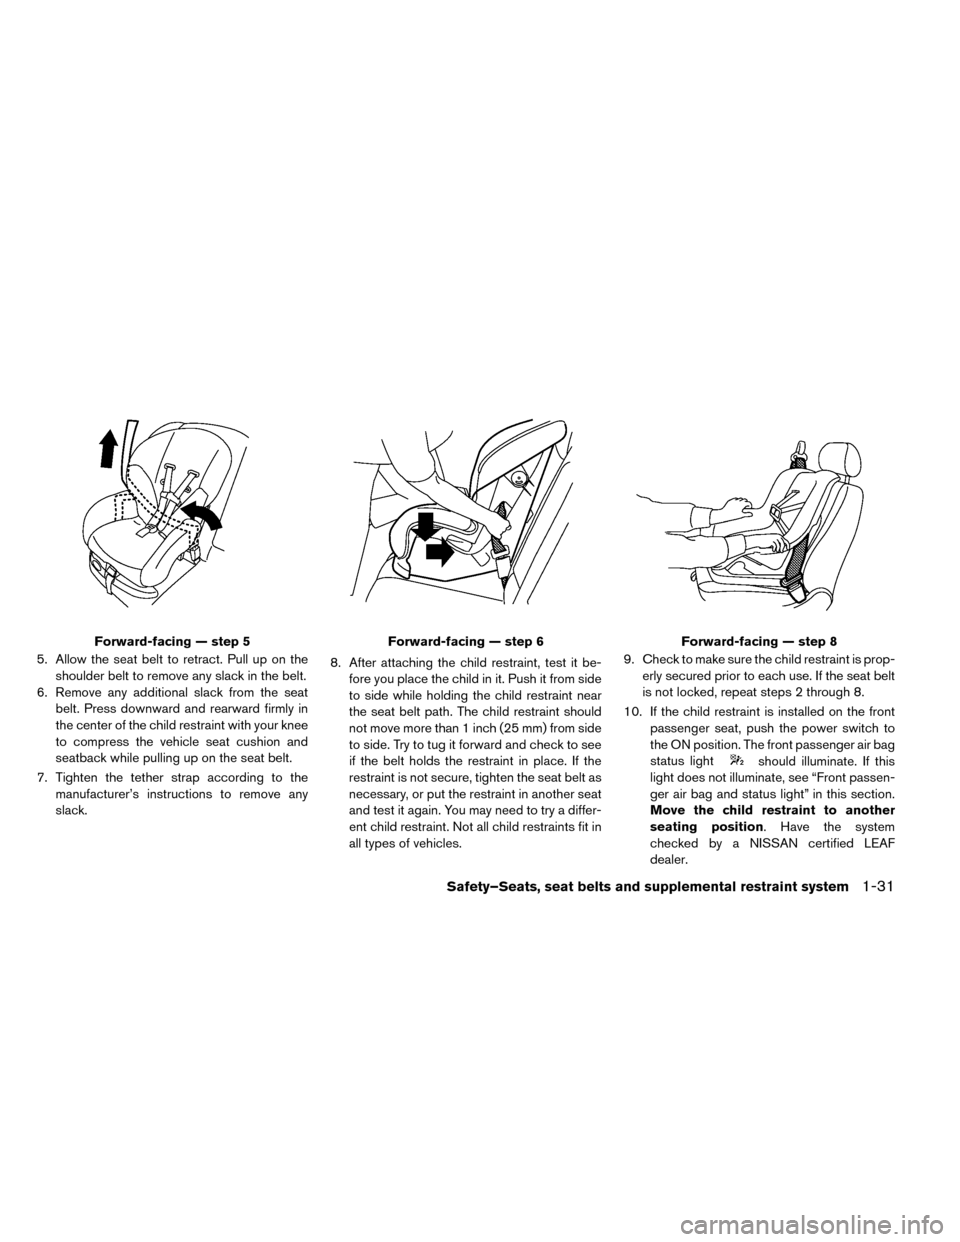
5. Allow the seat belt to retract. Pull up on theshoulder belt to remove any slack in the belt.
6. Remove any additional slack from the seat belt. Press downward and rearward firmly in
the center of the child restraint with your knee
to compress the vehicle seat cushion and
seatback while pulling up on the seat belt.
7. Tighten the tether strap according to the manufacturer’s instructions to remove any
slack. 8. After attaching the child restraint, test it be-
fore you place the child in it. Push it from side
to side while holding the child restraint near
the seat belt path. The child restraint should
not move more than 1 inch (25 mm) from side
to side. Try to tug it forward and check to see
if the belt holds the restraint in place. If the
restraint is not secure, tighten the seat belt as
necessary, or put the restraint in another seat
and test it again. You may need to try a differ-
ent child restraint. Not all child restraints fit in
all types of vehicles. 9. Check to make sure the child restraint is prop-
erly secured prior to each use. If the seat belt
is not locked, repeat steps 2 through 8.
10. If the child restraint is installed on the front passenger seat, push the power switch to
the ON position. The front passenger air bag
status light
should illuminate. If this
light does not illuminate, see “Front passen-
ger air bag and status light” in this section.
Move the child restraint to another
seating position. Have the system
checked by a NISSAN certified LEAF
dealer.
Forward-facing — step 5Forward-facing — step 6Forward-facing — step 8
Safety–Seats, seat belts and supplemental restraint system1-31
Page 122 of 412
BOOSTER SEAT INSTALLATION
CAUTION
Do not use the lap/shoulder belt Auto-
matic Locking Retractor (ALR) mode
when using a booster seat with the seat
belts.
Refer to all Warnings and Cautions in “Child
safety”, “Child restraints” and “Booster seats” in
this section before installing a child restraint.
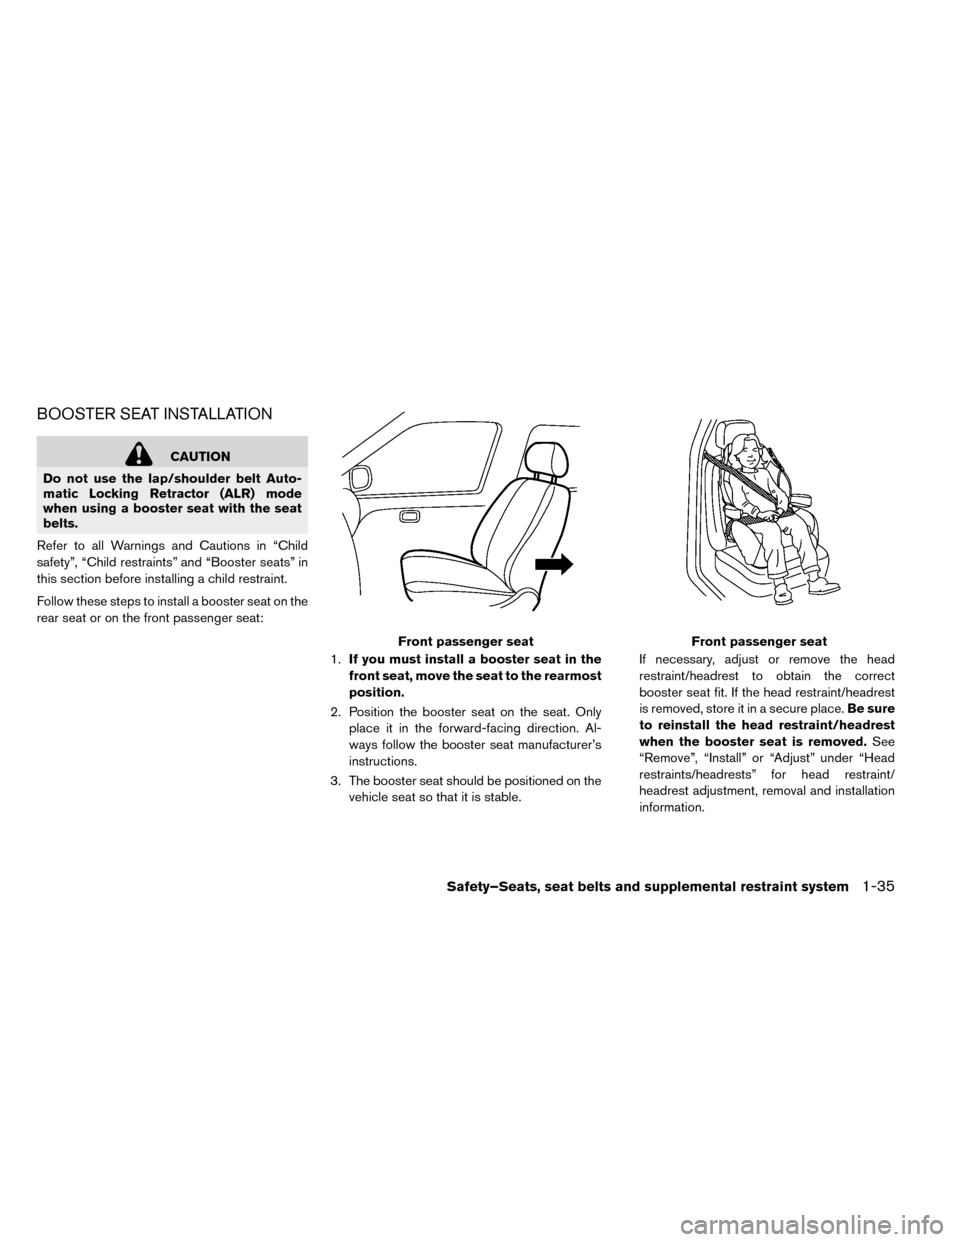
Follow these steps to install a booster seat on the
rear seat or on the front passenger seat:
1.If you must install a booster seat in the
front seat, move the seat to the rearmost
position.
2. Position the booster seat on the seat. Only place it in the forward-facing direction. Al-
ways follow the booster seat manufacturer’s
instructions.
3. The booster seat should be positioned on the vehicle seat so that it is stable. If necessary, adjust or remove the head
restraint/headrest to obtain the correct
booster seat fit. If the head restraint/headrest
is removed, store it in a secure place.
Be sure
to reinstall the head restraint/headrest
when the booster seat is removed. See
“Remove”, “Install” or “Adjust” under “Head
restraints/headrests” for head restraint/
headrest adjustment, removal and installation
information.
Front passenger seatFront passenger seat
Safety–Seats, seat belts and supplemental restraint system1-35
Page 132 of 412
seat, the Advanced Air Bag System is designed
to turn the passenger air bag OFF in accordance
with the regulations. Also, if a child restraint of the
type specified in the regulations is on the seat, its
weight and the child’s weight can be detected
and cause the air bag to turn OFF.
Front passenger seat adult occupants who are
properly seated and using the seat belt as out-
lined in this manual should not cause the passen-
ger air bag to be automatically turned OFF. For
small adults it may be turned OFF, however, if the
occupant does not sit in the seat properly (for
example, by not sitting upright, by sitting on an
edge of the seat, or by otherwise being out of
position) , this could cause the sensors to turn the
air bag OFF. Always be sure to be seated and
wearing the seat belt properly for the most effec-
tive protection by the seat belt and supplemental
air bag.
NISSAN recommends that pre-teens and chil-
dren be properly restrained in a rear seat.
NISSAN also recommends that appropriate child
restraints and booster seats be properly installed
in a rear seat. If this is not possible, the occupant
classification sensors are designed to operate as
described above to turn the front passenger air
bag OFF for specified child restraints. Failing toproperly secure child restraints and to use the
Automatic Locking Retractor (ALR) mode (child
restraint mode) may allow the restraint to tip or
move in an accident or sudden stop. This can
also result in the passenger air bag inflating in a
crash instead of being OFF. See “Child re-
straints” in this section for proper use and instal-
lation.
If the front passenger seat is not occupied, the
passenger air bag is designed not to inflate in a
crash. However, heavy objects placed on the
seat could result in air bag inflation, because of
the object being detected by the occupant clas-
sification sensors. Other conditions could also
result in air bag inflation, such as if a child is
standing on the seat, or if two children are on the
seat, contrary to the instructions in this manual.
Always be sure that you and all vehicle occupants
are seated and restrained properly.
Using the passenger air bag status light, you can
monitor when the front passenger air bag is au-
tomatically turned OFF with the seat occupied.
The light will not illuminate when the front pas-
senger seat is unoccupied.
If an adult occupant is in the seat but the passen-
ger air bag status light is illuminated (indicating
that the air bag is OFF) , it could be that theperson is a small adult, or is not sitting on the seat
properly.
If a child restraint must be used in the front seat,
the passenger air bag status light may or may not
be illuminated, depending on the size of the child
and the type of child restraint being used. If the air
bag status light is not illuminated (indicating that
the air bag might inflate in a crash) , it could be
that the child restraint or seat belt is not being
used properly. Make sure that the child restraint is
installed properly, the seat belt is used properly
and the occupant is positioned properly. If the air
bag status light is not illuminated, reposition the
occupant or child restraint in a rear seat.
If the passenger air bag status light will not illu-
minate even though you believe that the child
restraint, the seat belts and the occupant are
properly positioned, the system may be sensing
an unoccupied seat (in which case the air bag is
OFF) . Your NISSAN certified LEAF dealer can
check that the system is OFF by using a special
tool. However, until you have confirmed with your
dealer that your air bag is working properly, repo-
sition the occupant or child restraint in a rear seat.
The air bag system and passenger air bag status
light will take a few seconds to register a change
in the passenger seat status. However, if the seat
Safety–Seats, seat belts and supplemental restraint system1-45
Page 138 of 412
WARNING
If the supplemental air bag warning light
is on, it could mean that the front air bag,
side air bag, curtain air bag and/or pre-
tensioner systems will not operate in an
accident. To help avoid injury to yourself
or others, have your vehicle checked by a
NISSAN certified LEAF dealer as soon as
possible.
REPAIR AND REPLACEMENT
PROCEDURE
The front air bags, side air bags, curtain air bags
and pretensioners are designed to activate on a
one-time-only basis. As a reminder, unless it is
damaged, the supplemental air bag warning light
will remain illuminated after inflation has oc-
curred. Repair and replacement of these systems
should be done only by a NISSAN certified LEAF
dealer.
When maintenance work is required on the ve-
hicle, the front air bags, side air bags, curtain air
bags and pretensioners and related parts should
be pointed out to the person performing the
maintenance. The power switch should always
be in the LOCK position when working under the
hood or inside the vehicle.
WARNING
• Once a front air bag, side air bag or curtain air bag has inflated, the air bag
module will not function again and
must be replaced. Additionally, the ac-
tivated pretensioners must also be re-
placed. The air bag module and preten-
sioner should be replaced by a
NISSAN certified LEAF dealer. The air
bag modules and pretensioner system
cannot be repaired.
• The front air bag, side air bag and curtain air bag systems, and preten-
sioner system should be inspected by
a NISSAN certified LEAF dealer if there
is any damage to the front end or side
portion of the vehicle.
• If you need to dispose of a supplemen- tal air bag or pretensioner or scrap the
vehicle, contact a NISSAN certified
LEAF dealer. Correct supplemental air
bag and pretensioner system disposal
procedures are set forth in the appro-
priate NISSAN Service Manual. Incor-
rect disposal procedures could cause
personal injury.
Safety–Seats, seat belts and supplemental restraint system1-51
Page 140 of 412
2 Instruments and controls
Cockpit............................ .2-3
Instrument panel ....................... .2-4
Meters and gauges ..................... .2-5
Speedometer and odometer ...............2-6
Li-ion battery temperature gauge ............2-7
Power meter ....................... .2-7
Driving range ....................... .2-8
Li-ion battery available charge gauge .........2-9
Li-ion battery capacity level gauge ..........2-10
Outside air temperature ................2-10
ECO indicator ..................... .2-10
Clock .......................... .2-11
Warning/indicator lights and audible reminders .....2-12
Checking bulbs .................... .2-13
Warning lights ..................... .2-13
Indicator lights ..................... .2-19
Audible reminders ................... .2-21
Vehicle information display .................2-22
Indicators for operation ................ .2-23
Trip computer ..................... .2-27
Warning information displays .............2-32
Indicators for maintenance ...............2-34
Indicator for timer ................... .2-35
Security systems ..................... .2-35Vehicle security system
................ .2-35
NISSAN Vehicle Immobilizer System .........2-37
Windshield wiper and washer switch ...........2-38
Washer operation ................... .2-39
Rear window wiper and washer switch .........2-40
Rear window and outside mirror defroster switch . . .2-41
Instrument brightness control ...............2-41
Headlight and turn signal switch .............2-42
Headlight switch .................... .2-42
Turn signal switch ................... .2-44
Fog light switch (if so equipped) .............2-44
Heated steering
wheel switch ...............2-45
Horn ............................. .2-46
ECO switch ........................ .2-46
Heated seat switch .................... .2-46
Vehicle Dynamic Control (VDC) OFF switch ......2-48
Charge port lid switch .................. .2-48
Charge connector lock switch ...............2-49
Charge timer OFF switch .................2-49
Power outlet ........................ .2-49
Storage ........................... .2-50
Cup holders ...................... .2-50
Seatback Pocket ................... .2-51
Sunglasses holder ................... .2-51
Glove box ........................ .2-52
Page 142 of 412
1. TRIP switch for twin trip odometer
2. Trip computer switch
3. Instrument brightness control switch
4. Headlight, fog light (if so equipped) and turnsignal switch
— Headlight
— Turn signal light — Fog light (if so equipped)
5. Steering-wheel-mounted controls (left side) (See LEAF Navigation System Owner’s
Manual.)
—
Driving range button (if so
equipped)
— Audio control — Bluetooth® Hands-Free Phone System
control
6. Steering wheel — Electric power steering system
— Horn
— Driver’s supplemental air bag
7. Wiper and washer switch
8. Steering-wheel-mounted controls (right side)
— Cruise control switches
— ECO button (if so equipped)
9. Fuse box cover
10. Heated steering wheel
11. Vehicle Dynamic Control (VDC) OFF switch
12. Charge timer OFF switch
13. Charge connector lock switch
14. Charge port lid opener switch
15. Tilting steering wheel lever
16. Heated seat switch
17. Shift lever
18. Storage tray
COCKPIT
Instruments and controls2-3