Page 358 of 412

CAUTION
• Be careful not to allow children to swallow the battery and removed
parts.
• An improperly disposed battery can harm the environment. Always confirm
local regulations for battery disposal.
• When changing batteries, do not let dust or oil get on the components.
• There is danger of explosion if the lithium battery is incorrectly replaced.
Replace only with the same or equiva-
lent type. Replace the battery in the Intelligent Key as fol-
lows:
1. Remove the mechanical key from the Intelli-
gent Key.
2. Insert a small screwdriver into the slit of the corner and twist it to separate the upper part
from the lower part. Use a cloth to protect the
casing.
3. Replace the battery with a new one.
Recommended battery:
CR2025 or equivalent
• Do not touch the internal circuit and electricterminals as doing so could cause a malfunc-
tion.
• Hold the battery by the edges. Holding the battery across the contact points will seri-
ously deplete the storage capacity.
• Make sure that the �side faces the bottom
of the case.
NISSAN INTELLIGENT KEY®
BATTERY REPLACEMENT
Maintenance and do-it yourself8-19
Page 359 of 412

4. Align the tips of the upper and lower parts�1,
and then push them together
�2until it is
securely closed.
5. Operate the buttons to check that it is func- tioning properly.
See a NISSAN certified LEAF dealer if you need
any assistance for replacement. FCC Notice:
For USA:
This device complies with Part 15 of the
FCC Rules. Operation is subject to the fol-
lowing two conditions: (1) This device may
not cause harmful interference, and (2) this
device must accept any interference re-
ceived, including interference that may
cause undesired operation.
NOTE:
Changes or modifications not expressly ap-
proved by the party responsible for compli-
ance could void the user’s authority to op-
erate the equipment.
For Canada:
This device complies with Industry Canada
licence-exempt RSS standard(s) . Opera-
tion is subject to the following two condi-
tions: (1) this device may not cause inter-
ference, and (2) this device must accept any
interference, including interference that
may cause undesired operation of the
device.
8-20Maintenance and do-it yourself
Page 360 of 412
1. Front parking light
2. Headlight (low-beam)
3. Front turn signal light
4. Map light
5. Ceiling light
6. Front fog light (if so equipped)
7. Headlight (high-beam)
8. High-mounted stop light
9. Rear combination light (stop/tail/turn signal/back-up light/rear side marker)
10. License plate light
11. Cargo light
Fog may temporarily form inside the lens of the
exterior lights in the rain or in a car wash. A
temperature difference between the inside and
the outside of the lens causes the fog. This is not
a malfunction. If large drops of water collect
inside the lens, contact a NISSAN certified LEAF
dealer.
LIGHTS
Maintenance and do-it yourself8-21
Page 361 of 412
:
The headlight high-beam is a semi-sealed beam
type that uses a replaceable headlight (halogen)
bulb.
CAUTION
• Do not leave the bulb out of the he")
HEADLIGHTS
Replacing
Halogen headlight (high-beam):
The headlight high-beam is a semi-sealed beam
type that uses a replaceable headlight (halogen)
bulb.
CAUTION
• Do not leave the bulb out of the head- light reflector for a long period of time.
Dust, moisture, smoke, etc. entering
the headlight body may affect bulb
performance.
• High-pressure halogen gas is sealed inside the halogen bulb. The bulb may
break if the glass envelope is
scratched or the bulb is dropped.
• Only touch the base when handling the bulb. Never touch the glass envelope.
Touching the glass envelope could sig-
nificantly affect bulb life and/or head-
light performance.
• Aiming is not necessary after replacing the bulb. When aiming adjustment is
necessary, contact a NISSAN certified
LEAF dealer.
Use the same number and wattage as originally
installed as shown in the chart. Disconnect the battery negative cable before
replacing bulbs.
1. Remove the connector
�1.
2. Turn the headlight bulb, and then remove the bulb
�2. Disconnect the battery negative cable before
replacing bulbs.
1. Remove the connector
�1.
2. Turn the headlight bulb, and then remove the bulb
�2.
Type AType B
8-22Maintenance and do-it yourself
Page 362 of 412
EXTERIOR AND INTERIOR LIGHTS
ItemWattage
(W) Bulb No.
Headlight low beams
(Type A)* LED —
Headlight high beams
(Halogen) (Type A) 65 H9
Headlight (Type B) 60/55 H13
Turn/Park light 27/7 3457NAK
Front fog light (if so
equipped)* 55 H11
Rear combination light Turn signal 21 WY21W
Stop/tail* LED —
Back-up 16 W16W
Front sidemarker 5 W5W
License plate light* 5 W5W
Map light* LED —
High-mounted stop
light* LED —
Ceiling light 8 —
Cargo compartment
light 5—*Contact a NISSAN certified LEAF dealer for
replacement.
NOTE: Always check with the Parts Department
at a NISSAN certified LEAF dealer for the latest
information about parts.
Replacement procedures
All other lights are either type A, B, C, D or E.
When replacing a bulb, first remove the lens
and/or cover.
: REMOVE
: INSTALL
Maintenance and do-it yourself8-23
Page 363 of 412
Front turn signal light
Parking light
License plate light
8-24Maintenance and do-it yourself
Page 364 of 412
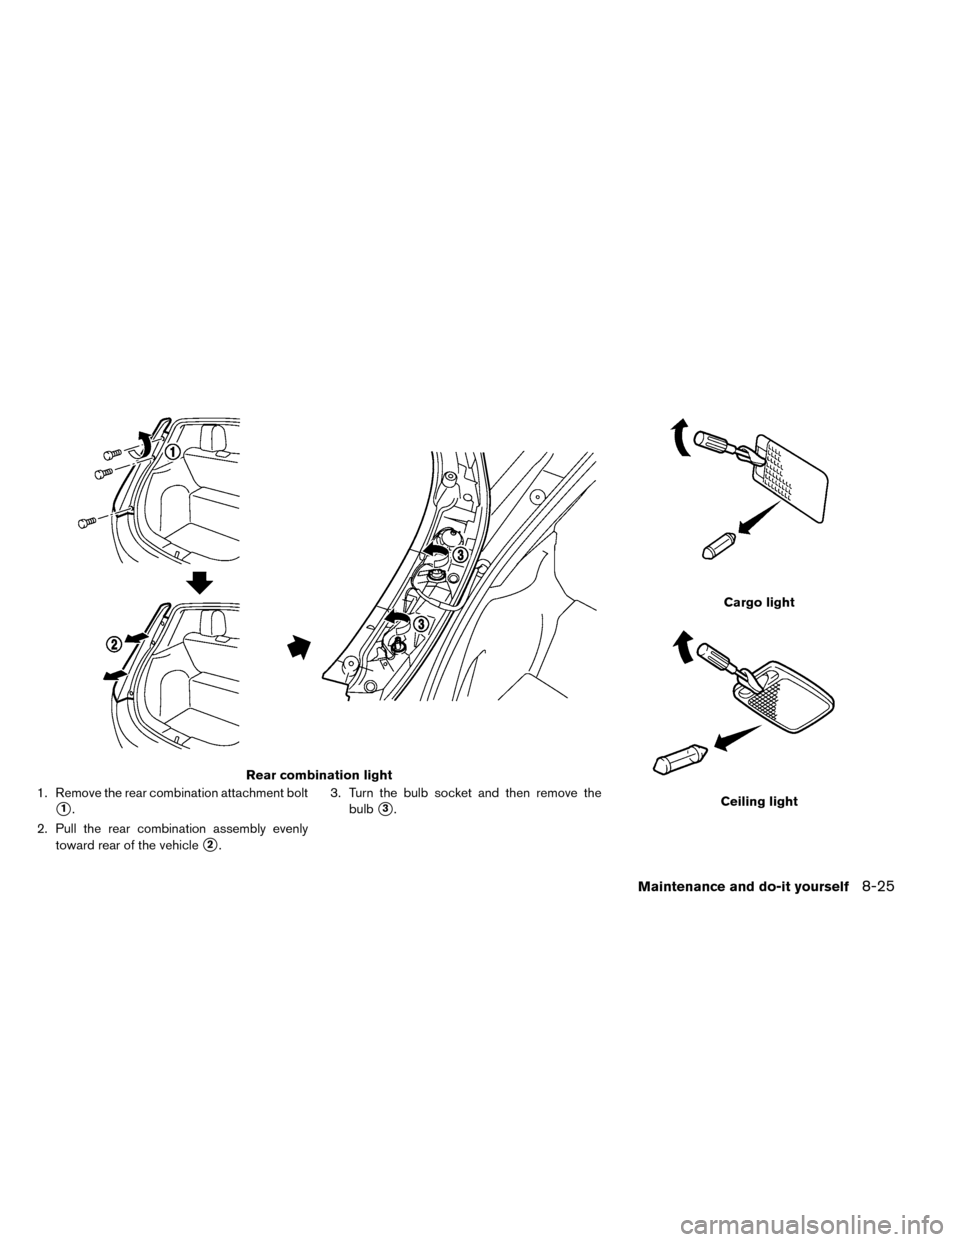
1. Remove the rear combination attachment bolt
�1.
2. Pull the rear combination assembly evenly toward rear of the vehicle
�2. 3. Turn the bulb socket and then remove the
bulb
�3.
Rear combination light
Cargo light
Ceiling light
Maintenance and do-it yourself8-25
Page 365 of 412

This vehicle is equipped with the Tire Pressure
Monitoring")
If you have a flat tire, see “Flat tire” in the
“In case of emergency” section.
TIRE PRESSURE
Tire Pressure Monitoring System
(TPMS)
This vehicle is equipped with the Tire Pressure
Monitoring System (TPMS) . It monitors tire pres-
sure of all tires. When the low tire pressure warn-
ing light is lit, and the CHECK TIRE PRESSURE
warning appears on the vehicle information dis-
play, one or more of your tires is significantly
under-inflated.
The TPMS will activate only when the vehicle is
driven at speeds above 16 MPH (25 km/h) . Also,
this system may not detect a sudden drop in tire
pressure (for example a flat tire while driving) .
For more details, see “Low tire pressure warning
light” in the “Instruments and controls” section,
“Tire Pressure Monitoring System (TPMS)” in the
“Starting and driving” section and “Tire Pressure
Monitoring System (TPMS)” in the “In case of
emergency” section.
Tire inflation pressure
Check the pressure of the tires often and
always prior to long distance trips. Therecommended tire pressure specifica-
tions are shown on the Tire and Loading
Information label under the “Cold Tire
Pressure” heading. The Tire and Loading
Information label is affixed to the driver
side center pillar. Tire pressures should
be checked regularly because:
• Most tires naturally lose air over time.
• Tires can lose air suddenly when driven
over potholes or other objects or if the
vehicle strikes a curb while parking.
The tire pressures should be checked
when the tires are cold. The tires are
considered COLD after the vehicle has
been parked for 3 or more hours, or driven
less than 1 mile (1.6 km) at moderate
speeds.
The TPMS with Easy Fill Tire Alert also provides
visual and audible signals outside the vehicle for
inflating the tires to the recommended COLD tire
pressure. (See “TPMS with Easy Fill Tire Alert” in
the “Starting and driving” section.)
Incorrect tire pressure, including un-
der inflation, may adversely affect
tire life and vehicle handling.
WARNING
•
Improperly inflated tires can fail
suddenly and cause an accident.
•The Gross Vehicle Weight rating
(GVWR) is located on the F.M-
.V.S.S. certification label. The ve-
hicle weight capacity is indicated
on the Tire and Loading Informa-
tion label. Do not load your ve-
hicle beyond this capacity. Over-
loading your vehicle may result
in reduced tire life, unsafe oper-
ating conditions due to prema-
ture tire failure, or unfavorable
handling characteristics and
could also lead to a serious acci-
dent. Loading beyond the speci-
fied capacity may also result in
failure of other vehicle
components.
WHEELS AND TIRES
8-26Maintenance and do-it yourself

3. Front turn signal light
4. Map light
5. Ceiling light
6. Front fog light (if so equipped)
7. Headlight (high-beam)
8. High-mounted stop light
9. Rear")
 Bulb No.
Headlight low beams
(Type A)* LED —
Headlight high beams
(Halogen) (Type A) 65 H9
Headlight (Type B) 60/55 H13
Turn/Park light 27/7 3457NAK
Fron")