Page 357 of 412
PASSENGER COMPARTMENT
CAUTION
Never use a fuse of a higher or lower
amperage rating than that specified on
the fuse box cover. This could damage
the electrical system or cause a fire.
If any electrical equipment does not operate,
check for an open fuse.
1. Make sure that the power switch and the headlight switch are turned off. 2. Insert a screwdriver wrapped with the cloth
�Cinto the slit�1.
Use a cloth
�Cto protect the fuse box cover.
3. Then pull to remove the fuse box cover
�2.
4. Remove the fuse with the fuse puller
�3. 5. If the fuse is open
�A, replace it with a new
fuse
�B.
6. If a new fuse also opens, have the electrical system checked, and if necessary repaired,
by a NISSAN certified LEAF dealer.
8-18Maintenance and do-it yourself
Page 360 of 412
1. Front parking light
2. Headlight (low-beam)
3. Front turn signal light
4. Map light
5. Ceiling light
6. Front fog light (if so equipped)
7. Headlight (high-beam)
8. High-mounted stop light
9. Rear combination light (stop/tail/turn signal/back-up light/rear side marker)
10. License plate light
11. Cargo light
Fog may temporarily form inside the lens of the
exterior lights in the rain or in a car wash. A
temperature difference between the inside and
the outside of the lens causes the fog. This is not
a malfunction. If large drops of water collect
inside the lens, contact a NISSAN certified LEAF
dealer.
LIGHTS
Maintenance and do-it yourself8-21
Page 361 of 412
:
The headlight high-beam is a semi-sealed beam
type that uses a replaceable headlight (halogen)
bulb.
CAUTION
• Do not leave the bulb out of the he")
HEADLIGHTS
Replacing
Halogen headlight (high-beam):
The headlight high-beam is a semi-sealed beam
type that uses a replaceable headlight (halogen)
bulb.
CAUTION
• Do not leave the bulb out of the head- light reflector for a long period of time.
Dust, moisture, smoke, etc. entering
the headlight body may affect bulb
performance.
• High-pressure halogen gas is sealed inside the halogen bulb. The bulb may
break if the glass envelope is
scratched or the bulb is dropped.
• Only touch the base when handling the bulb. Never touch the glass envelope.
Touching the glass envelope could sig-
nificantly affect bulb life and/or head-
light performance.
• Aiming is not necessary after replacing the bulb. When aiming adjustment is
necessary, contact a NISSAN certified
LEAF dealer.
Use the same number and wattage as originally
installed as shown in the chart. Disconnect the battery negative cable before
replacing bulbs.
1. Remove the connector
�1.
2. Turn the headlight bulb, and then remove the bulb
�2. Disconnect the battery negative cable before
replacing bulbs.
1. Remove the connector
�1.
2. Turn the headlight bulb, and then remove the bulb
�2.
Type AType B
8-22Maintenance and do-it yourself
Page 362 of 412
EXTERIOR AND INTERIOR LIGHTS
ItemWattage
(W) Bulb No.
Headlight low beams
(Type A)* LED —
Headlight high beams
(Halogen) (Type A) 65 H9
Headlight (Type B) 60/55 H13
Turn/Park light 27/7 3457NAK
Front fog light (if so
equipped)* 55 H11
Rear combination light Turn signal 21 WY21W
Stop/tail* LED —
Back-up 16 W16W
Front sidemarker 5 W5W
License plate light* 5 W5W
Map light* LED —
High-mounted stop
light* LED —
Ceiling light 8 —
Cargo compartment
light 5—*Contact a NISSAN certified LEAF dealer for
replacement.
NOTE: Always check with the Parts Department
at a NISSAN certified LEAF dealer for the latest
information about parts.
Replacement procedures
All other lights are either type A, B, C, D or E.
When replacing a bulb, first remove the lens
and/or cover.
: REMOVE
: INSTALL
Maintenance and do-it yourself8-23
Page 363 of 412
Front turn signal light
Parking light
License plate light
8-24Maintenance and do-it yourself
Page 364 of 412
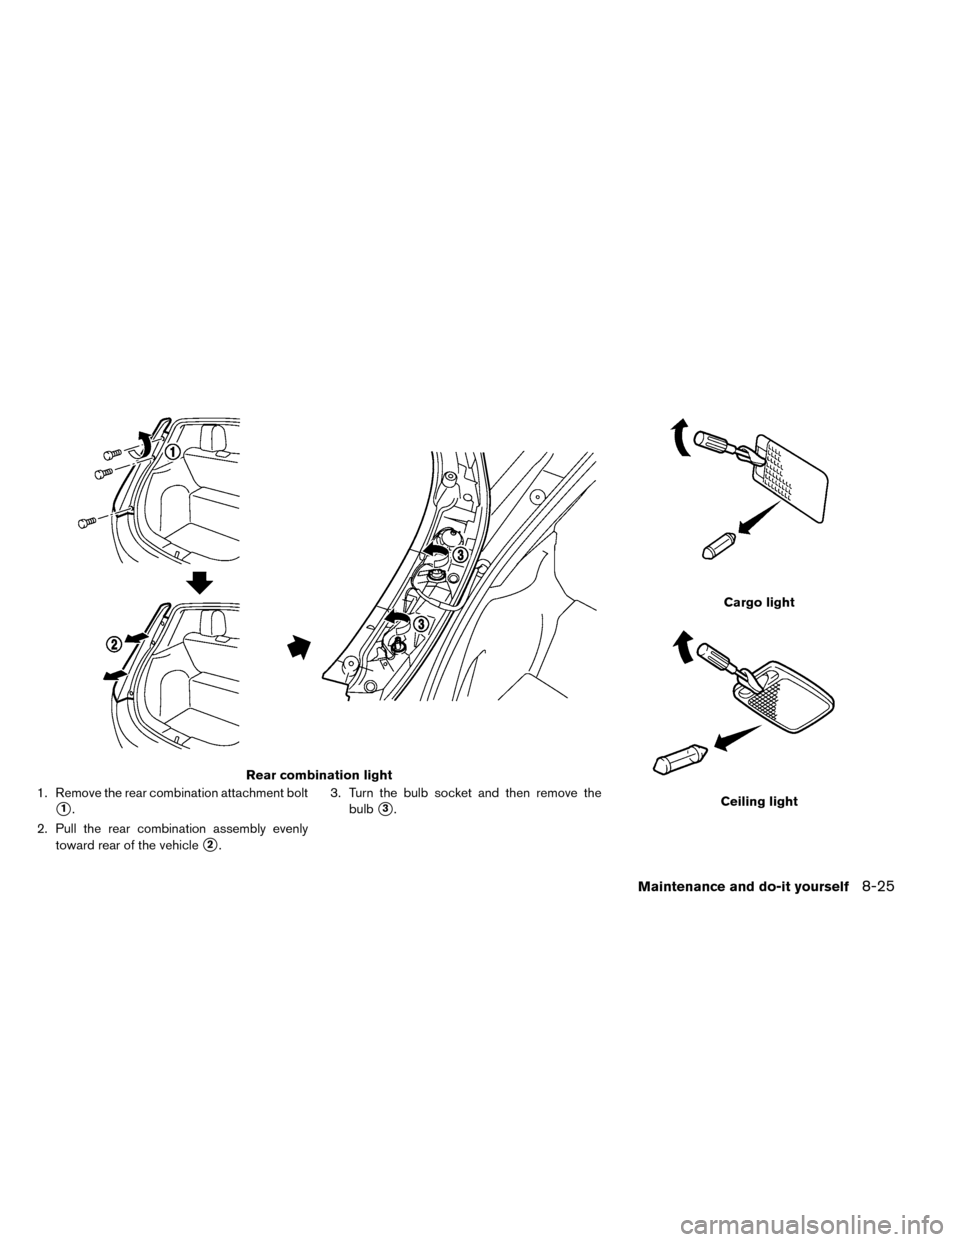
1. Remove the rear combination attachment bolt
�1.
2. Pull the rear combination assembly evenly toward rear of the vehicle
�2. 3. Turn the bulb socket and then remove the
bulb
�3.
Rear combination light
Cargo light
Ceiling light
Maintenance and do-it yourself8-25
Page 365 of 412

This vehicle is equipped with the Tire Pressure
Monitoring")
If you have a flat tire, see “Flat tire” in the
“In case of emergency” section.
TIRE PRESSURE
Tire Pressure Monitoring System
(TPMS)
This vehicle is equipped with the Tire Pressure
Monitoring System (TPMS) . It monitors tire pres-
sure of all tires. When the low tire pressure warn-
ing light is lit, and the CHECK TIRE PRESSURE
warning appears on the vehicle information dis-
play, one or more of your tires is significantly
under-inflated.
The TPMS will activate only when the vehicle is
driven at speeds above 16 MPH (25 km/h) . Also,
this system may not detect a sudden drop in tire
pressure (for example a flat tire while driving) .
For more details, see “Low tire pressure warning
light” in the “Instruments and controls” section,
“Tire Pressure Monitoring System (TPMS)” in the
“Starting and driving” section and “Tire Pressure
Monitoring System (TPMS)” in the “In case of
emergency” section.
Tire inflation pressure
Check the pressure of the tires often and
always prior to long distance trips. Therecommended tire pressure specifica-
tions are shown on the Tire and Loading
Information label under the “Cold Tire
Pressure” heading. The Tire and Loading
Information label is affixed to the driver
side center pillar. Tire pressures should
be checked regularly because:
• Most tires naturally lose air over time.
• Tires can lose air suddenly when driven
over potholes or other objects or if the
vehicle strikes a curb while parking.
The tire pressures should be checked
when the tires are cold. The tires are
considered COLD after the vehicle has
been parked for 3 or more hours, or driven
less than 1 mile (1.6 km) at moderate
speeds.
The TPMS with Easy Fill Tire Alert also provides
visual and audible signals outside the vehicle for
inflating the tires to the recommended COLD tire
pressure. (See “TPMS with Easy Fill Tire Alert” in
the “Starting and driving” section.)
Incorrect tire pressure, including un-
der inflation, may adversely affect
tire life and vehicle handling.
WARNING
•
Improperly inflated tires can fail
suddenly and cause an accident.
•The Gross Vehicle Weight rating
(GVWR) is located on the F.M-
.V.S.S. certification label. The ve-
hicle weight capacity is indicated
on the Tire and Loading Informa-
tion label. Do not load your ve-
hicle beyond this capacity. Over-
loading your vehicle may result
in reduced tire life, unsafe oper-
ating conditions due to prema-
ture tire failure, or unfavorable
handling characteristics and
could also lead to a serious acci-
dent. Loading beyond the speci-
fied capacity may also result in
failure of other vehicle
components.
WHEELS AND TIRES
8-26Maintenance and do-it yourself
Page 373 of 412

Replacing wheels and tires
When replacing a tire, use the same size, tread
design, speed rating and load carrying capacity
as originally equipped. See “Specifications” in
the “Technical and consumer information” sec-
tion for recommended types and sizes of tires
and wheels.
WARNING
• The use of tires other than those rec- ommended or the mixed use of tires of
different brands, construction (bias,
bias-belted or radial) , or tread patterns
can adversely affect the ride, braking,
handling, ground clearance, body-to-
tire clearance, tire chain clearance,
speedometer calibration, headlight
aim and bumper height. Some of these
effects may lead to accidents and
could result in serious personal injury.
• If your vehicle was originally equipped with 4 tires that were the same size
and you are only replacing 2 of the 4
tires, install the new tires on the rear
axle. Placing new tires on the front
axle may cause loss of vehicle control
in some driving conditions and cause
an accident and personal injury. • If the wheels are changed for any rea-
son, always replace with wheels which
have the same off-set dimension.
Wheels of a different off-set could
cause premature tire wear, degrade
vehicle handling characteristics
and/or interference with the brake
discs. Such interference can lead to
decreased braking efficiency and/or
early brake pad/shoe wear. See
“Wheels and tires” in the “Technical
and consumer information” section of
this manual for wheel off-set dimen-
sions.
• When a wheel is replaced, the TPMS will not function and the low tire pres-
sure warning light will flash for ap-
proximately 1 minute. The light will re-
main on after 1 minute. Contact your
NISSAN certified LEAF dealer as soon
as possible for tire replacement
and/or system resetting.
• Replacing tires with those not origi- nally specified by NISSAN could affect
the proper operation of the TPMS.
• Do not install a damaged or deformed wheel or tire even if it has been re-
paired. Such wheels or tires could have
structural damage and could fail with-
out warning. • The use of retread tire is not recom-
mended.
• For additional information regarding tires, refer to “Important Tire Safety
Information” (US) or “Tire Safety Infor-
mation” (Canada) in the Warranty In-
formation Booklet.Wheel balance
Unbalanced wheels may affect vehicle handling
and tire life. Even with regular use, wheels can get
out of balance. Therefore, they should be bal-
anced as required.
Wheel balance service should be per-
formed with the wheels off the vehicle.
Spin balancing the wheels on the vehicle
could lead to mechanical damage.
For additional information regarding tires, refer to
“Important Tire Safety Information” (US) or “Tire
Safety Information” (Canada) in the Warranty In-
formation Booklet.
Care of wheels
See “Cleaning exterior” in the “Appearance and
care” section for details about care of the wheels.
8-34Maintenance and do-it yourself


3. Front turn signal light
4. Map light
5. Ceiling light
6. Front fog light (if so equipped)
7. Headlight (high-beam)
8. High-mounted stop light
9. Rear")
 Bulb No.
Headlight low beams
(Type A)* LED —
Headlight high beams
(Halogen) (Type A) 65 H9
Headlight (Type B) 60/55 H13
Turn/Park light 27/7 3457NAK
Fron")