Page 215 of 412

Locking doors
�1LOCKbutton
�2UNLOCKbutton
�3CHARGE PORT UNLOCK
�4PANICbutton
When you lock or unlock the doors, the hazard
indicator will flash and the horn will sound as a
confirmation. See “Hazard warning indicator
light” and “Horn” in the “Instruments and con-
trols” section. 1. Push the power switch to the OFF position
and make sure you carry the Intelligent Key
with you.*1
2. Carry the Intelligent Key with you.
3. Close all the doors.
4. Push the LOCK
button�1on the
Intelligent Key.
5. All the doors and the rear hatch will lock.
6. The hazard indicator flashes twice and the horn chirps once.
*1: Doors will not lock with the Intelligent Key
while the power switch is in the ACC or ON
position.
Operate the door handles to confirm that the
doors have been securely locked.
Unlocking doors
1. Push the UNLOCKbutton�2on the
Intelligent Key once.
2. The hazard indicator flashes once. The driv- er’s door will unlock.
3. Push the UNLOCK
button on the Intel-
ligent Key again within 1 minute.
4. The hazard indicator flashes once again. All the doors and the rear hatch will unlock. All doors will be locked automatically unless one
of the following operations is performed within 1
minute after pushing the UNLOCK
button
while the doors are locked.
• Opening any door (including the rear hatch) .
• Pushing the power switch.
During this 1-minute time period, if the UNLOCK
button on the Intelligent Key is pushed, all
doors will be locked automatically after another 1
minute.
Opening charge port lid
The charge port lid may be opened by pressing
and holding the charge port unlock
button
�3.
For additional information see �Opening charge
port lid� in this section.
Using panic alarm
If you are near your vehicle and feel threatened,
you may activate the alarm to call attention as
follows:
1. Push the PANIC
button�4on the
Intelligent Key for more than 1 second.
2. The theft warning alarm and headlights will stay on for a period of time.
3-14Pre-driving checks and adjustments
Page 218 of 412

WARNING
• Make sure that the hood is completely closed and latched before driving. Fail-
ure to do so could cause the hood to
open during driving and result in an
accident.
• If steam or smoke is emitting from the motor compartment, do not open the
hood. Doing so could cause an injury. When opening the hood:
1. Securely close the charge port door.
2. Pull the hood release handle
�1located be-
low the instrument panel. The hood will then
spring up slightly.
3. Locate the lever
�2in between the hood and
charge port lid, and push the lever upward
with your fingertips.
4. Raise the hood
�3.
5. Remove the support rod
�4from the hood
and insert it into the slot
�5. Hold the coated part
�Awhen removing or
resetting the support rod. Avoid direct con-
tact with the metal parts because they may
be hot immediately after the EV (Electric
Vehicle) system has been stopped.
When closing the hood:
1. Return the support rod to its original position.
2. Slowly move the hood down to latch the lock.
3. Push the hood down to lock the hood se- curely into place.
HOOD
Pre-driving checks and adjustments3-17
Page 219 of 412
WARNING
• Always make sure that the rear hatch has been closed securely to prevent it
from opening while driving.
• Do not drive with the rear hatch open.
• Make sure that all passengers have their hands, etc. inside the vehicle be-
fore closing the rear hatch.
To open the rear hatch, unlock it and push the
rear hatch opener switch
�A. Pull up the rear
hatch to open. The rear hatch can be unlocked by:
• Pushing the rear hatch request switch (See
“NISSAN Intelligent Key® system” in this
section) .
• Pushing the UNLOCK
button on the
Intelligent Key (See “NISSAN Intelligent Key®
system” in this section) .
• Pushing the UNLOCK
button on the
remote controller (See “NISSAN Intelligent
Key® system” in this section) .
• Pushing the power door lock switch to the “UNLOCK” position.
REAR HATCH
3-18Pre-driving checks and adjustments
Page 222 of 412
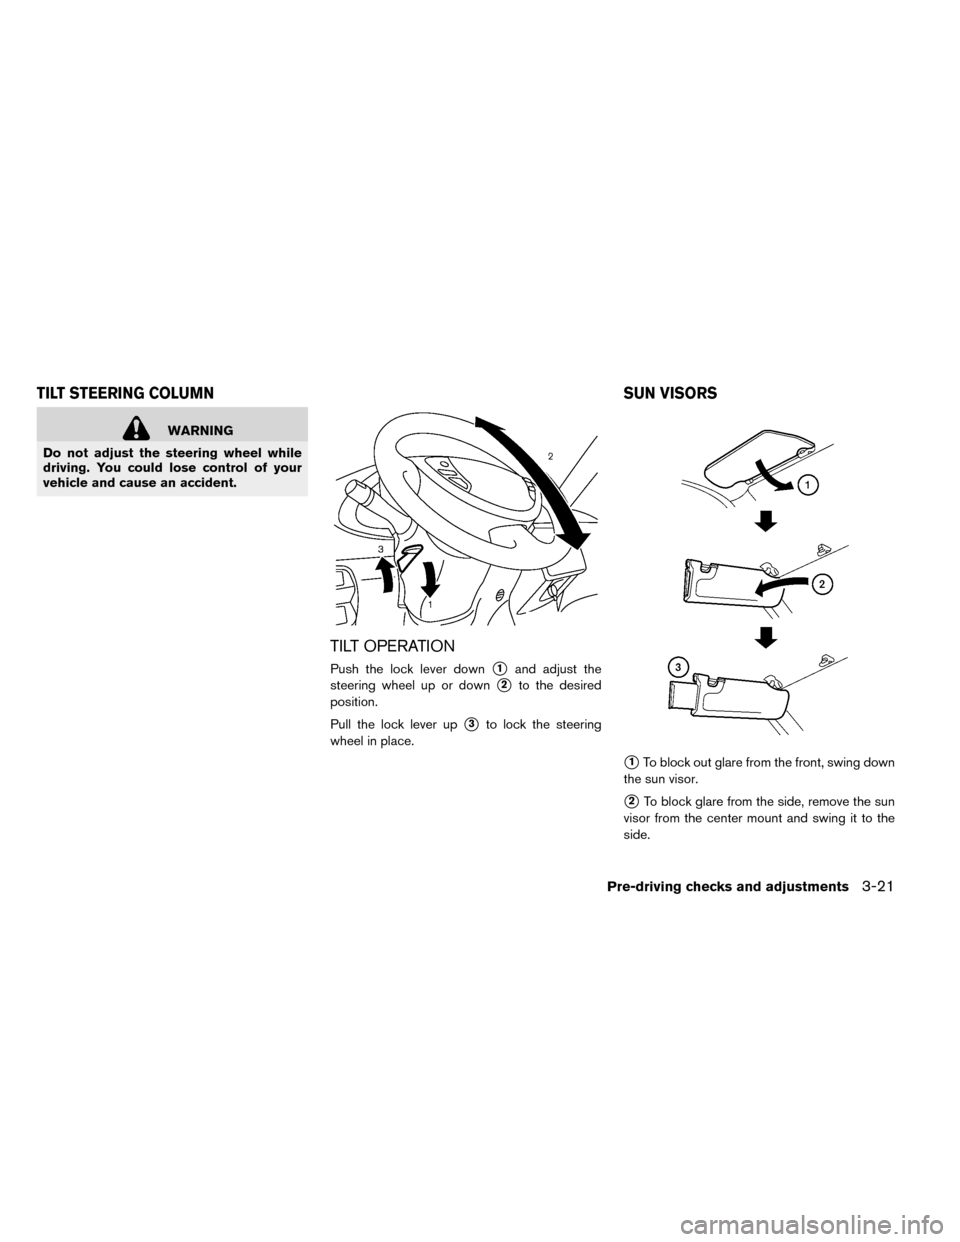
WARNING
Do not adjust the steering wheel while
driving. You could lose control of your
vehicle and cause an accident.
TILT OPERATION
Push the lock lever down�1and adjust the
steering wheel up or down
�2to the desired
position.
Pull the lock lever up
�3to lock the steering
wheel in place.
�1To block out glare from the front, swing down
the sun visor.
�2To block glare from the side, remove the sun
visor from the center mount and swing it to the
side.
TILT STEERING COLUMN SUN VISORS
Pre-driving checks and adjustments3-21
Page 225 of 412

light will turn off. Push the “I” switch�Dto turn the
system on.
Do not allow any object to cover the sen-
sors
�Eor apply glass cleaner on them.
Doing so will reduce the sensitivity of the
sensor, resulting in improper operation.
WARNING
Use the night position only when neces-
sary, because it reduces rear view clarity.
OUTSIDE MIRRORS
Adjusting outside mirrors
WARNING
Objects viewed in the outside mirror on
the passenger side are closer than they
appear. Be careful when moving to the
right. Using only this mirror could cause
an accident. Use the inside mirror or
glance over your shoulder to properly
judge distances to other objects. The outside mirror control switch is located on
the armrest.
The outside mirror will operate only when the
power switch is in the ACC or ON position.
Turn the switch right or left to select the right or
left side mirror
�1, then adjust the mirror using
the control switch
�2.
Defrosting outside mirrors
The outside mirrors will be heated when the rear
window defroster switch is operated. See “Rear
window and outside mirror defroster switch” in
the “Instruments and controls” section.
3-24Pre-driving checks and adjustments
Page 229 of 412
 position, the monitor display shows a rear-
ward view from the vehicle.
WARNING
Failure to follow the warnings and in-
structions for proper use")
When the shift lever is shifted into the R (Re-
verse) position, the monitor display shows a rear-
ward view from the vehicle.
WARNING
Failure to follow the warnings and in-
structions for proper use of the Rear View
Monitor could result in serious injury or
death.
• The RearView Monitor is a conve- nience but it is not a substitute for
proper backing. Always turn and look
out the windows, and check mirrors to
be sure that it is safe to move before
operating the vehicle. Always back up
slowly.
• The system is designed as an aid to the driver in showing large stationary ob-
jects directly behind the vehicle, to
help avoid damaging the vehicle.
• The system will not detect small ob- jects below the bumper, and may not
detect objects close to the bumper or
on the ground.
• The system cannot completely elimi- nate blind spots and may not show
every object. • Underneath the bumper and the corner
areas of the bumper cannot be viewed
on the RearView Monitor because of
its monitoring range limitation. The
system will not show objects below
the bumper, and may not show objects
close to the bumper or on the ground.
• Objects viewed in the RearView Moni- tor differ from actual distance because
a wide-angle lens is used.
• Objects in the RearView Monitor will appear visually opposite than when
viewed in the rear view and outside
mirrors.
• Make sure that the hatch is securely closed when backing up.
• Do not put anything on the rearview camera. The rearview camera is in-
stalled on top of the hatch.
• When washing the vehicle with high pressure water, be sure not to spray it
around the camera. Otherwise, water
may enter the camera unit causing wa-
ter condensation on the lens, a mal-
function, fire or an electric shock.
• Do not strike the camera. It is a preci- sion instrument. Otherwise, it may
malfunction or cause damage result-
ing in a fire or an electric shock.
CAUTION
There is a plastic cover over the camera.
Do not scratch the cover when cleaning
dirt or snow from the cover.
REARVIEW MONITOR
4-2Display screen, heater, air conditioner, audio and phone systems
Page 236 of 412

WARNING
• The air conditioning cooling function operates only when the power switch
is in the ON position or when the
READY to drive indicator light is ON.
• Do not leave children or adults who would normally require the support of
others alone in your vehicle. Pets
should not be left alone either. On hot,
sunny days, temperatures in a closed
vehicle could quickly become high
enough to cause severe or possibly
fatal injuries to people or animals.
• Do not use the recirculation mode for long periods as it may cause the inte-
rior air to become stale and the win-
dows to fog up.
Note
•Odors from inside and outside the vehicle
can build up in the air conditioner unit.
Odor can enter the passenger compart-
ment through the vents.
• When parking, set the heater and air con-
ditioner controls to turn off air recircula-
tion to allow fresh air into the passenger
compartment. This should help reduce
odors inside the vehicle.
The climate control system (air conditioner and
heater functions) can be operated when the
READY to drive indicator light is illuminated.
However, while charging, the climate control sys-
tem can be used when the power switch is in the
ON position.
The fan, heater and air conditioning can be turned
on manually, using the timer function and using
the remote climate control function.
Passenger side
CLIMATE CONTROL SYSTEM
Display screen, heater, air conditioner, audio and phone systems4-9
Page 242 of 412
therefore not necessary to set the Climate Ctrl.
Timer everyday.
WARNING
Even if the Climate Ctrl. Timer is set, the
temperature in the passenger compart-
ment may become high or low if the sys-
tem automatically stops. Do not leave
children or adults who would normally
require the support of others alone in
your vehicle. Pets should not be left
alone either. On hot, sunny days, tem-
peratures in a closed vehicle could
quickly become high enough to cause
severe or possibly fatal injuries to people
or animals. Also on cold days, tempera-
ture in a vehicle could become low
enough to cause severe or possible fatal
injuries to people or animals. 1. Push the
switch�Aon the left side of
the combination meter panel.
2. Push the
switch�Buntil “Climate Ctrl.
Timer” is highlighted on the vehicle informa-
tion display and then push the
switch.
Display screen, heater, air conditioner, audio and phone systems4-15