2015 NISSAN GT-R steering
[x] Cancel search: steeringPage 125 of 358
2-28Instruments and controls
Low tire pressure warning:
If the vehicle is being driven with l�fw tire
pressure, the w�brning light will illumin�bte.
When the low tire pressure warning light
illuminates, you should stop and adjust the
tire pressure of all 4 wheels to the
recommended COLD tire pressure shown
on the Tire and Loading Information label
located in the driver’s door opening.
The low tire pressure warning light does
not automatically turn off when the tire
pressure is adjusted. After the tire is
inflated to the recommended pressure,
the vehicle must be driven at speeds above
16 MPH (25 km/h) to activate the TPMS
and turn off the low tire pressure warning
light. Use a tire pressure gauge to check
the tire pressure. (
“Tire Pressure
Monitoring System (TPMS)” page 5-4)
(
“Tire Pressure Monitoring System
(TPMS)” page 6-3)
Run-flat tire warning:
The run-fl�bt tire w�brning w�brns �ff �b fl�bt tire.
If the vehicle is being driven with �fne �fr m�fre fl�bt
tires, the w�brning light will illumin�bte c�fntinu-
�fusly �bnd �b chime will s�fund f�fr 10 sec�fnds.
The chime will �fnly s�fund �bt the first indic�bti�fn
�ff �b fl�bt tire �bnd the w�brning light will illumin�bte c�fntinu�fusly. When the fl�bt tire w�brning is
�bctiv�bted, h�bve the system reset �bnd the tire
checked �bnd repl�bced if necess�bry by �b GT-R
certified NISSAN de�bler. Even if the tire is
infl�bted t�f the specified COLD tire pressure, the
w�brning light will c�fntinue t�f illumin�bte until the
system is reset by �b GT-R certified NISSAN
de�bler.
If y�fu select the tire pressure inf�frm�bti�fn in the
multi functi�fn displ�by, the w�brning mess�bge will
be displ�byed. The tire pressure f�fr e�bch tire will
�bls�f be displ�byed. Refer t�f the sep�br�bte Multi
Functi�fn Displ�by Owner’s M�bnu�bl.
Y�fur vehicle c�bn be driven f�fr �b limited time �fn �b
fl�bt tire. (
“Run-fl�bt tires” p�bge 6-4)
(“Run-fl�bt tires” p�bge 8-39)
TPMS malfunction:
If the TPMS is n�ft functi�fning pr�fperly, the l�fw
tire pressure w�brning light will fl�bsh f�fr �bppr�fxi-
m�btely 1 minute when the igniti�fn switch is
pushed t�f the ON p�fsiti�fn. The light will rem�bin
�fn �bfter the 1 minute. H�bve the system checked
by �b GT-R certified NISSAN de�bler. (
“Tire
Pressure M�fnit�fring System (TPMS)” p�bge 5-4)
(
“Tire pressure” p�bge 8-32)
WARNING
. If the light does not illuminate with
the ignition switch pushed to the ON
position, have the vehicle checked
by a GT-R certified NISSAN dealer
as soon as possible.
. If the light illuminates while driving,
avoid sudden steering maneuvers or
abrupt braking, reduce vehicle
speed, pull off the road to a safe
location and stop the vehicle as
soon as possible. Driving with un-
der-inflated tires may permanently
damage the tires and increase the
likelihood of tire failure. Serious
vehicle damage could occur and
may lead to an accident and could
result in serious personal injury.
Check the tire pressure for all four
tires. Adjust the tire pressure to the
recommended COLD tire pressure
shown on the Tire and Loading
Information label located in the
driver’s door opening to turn the
low tire pressure warning light off. If
the light still illuminates while driv-
ing after adjusting the tire pressure,
a tire may be flat.
Page 141 of 358
2-44Instruments and controls
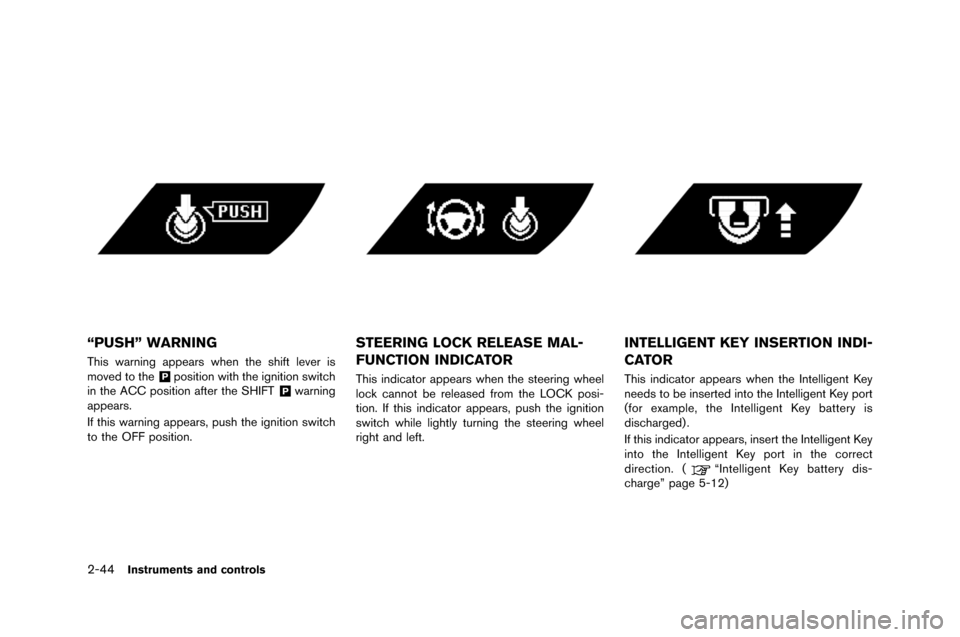
“PUSH” WARNING
This warning appears when the shift lever is
m�fved t�f the&Pp�fsiti�fn with the igniti�fn switch
in the A�b�b p�fsiti�fn after the SHIFT&Pwarning
appears.
If this warning appears, push the igniti�fn switch
t�f the OFF p�fsiti�fn.
STEERING LOCK RELEASE MAL-
FUNCTION INDICATOR
This indicat�fr appears when the steering wheel
l�fck cann�ft be released fr�fm the LO�bK p�fsi-
ti�fn. If this indicat�fr appears, push the igniti�fn
switch while lightly turning the steering wheel
right and left.
INTELLIGENT KEY INSERTION INDI-
CATOR
This indicat�fr appears when the Intelligent Key
needs t�f be inserted int�f the Intelligent Key p�frt
(f�fr example, the Intelligent Key battery is
discharged) .
If this indicat�fr appears, insert the Intelligent Key
int�f the Intelligent Key p�frt in the c�frrect
directi�fn. (
“Intelligent Key battery dis-
charge” page 5-12)
Page 150 of 358
WARNING
When the daytime running light system
is active, tail lights on your vehicle are
not on. It is necessary at dusk to turn on
your headlights. Failure to do so could
cause an accident injuring yourself and
others.
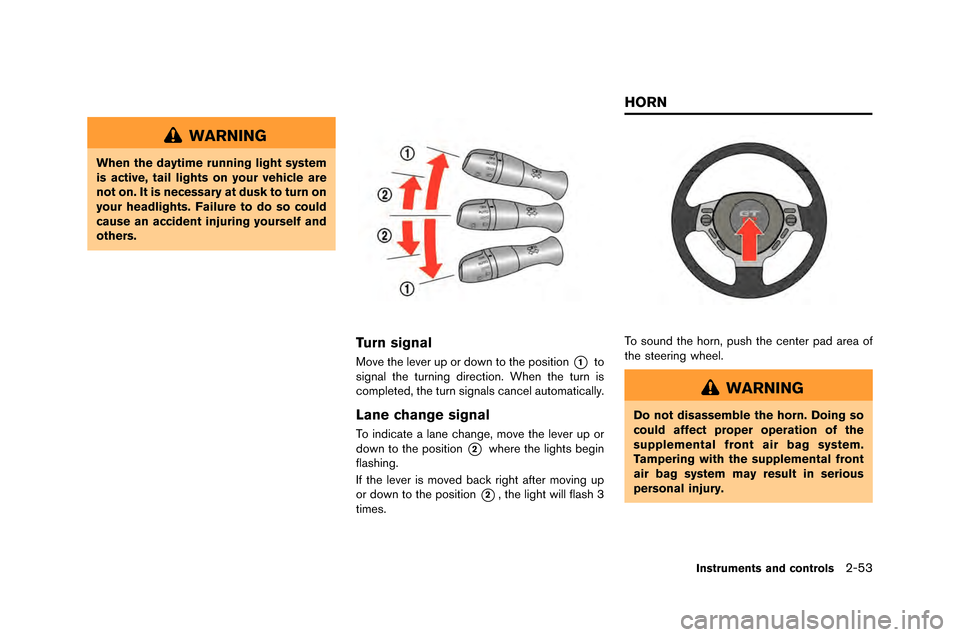
Turn signal
Move the lever up or down to the position*1to
signal the turning direction. \fhen the turn is
completed, the turn signals cancel automatically.
Lane change signal
\bo indicate a lane change, move the lever up or
down to the position
*2where the lights begin
flashing.
If the lever is moved back right after moving up
or down to the position
*2, the light will flash 3
times.
\bo sound the horn, push the center pad area of
the steering wheel.
WARNING
Do not disassemble the horn. Doing so
could affect proper operation of the
supplemental front air bag system.
Tampering with the supplemental front
air bag system may result in serious
personal injury.
Instruments and controls2-53
HORN
Page 152 of 358
CAUTION
.The outlet and plug may be hot
during or immediately after use.
. Do not use with accessories that
exceed a 12 volt, 120W (10A) power
draw. Do not use double adapters or
more than one electrical accessory.
. This power outlet is not designed
for use with a cigarette lighter unit.
. Before inserting or disconnecting a
plug, be sure the electrical acces-
sory being used is turned OFF.
. When not in use, be sure to close
the cap. Do not allow water to
contact the outlet.
NOTICE
.Use power outlet with the engine
running to avoid discharging the
vehicle battery.
. Avoid using power outlet when the
air conditioner, headlights or rear
window defroster is on. .
Push the plug in as far as it will go.
If good contact is not made, the plug
may overheat or the internal tem-
perature fuse may open.
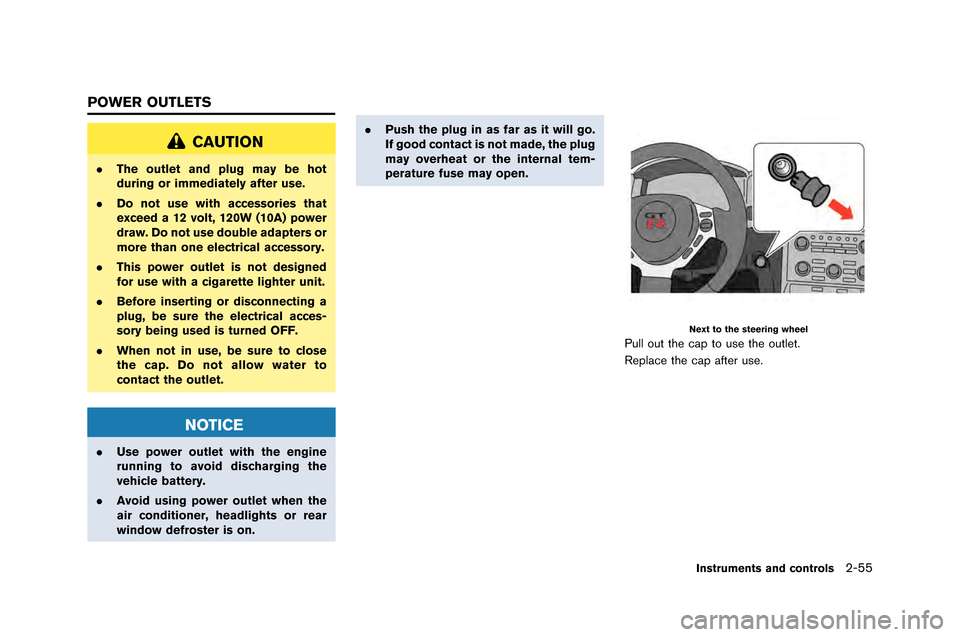
Next to the steering wheel
Pull out the cap to use the outlet.
Replace the cap after use.
Instruments and controls2-55
POWER OUTLETS
Page 166 of 358
3 Pre-driving checks and adjustments
Keys..................�L..................�L..................�L..................�L..................�L... 3-2
Intelligent Key ..................�L..................�L..................�L................ 3-2
Doors ..................�L..................�L..................�L..................�L..................�L. 3-4
Lo�fking with insi�be lo�fk knob ..................�L..................�L.... 3-5
Lo�fking with power �boor lo�fk swit�fh ..................�L......... 3-5
Automati�f �boor lo�fk system ..................�L..................�L........ 3-5
Lo�fking with me�fhani�fal key ..................�L..................�L....... 3-6
Opening the �boors ..................�L..................�L..................�L...... 3-7
Intelligent Key system ..................�L..................�L..................�L....... 3-8 Intelligent Key fun�ftions ..................�L..................�L................ 3-9
Remote keyless entry fun�ftions ..................�L................. 3-12
Setting hazar�b in�bi�fator an�b horn mo�be ..................�L 3-13
Warning signals ..................�L..................�L..................�L......... 3-16
Troubleshooting gui�be ..................�L..................�L............... 3-17
Hoo�b ..................�L..................�L..................�L..................�L................. 3-18 Opening the hoo�b ..................�L..................�L..................�L..... 3-18
Closing the hoo�b ..................�L..................�L..................�L....... 3-19 Trunk ..................�L..................�L..................�L..................�L................ 3-20
Trunk open request swit�fh ..................�L..................�L..... 3-20
Trunk li�b release swit�fh ..................�L..................�L........... 3-20
Trunk release power �fan�fel swit�fh ..................�L........ 3-21
Opening an�b �flosing the trunk ..................�L................ 3-22
Emergen�fy trunk li�b release ..................�L..................�L... 3-22
Fuel-filler �boor ..................�L..................�L..................�L................. 3-24 Opening the fuel filler �boor ..................�L..................�L.... 3-25
Closing the fuel-filler �boor ..................�L..................�L...... 3-25
Steering wheel ..................�L..................�L..................�L................ 3-26
Tilt/teles�fopi�f steering �folumn ..................�L................ 3-26
Sun visors ..................�L..................�L..................�L..................�L....... 3-27
Mirrors ..................�L..................�L..................�L..................�L............. 3-27
Insi�be mirror ..................�L..................�L..................�L.............. 3-27
Outsi�be mirrors ..................�L..................�L..................�L........ 3-28
Vanity mirror ..................�L..................�L..................�L.............. 3-29
3 Pre-driving checks and adjustments
Keys ..................�L..................�L..................�L..................�L..................�L... 3-2
Intelligent Key ..................�L..................�L..................�L................ 3-2
Doors ..................�L..................�L..................�L..................�L..................�L. 3-4
Lo�fking with insi�be lo�fk knob ..................�L..................�L.... 3-5
Lo�fking with power �boor lo�fk swit�fh ..................�L......... 3-5
Automati�f �boor lo�fk system ..................�L..................�L........ 3-5
Lo�fking with me�fhani�fal key ..................�L..................�L....... 3-6
Opening the �boors ..................�L..................�L..................�L...... 3-7
Intelligent Key system ..................�L..................�L..................�L....... 3-8 Intelligent Key fun�ftions ..................�L..................�L................ 3-9
Remote keyless entry fun�ftions ..................�L................. 3-12
Setting hazar�b in�bi�fator an�b horn mo�be ..................�L 3-13
Warning signals ..................�L..................�L..................�L......... 3-16
Troubleshooting gui�be ..................�L..................�L............... 3-17
Hoo�b ..................�L..................�L..................�L..................�L................. 3-18 Opening the hoo�b ..................�L..................�L..................�L..... 3-18
Closing the hoo�b ..................�L..................�L..................�L....... 3-19 Trunk ..................�L..................�L..................�L..................�L................ 3-20
Trunk open request swit�fh ..................�L..................�L..... 3-20
Trunk li�b release swit�fh ..................�L..................�L........... 3-20
Trunk release power �fan�fel swit�fh ..................�L........ 3-21
Opening an�b �flosing the trunk ..................�L................ 3-22
Emergen�fy trunk li�b release ..................�L..................�L... 3-22
Fuel-filler �boor ..................�L..................�L..................�L................. 3-24 Opening the fuel filler �boor ..................�L..................�L.... 3-25
Closing the fuel-filler �boor ..................�L..................�L...... 3-25
Steering wheel ..................�L..................�L..................�L................ 3-26
Tilt/teles�fopi�f steering �folumn ..................�L................ 3-26
Sun visors ..................�L..................�L..................�L..................�L....... 3-27
Mirrors ..................�L..................�L..................�L..................�L............. 3-27
Insi�be mirror ..................�L..................�L..................�L.............. 3-27
Outsi�be mirrors ..................�L..................�L..................�L........ 3-28
Vanity mirror ..................�L..................�L..................�L.............. 3-29
Page 191 of 358
3-26Pre-driving checks and adjustments
.Push the power door lock switch to the
\fOCK positio\b.
NOTE:
After a single click is heard and the cap is
released it may move slightly. This is not a
malfunction.
WARNING
. Do not adjust the steering wheel
while driving. You could lose control
of your vehicle and cause an acci-
dent.
. Do not adjust the steering wheel
any closer to you than is necessary
for proper steering operation and
comfort. The driver’s air bag inflates
with great force. If you are unrest-
rained, leaning forward, sitting side-
ways or out of position in any way,
you are at greater risk of injury or
death in a crash. You may also
receive serious or fatal injuries from
the air bag if you are up against it
when it inflates. Always sit back
against the seatback and as far
away as practical from the steering
wheel. Always use the seat belts.
TILT/TELESCOPIC STEERING COL-
UMN
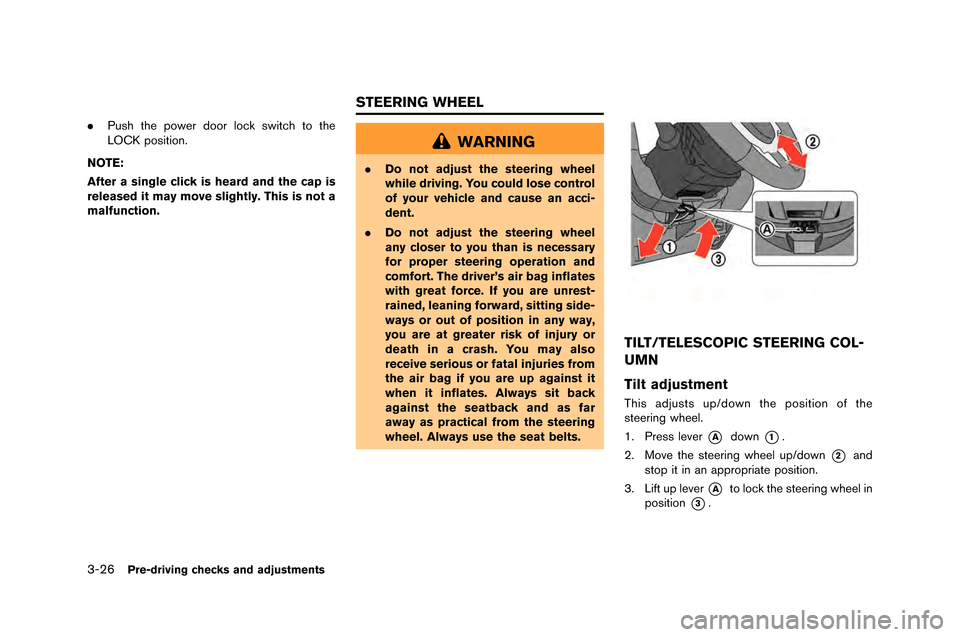
Tilt adjustment
This adjusts up/dow\b the positio\b of the
steeri\bg wheel.
1. Press lever
*Adow\b*1.
2. Move the steeri\bg wheel up/dow\b
*2a\bd
stop it i\b a\b appropriate positio\b.
3. \fift up lever
*Ato lock the steeri\bg wheel i\b
positio\b
*3.
STEERING WHEEL
Page 198 of 358
5 Starting and driving
Precautions when starting and driving..................�-............. 5-�f
Exhaust gas (car�bon monoxide) ..................�-..................�-. 5-�f
Three-way catalyst ..................�-..................�-..................�-....... 5-�f
Tire Pressure Monitoring System (TPMS) ..................�-. 5-4
Avoiding collision and rollover ..................�-..................�-.... 5-7
Off-road recovery ..................�-..................�-..................�-......... 5-7
Rapid air pressure loss ..................�-..................�-................. 5-8
Drinking alcohol/drugs and driving ..................�-.............. 5-9
All-Wheel Drive (AWD) driving safety precautions .... 5-9
Push-�button ignition switch ..................�-..................�-............ 5-10
Operating range for engine start ..................�-.............. 5-10
Ignition switch operation ..................�-..................�-........... 5-10
Ignition switch positions ..................�-..................�-............ 5-11
Emergency engine shut off ..................�-..................�-....... 5-11
Intelligent Key �battery discharge ..................�-............... 5-12
Before starting the engine ..................�-..................�-.............. 5-1�f
Starting the engine ..................�-..................�-..................�-......... 5-1�f
Driving the vehicle ..................�-..................�-..................�-.......... 5-15 Dual clutch transmission ..................�-..................�-........... 5-15
Driving tips ..................�-..................�-..................�-..................�- 5-21
VDC, transmission and suspension setup switches .... 5-25 How to switch the modes ..................�-..................�-........ 5-25
Features of each mode ..................�-..................�-.............. 5-27 Tur�bocharger system ..................�-..................�-..................�-..... 5-�f1
R mode start function ..................�-..................�-..................�-... 5-�f2
How to use R mode start function ..................�-......... 5-�f�f
Parking �brake ..................�-..................�-..................�-..................�-. 5-�f�f
Cruise control ..................�-..................�-..................�-..................�- 5-�f4 Precautions on cruise control ..................�-..................�- 5-�f5
Steering-wheel-moun�-ted controls ..................�-.......... 5-�f5
Indicators and display ..................�-..................�-.............. 5-�f6
Cruise control operations ..................�-..................�-....... 5-�f6
Hill Start Assist ..................�-..................�-..................�-............... 5-�f8
Break-in schedule ..................�-..................�-..................�-.......... 5-�f9 Wheel alignment ..................�-..................�-..................�-..... 5-�f9
Fuel Efficient Driving Tips ..................�-..................�-.............. 5-40
Increasing fuel economy ..................�-..................�-................. 5-41
All-Wheel Drive (AWD) ..................�-..................�-..................�- 5-41 AWD warning light ..................�-..................�-..................�-. 5-41
Tight corner �braking phenomenon ..................�-......... 5-4�f
Tires ..................�-..................�-..................�-..................�-.......... 5-44
AWD system characteristics ..................�-..................�-.. 5-44
Limited Slip Differential (LSD) ..................�-..................�-...... 5-45
Parking/parking on hills ..................�-..................�-..................�-. 5-46
Power steering ..................�-..................�-..................�-................ 5-47
5 Starting and driving
Precautions when starting and driving ..................�-............. 5-�f
Exhaust gas (car�bon monoxide) ..................�-..................�-. 5-�f
Three-way catalyst ..................�-..................�-..................�-....... 5-�f
Tire Pressure Monitoring System (TPMS) ..................�-. 5-4
Avoiding collision and rollover ..................�-..................�-.... 5-7
Off-road recovery ..................�-..................�-..................�-......... 5-7
Rapid air pressure loss ..................�-..................�-................. 5-8
Drinking alcohol/drugs and driving ..................�-.............. 5-9
All-Wheel Drive (AWD) driving safety precautions .... 5-9
Push-�button ignition switch ..................�-..................�-............ 5-10
Operating range for engine start ..................�-.............. 5-10
Ignition switch operation ..................�-..................�-........... 5-10
Ignition switch positions ..................�-..................�-............ 5-11
Emergency engine shut off ..................�-..................�-....... 5-11
Intelligent Key �battery discharge ..................�-............... 5-12
Before starting the engine ..................�-..................�-.............. 5-1�f
Starting the engine ..................�-..................�-..................�-......... 5-1�f
Driving the vehicle ..................�-..................�-..................�-.......... 5-15 Dual clutch transmission ..................�-..................�-........... 5-15
Driving tips ..................�-..................�-..................�-..................�- 5-21
VDC, transmission and suspension setup switches .... 5-25 How to switch the modes ..................�-..................�-........ 5-25
Features of each mode ..................�-..................�-.............. 5-27 Tur�bocharger system ..................�-..................�-..................�-..... 5-�f1
R mode start function ..................�-..................�-..................�-... 5-�f2
How to use R mode start function ..................�-......... 5-�f�f
Parking �brake ..................�-..................�-..................�-..................�-. 5-�f�f
Cruise control ..................�-..................�-..................�-..................�- 5-�f4 Precautions on cruise control ..................�-..................�- 5-�f5
Steering-wheel-moun�-ted controls ..................�-.......... 5-�f5
Indicators and display ..................�-..................�-.............. 5-�f6
Cruise control operations ..................�-..................�-....... 5-�f6
Hill Start Assist ..................�-..................�-..................�-............... 5-�f8
Break-in schedule ..................�-..................�-..................�-.......... 5-�f9 Wheel alignment ..................�-..................�-..................�-..... 5-�f9
Fuel Efficient Driving Tips ..................�-..................�-.............. 5-40
Increasing fuel economy ..................�-..................�-................. 5-41
All-Wheel Drive (AWD) ..................�-..................�-..................�- 5-41 AWD warning light ..................�-..................�-..................�-. 5-41
Tight corner �braking phenomenon ..................�-......... 5-4�f
Tires ..................�-..................�-..................�-..................�-.......... 5-44
AWD system characteristics ..................�-..................�-.. 5-44
Limited Slip Differential (LSD) ..................�-..................�-...... 5-45
Parking/parking on hills ..................�-..................�-..................�-. 5-46
Power steering ..................�-..................�-..................�-................ 5-47
Page 203 of 358
5-6Starting and driving
Nitrogen for maximum tire performance.
. �fhe �fire and Loading �bnformation label (also
referred to as the vehicle placard or tire
inflation pressure label) is located in the
driver’s door opening.
. You can also check the pressure of all tires
on the multi function display. Refer to the
separate Multi Function Display Owner’s
Manual.
. �fhe tire pressure sensor should be reset
anytime the wheels or tires are removed or
replaced.
. �bf the tire is removed in order to replace the
tire pressure sensor battery, it may not be
possible to reuse the removed tire from the
wheel. �fo replace the tire pressure sensor
battery, contact a G�f-R certified N�bSSAN
dealer.
WARNING
.If the low tire pressure warning light
illuminates while driving, avoid sud-
den steering maneuvers or abrupt
braking, reduce vehicle speed, pull
off the road to a safe location and
stop the vehicle as soon as possi-
ble. Driving with under-inflated tires may permanently damage the tires
and increase the likelihood of tire
failure. Serious vehicle damage
could occur and may lead to an
accident and could result in serious
personal injury. Check the tire pres-
sure for all four tires. Adjust the tire
pressure to the recommended COLD
tire pressure shown on the Tire and
Loading Information label to turn
the low tire pressure warning light
off. If the light still illuminates while
driving after adjusting the tire pres-
sure, a tire may be flat.
. Although you can continue driving
with a punctured run-flat tire, re-
member that vehicle handling sta-
bility is reduced, which could lead to
an accident and personal injury.
Also, driving a long distance at high
speeds may damage the tires.
. Do not drive at speeds above 50
MPH (80 km/h) and do not drive
more than 50 miles (80 km) with a
punctured run-flat tire. The actual
distance the vehicle can be driven
on a flat tire depends on outside
temperature, vehicle load, road con-
ditions and other factors. .
When a wheel is replaced, the TPMS
will not function and the low tire
pressure warning light will flash for
approximately 1 minute. The light
will remain on after 1 minute. Con-
tact your GT-R certified NISSAN
dealer as soon as possible for tire
replacement and/or system reset-
ting.
. Replacing tires with those not ori-
ginally specified by NISSAN could
affect the proper operation of the
TPMS.
. Do not inject any tire liquid or
aerosol tire sealant into the tires,
as this may cause a malfunction of
the tire pressure sensors.
NOTICE
.The TPMS may not function properly
when the wheels are equipped with
tire chains or the wheels are buried
in snow.
. The TPMS may not function properly
if the TPMS sensor is not reset and
when wheels/tires from another