2015 NISSAN GT-R ESP
[x] Cancel search: ESPPage 128 of 298
.An iPod nano®(2nd Generation) will con-
tinue to fast-forward or rewind if it is
disconnected during a seek operation.
. An incorrect song title may appear when the
Play Mode is changed while using an iPod
nano
®(2nd Generation)
. Audiobooks may not play in the same order
as they appear on an iPod
®.
. Large video files cause slow responses in an
iPod
®. The vehicle center display may
momentarily black out, but will soon recover.
. If an iPod
®automatically selects large video
files while in the shuffle mode, the vehicle
center display may momentarily black out,
but will soon recover.
Compressed Audio Files (MP3/
WMA/AAC/ATRAC3)
Explanation of terms:
. MP3 — MP3 is short for Moving Pictures
Experts Group Audio Layer 3. MP3 is the
most well known compressed digital audio
file format. This format allows for near “CD
quality” sound, but at a fraction of the size of
normal audio files. MP3 conversion of an
audio track can reduce the file size by
approximately a 10:1 ratio (Sampling: 44.1
kHz, Bit rate: 128 kbps) with virtually no
perceptible loss in quality. The compression reduces certain parts of sound that seem
inaudible to most people.
. WMA — Windows Media Audio (WMA) is a
compressed audio format created by Micro-
soft as an alternative to MP3. The WMA
codec offers greater file compression than
the MP3 codec, enabling storage of more
digital audio tracks in the same amount of
space when compared to MP3s at the same
level of quality.
. AAC/M4A — Advanced Audio Coding
(AAC) is a lossy audio compression format.
Audio files that have been encoded with
AAC are generally smaller in size and deliver
a higher quality of sound than MP3.
. Bit rate — Bit rate denotes the number of
bits per second used by a digital music file.
The size and quality of a compressed digital
audio file is determined by the bit rate used
when encoding the file.
. Sampling frequency — Sampling frequency
is the rate at which the samples of a signal
are converted from analog to digital (A/D
conversion) per second.
. Multisession — Multisession is one of the
methods for writing data to media. Writing
data once to the media is called a single
session, and writing more than once is
called a multisession. .
ID3/WMA Tag — The ID3/WMA tag is the
part of the encoded MP3 or WMA file that
contains information about the digital music
file such as song title, artist, album title,
encoding bit rate, track time duration, etc.
ID3 tag information is displayed on the
Album/Artist/Track title line on the display.
* Windows
®and Windows Media®are regis-
tered trademarks or trademarks of Microsoft
Corporation in the United States of America
and/or other countries.
Audio system3-7
Page 138 of 298
Angle Mark (DVD-VIDEO):
When this item is turned on, an angle mark will
be shown on the bottom of the screen if the
scene can be seen from a different angle.
Menu Skip (DVD-VIDEO):
DVD menus are automatically configured and
the contents will be played directly when [Menu
Skip] is turned on. Note that some discs may not
be played directly even if this item is turned on.
CM Skip (DVD-VIDEO):
Select [CM Skip]. Choose the setting time from
15, 30 or 60 seconds by selecting the [+] side
or [−] side.
DRC (DVD-VIDEO, DVD-VR):
DRC (Dynamic Range Compression) automati-
cally adjusts the soundtrack volume level to
maintain a more even sound to the speakers.
DVD Language (DVD-VIDEO, VIDEO-CD):
Select [DVD Language] to open the number
entry screen. Input the number corresponding to
the preferred language and select [OK]. The
DVD top menu language will be changed to the
one specified.Display:
To adjust the image quality of the screen, select
the preferred adjustment items.
Audio:
Select the preferred language for audio.
Subtitle (DVD-VIDEO, DVD-VR):
Select the preferred language for subtitles.
Display Mode (DVD-VIDEO, VIDEO-CD,
DVD-VR):
Select from the “Full”, “Wide”, “Normal” or
“Cinema” modes.
Title List (DVD-VR):
Select the preferred title from the list.
Play Mode:
Select the preferred play mode.
PG/PL Mode (DVD-VR):
Select the “PG” or “PL” mode.USB DEVICE OPERATION
Audio main operation
Open the console lid and connect a USB device
as illustrated. Then, push
peatedly to switch to the USB device mode.
If the system has been turned off while the USB
device was playing, pushing the ON·OFF/VOL
control knob will start the USB device.
CAUTION
. Depending on size and shape of
USB device, the console lid may not
fully close. Do not force console lid
closed as this may damage USB
device.
Audio system3-17
Page 195 of 298
![NISSAN GT-R 2015 R35 Multi Function Display Owners Manual 7-8Other settings
This key does not appear on the display until the
ignition switch is pushed to the ON position.
1. Push<SETTING>.
2. Highlight [Comfort] and push <ENTER>.
3. Highlight the preferred NISSAN GT-R 2015 R35 Multi Function Display Owners Manual 7-8Other settings
This key does not appear on the display until the
ignition switch is pushed to the ON position.
1. Push<SETTING>.
2. Highlight [Comfort] and push <ENTER>.
3. Highlight the preferred](/manual-img/5/423/w960_423-194.png)
7-8Other settings
This key does not appear on the display until the
ignition switch is pushed to the ON position.
1. Push
2. Highlight [Comfort] and push
3. Highlight the preferred setting item and push
selected item illuminates.
4. After setting, push
to apply the setting.
5. Push
screen. Push
Page 196 of 298
![NISSAN GT-R 2015 R35 Multi Function Display Owners Manual 5. Highlight the preferred setting item andpush <ENTER>. The indicator light of the
selected item illuminates.
Available languages
.[English]
.[Franc¸ ais]
.[Espan ˜
ol]
NOTICE
Do not change the ign NISSAN GT-R 2015 R35 Multi Function Display Owners Manual 5. Highlight the preferred setting item andpush <ENTER>. The indicator light of the
selected item illuminates.
Available languages
.[English]
.[Franc¸ ais]
.[Espan ˜
ol]
NOTICE
Do not change the ign](/manual-img/5/423/w960_423-195.png)
5. Highlight the preferred setting item andpush
selected item illuminates.
Available languages
.[English]
.[Franc¸ ais]
.[Espan ˜
ol]
NOTICE
Do not change the ignition switch
position while changing the language.
Doing so may cause a system malfunc-
tion.
UNIT SETTINGS
1. Push
2. Highlight [Others] and push
3. Highlight [Language & Units] and push
4. Highlight [Select Units] and push
5. Highlight the preferred unit and push
unit illuminates.
Available units
.US:
mile, MPH, 8F, MPG
.Metric:
km, km/h, 8C, L/100 km
6. Push
screen. Push
Page 239 of 298
10-4Multi function meter
Screen information
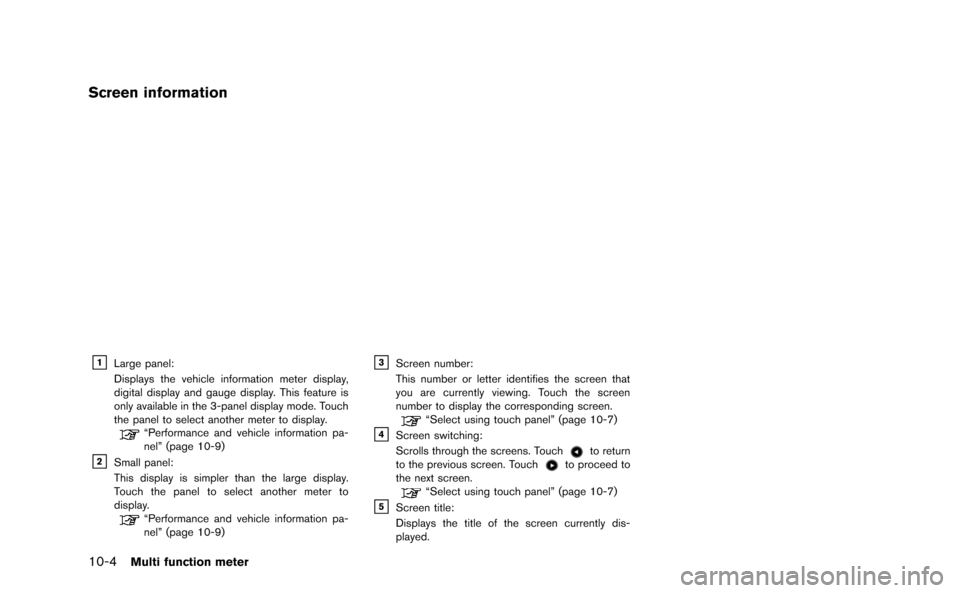
&1Large panel:
Displays the vehicle information meter display,
digital display and gauge display. This feature is
only available in the 3-panel display mode. Touch
the panel to select another meter to display.
“Performance and vehicle information pa-
nel” (page 10-9)
&2Small panel:
This display is simpler than the large display.
Touch the panel to select another meter to
display.
“Performance and vehicle information pa-
nel” (page 10-9)
&3Screen number:
This number or letter identifies the screen that
you are currently viewing. Touch the screen
number to display the corresponding screen.
“Select using touch panel” (page 10-7)
&4Screen switching:
Scrolls through the screens. Touchto return
to the previous screen. Touchto proceed to
the next screen.
“Select using touch panel” (page 10-7)
&5Screen title:
Displays the title of the screen currently dis-
played.
Page 255 of 298
10-20Multi function meter
Using result screens to improve
driving
INFO:
This section explains how to use the driving
timeline screens. Use this information to make
your driving smoother.
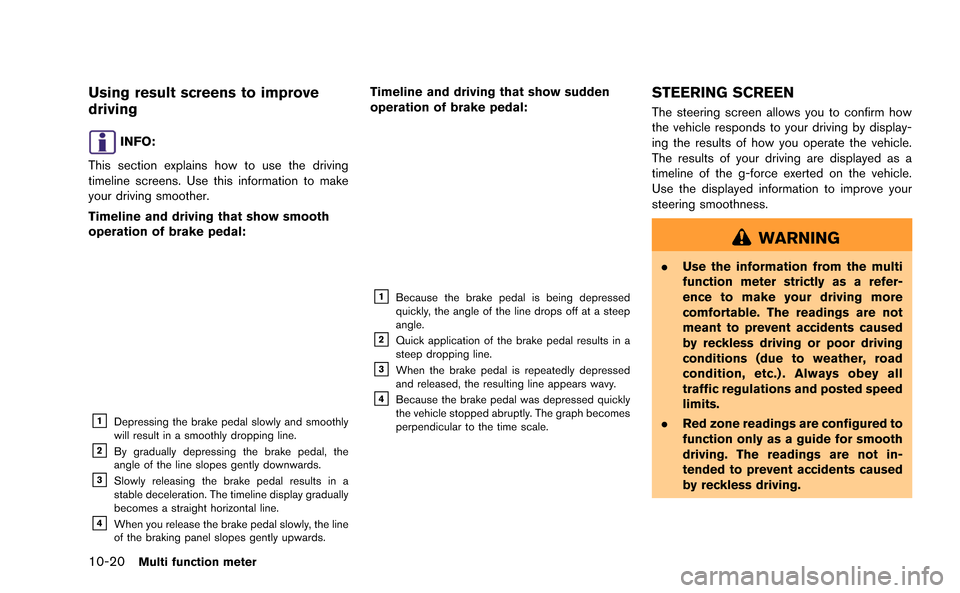
Timeline and driving that show smooth
operation of brake pedal:
&1Depressing the brake pedal slowly and smoothly
will result in a smoothly dropping line.
&2By gradually depressing the brake pedal, the
angle of the line slopes gently downwards.
&3Slowly releasing the brake pedal results in a
stable deceleration. The timeline display gradually
becomes a straight horizontal line.
&4When you release the brake pedal slowly, the line
of the braking panel slopes gently upwards.
Timeline and driving that show sudden
operation of brake pedal:
&1Because the brake pedal is being depressed
quickly, the angle of the line drops off at a steep
angle.
&2Quick application of the brake pedal results in a
steep dropping line.
&3When the brake pedal is repeatedly depressed
and released, the resulting line appears wavy.
&4Because the brake pedal was depressed quickly
the vehicle stopped abruptly. The graph becomes
perpendicular to the time scale.
STEERING SCREEN
The steering screen allows you to confirm how
the vehicle responds to your driving by display-
ing the results of how you operate the vehicle.
The results of your driving are displayed as a
timeline of the g-force exerted on the vehicle.
Use the displayed information to improve your
steering smoothness.
WARNING
. Use the information from the multi
function meter strictly as a refer-
ence to make your driving more
comfortable. The readings are not
meant to prevent accidents caused
by reckless driving or poor driving
conditions (due to weather, road
condition, etc.) . Always obey all
traffic regulations and posted speed
limits.
. Red zone readings are configured to
function only as a guide for smooth
driving. The readings are not in-
tended to prevent accidents caused
by reckless driving.
Page 264 of 298
*In a canyon
INFO:
The GPS antenna is located on the instrument
panel inside the vehicle. Do not place any
objects, especially mobile phones or transcei-
vers, on the instrument panel. Because the
strength of the GPS signal is approximately one
billionth of that of TV waves, phones and
transceivers will affect or may totally disrupt
the signal.
Display of GPS information
GPS information can be displayed.“Viewing GPS current location informa-
tion” (page 6-22)
NOTICE
Route guidance provided by the naviga-
tion system does not take carpool lane
driving into consideration, especially
when carpool lanes are separated from
other road lanes.
INCORRECT DISPLAY OF VEHICLE
POSITION
The following cases may affect the display
accuracy of the vehicle’s position or traveling
direction. The accuracy will return to normal if
the driving conditions return to normal.
*When there is a similar road nearby.
*When the vehicle is traveling in an area with a
grid pattern road system.
General system information11-3
Page 268 of 298
— If one section between waypoints cannotbe calculated, none of the route will be
displayed.
— The route may not connect completely at some waypoints.
— The route may require a U-turn close to some waypoints.
. Route calculation may not be completed in
the following cases.
— If there is no main road within a range of
1.5 miles (2.5 km) from the vehicle, a
message saying so will appear on the
screen. Try recalculating when the vehi-
cle is closer to a main road.
— If there is no main road within a range of 1.5 miles (2.5 km) from the destination or
waypoint, a message saying so will
appear on the screen. Try setting the
location closer to a main road.
— If the vehicle is too close to the destina- tion or if there are no roads to the
destination, a message saying so will
appear on the screen.
— If it is impossible to reach the destination or waypoints because of traffic regula-
tions, etc. — If the only route to reach the destination
or waypoints is extremely complicated.
— If the destination, current vehicle position or waypoint is within the “Avoid Area”.
— If a part of the route is included in the “Avoid Area”.
. The following may occur when the route is
displayed.
— If you calculate a route on a main road,
the starting point of the route may not
exactly match the current vehicle loca-
tion.
— The endpoint of the route may not exactly match the destination.
— If you calculate a route on a main road, the system may display a route from
another main road. This may be because
the position of the vehicle icon is not
accurate. In this case, park the vehicle in
a safe location and reset the vehicle icon,
or continue driving to see if the position
of the vehicle icon is automatically
adjusted before recalculating the route.
— There are cases in which the system shows an indirect route to reach the
destination or waypoints, if you set them
from stored or facility information. In
order to correct this, you must be careful
about the traffic direction, especially when lanes with different travel directions
are shown separately, such as inter-
changes and service areas.
— This system makes no distinction be- tween limited traffic control and total
control (blockage) . It may show an
indirect route even if the road is usable.
— Even if the freeway preference is set to OFF, a route that uses the freeway may
be suggested.
— Even if the ferry preference is set to OFF, a route that uses a ferry line may be
suggested.
— Ferry lines, excluding those that are only for pedestrians, bicycles and motor-
cycles, are stored in this system. Take
into consideration the travel time required
and operational condition before decid-
ing whether to use them or not.
General system information11-7