2015 MITSUBISHI OUTLANDER SPORT fog light
[x] Cancel search: fog lightPage 269 of 384
Automatic air conditioning
-Type2 (if so equipped)
7-22 Comfort controls
7
N00760000021
You can change the following functions to match your preference. Enable automatic air control: When the mode selection dial or the blower speed selection dial is set to the “AUTO” position, the air selection switchwill also be automatically controlled. Disable automatic air control: Even when the mode selection dial or the blower speed selection dial is set to the“AUTO” position, the air selection switch will not be automatically controlled. Changing the settings Press the air selection switch for about 10seconds or longer. When the setting has changed, the system will beep and the indicator light will flash.• When the setting has changed from enabled to disabled, the system will beep three times and theindicator will flash three times.
• When the setting has changed from dis- abled to enabled, the system will beep two times and the indicator light will flash three times.
N00737300239
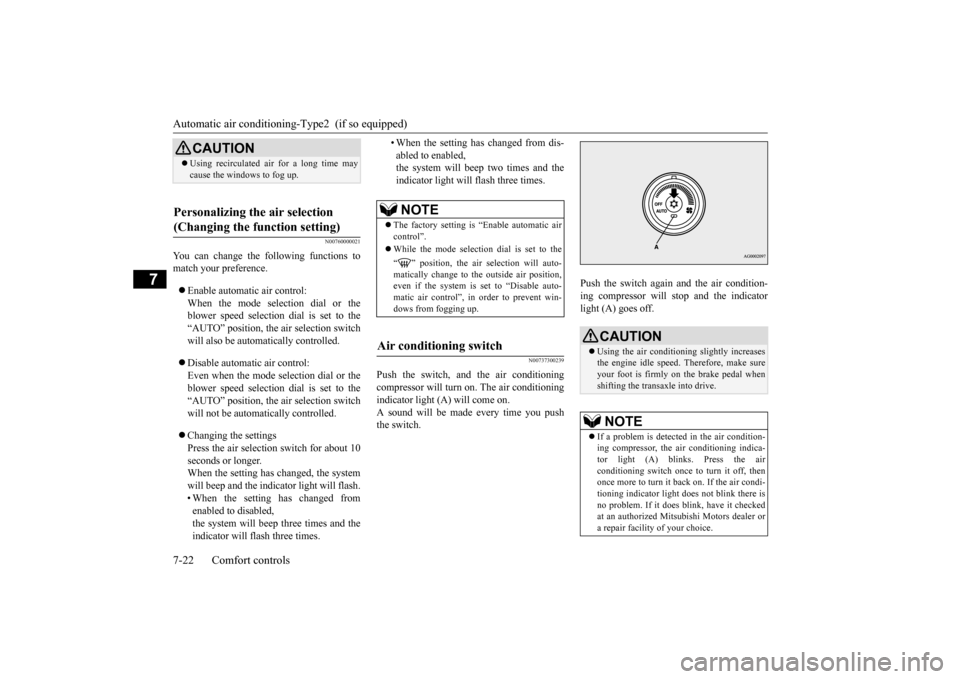
Push the switch, and the air conditioning compressor will turn
on. The air conditioning
indicator light (A) will come on.A sound will be made every time you push the switch.
Push the switch again and the air condition- ing compressor will stop and the indicator light (A) goes off.
CAUTION Using recirculated air for a long time may cause the windows to fog up.
Personalizing the air selection (Changing the function setting)
NOTE
The factory setting is “Enable automatic air control”. While the mode selection dial is set to the “ ” position, the air selection will auto- matically change to the outside air position, even if the system is set to “Disable auto-matic air control”, in order to prevent win- dows from fogging up.
Air conditioning switch
CAUTION Using the air conditioning slightly increases the engine idle speed. Therefore, make sureyour foot is firmly on the brake pedal when shifting the transaxle into drive.NOTE
If a problem is detected in the air condition- ing compressor, the air conditioning indica- tor light (A) blinks. Press the air conditioning switch once to turn it off, thenonce more to turn it b
ack on. If the air condi-
tioning indicator light does not blink there is no problem. If it does blink, have it checkedat an authorized Mitsubishi Motors dealer or a repair facility of your choice.
BK0206700US.bo
ok 22 ページ 2014年3月25日 火曜日 午後4時42分
Page 270 of 384
Automatic air conditioning-Type2 (if so equipped)
Comfort controls 7-23
7
N00759800029
You can change the following functions to match your preference. Enable automatic air conditioning control: When the mode selection dial or blower speed selection dial has been set to the“AUTO” position or when the tempera- ture control dial has been set to the mini- mum temperature, the air conditioningswitch is automatically controlled. Disable automatic air conditioning con- trol: The air conditioning switch is not auto-matically controlled, unless the air condi- tioning switch is used.
Changing the settings Press the air conditioning switch for about 10 seconds or longer. When the setting has changed, the systemwill beep and the indicator light will flash. • When the setting has changed from enabled to disabled,the system will beep three times and the indicator will flash three times. • When the setting has changed from dis-abled to enabled,the system will beep two times and the indicator light will flash three times.
N00731700286
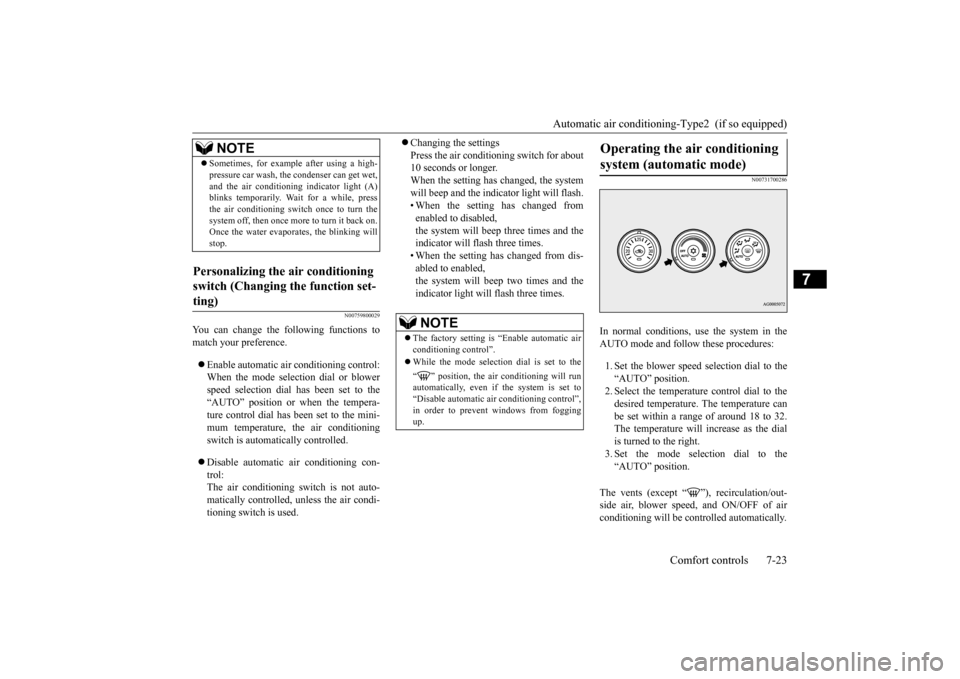
In normal conditions, use the system in theAUTO mode and follow these procedures: 1. Set the blower speed selection dial to the “AUTO” position.2. Select the temperature control dial to thedesired temperature. The temperature can be set within a range of around 18 to 32. The temperature will increase as the dialis turned to the right. 3. Set the mode selection dial to the “AUTO” position.
The vents (except “ ”), recirculation/out- side air, blower speed, and ON/OFF of airconditioning will be controlled automatically.
Sometimes, for example after using a high- pressure car wash, the condenser can get wet, and the air conditioning indicator light (A) blinks temporarily. Wait for a while, press the air conditioning switch once to turn thesystem off, then once more to turn it back on. Once the water evaporates, the blinking will stop.
Personalizing the air conditioning switch (Changing the function set- ting)
NOTE
NOTE
The factory setting is “Enable automatic air conditioning control”. While the mode selection dial is set to the “ ” position, the air conditioning will run automatically, even if the system is set to“Disable automatic air conditioning control”, in order to prevent windows from fogging up.
Operating the air conditioning system (automatic mode)
BK0206700US.bo
ok 23 ページ 2014年3月25日 火曜日 午後4時42分
Page 272 of 384
Important air conditioning operating tips
Comfort controls 7-25
7
N00733700280
1. Park the vehicle in the shade whenever possible. Parking in the hot sun makes the vehicle interior extremely hot which then requires more time to cool. If it is neces-sary to park in the sun, open the windows for the first few minutes of air condition- ing to expel the hot air.2. Afterwards, keep the windows closed when the air conditioning is in use. The entry of outside air through open windowswill reduce cooling efficiency. 3. When running the air conditioning, make sure the air intake, which is located infront of the windshield, is free of obstruc- tions such as leaves. Leaves collected in the air-intake chamber may reduce airflow and plug the water drains.
If the air conditioning seems less effective than usual, the cause might be a refrigerant leak.Have the system inspected by your authorized Mitsubishi Motors dealer or a repair facility of your choice.
The air conditioning should be operated for at least five minutes each week, even in coldweather. This includes the quick defrosting mode. Operating the air condition system weekly maintains lubrication of the compres-sor internal parts to keep the air conditioning in the best operating condition.
N00733800151
The air conditioning system is equipped with an air filter to remove pollen and dust. The air filter’s ability to collect pollen and dirt is reduced as it becomes dirty, so replaceit periodically. For the maintenance interval, refer to the “WARRANTY AND MAINTE- NANCE MANUAL”.
When defrosting, do not set the temperature control dial to the maximum cool position. This will blow cool air on the window glass and fog it up.
Important air conditioning operating tips
NOTE
Air conditioning system refrig- erant and lubricant recommen- dations
CAUTION The air conditioning system in your vehicle must be charged with the refrigerant HFC-134a and the lubricant SUN-PAG56. Use of any other refrigerant or lubricant will cause severe damage and may require replac-ing your vehicle’s entire air conditioning system. The release of refrigerant into the atmo-sphere is not recommended. The new refrigerant HFC-134a in your vehi- cle is designed not to harm the earth’s ozonelayer. However, it may contribute slightly to global warming. It is recommended that the old refrigerant be saved and recycled for future use.
During a long period of disuse Air purifier
NOTE
Operation in certain conditions such as driv- ing on a dusty road and frequent use of the air conditioning can lead to reduction of ser- vice life of the filter.
When you feel that the
air flow is lower than normal or when thewindshield or windows start to fog up easily, replace the air filter. Contact your Mitsubishi Motors dealer or arepair facility of your choice for assistance.
BK0206700US.bo
ok 25 ページ 2014年3月25日 火曜日 午後4時42分
Page 348 of 384
Fuses
Vehicle care and maintenance 9-25
9
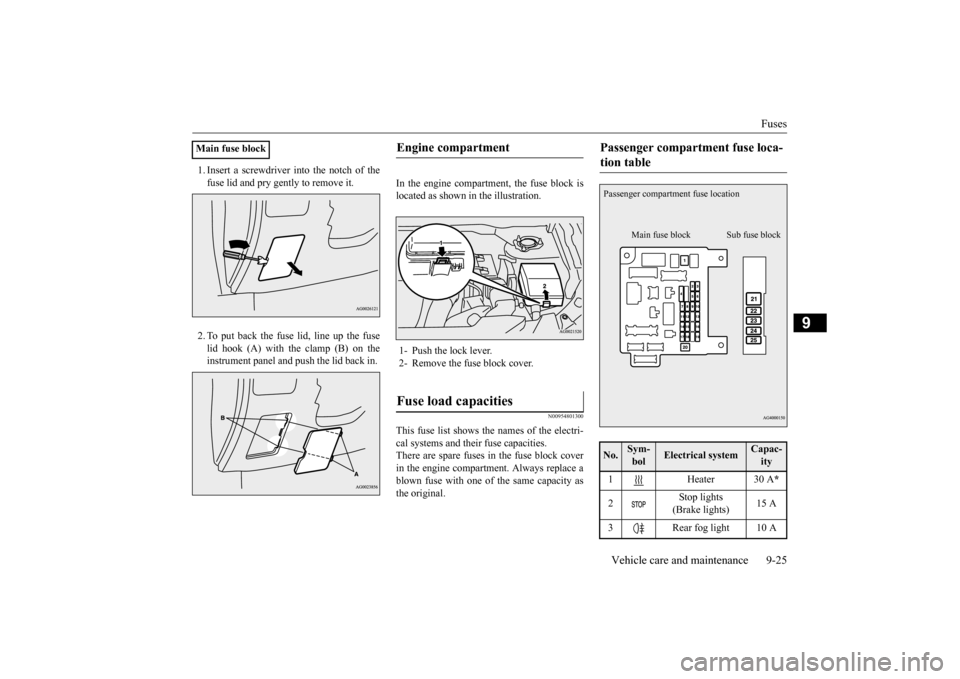
1. Insert a screwdriver into the notch of the fuse lid and pry gently to remove it. 2. To put back the fuse lid, line up the fuse lid hook (A) with the clamp (B) on the instrument panel and push the lid back in.
In the engine compartment, the fuse block is located as shown in the illustration.
N00954801300
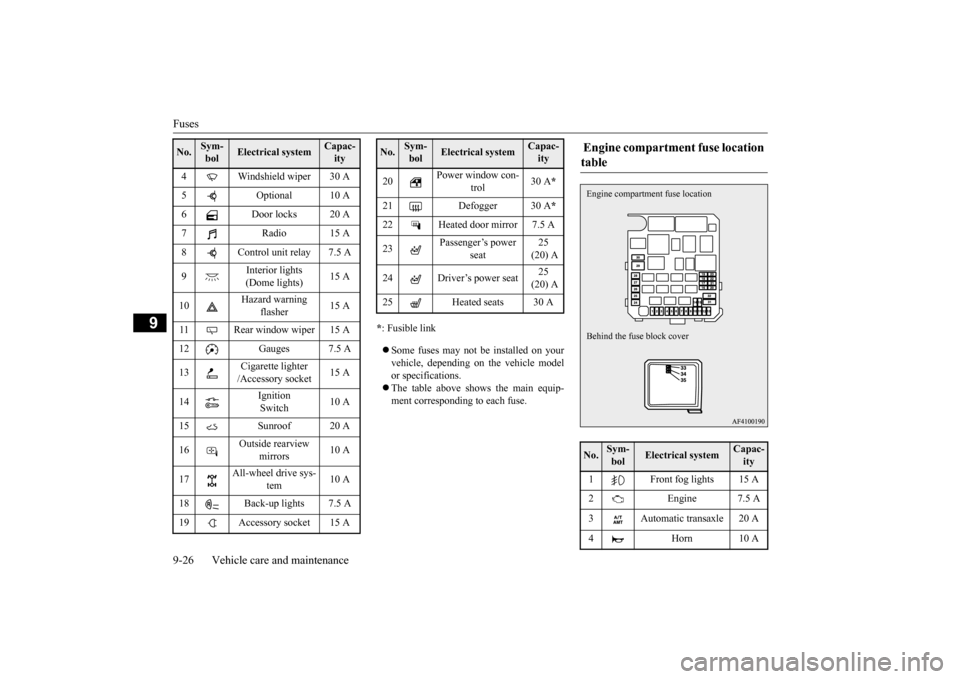
This fuse list shows the names of the electri-cal systems and their fuse capacities. There are spare fuses in the fuse block cover in the engine compartment. Always replace ablown fuse with one of the same capacity as the original.
Main fuse block
Engine compartment 1- Push the lock lever. 2- Remove the fuse block cover.Fuse load capacities
Passenger compartment fuse loca- tion table No.
Sym- bol
Electrical system
Capac-ity
1 Heater 30 A
*
2
Stop lights (Brake lights)
15 A
3 Rear fog light 10 APassenger compartment fuse location
Main fuse block Sub fuse block
BK0206700US.bo
ok 25 ページ 2014年3月25日 火曜日 午後4時42分
Page 349 of 384
Fuses 9-26 Vehicle care and maintenance
9
* : Fusible link Some fuses may not be installed on your vehicle, depending on the vehicle model or specifications. The table above shows the main equip- ment corresponding to each fuse.
4 Windshield wiper 30 A 5 Optional 10 A 6 Door locks 20 A 7 Radio 15 A8 Control unit relay 7.5 A 9
Interior lights (Dome lights)
15 A
10
Hazard warning
flasher
15 A
11 Rear window wiper 15 A 12 Gauges 7.5 A 13
Cigarette lighter /Accessory socket
15 A
14
Ignition Switch
10 A
15 Sunroof 20 A16
Outside rearview
mirrors
10 A
17
All-wheel drive sys-
tem
10 A
18 Back-up lights 7.5 A 19 Accessory socket 15 ANo.
Sym- bol
Electrical system
Capac-ity
20
Power window con-
trol
30 A
*
21 Defogger 30 A
*
22 Heated door mirror 7.5 A 23
Passenger’s power
seat
25 (20) A
24 Driver’s power seat
25 (20) A
25 Heated seats 30 ANo.
Sym- bol
Electrical system
Capac-ity
Engine compartment fuse location table No.
Sym- bol
Electrical system
Capac-ity
1 Front fog lights 15 A 2 Engine 7.5 A 3 Automatic transaxle 20 A 4 Horn 10 AEngine compartment
fuse location
Behind the fuse block cover
BK0206700US.bo
ok 26 ページ 2014年3月25日 火曜日 午後4時42分
Page 352 of 384
Replacement of light bulbs
Vehicle care and maintenance 9-29
9
N00942900310
Before replacing the bulb, be sure the light is off. Do not touch the glass part of the newbulb with your bare fingers; the oil from your skin will stay on the glass and dim or destroy the bulb when it gets hot.
N00943000132
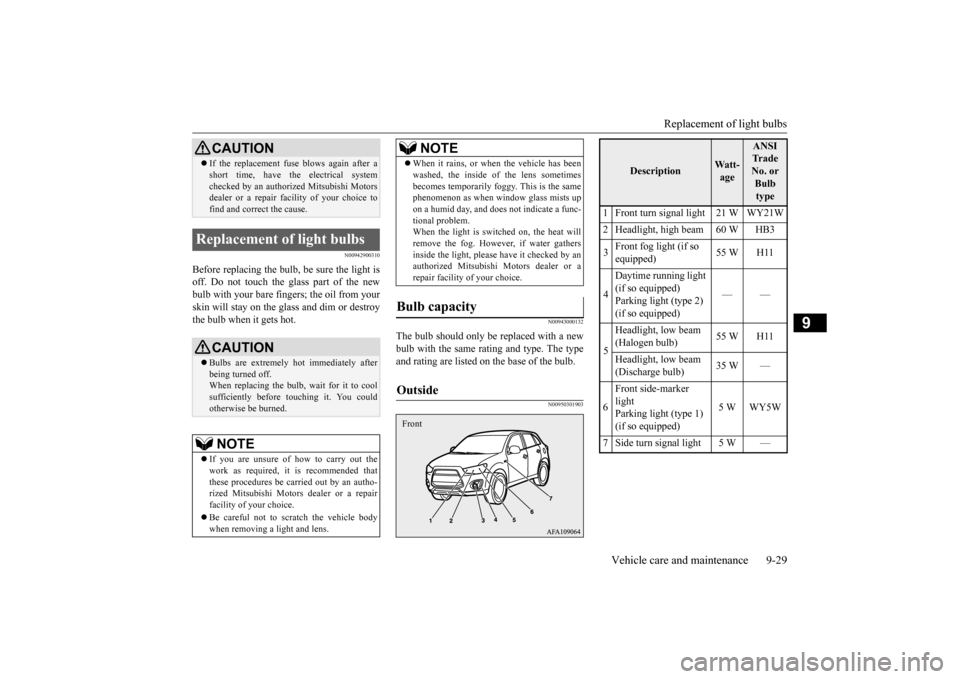
The bulb should only be replaced with a newbulb with the same rating and type. The typeand rating are listed on the base of the bulb.
N00950301903
If the replacement fuse blows again after a short time, have the electrical system checked by an authorized Mitsubishi Motors dealer or a repair faci
lity of your choice to
find and correct the cause.
Replacement of light bulbs
CAUTION Bulbs are extremely hot immediately after being turned off. When replacing the bulb, wait for it to coolsufficiently before touching it. You could otherwise be burned.NOTE
If you are unsure of how to carry out the work as required, it is recommended that these procedures be carried out by an autho-rized Mitsubishi Motors dealer or a repair facility of your choice. Be careful not to scratch the vehicle body when removing a light and lens.CAUTION
When it rains, or when the vehicle has been washed, the inside of the lens sometimes becomes temporarily foggy. This is the same phenomenon as when window glass mists up on a humid day, and does not indicate a func-tional problem. When the light is switched on, the heat will remove the fog. However, if water gathersinside the light, please have it checked by an authorized Mitsubishi Motors dealer or a repair facility of your choice.
Bulb capacity Outside
NOTE
Front
Description
Watt- age
ANSI Tr a d e No. or Bulb type
1 Front turn signal light 21 W WY21W2 Headlight, high beam 60 W HB3 3
Front fog light (if so equipped)
55 W H11
4
Daytime running light (if so equipped) Parking light (type 2) (if so equipped)
——
5
Headlight, low beam (Halogen bulb)
55 W H11
Headlight, low beam (Discharge bulb)
35 W —
6
Front side-marker light Parking light (type 1) (if so equipped)
5W WY5W
7 Side turn signal light 5 W —
BK0206700US.bo
ok 29 ページ 2014年3月25日 火曜日 午後4時42分
Page 357 of 384
Replacement of light bulbs 9-34 Vehicle care and maintenance
9
3. Pull the bulb out of the socket. 1. To install the bulb, perform the removal steps in reverse. 2. Install the upper cover. For information regarding how to installthe upper cover, refer to “Removing andinstalling the upper cover and duct” on page 9-9.
N00943500137
N00943601816
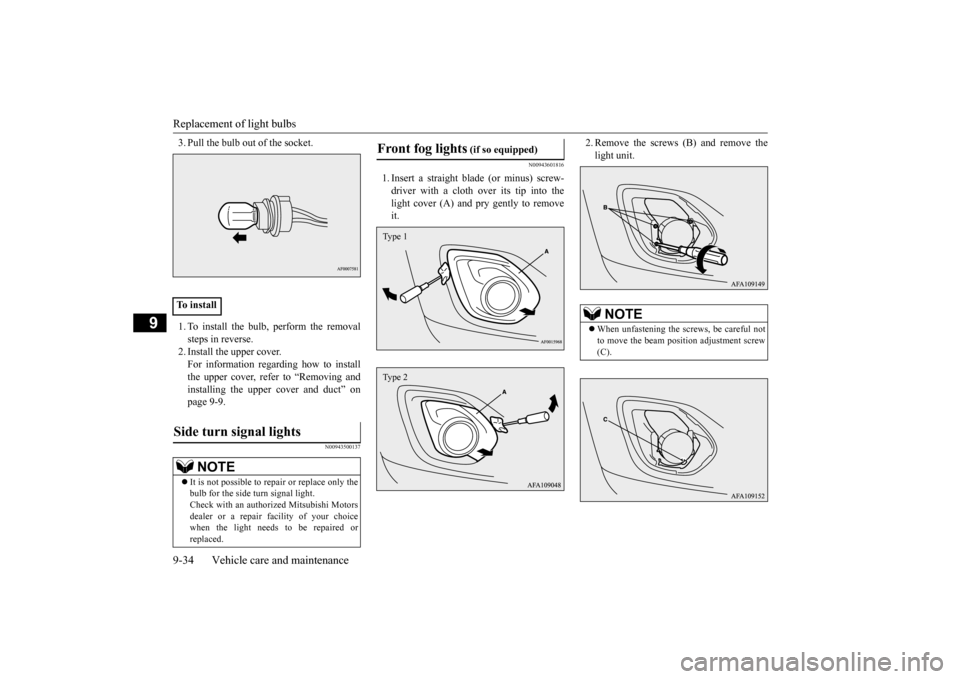
1. Insert a straight blade (or minus) screw- driver with a cloth over its tip into thelight cover (A) and pry gently to remove it.
2. Remove the screws (B) and remove the light unit.
To installSide turn signal lights
NOTE
It is not possible to re
pair or replace only the
bulb for the side turn signal light. Check with an authorized Mitsubishi Motors dealer or a repair facility of your choicewhen the light needs to be repaired or replaced.
Front fog lights
(if so equipped)
Type 1Type 2
NOTE
When unfastening the screws, be careful not to move the beam position adjustment screw (C).
BK0206700US.bo
ok 34 ページ 2014年3月25日 火曜日 午後4時42分
Page 358 of 384
Replacement of light bulbs
Vehicle care and maintenance 9-35
9
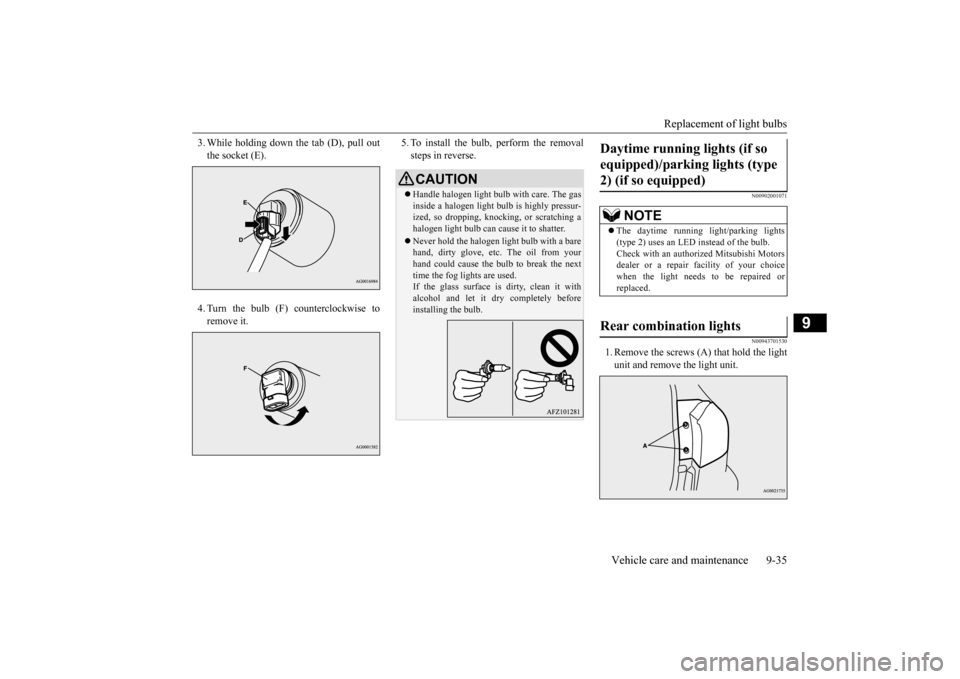
3. While holding down
the tab (D), pull out
the socket (E). 4. Turn the bulb (F) counterclockwise to remove it.
5. To install the bulb, perform the removal steps in reverse.
N00902001071 N00943701530
1. Remove the screws (A) that hold the light unit and remove the light unit.
CAUTION Handle halogen light bulb with care. The gas inside a halogen light bulb is highly pressur-ized, so dropping, knocking, or scratching a halogen light bulb can cause it to shatter. Never hold the halogen light bulb with a bare hand, dirty glove, etc. The oil from your hand could cause the bulb to break the nexttime the fog lights are used. If the glass surface is dirty, clean it with alcohol and let it dry completely beforeinstalling the bulb.
Daytime running lights (if so equipped)/parking lights (type 2) (if so equipped)
NOTE
The daytime running light/parking lights (type 2) uses an LED instead of the bulb. Check with an authorized Mitsubishi Motorsdealer or a repair facility of your choice when the light needs to be repaired or replaced.
Rear combination lights
BK0206700US.bo
ok 35 ページ 2014年3月25日 火曜日 午後4時42分