2015 MITSUBISHI OUTLANDER SPORT weight
[x] Cancel search: weightPage 54 of 384

Supplemental Restraint System (SRS) - airbag
Seat and restraint systems 4-33
4
N00407900291
The driver’s airbag is located under the pad- ded cover in the middle of the steering wheel.The front passenger’s airbag is contained in the instrument panel above the glove com- partment. The driver’s airbag and the frontpassenger’s airbag are designed to deploy at the same time. However, the front passen-
ger’s airbag does not deploy when the front passenger seat is not occupied or when the weight sensor in the front passenger seat senses a weight on the seat of less thanapproximately 66 pounds (30 kg).
N00404500010
The driver’s knee airbag is located under thesteering wheel. The driver’s knee airbag isdesigned to deploy at the same time as the driver’s front airbag.
WA R N I N G If any of the following conditions occur, there may be a problem with the SRS air- bags and/or seat belt pre-tensioners, and they may not function properly in a colli- sion or may suddenly activate without acollision:• Even when the ignition switch or theoperation mode is in ON, the SRS warn- ing light does not come on or it remains on.• The SRS warning light and/or the warn-ing display comes on while driving.The SRS airbags and seat belt pre-ten-sioners are designed to help reduce therisk of serious injury or death in certain collisions. If either of the above conditions occurs, immediately have your vehiclechecked by an authorized Mitsubishi Motors dealer.
Driver’s and passenger’s front airbag system
Driver’s knee airbag system Driver
Front passenger
BK0206700US.bo
ok 33 ページ 2014年3月25日 火曜日 午後4時42分
Page 143 of 384

Rear-view camera (if so equipped) 5-80 Features and controls
5
The rear-view camera (A) is in the liftgate, at the left side of the liftgate handle.
Reference lines and upper surface of the rear bumper (A) are displayed on the screen. Red line (B) indicates approximately 20 inches (50 cm) behind the rear bumper. Two Green lines (C) indicate approxi- mately 8 inches (20 cm) outside of the vehicle body. Short transverse lines (1 to 3) indicate dis- tance from the rear bumper.
The view on the screen is limited, and objects outside the view, such as under the bumper or around either corner of the bumper end, cannot be seen on the screen.
Location of rear-view camera
CAUTION If the camera lens gets dirty, a clear image cannot be obtained. As necessary, rinse thelens with clean water and gently wipe with a clean, soft cloth. To avoid damaging the camera;• Do not rub the cover excessively or polish it by using an abrasive compound. • Do not disassemble the camera.WA R N I N G
• Do not splash hot water directly on the lens. • Do not spray the camera and its surround- ings with high-pressure water.• Make sure that the liftgate is securelyclosed when backing up.
Reference lines on the screen
CAUTION
1: Approximately at the rear edge of the
rear bumper
2: Approximately 39 inches (100 cm) 3: Approximately 79 inches (200 cm)
CAUTION The rear-view camera uses a wide-angle lens. As a result, images and distances shownon the screen are not exact. Actual distance may be different from dis- tance indicated by the lines on the screen, depending on the loading condition of the vehicle and road surface condition.The reference lines for distance and vehicle width are based on a level, flat road surface. In the following cases, objects shown on thescreen will appear to be farther off than they actually are.• When the rear of the vehicle is weigheddown with the weight of passengers and luggage in the vehicle. (Case 1)
BK0206700US.bo
ok 80 ページ 2014年3月25日 火曜日 午後4時42分
Page 232 of 384

Assist grips
Features and controls 5-169
5
2. Hang the strap (C) of the cargo area cover on the hook (D).
Follow this procedure in reverse to remove.
N00559000061
The assist grips (located above the doors on the headliner) are not designed to supportbody weight. They are intended for use only while seated in the vehicle.
N00553600153
There is a coat hook on the rear seat assist grip of the driver’s side.
To remove
Assist grips
CAUTION Do not use the assist grips when getting into or out of the vehicle. The assist grips could detach causing you to fall.
Coat hook
WA R N I N G Do not put a hanger or any heavy or pointed object on the coat hook. If the cur- tain airbag was activated, any such itemcould be propelled away with great force and could prevent the curtain airbag from inflating correctly. Hang clothes directlyon the coat hook (without using a hanger). Make sure there are no heavy or sharp objects in the pockets of clothes that youhang on the coat hook.
BK0206700US.book
169 ページ 2014年3月25日 火曜日 午後4時42分
Page 240 of 384
Loading information Driving safety 6-7
6
More effort could be required to turn the steering wheel.Refer to “Electric power steering system (EPS)” on page 5-67. Always remove the key from the ignition switch and lock all doors and the liftgate when leaving the vehicle unattended.Always try to park your vehicle in a well lit area.
N00629900408
It is very importan
t to know how much
weight your vehicle can carry. This weight is called the vehicle capacity weight andincludes the weight of all occupants, cargo (including the roof load), non-factory-
installed options, if any, being towed. The tire and loading information placard located on the driver’s door sill of your vehicle will show how much weight it may properly carry. It is important to fami
liarize yourself with the
following terms before loading your vehicle: Vehicle maximum load on the tire: load on an individual tire that is determined by distributing to each axle its share of the maximum loaded vehicle weight anddividing by two. Vehicle normal load on the tire: load on an individual tire that is determined by dis-tributing to each axle its share of the curb weight, accessory weight, and normal occupant weight and dividing by two. Maximum loaded vehicle weight: the sum of - (a) Curb weight;(b) Accessory weight; (c) Vehicle capacity weight; and (d) Production options weight.
Curb weight: the weight of a motor vehi- cle with standard equipment including the maximum capacity of fuel, oil, and cool- ant. Accessory weight: the combined weight (in excess of those standard items which may be replaced) of automatic transmis-sion, power steering, power brakes, power windows, power seats, radio, and heater, to the extent that these items are availableas factory- installed equipment (whetherinstalled or not). Vehicle capacity weight: the rated cargo and luggage load plus 150 lbs (68 kg)
*
times the vehicle’s designated seating capacity. Production options weight: the combined weight of those installed regular produc- tion options weighing over 5 lbs (2.3 kg) in excess of those standard items whichthey replace, not previously considered in curb weight or accessory weight, includ- ing heavy duty brakes, ride levelers, roofrack, heavy duty battery, and special trim. Normal occupant weight: 150 lbs (68 kg)
* times the number of specified
occupants. (In your vehicle the number is 3)
WA R N I N G Do not park your vehicle in areas where combustible materials such as dry grass or leaves can come in contact with a hot exhaust, since a fire could occur.
Do not keep the steering wheel fully turned for a long time When leaving the vehicle Loading information
WA R N I N G Never overload your vehicle. Overloading can damage your vehicle, adversely affectvehicle performance, including handling and braking, cause tire failure, and result in an accident.
BK0206700US.bo
ok 7 ページ 2014年3月25日 火曜日 午後4時42分
Page 241 of 384
Loading information 6-8 Driving safety
6
Occupant distribution: Occupant distribu- tion within the passenger compartment (In your vehicle the distribution is 2 in front, 1 in second row seat)
N00630100383
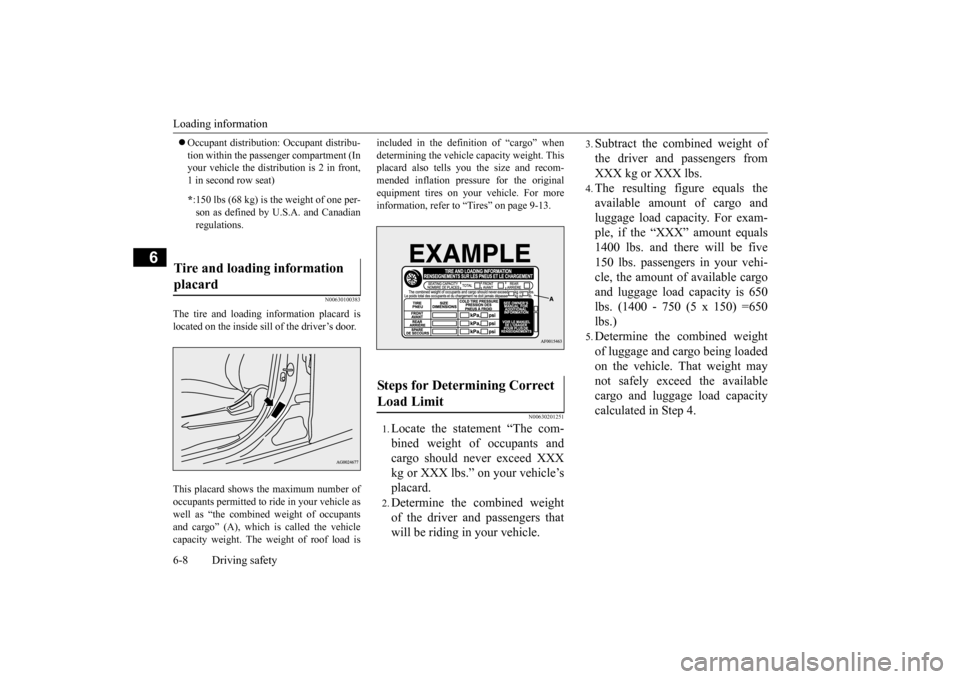
The tire and loading information placard islocated on the inside sill of the driver’s door. This placard shows the maximum number of occupants permitted to ride in your vehicle as well as “the combined weight of occupantsand cargo” (A), which is called the vehicle capacity weight. The weight of roof load is
included in the definition of “cargo” when determining the vehicle capacity weight. This placard also tells you the size and recom- mended inflation pressure for the originalequipment tires on your vehicle. For more information, refer to “Tires” on page 9-13.
N00630201251
1.Locate the statement “The com- bined weight of occupants andcargo should never exceed XXX kg or XXX lbs.” on your vehicle’s placard.2.Determine the combined weight of the driver and passengers that will be riding in your vehicle.
3.Subtract the combined weight of the driver and passengers from XXX kg or XXX lbs.4.The resulting figure equals theavailable amount of cargo andluggage load capacity. For exam- ple, if the “XXX” amount equals 1400 lbs. and there will be five150 lbs. passengers in your vehi- cle, the amount of available cargo and luggage load capacity is 650lbs. (1400 - 750 (5 x 150) =650 lbs.)5.Determine the combined weight of luggage and cargo being loaded on the vehicle. That weight may not safely exceed the availablecargo and luggage load capacity calculated in Step 4.
* :150 lbs (68 kg) is the weight of one per- son as defined by U.S.A. and Canadian regulations.
Tire and loading information placard
Steps for Determining Correct Load Limit
BK0206700US.bo
ok 8 ページ 2014年3月25日 火曜日 午後4時42分
Page 243 of 384

Cargo loads 6-10 Driving safety
6
N00629700435
N00630300040
To determine the cargo load capacity for your vehicle, subtract the weight of all vehicle
NOTE
The following table shows examples on how
to calculate total cargo/load cap
acity of your vehicle with varying
seating configurations and number and size of occupants.
This table is for illustration purposes only and may not
be accurate for the seating and lo
ad capacity of your vehicle.
For the following example the combined weight of oc
cupants and cargo should never exceed 865 lbs (392 kg).
Under a maximum loaded vehicle condition, gross axle
weight ratings (GAWR’s) for the front and rear axles
must not be exceeded. For further information on GAWR
’s, vehicle loading, see the “Specifications” section of
this manual.
Cargo loads
Cargo load precautions
BK0206700US.bo
ok 10 ページ 2014年3月25日 火曜日 午後4時42分
Page 244 of 384

Cargo loads
Driving safety 6-11
6
occupants from the vehicle capacity weight. For additional information, if needed, refer to “Steps for Determining Correct Load Limit” on page 6-8.DO NOT USE the Gross Vehicle Weight Rat- ing and Gross Axle Weight Rating numbers listed on the safety certification label (A)located on the inside sill of the driver’s door as the guide for passengers and/or cargo weight.
N00630400100
WA R N I N G To reduce the risk of serious injury or death, the combined weights of the driver, passengers and cargo and must neverexceed the vehicle capacity weight. Exceeding the vehicle capacity weight will adversely affect vehicle performance, including handling and braking, and may cause an accident.
Do not load cargo or luggage higher than the top of the seatback. Be sure that your cargo or luggage cannot move when your vehicle is in motion. Having either the rear view blocked, oryour cargo being thrown inside the cabin if you suddenly have to brake can cause a serious accident or injury or death. Put cargo or luggage in the cargo area of your vehicle. Try to spread the weightevenly.
Loading cargo on the roof
WA R N I N G Weight placed on the roof of the vehicle will raise the vehicle’s center of gravity and adversely affect its handling charac- teristics. As a result, driving errors oremergency maneuvers could lead to a loss of control and result in an accident. Drive slowly and avoid excessive maneuverssuch as sudden braking or quick turning. Make sure that the weight of luggage and the roof carrier do not exceed the maxi- mum roof load, 176 lb (80 kg). If the maxi-mum roof load is exceeded, this could cause damage to the vehicle or result in an accident.WA R N I N G
The total weight of all occupants and lug- gage, including your roof load, must not exceed the vehicle capacity weight. For more information, refer to “Tire and load- ing information placard” on page 11-2 Roof load is determined by adding the weight of the roof carrier and the weightof the luggage placed on the roof carrier. For additional information, refer to “Maximum roof load” on page 11-3.CAUTION Do not load luggage directly onto the roof. Use a roof carrier th
at properly fits your
vehicle.For installation, refer to the instruction man- ual provided with the roof carrier. Place the luggage on the carrier so that its weight is distributed evenly with the heaviest items on the bottom. Do not load items thatare wider than the roof carrier. When attaching/removing the roof carrier and loading/removing luggage, do not apply excessive pressure on a single point. Depending on how and where the force is applied, this may cause dents on the vehicle roof.WA R N I N G
BK0206700US.bo
ok 11 ページ 2014年3月25日 火曜日 午後4時42分
Page 313 of 384

How to change a tire 8-6 For emergencies
8
5. To prevent the vehicle from rolling when it is raised on the jack, place chocks or blocks (A) in front
of and behind the tire
that is diagonally opposite from the tire(B) you are changing.
6. Get the jack, bar and wheel nut wrench ready. (Refer to “Jack and tools” on page 8-5.)
N00849600331
The compact spare tire is stowed beneath the luggage floor board of the luggage compart- ment. It is designed to save space in the lug- gage compartment. Its lighter weight makes iteasier to use if a flat tire occurs.
WA R N I N G Be sure to apply chocks or blocks to the correct tire when jacking up the vehicle. Ifthe vehicle moves while jacked up, the jack could slip out of position, leading to an accident.NOTE
The chocks shown in the illustration do not come with your vehicle. It is recommended that you purchase chocks or blocks and keepthem in the vehicle for use if needed. If chocks or blocks are not available, use stones or any other objects that are large enough to hold the wheel in position.
Spare tire information Compact spare tire
WA R N I N G Tires, including spare tire, degrade over time with age even when they are not being used. It is recommended that tires over 6 years generally be replaced even ifdamage is not obvious.CAUTION While the compact spare tire is stowed, the inflation pressure should be checked at least once a month to assure that it remains at the recommended inflation pressure. See the tireand loading information placard attached to the driver’s door sill. Refer to “Tire and load- ing information placard” on page 11-2.
Driving with an improperly inflated tire can cause an accident. If
you have no choice but
to drive with an under-inflated tire, keep your speed down and avoid sudden steering or braking, if possible
. Inflate the tire to the
correct pressure as soon as possible. Refer to “Tire inflation pressures” on page 9-17. The compact spare tire should be used only temporarily. While the compact spare tire is being used, the tire pressure monitoring sys-tem will not function properly. Have the tire replaced or repaired at an authorized Mitsubishi Motors dealer or a repair facilityof your choice as soon as possible. Do not go over 50 mph (80 km/h) when driv- ing with the compact spare tire. Avoid sudden starting and braking when driving with the compact spare tire. Do not drive through automatic car washes and over obstacles that could possibly dam- age the underside of your vehicle. Because the compact spare tire is smaller than theoriginal tire, there is less clearance between the ground and your vehicle. Because the compact spare tire is designed only for your vehicle, do not use it on any other vehicle. Do not put the compact spare tire on a differ- ent wheel, and do not put standard tires, snow tires, wheel covers or trim rings on the compact spare wheel. Otherwise, you coulddamage these parts or other parts on your vehicle.CAUTION
BK0206700US.bo
ok 6 ページ 2014年3月25日 火曜日 午後4時42分