2015 MITSUBISHI OUTLANDER SPORT brake light
[x] Cancel search: brake lightPage 104 of 384
Steering wheel height and reach adjustment
Features and controls 5-41
5
N00511500228
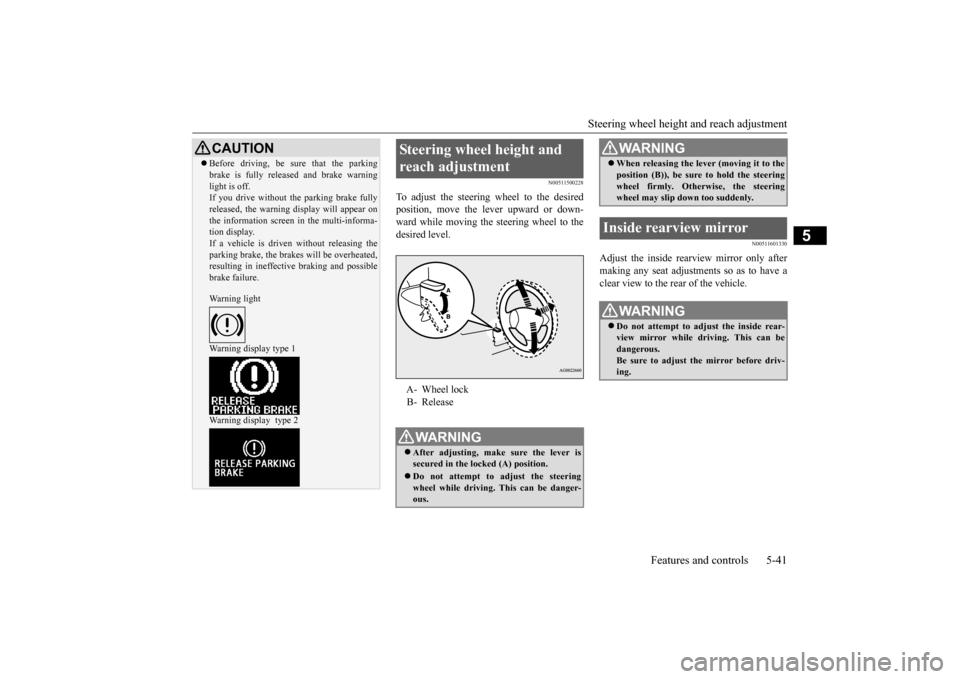
To adjust the steering wheel to the desired position, move the lever upward or down-ward while moving the steering wheel to the desired level.
N00511601330
Adjust the inside rearview mirror only after making any seat adjustments so as to have a clear view to the rear of the vehicle.
CAUTION Before driving, be sure that the parking brake is fully released and brake warning light is off. If you drive without the parking brake fully released, the warning display will appear onthe information screen in the multi-informa- tion display. If a vehicle is driven without releasing theparking brake, the brakes will be overheated, resulting in ineffective braking and possible brake failure. Warning light Warning display type 1 Warning display type 2
Steering wheel height and reach adjustment A- Wheel lock B- ReleaseWA R N I N G After adjusting, make sure the lever is secured in the locked (A) position. Do not attempt to adjust the steering wheel while driving. This can be danger-ous.
When releasing the lever (moving it to the position (B)), be sure to hold the steering wheel firmly. Otherwise, the steering wheel may slip down too suddenly.
Inside rearview mirror
WA R N I N G Do not attempt to adjust the inside rear- view mirror while driving. This can bedangerous. Be sure to adjust the mirror before driv- ing.WA R N I N G
BK0206700US.bo
ok 41 ページ 2014年3月25日 火曜日 午後4時42分
Page 109 of 384
Starting the engine 5-46 Features and controls
5
Do not operate the starter motor continu- ously for longer than
15 seconds as this
could run the battery down or damage thestarter motor. If the engine does not start, turn the ignition switch back to the “OFF” position, wait a few seconds, and then tryagain. Trying repeatedly with the engine or starter motor still turning will damage the starter mechanism. If the engine will not start because the bat- tery is weak or discharged, refer to “Jump-starting the engine” (on page 8-2) for instructions. A longer warm up period will only con- sume extra fuel. The
engine is warmed up
enough for driving when the bar graph ofengine coolant temperature display starts to move. Refer to “Interrupt display screen (With ignition switch or operationmode in ON)” on page 5-93.
This model is equipped with an electronically controlled fuel injection system. This is a sys-tem that automatically controls fuel injection. There is usually no need to depress the accel- erator pedal when starting the engine.The starter should not be run for more than 15 seconds at a time. To prevent battery drain, wait a few secondsbetween attempts to restart the engine. 1. Make sure all occupants are properly seated with seat belts fastened. 2. Insert the ignition key.3. Make sure the parking brake is applied. 4. Press and hold the brake pedal down with your right foot.5. Press and hold the clutch pedal all the way down (manual transaxle).
6. On vehicles equipped with manual trans- axle, place the gearshift lever in the “N” (Neutral) position. On vehicles equipped with continuouslyvariable transmission (CVT), make sure the selector lever is in the “P” (PARK) position. 7. Turn the ignition switch to the “ON” posi- tion and make certain that all warning lights are functioning properly beforestarting the engine. 8. Turn the ignition switch to the “START” position without pressing the acceleratorpedal. Release the key when the engine starts.
Tips for starting
WA R N I N G Never run the engine in a closed or poorly ventilated area any longer than is needed to move your vehicle out of the area. Car-bon monoxide gas, which is odorless and extremely poisonous, could build up and cause serious injury or death.
CAUTION Do not push-start the vehicle.Do not run the engine
at high rpms or drive
at high speeds until the engine has had a chance to warm up. Release the ignition switch as soon as the engine starts. Otherwise, the starter motorwill be damaged.
Starting the engine
NOTE
On vehicles equipped with CVT, the starter will not operate unless the selector lever is in the “P” (PARK) or “N” (NEUTRAL) posi- tion.For safety reasons, start the engine in the “P” (PARK) position so that the wheels are locked.NOTE
Minor noises may be heard on engine start- up. These will disappear as the engine warms up.
BK0206700US.bo
ok 46 ページ 2014年3月25日 火曜日 午後4時42分
Page 110 of 384
Manual transaxle (if so equipped)
Features and controls 5-47
5
After several attempts, you may experience that the engine still does not start. 1. Make sure that all electric devices, such as lights, air conditioning blower and rear window defogger, are turned off. 2. While depressing the brake pedal {contin-uously variable transmission (CVT)} orthe clutch pedal (manual transaxle), press the accelerator pedal halfway and hold it there, then crank the engine. Release theaccelerator pedal, immediately after the engine starts.
3. If the engine still will not start, the engine could be flooded with too much gasoline. While depressing the brake pedal (CVT) or the clutch pedal (manual transaxle),push the accelerator pedal all the way down and hold it there, then crank the engine for 5 to 6 seconds. Return the igni-tion switch to the “OFF” position and release the accelerator pedal. Wait a few seconds, and then crank the engine againfor 5 to 6 seconds while depressing thebrake pedal (CVT) or the clutch pedal (manual transaxle), but do not push the accelerator pedal. Release the ignition keyif the engine starts. If the engine fails to start, repeat these procedures. If the engine still will not start, contact yourlocal Mitsubishi Motors dealer or a repair facility of your choice for assistance.
When the ambient temperature is -22 °F (-30 °C) or lower, it may not be possible to start from a standstill even with the selector leverin the “D” (DRIVE) or “R” (REVERSE) position.
This occurs because the transaxle has not warmed up sufficiently; it does not indicate a problem. If this occurs, place the selector lever in the “P” (PARK) position and let theengine idle for at least 10 minutes. The transaxle will warm up, and you will be able to start normally.Do not leave the vehicle during warm-up operation.
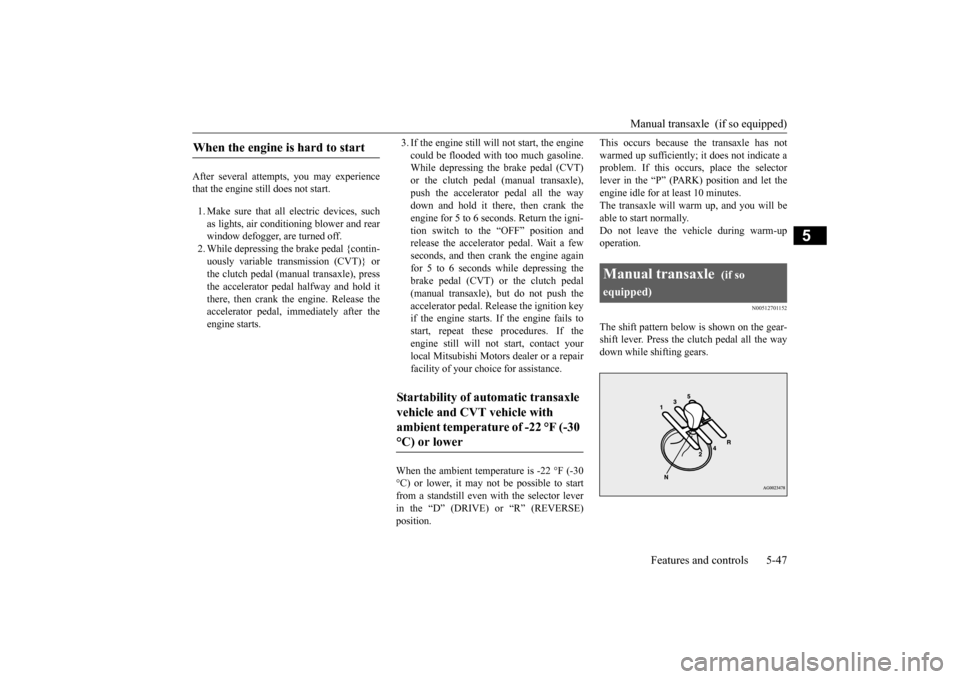
N00512701152
The shift pattern below is shown on the gear-shift lever. Press the clutch pedal all the way down while shifting gears.
When the engine is hard to start
Startability of automatic transaxle vehicle and CVT vehicle with ambient temperature of -22 °F (-30 °C) or lower
Manual transaxle
(if so
equipped)
BK0206700US.bo
ok 47 ページ 2014年3月25日 火曜日 午後4時42分
Page 118 of 384
Continuously variable transmission (CVT) (if so equipped)
Features and controls 5-55
5
N00560800027
To gain extra acceleration in “D” (DRIVE) position (when passing another vehicle) push the accelerator to the floor. The CVT will automatically downshift.
For short waiting periods, such as at traffic lights, the vehicle can be left in selector leverposition and held stationary with the service brake. For longer waiting periods with the enginerunning, place the selector lever in the “N” (NEUTRAL) position and apply the parking brake, while holding the vehicle stationarywith the service brake. Prior to moving off after having stopped the vehicle, make sure that the selector lever is in“D” (DRIVE) position or Sports mode posi- tion.
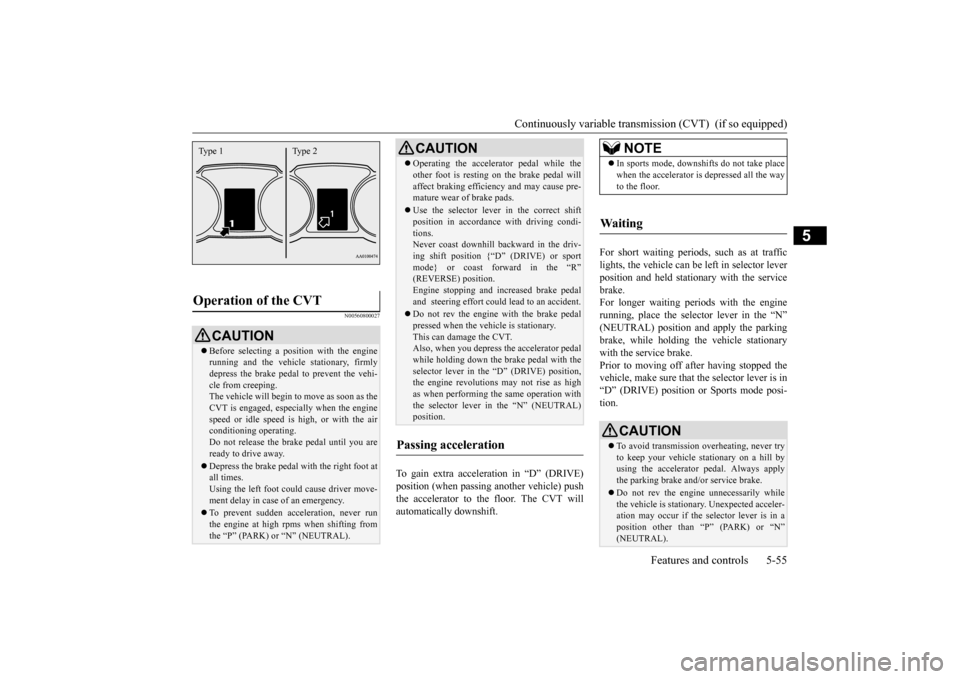
Operation of the CVT
CAUTION Before selecting a position with the engine running and the vehicle stationary, firmly depress the brake pedal to prevent the vehi- cle from creeping.The vehicle will begin to move as soon as the CVT is engaged, especially when the engine speed or idle speed is high, or with the airconditioning operating. Do not release the brake pedal until you are ready to drive away. Depress the brake pedal
with the right foot at
all times.Using the left foot could cause driver move- ment delay in case of an emergency. To prevent sudden acceleration, never run the engine at high rpms when shifting from the “P” (PARK) or “N” (NEUTRAL).Type 1 Type 2
Operating the accelerator pedal while the other foot is resting on the brake pedal will affect braking efficiency and may cause pre- mature wear of brake pads. Use the selector lever in the correct shift position in accordance with driving condi- tions.Never coast downhill backward in the driv- ing shift position {“D” (DRIVE) or sport mode} or coast forward in the “R”(REVERSE) position. Engine stopping and increased brake pedal and steering effort could lead to an accident. Do not rev the engine with the brake pedal pressed when the vehicle is stationary.This can damage the CVT. Also, when you depress the accelerator pedal while holding down the brake pedal with theselector lever in the “D” (DRIVE) position, the engine revolutions may not rise as high as when performing the same operation withthe selector lever in the “N” (NEUTRAL) position.
Passing acceleration
CAUTION
NOTE
In sports mode, downshifts do not take place when the accelerator is depressed all the way to the floor.
Waiting
CAUTION To avoid transmission overheating, never try to keep your vehicle stationary on a hill by using the accelerator pedal. Always apply the parking brake and/or service brake. Do not rev the engine unnecessarily while the vehicle is stationary. Unexpected acceler-ation may occur if the selector lever is in a position other than “P” (PARK) or “N” (NEUTRAL).
BK0206700US.bo
ok 55 ページ 2014年3月25日 火曜日 午後4時42分
Page 122 of 384
4-wheel drive operation
Features and controls 5-59
5
When turning a sharp corner in “4WD LOCK” or “LOCK” position at low speed, a slight difference in steering may be experi-enced similar to feeling as if the brakes were
applied. This is called tight corner braking and results from each of the four tires being at a different distance from the corner. The phe- nomenon is typical of 4-wheel drive vehicles.If this occurs, either straighten out the steer- ing wheel or change to another mode. Set the drive mode-selector to “4WD AUTO”, “4WD LOCK” or “SNOW” in accordance with the road conditions, and then gradually depress the accelerator pedal for asmooth start.
WA R N I N G Do not over-rely on the 4-wheel drive vehi- cles. Even 4-wheel drive vehicles have lim- its to the system and ability to maintain control and traction. Reckless driving may lead to accidents. Always drive carefully,taking account of the road conditions. Improperly operating this vehicle on or off-pavement can cause an accident or rollover in which you and your passengers could be seriously injured or killed.• Follow all instructio
ns and guidelines in
the owner’s manual.• Keep your speed low and do not drivefaster than conditions.NOTE
Driving on rough roads can be hard on a vehicle. Before you leave the pavement, be sure all scheduled maintenance and servicehas been done, and that you have inspected your vehicle. Pay special attention to the condition of the tires, and check the tire pres-sures. Mitsubishi Motors is not responsible to the operator for any damage or injury caused or liability incurred by improper and negligentoperation of a vehicle. All techniques of vehicle operation depend on the skill and experience of the operator and other partici-pating parties. Any deviation from the rec- ommended operating instructions above is at their own risk.
Note that the stopping distance required of the 4-wheel drive vehicle differs very little from that of the front-wheel drive vehicle. When driving on a snow-covered road or a slippery, muddy surface, make sure that youkeep a sufficient distance between your vehi- cle and the one ahead of you. The driving posture should be more upright; adjust the seat to a good position for easy steering and pedal operation. Be sure to wearthe seat belt. After driving on rough roads, check each part of the vehicle and wash it thoroughly with water. Refer to the “Inspection and maintenance following rough road opera-tion” section and “Vehicle care and Mainte- nance” sections.CAUTION Setting the drive mode-selector to “4WD LOCK” or “LOCK” position to drive on drypaved road will increase fuel consumption, with possible noise generation.
Turning sharp corners
NOTE
On snowy or icy roads
NOTE
The use of snow tires is recommended. Maintain a safe distance between vehicles, avoid sudden braking, and use engine brak-ing (downshifting).CAUTION Avoid sudden braking, sudden acceleration and sharp turning. Skidding occurs and con- trol of the vehicle could be lost.
BK0206700US.bo
ok 59 ページ 2014年3月25日 火曜日 午後4時42分
Page 124 of 384
Inspection and maintenance fo
llowing rough road operation Features and controls 5-61
5
N00530700098
After operating the vehicle in rough road con- ditions, be sure to perform the following inspection and maintenance procedures: Check that the vehicle has not been dam- aged by rocks, gravel, etc. Carefully wash the vehicle with water. Drive the vehicle slowly while lightlydepressing the brake pedal in order to dry out the brakes. If the brakes still do not function properly, co
ntact an authorized
Mitsubishi Motors dealer or a repair facil- ity of your choice as soon as possible to have the brakes checked. Remove the insects, dried grass, etc. clog- ging the radiator core.
After driving through water, check the engine, transaxle and differential oil. If the oil or grease is milky or cloudy because of water contamination, it mustbe replaced with new oil. Check the inside of the vehicle. If water entry is found, dry the carpet etc. Inspect the headlights. If water is in the headlight housing, have it drained at an authorized Mitsubishi Motors dealer or arepair facility of your choice. Have an authorized Mitsubishi Motors dealer replace grease in the wheel bear- ings.
N00530800187
Since the driving torque can be applied to thefour wheels, the driving performance of thevehicle when operating in 4-wheel drive is greatly affected by the condition of the tires. Pay close attention to the tires. Install only the specified tires on all wheels. Refer to “Tires and wheels” onpage 11-5.
Be sure all four tires and wheels are the same size and type. When it is necessary to replace any of the tires or wheels, replace all four. All tires should be rotated before the wear difference between the front and rear tires is recognizable.
Good vehicle performance cannot be expected if there is a difference in wear between tires. Refer to “Tire rotation” on page 9-19. Check the tire inflation pressure regularly.
After driving through water, apply the brakes to be sure they are functioning properly. If the brakes are wet and not functioning prop- erly, dry them out by driving slowly while lightly depressing the brake pedal. Inspecteach part of the vehicle carefully.
Inspection and maintenance following rough road opera-tion
CAUTION
Cautions on the handling of 4-wheel drive vehicles Tires and wheels
CAUTION Always use tires of the same size, type, and brand that have no wear differences. Usingtires of different size, type, brands or degree of wear, will increase the differential oil tem- perature and result in possible damage to thedriving system. Further, the drive train will be subject to excessive loading, possibly leading to oil leakage, component seizure, orother serious failures.
BK0206700US.bo
ok 61 ページ 2014年3月25日 火曜日 午後4時42分
Page 125 of 384
Service brake 5-62 Features and controls
5
N00517500275
Overuse of the brake can cause weakening, resulting in poor brake response and prema- ture wear of the brake pads.When driving down a long or steep hill, use engine braking by downshifting.
N00517600436
Your vehicle is equipped with power brakes for more braking force with less brake pedaleffort. Your brakes are designed to operate at full capacity, even if the power
assist is not being
used. If the power assist is not being used, the effort needed to press the brake pedal is greater.If you should lose the power assist for some reason, the brakes will still work. If the power brake unit or either of the twobrake hydraulic systems stops working prop- erly, the rest of the br
ake system will still
work, but the vehicle will not slow down asquickly. You will know this has happened if you find you need to press the brake down farther, orharder when slowing down or stopping, or if the brake warning light and the warning dis- play in the multi-information display comeon. Have the brake system repaired at an
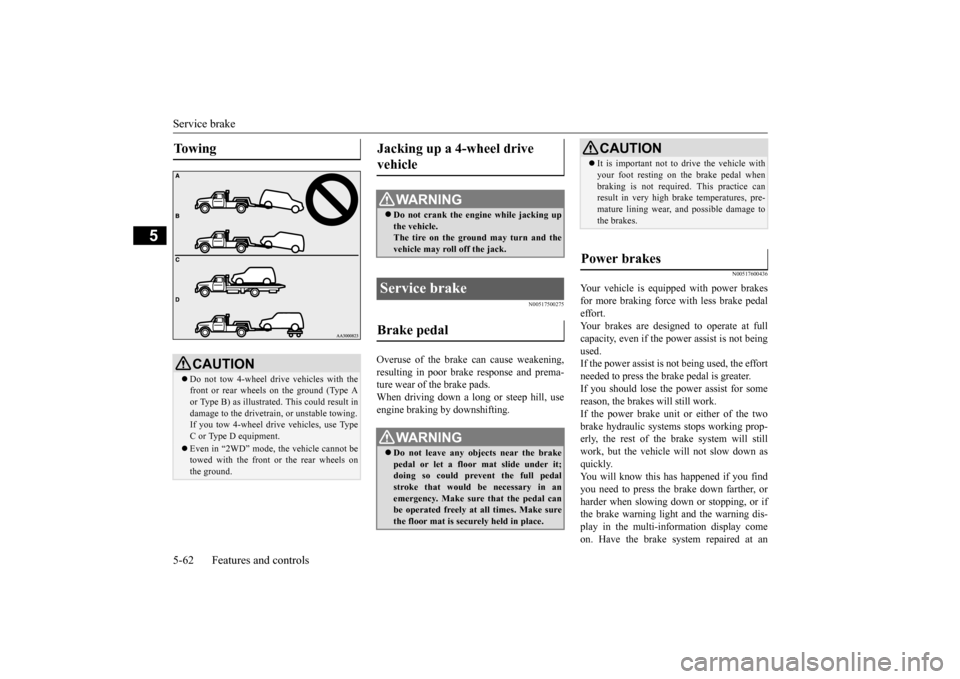
To w i n g
CAUTION Do not tow 4-wheel drive vehicles with the front or rear wheels on the ground (Type Aor Type B) as illustrated. This could result in damage to the drivetrain, or unstable towing. If you tow 4-wheel drive vehicles, use Type C or Type D equipment. Even in “2WD” mode, the vehicle cannot be towed with the front or the rear wheels on the ground.
Jacking up a 4-wheel drive vehicle
WA R N I N G Do not crank the engine while jacking up the vehicle.The tire on the ground may turn and the vehicle may roll off the jack.
Service brake Brake pedal
WA R N I N G Do not leave any objects near the brake pedal or let a floor mat slide under it; doing so could prevent the full pedal stroke that would be necessary in anemergency. Make sure that the pedal can be operated freely at all times. Make sure the floor mat is securely held in place.
CAUTION It is important not to drive the vehicle with your foot resting on the brake pedal when braking is not required. This practice can result in very high brake temperatures, pre- mature lining wear, and possible damage tothe brakes.
Power brakes
BK0206700US.bo
ok 62 ページ 2014年3月25日 火曜日 午後4時42分
Page 128 of 384
Anti-lock braking system
Features and controls 5-65
5
N00517900240
The anti-lock braking system helps prevent the wheels from lockin
g up when braking.
This helps maintain vehicle drivability and steering wheel handling.
When using the anti-lock brakes (sudden braking), steering is slightly different from normal driving conditions. Use thesteering wheel carefully. Always keep a safe distance from the vehicle in front of you. Even if your vehi-cle is equipped with the anti-lock braking system, leave a greater braking distance when:• Driving on gravel or snow-coveredroads. • Driving on uneven road surfaces. Operation of anti-lock braking system is not restricted situations where brakes are applied suddenly. This system may also prevent the wheels from locking whenyou drive over manholes, steel roadwork plates, road markings, or any uneven road surface. When the anti-lock braking system is in use, you may feel the brake pedal vibrat- ing and hear a unique sound. It may alsofeel as if the pedal resists being pressed. In this situation, si
mply hold the brake
pedal down firmly. Do not pump thebrake, which will result in reduced braking performance.
N00531600645
Warning light
NOTE
Once the brake assist system is operational, it maintains great braking force even if the brake pedal is lightly released. To stop its operation, completely remove your foot from the brake pedal. When the brake assist system is in use while driving, you may feel as if the depressedbrake pedal is soft, the pedal moves in small motions in conjunction with the operation noise, or the vehicle body and the steeringwheel vibrate. This occurs when the brake assist system is operating normally and does not indicate faulty operation. Continue todepress the brake pedal. You may hear an operation noise when the brake pedal is suddenly or fully depressed while stationary. This does not indicate a malfunction and the brake assist system isoperating normally. When the anti-lock brake system warning light/display or only ASC warning display illuminate, the brake assist system in not functioning.
Anti-lock braking system
Driving hints
CAUTION The anti-lock braking system cannot prevent accidents. It is your responsibility to take safety precautions and to drive carefully. To prevent failure of the anti-lock braking system, be sure all 4 wheels and tires are the same size and the same type.NOTE
A whining sound is emitted from the engine compartment when driving immediately after starting the engine. These are the nor- mal sounds the anti-lock braking systemmakes when performing a self-check. It does not indicate a malfunction. The anti-lock braking system can be used after the vehicle has reached a speed over approximately 6 mph (10 km/h). It stopsworking when the vehicle slows below 3 mph (5 km/h).
Anti-lock braking system warn- ing light/display
BK0206700US.bo
ok 65 ページ 2014年3月25日 火曜日 午後4時42分