2015 MITSUBISHI OUTLANDER steering
[x] Cancel search: steeringPage 344 of 446
Listen to Satellite Radio (if so equipped)
Comfort controls 7-29
7
During RBDS broadcast
reception, select
PTY (program content) to perform a collec- tive search for stations. 1. During FM reception, press the PTY key. This switches to the PTY selection mode. 2. Press the PTY key to select PTY.3. Press the SCAN key. When a broadcast station is received, this is played for 5 seconds, then the productsearches for the next station.
N00717000025
This section explains how
to listen to satellite
radio. Press the RADIO key to switch the band. Switches between SIR1, SIR2, SIR3, and SIR4 bands. The selected band is indicated on the display.
Press the key or ke
y to select the sta-
tion.
NOTE
This receives the station detected first. 10 seconds after reception, PTY search mode will be cancelled. To receive a different station, press the key or key again.
PTY Scan
NOTE
Press this key again while receiving the sta- tion to return to normal reception.
Listen to Satellite Radio
(if so
equipped)
NOTE
A subscription is require
d to listen to satel-
lite radio. Satellite
radio cannot be received
after the free tria
l period has expired.
If no subscription has been made when the free trial period expire
s, the display will
alternate between “CALL” and “888-539-SIRI”.
To listen to Satellite Radio
NOTE
Bands switch in the order AM, FM1, FM2, SIR1, SIR2*, SIR3*, and SIR4*. Switch satellite radi
o bands by holding down
the key or key on the steering remote control switch.
*:If no signal is received, bands will not be switched.
Select a Station
key
Go down one step from the channel being received.
key
Go up one step from the channel being received.
key
(Hold down)
While the key is held down, it will cycle down through the channels being received.
key
(Hold down)
While the key is held down, it will cycle up through the channels being received.
NOTE
When cycling up/down through channels, the channel number display
in the upper level of
the display changes. When channel number “
000” is selected, the
SIRIUS ID (12 digi
ts) is displayed.
BK0211800US.book 29 ページ 2014年3月12日 水曜日 午後2時42分
Page 367 of 446
If the vehicle breaks down 8-2 For emergencies
8
N00836301230
If your vehicle breaks down on the road, move to the shoulder and turn on the hazard warning flashers. If there is no shoulder, orthe shoulder is not safe, drive in the right lane slowly with the hazard
lights flashing, until
you come to a safe stopping place. Keep theflashers flashing. If the engine stops, there will be no power assist to the steering and brakes, making these difficult to use. The brake booster will not work, so the brakes will not grip well. The brake pedal will be harder to press than usual. Since there is no power steering assist, the steering wheel will be hard to turn.
Get help from your passengers, bystanders, etc. to push the vehicle
and move it to a safe
area.
N00836401778
If the engine cannot be started because the battery is weak or de
ad, you can start it with
the battery from anothe
r vehicle using jumper
cables. 1. Take off any metal jewelry such as watch bands or bracelets th
at might create an
accidental electrical contact. 2. Position the vehi
cles close enough
together so that the jumper cables canreach, but be sure the vehicles aren’t touching each other.
3. Set the parking brake firmly on your vehi- cle and move the selector lever into the “P” (PARK) position. 4. Set the parking brake firmly on the othervehicle. Put the automatic transaxle in “P” (PARK) or the manual transaxle in “N” (Neutral).5. Turn the ignition switch (the engine switch) on each vehicle to the “LOCK” or “OFF” position. 6. Make sure your battery electrolyte is at the proper level. (Refer to “Battery” on page 9-13.)
If the vehicle breaks down If the engine stops/fails When the engine fails at the intersection
Jump-starting the engine
WA R N I N G To reduce the risk of igniting flammable gas that may be emitted from the battery,carefully read this section before jump- starting the vehicle. Do not try to start you
r vehicle by pushing
or towing. This can cause an accident resulting in serious
injury or death and
can damage the vehicle.NOTE
Do not use jumper cables if they have dam- age or corrosion.
CAUTION Check the other vehicle.
It must have a 12-
volt battery. If the other system isn’t 12-volt,both systems can be damaged.NOTE
Turn off all lights, heat
er, and othe
r electrical
loads. This will avoid sparks and help saveboth batteries.
BK0211800US.book 2 ページ 2014年3月12日 水曜日 午後2時42分
Page 372 of 446
How to change a tire
For emergencies 8-7
8
6. Get the jack, bar and wheel nut wrench ready.(Refer to “Jack and t
ools” on page 8-5.)
N00849600315
The compact spare tire is stowed below the luggage compartment fl
oor. It is designed to
save space in the luggage compartment. Itslighter weight makes it easier to use if a flat tire occurs.
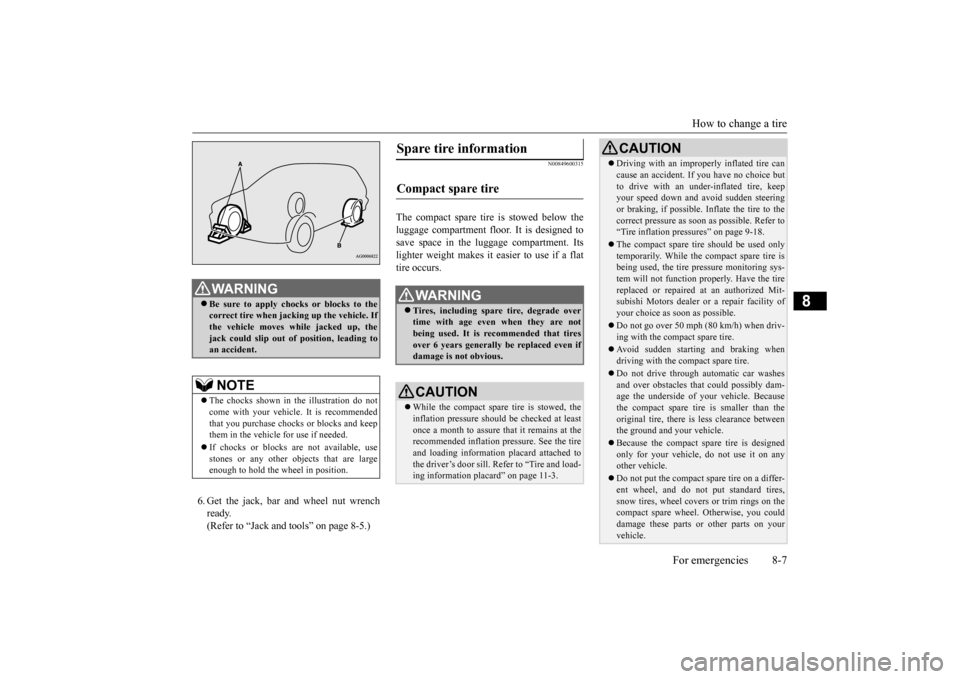
WA R N I N G Be sure to apply choc
ks or blocks to the
correct tire when jacking up the vehicle. Ifthe vehicle moves while jacked up, the jack could slip out of
position, leading to
an accident.NOTE
The chocks shown in the illustration do not come with your vehicl
e. It is recommended
that you purchase chocks or blocks and keep them in the vehicle for use if needed. If chocks or blocks
are not available, use
stones or any other obj
ects that are large
enough to hold the wheel in position.
Spare tire information Compact spare tire
WA R N I N G Tires, including spar
e tire, degrade over
time with age even when they are not being used. It is recommended that tiresover 6 years generally
be replaced even if
damage is not obvious.CAUTION While the compact spare tire is stowed, the inflation pressure shoul
d be checked at least
once a month to assure that it remains at the recommended inflation pressure. See the tire and loading informati
on placard attached to
the driver’s door sill. Refer to “Tire and load-ing information placard” on page 11-3.
Driving with an imprope
rly inflated tire can
cause an accident. If
you have no choice but
to drive with an under-inflated tire, keepyour speed down and avoid sudden steering or braking, if possible. Inflate the tire to the correct pressure as s
oon as possible. Refer to
“Tire inflation pressures” on page 9-18. The compact spare tire should be used only temporarily. While the compact spare tire is being used, the tire pr
essure monitoring sys-
tem will not function pr
operly. Have the tire
replaced or repaired at an authorized Mit- subishi Motors dealer or
a repair facility of
your choice as soon as possible. Do not go over 50 mph (80 km/h) when driv- ing with the compact spare tire. Avoid sudden starting and braking when driving with the compact spare tire. Do not drive through automatic car washes and over obstacles that
could possibly dam-
age the underside of your vehicle. Because the compact spare tire is smaller than the original tire, there is less clearance betweenthe ground and your vehicle. Because the compact spare tire is designed only for your vehicle, do not use it on any other vehicle. Do not put the compact spare tire on a differ- ent wheel, and do not put standard tires, snow tires, wheel covers
or trim rings on the
compact spare wheel. Otherwise, you could damage these parts or other parts on your vehicle.CAUTION
BK0211800US.book 7 ページ 2014年3月12日 水曜日 午後2時42分
Page 376 of 446
How to change a tire
For emergencies 8-11
8
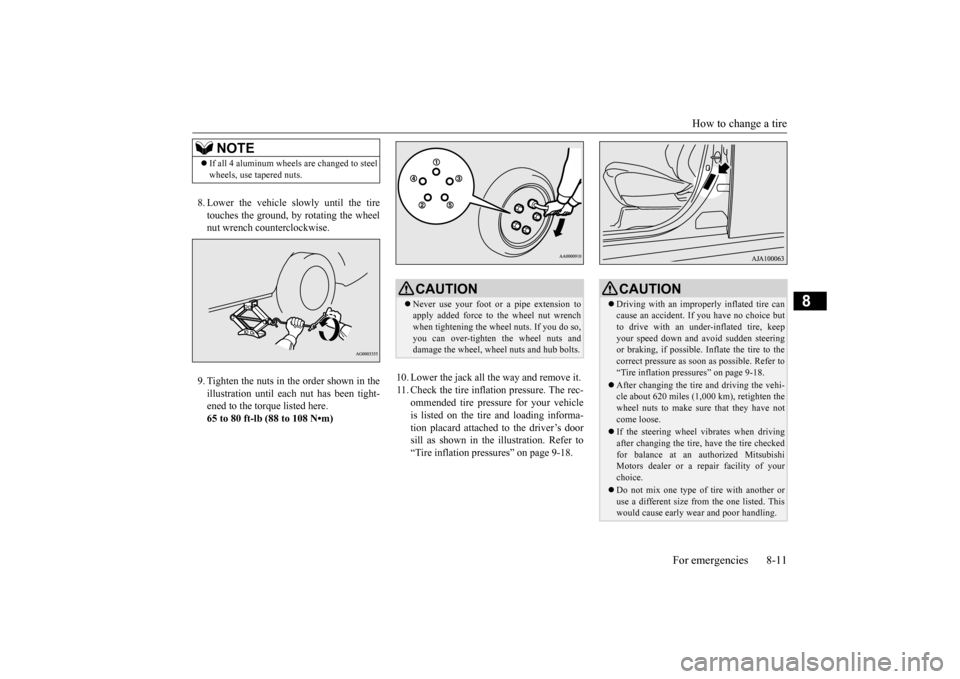
8. Lower the vehicle slowly until the tire touches the ground, by rotating the wheel nut wrench counterclockwise. 9. Tighten the nuts in the order shown in the illustration until each
nut has been tight-
ened to the torque listed here.65 to 80 ft-lb (88 to 108 N•m)
10. Lower the jack all the way and remove it. 11. Check the tire inflation pressure. The rec-
ommended tire pressure for your vehicleis listed on the tire
and loading informa-
tion placard attached to the driver’s door sill as shown in the illustration. Refer to“Tire inflation pressures” on page 9-18.
NOTE
If all 4 aluminum wheels are changed to steel wheels, use tapered nuts.
CAUTION Never use your foot or a pipe extension to apply added force to the wheel nut wrenchwhen tightening the wheel nuts. If you do so, you can over-tighten the wheel nuts and damage the wheel, wheel nuts and hub bolts.
CAUTION Driving with an imprope
rly inflated tire can
cause an accident. If
you have no choice but
to drive with an under-inflated tire, keep your speed down and avoid sudden steering or braking, if possible. Inflate the tire to thecorrect pressure as s
oon as possible. Refer to
“Tire inflation pressures” on page 9-18. After changing the tire
and driving the vehi-
cle about 620 miles (1,000 km), retighten the wheel nuts to make sure
that they have not
come loose. If the steering wheel vibrates when driving after changing the tire, have the tire checked for balance at an authorized Mitsubishi Motors dealer or a repair facility of yourchoice. Do not mix one type of tire with another or use a different size from the one listed. This would cause ea
rly wear and poor handling.
BK0211800US.book 11 ページ 2014年3月12日 水曜日 午後2時42分
Page 399 of 446
Tires 9-18 Vehicle care and maintenance
9
The temperature grades are A (the highest), B and C, representing the tire’s resistance to thegeneration of heat and
its ability to dissipate
heat when tested under controlled conditions on a specified indoor la
boratory test wheel.
Sustained high temper
ature can cause the
material of the tire to
degenerate and reduce
tire life, and excessive temperature can leadto sudden tire failure. The grade C corre- sponds to a level of performance which all passenger car tires must meet under the Fed- eral Motor Vehicle Safety Standard No. 109. Grades B and A represent higher levels ofperformance on the labora
tory test wheel than
the minimum required by law.
N00939300815
Proper tire inflation pres
sure is essential for
the safe and satisfactory operation of your vehicle. The wrong tire
pressure will cause
problems in three major areas: Safety Too little pressure increases flexing in the tire and can cause tire failure. Too muchpressure can cause a tire to lose its ability to cushion shock. Objects on the road and potholes could then cause tire damage thatmay result in tire failure.
Economy The wrong tire pressu
re can cause uneven
wear patterns in the tire tread. These abnormal wear patter
ns will reduce the
tread life, and the tire will have to bereplaced sooner. Too little pressure also
makes it harder for
the tire to roll, and this uses up more fuel. Ride comfort and vehicle stability The superior riding e
xperience built into
your vehicle partly depends on the correct tire pressure. Too much pressure gives an uncomfortable and ja
rring ride. Too little
pressure feels as if
your vehicle is slow to
respond. Unequal tire pressure
s can make steering
your vehicle uneven and unpredictable.
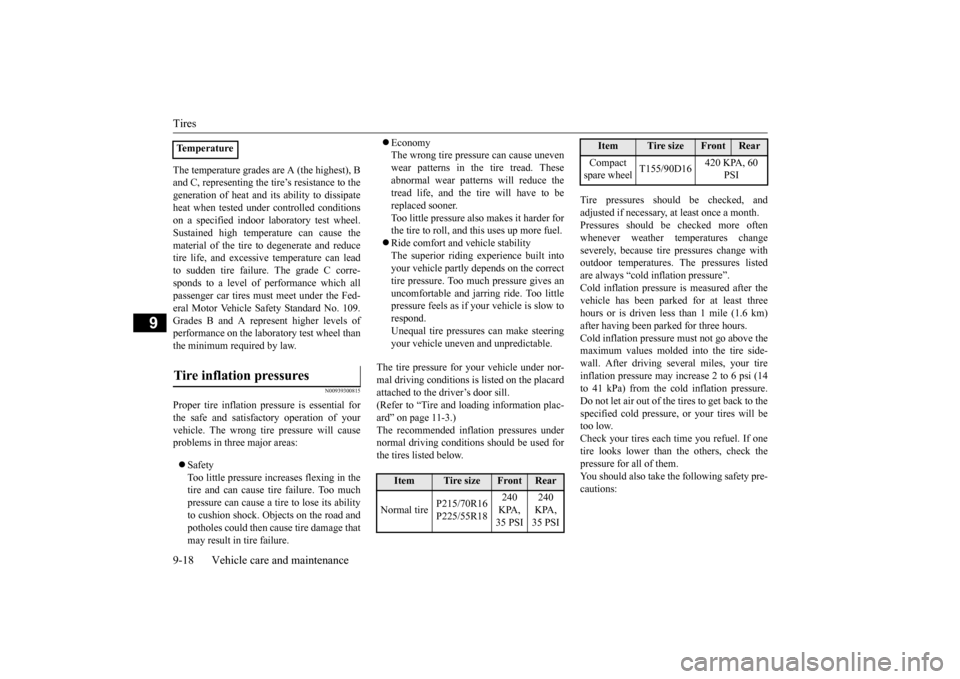
The tire pressure for your vehicle under nor- mal driving conditions is listed on the placard attached to the driver’s door sill.(Refer to “Tire and loading information plac- ard” on page 11-3.) The recommended infl
ation pressures under
normal driving conditions should be used for the tires listed below.
Tire pressures should be checked, and adjusted if necessary, at least once a month.Pressures should be checked more often whenever weather temperatures change severely, becaus
e tire pressures change with
outdoor temperatures. The pressures listed are always “cold in
flation pressure”.
Cold inflation pressure is measured after thevehicle has been parked
for at least three
hours or is driven less than 1 mile (1.6 km) after having been parked for three hours. Cold inflation pressure must not go above the maximum values molded into the tire side-wall. After driving seve
ral miles, your tire
inflation pressure may increase 2 to 6 psi (14 to 41 kPa) from the cold inflation pressure.Do not let air out of the tires to get back to the specified cold pressure, or your tires will be too low.Check your tires each time you refuel. If one tire looks lower than the others, check the pressure for all of them.You should also take the following safety pre- cautions:
TemperatureTire inflation pressures
Item
Tire size
Front
Rear
Normal tire
P215/70R16 P225/55R18
240 KPA, 35 PSI
240 KPA, 35 PSI
Compact spare wheel
T155/90D16
420 KPA, 60
PSI
Item
Tire size
Front
Rear
BK0211800US.book 18 ページ 2014年3月12日 水曜日 午後2時42分
Page 404 of 446
General maintenance
Vehicle care and maintenance 9-23
9
N00950100050
Have the valve clea
rance checked at an
authorized Mitsubishi Motors dealer at the mileage specified in the “WARRANTY ANDMAINTENANCE MANUAL”. If the engine sounds abnormally loud, have adjustments made by an authorizedMitsubishi Motors dealer.
N00941300173
Check these regularly for damage or leaks inthe fuel lines and connections. Check the fuel tank filler cap for dama
ge or looseness. Pay
special attention to the fuel lines closest tohigh heat sources such
as the exhaust mani-
fold.
N00941400187
If the fuel-vapor vent line is clogged or dam- aged, the fuel-vapor mixture will escape, pol- luting the air. Have the system checked at an authorizedMitsubishi Motors dealer at the mileage spec- ified in the “WARRANTY AND MAINTE- NANCE MANUAL”.
N00941501299
The next pages list th
e maintenance service
recommended by Mitsubishi Motors Corpo- ration. In addition to the general maintenance that needs to be performed at the times listed,there are other parts which do not usually need regular maintenance. But, if any of these parts stops working prop-erly, your vehicle performance could suffer. Have these items checked if you notice a problem with them. If you have any questions, see your autho- rized Mitsubishi Motors
dealer for assistance.
N00941600059
Good brakes are essential for safe driving. Check the brake pads for wear. For good braking performance, replace the brake padswith the same type pa
ds as the originals.
N00941700076
Brake hoses and tubing should be checked for: Severe surface cracki
ng, scuffing or worn
spots. If the fabric casing of the hose isshowing through any cracks or worn spots in the rubber hose cover, the hose should be replaced. The brakes can fail if thehose wears through. Improper installation may cause twisting, or wheel, tire or
chassis interference.
N00941800093
Check the following parts for damage and grease leaks: Ball joint boots of the suspension and steering linkage Bellows on both ends of the drive shaft
Intake valve clearance Fuel system (tank, pipe line and connection, and fuel tank filler cap)
WA R N I N G If you see a fuel leak
or if you smell fuel,
do not run the engine. Any spark (includ-ing from the ignition
), flame or smoking
material could cause an explosion or fire. Call an authorized Mitsubishi Motorsdealer or a repair fa
cility of your choice
for assistance.
Evaporative emission control system (except evaporative emission canister) General maintenance
Disc brake pads Brake hoses Ball joint, steering linkage seals, drive shaft boots
BK0211800US.book 23 ページ 2014年3月12日 水曜日 午後2時42分
Page 440 of 446
Alphabetical index
12-1
12
Numerics
12 V power outlets
............................
5-210
4-wheel drive operation
.......................
5-80
A
Accessory (installation)
.........................
3-6
Active stability control (ASC)
..............
5-89
Adaptive Cruise Cont
rol System (ACC) 5-96
Air bag
..............................................
4-33
Air cleaner filter
...................................
9-9
Air conditioner
Automatic climate control air conditioner
.
7-5Important air condi
tioning operating tips
..
7-14
Air purifier
.........................................
7-14
All-wheel drive operation
....................
5-80
Aluminum wheels
...............................
9-42
AM/FM radio
.....................................
7-15
Antenna
Roof antenna
..................................
7-47
Anti-lock braking system
.....................
5-86
Arm rest
...............................................
4-9
Assist grip
........................................
5-220
Audio
AM/FM radio
.................................
7-15
CD player
......................................
7-15
Troubleshooting
.............................
7-45
Automatic climate cont
rol air conditioner 7-5
Automatic transaxle
............................
5-60
Fluid
.....................................
9-10
, 11-7
Selector le
ver operation
..................
5-60
Selector lever positions
...................
5-63
Sports mode
...................................
5-64
B
Back-up light
Bulb capacity
.................................
9-30
Replacement
..................................
9-37
Ball joint, steering linka
ge seals, drive shaft
boots
...............................................
9-23
Battery
..............................................
9-13
Charging system warning light
.......
5-168
Checking battery
electrolyte level
....
9-13
Disconnection and connection
.........
9-13
During cold weather
.......................
9-13
Specification
..................................
11-6
Bluetooth® 2.0 interface
....................
5-185
Bottle holders
....................................
5-218
Brake
Fluid
.....................................
9-12
, 11-7
Brake assist
........................................
5-86
Braking
Anti-lock braking system
................
5-86
Braking
...........................................
6-5
Hose
..............................................
9-23
Pad wear alarm
...............................
5-84
Parking brake
.................................
5-52
Pedal
.............................................
5-84
Pedal free play
................................
9-21
Power brakes
..................................
5-84
Service brake
..................................
5-84
Warning lights and buzzer
.............
5-167
Break-in recommendations
....................
5-3
Bulb capacity
......................................
9-30
C
California Perchl
orate Materials
Requirements
.....................................
3-7
Capacities
..........................................
11-7
Card holder
............................
5-209
, 5-214
Cargo area cover
...............................
5-218
Cargo loads
........................................
6-10
Cargo room light
...............................
5-213
Bulb capacity
.................................
9-32
Catalytic converter
................................
9-2
Cautions on the handling of all-wheel drive vehicles
............................................
5-83
CD player
...........................................
7-15
Certification label
...............................
11-3
Charging system warning light
...........
5-168
Child restraint systems
........................
4-25
Child safety locks for rear door
............
5-35
BK0211800US.book 1 ページ 2014年3月12日 水曜日 午後2時42分
Page 441 of 446

Alphabetical index 12-2
12
Cleaning
Inside of your vehicle
......................
9-39
Outside of your vehicle
...................
9-40
Coat hook
........................................
5-220
Consumer information
........................
10-2
Continuously variable transmission (CVT)
....
5-67 Fluid
....................................
9-11
, 11-7
Selector lever operation
...................
5-67
Selector le
ver positions
...................
5-71
Sports mode
...................................
5-72
Coolant (engine)
..........................
9-8
, 11-7
Cruise control
.....................................
5-92
Cup holder
.......................................
5-217
D
Daytime running lights
Bulb capacity
.................................
9-30
Replacement
.........................
9-32
, 9-35
Defogger (rear window)
....................
5-183
Defrosting or defogging (windshield, door windows)
..................................
7-9
, 7-13
Digital clock
Time setting
...................................
7-44
Dimensions
........................................
11-4
Dimmer (high/lo
w beam change)
.......
5-174
Disc brake pads
..................................
9-23
Dome light (front)/Reading lights
.......
5-211
Bulb capacity
..................................
9-32
Dome light (rear)
...............................
5-212
Bulb capacity
..................................
9-32
Doors
Lock
..............................................
5-31
Power door locks
............................
5-33
Driving during cold weather
..................
6-5
Driving precaution
...............................
6-2
Driving, alcohol and drugs
....................
6-2
E
ECO mode switch
.............................
5-177
Electric power steering system (EPS)
....
5-88
Electric rear window
defogger switch
..5-183
Electronic immobilizer (Anti-theft starting system)
.....................................
5-4
, 5-26
Electronically cont
rolled 4WD system
..5-74
Emission-control system maintenance
...
9-22
Engine
Compartment
...................................
9-5
Coolant
...................................
9-8
, 11-7
Hood
...............................................
9-3
Malfunction indicator light
.............
5-167
MIVEC
.................................
5-24
, 5-59
Oil and oil filter
.......................
9-6
, 11-7
Overheating
.....................................
8-4
Serial number
.................................
11-2
Specification
...................................
11-6
Engine hood
.........................................
9-3
Engine switch
.....................................
5-16
Exhaust system
...................................
9-24
F
Floor console box
.............................
5-215
Floor mat
.............................................
6-3
Fluid
Automatic transaxle fluid
.......
9-10
, 11-7
Brake fluid
............................
9-12
, 11-7
Continuously variable transmission (CVT) fluid
...................................
9-11
, 11-7
Engine coolant
........................
9-8
, 11-7
Engine oil
...............................
9-6
, 11-7
Rear axle oil
..........................
9-12
, 11-7
Transfer oil
...........................
9-11
, 11-7
Washer fluid
.........................
9-12
, 11-7
Fluid capacities and lubricants
.............
11-7
Forward Collision Miti
gation System (FCM)
5-106 Free-hand advanced security transmitter (F.A.S.T.-key)
..................................
5-12
Front fog lights
Bulb capacity
.................................
9-30
Indicators
.....................................
5-166
Replacement
..................................
9-35
Switch
.........................................
5-178
Front side-marker lights
Bulb capacity
.................................
9-30
BK0211800US.book 2 ページ 2014年3月12日 水曜日 午後2時42分