2015 MITSUBISHI OUTLANDER ECO mode
[x] Cancel search: ECO modePage 173 of 446
Adaptive Cruise Control System (ACC) (if so equipped) 5-96 Features and controls
5
Under either of the following conditions, however, using the switch does not allow youto resume the previously set speed. In these situations, repeat the
speed setting procedure:
The CRUISE CONTROL ON/OFF switch is pressed. The operation mode is put in OFF. Indicator go off.
N00576800035
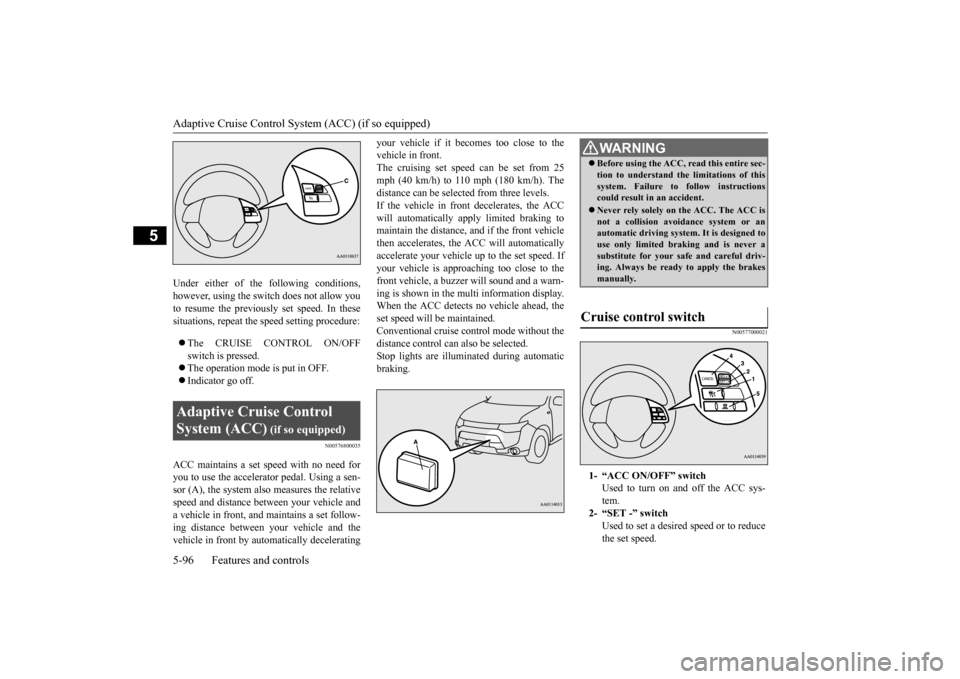
ACC maintains a set speed with no need for you to use the accelerator pedal. Using a sen-sor (A), the system also measures the relative speed and distance between your vehicle and a vehicle in front, and maintains a set follow-ing distance between your vehicle and the vehicle in front by auto
matically decelerating
your vehicle if it becomes too close to the vehicle in front.The cruising set speed can be set from 25 mph (40 km/h) to 110 mph (180 km/h). The distance can be select
ed from three levels.
If the vehicle in front decelerates, the ACC will automatically apply limited braking to maintain the distance, a
nd if the front vehicle
then accelerates, the ACC will automatically accelerate your vehicle up to the set speed. If your vehicle is approa
ching too close to the
front vehicle, a buzzer
will sound and a warn-
ing is shown in the multi information display.When the ACC detects no vehicle ahead, the set speed will be maintained. Conventional cruise cont
rol mode without the
distance control can also be selected. Stop lights are illuminated during automatic braking.
N00577000021
Adaptive Cruise Control System (ACC)
(if so equipped)
WA R N I N G Before using the ACC, read this entire sec- tion to understand th
e limitations of this
system. Failure to follow instructionscould result in an accident. Never rely solely on the ACC. The ACC is not a collision avoidance system or an automatic driving system. It is designed to use only limited brak
ing and is never a
substitute for your safe and careful driv- ing. Always be ready to apply the brakes manually.
Cruise control switch
1- “ACC ON/OFF” switch
Used to turn on and off the ACC sys-tem.
2- “SET -” switch
Used to set a desired speed or to reducethe set speed.
BK0211800US.book 96 ページ 2014年3月12日 水曜日 午後2時42分
Page 187 of 446
Forward Collision Mitigation System (FCM) (if so equipped) 5-110 Features and controls
5
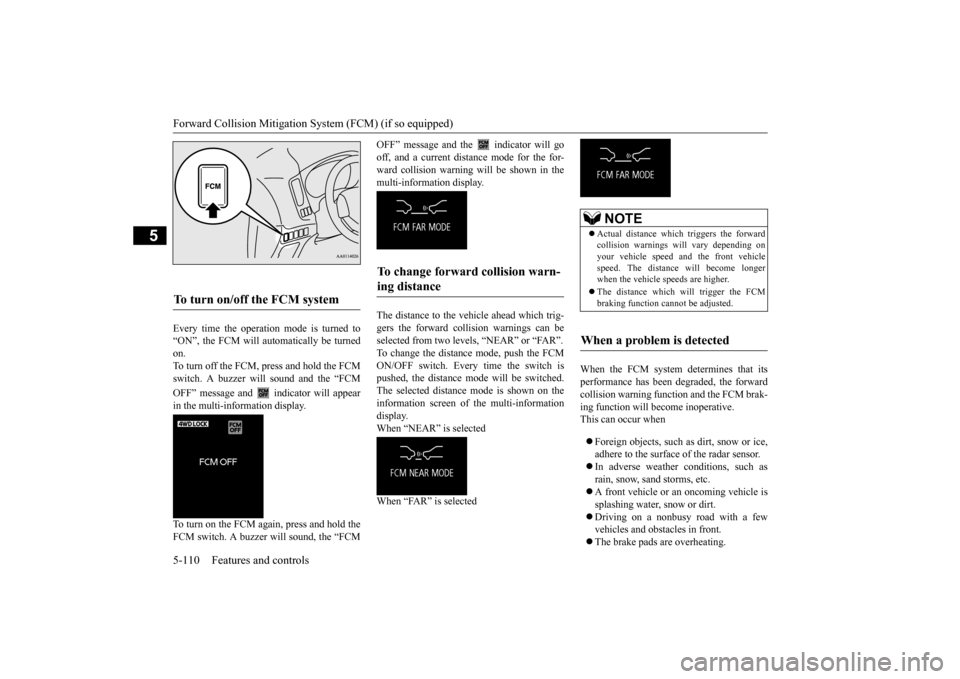
Every time the operation mode is turned to “ON”, the FCM will automatically be turned on. To turn off the FCM, press and hold the FCMswitch. A buzzer will sound and the “FCM OFF” message and
indicator will appear
in the multi-information display. To turn on the FCM again, press and hold the FCM switch. A buzzer w
ill sound, the “FCM
OFF” message and the indicator will go off, and a current distance mode for the for- ward collision warning w
ill be shown in the
multi-information display. The distance to the vehicle ahead which trig- gers the forward collision warnings can be selected from two levels, “NEAR” or “FAR”.To change the distan
ce mode, push the FCM
ON/OFF switch. Every time the switch is pushed, the distance
mode will be switched.
The selected distance
mode is shown on the
information screen of
the multi-information
display. When “NEAR” is selected When “FAR” is selected
When the FCM system determines that its performance has been degraded, the forwardcollision warning function and the FCM brak- ing function will become inoperative. This can occur when Foreign objects, such as
dirt, snow or ice,
adhere to the surface of the radar sensor. In adverse weather
conditions, such as
rain, snow, sand storms, etc. A front vehicle or an oncoming vehicle is splashing water, snow or dirt. Driving on a nonbusy road with a few vehicles and obstacles in front. The brake pads are overheating.
To turn on/off the FCM system
To change forward collision warn- ing distance
NOTE
Actual distance which
triggers the forward
collision warnings wi
ll vary depending on
your vehicle speed a
nd the front vehicle
speed. The distance
will become longer
when the vehicle speeds are higher. The distance which will trigger the FCM braking function cannot be adjusted.
When a problem is detected
BK0211800US.book 110 ページ 2014年3月12日 水曜日 午後2時42分
Page 189 of 446
Lane Departure Warning System (LDW) (if so equipped) 5-112 Features and controls
5
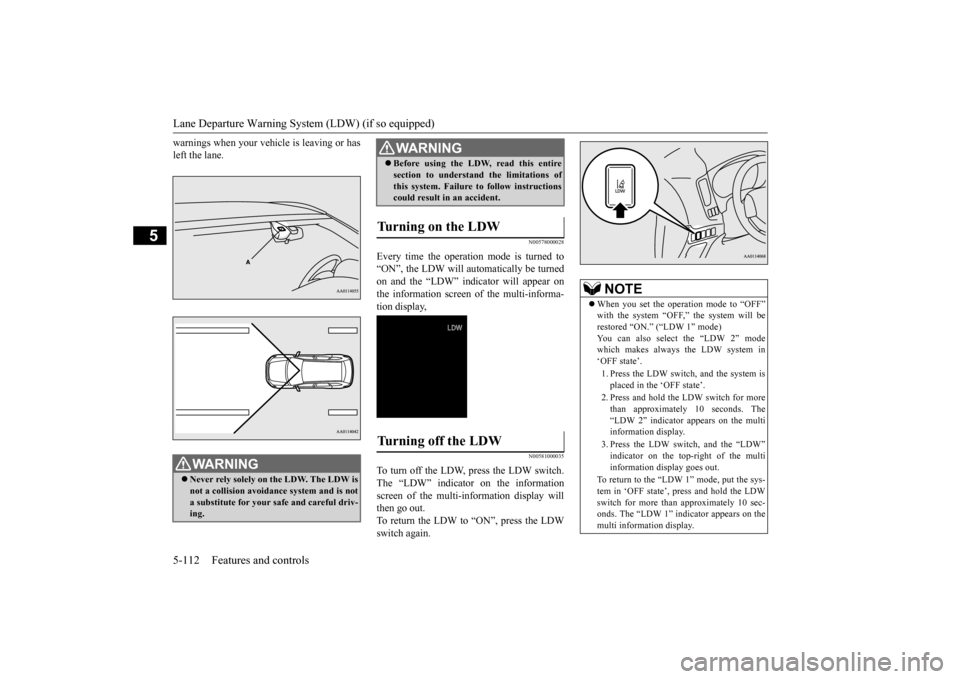
warnings when your vehi
cle is leaving or has
left the lane.
N00578000028
Every time the operation mode is turned to“ON”, the LDW will automatically be turnedon and the “LDW” indicator will appear on the information screen of the multi-informa- tion display,
N00581000035
To turn off the LDW, press the LDW switch.The “LDW” indicator on the information screen of the multi-in
formation display will
then go out.To return the LDW to “ON”, press the LDW switch again.
WA R N I N G Never rely solely on the LDW. The LDW is not a collision avoidance system and is not a substitute for your safe and careful driv-ing.
Before using the LDW, read this entire section to understand the limitations ofthis system. Failure to follow instructionscould result in an accident.
Turning on the LDW
Turning off the LDW
WA R N I N G
NOTE
When you set the operation mode to “OFF” with the system “OFF,” the system will berestored “ON.” (“LDW 1” mode) You can also select the “LDW 2” mode which makes always the LDW system in‘OFF state’. 1. Press the LDW switch, and the system is placed in the ‘OFF state’. 2. Press and hold the LDW switch for more than approximately 10 seconds. The “LDW 2” indicator appears on the multi information display. 3. Press the LDW switch, and the “LDW” indicator on the top-right of the multiinformation display goes out.
To return to the “LDW 1” mode, put the sys- tem in ‘OFF state’, press and hold the LDW switch for more than
approximately 10 sec-
onds. The “LDW 1” indicator appears on themulti information display.
BK0211800US.book 112 ページ 2014年3月12日 水曜日 午後2時42分
Page 192 of 446

Tire pressure monitoring system
Features and controls 5-115
5
N00532701334
When the ignition switch is turned to the “ON” position or the ope
ration mode is put in
ON, the tire pressure monitoring system
warning light normally
illuminates and goes
off a few seconds later. If one or more of the vehicle tires (except for the spare tire) is significantly under-inflated, the warning light will remain illuminated while the ignition switch is in the “ON” posi-tion or the operation mode is put in ON. Refer to “If the warning light / display illumi- nates while driving” on page 5-117 and takethe necessary measures.
NOTE
The tire pressure monitoring system is not a substitute for regularly
checking tire infla-
tion pressures.Be sure to check the tire inflation pressures as described in “Tires” on page 9-14. The tire inflation pressure sensor (A) is installed in the illustrated location. • On vehicles with Type
1 sensor which has
the metallic air valve (B), replace grommet and washer (C) with a new one when thetire is replaced. • On vehicles with Type
2 sensor which has
the rubber air valve (D), replace rubber valve (D) with new one when the tire is replaced.
For details, please
contact your authorized
Mitsubishi Moto
rs dealer.
Tire pressure monitoring sys- tem warning light / display
NOTE
Type 1Type 2
NOTE
In addition, the warni
ng display is displayed
on the information screen in the multi-infor-mation display.
BK0211800US.book 115 ページ 2014年3月12日 水曜日 午後2時42分
Page 193 of 446
Tire pressure monitoring system 5-116 Features and controls
5
Each tire, including the spare (if provided), should be checked monthly when cold and inflated to the inflation pressure recom-mended by the vehicle manufacturer on the vehicle placard or tire in
flation pressure label.
(If your vehicle has tires of a different sizethan the size indicated on the vehicle placard or tire inflation pres
sure label, you should
determine the proper ti
re inflation pressure
for those tires.) As an added safety fe
ature, your vehicle has
been equipped with a ti
re pressure monitoring
system (TPMS) that illuminates a low tire pressure telltale when one or more of your tires is significan
tly under-inflated.
Accordingly, when the low tire pressure tell- tale illuminates, you should stop and check your tires as soon as
possible, and inflate
them to the proper pressure. Driving on a sig- nificantly under-inflated
tire causes the tire to
overheat and can lead to tire failure.
Under-inflation also reduces fuel efficiency and tire tread life, a
nd may affect the vehi-
cle’s handling and stopping ability. Please note that the TPMS is not a substitute for proper tire maintenance, and it is the driver’sresponsibility to mainta
in correct tire pres-
sure, even if under-inf
lation has not reached
the level to trigger illumination of the TPMSlow tire pressure telltale. Your vehicle has also been equipped with a TPMS malfunction indica
tor to indicate when
the system is not operating properly. The TPMS malfunction indicator is combined with the low tire pressure telltale.When the system detects a malfunction, the telltale will flash for approximately one min- ute and then remain continuously illuminated.This sequence will continue upon subsequent vehicle start-ups as
long as the malfunction
exists.When the malfunction indicator is illumi- nated, the system may not
be able to detect or
signal low tire pressure as intended.TPMS malfunctions may
occur for a variety
of reasons, including the installation of replacement or alternate tires or wheels on thevehicle that prevent the TPMS from function- ing properly. Always check the TPMS mal- function telltale after
replacing one or more
tires or wheels on your vehicle to ensure that the replacement or alternate tires and wheels
CAUTION If the tire pressure monitoring system warn- ing light does not illumi
nate when the igni-
tion switch is turned to the “ON” position orthe operation mode is put in ON, it means that the tire pressure monitoring system is not working properly. Have the systeminspected by an authorized Mitsubishi Motors dealer. In such situations,
a malfunctioning of the
system may be preventing the monitoring of the tire pressure. Avoid sudden braking, sharp turning and high-speed driving. If a malfunction is detected in the tire pres- sure monitoring system, the tire pressuremonitoring system warn
ing light will blink
for approximately 1 minute and then remain continuously illuminated. The warning lightwill issue further warnings each time the engine is restarted as
long as the malfunction
exists.Check to see whether
the warning light goes
off after few minutes driving. If it then goes off during driving, there is noproblem. However, if the warning light does not go off, or if it blinks again when the engine isrestarted, have the vehicle inspected by an authorized Mitsubishi Motors dealer. In such situations,
a malfunctioning of the
system may be preventing the monitoring of the tire pressure. For safety reasons, when the warning light appears while driving,avoid sudden braking, sharp turning and high-speed driving.
NOTE
In addition, the warni
ng display is displayed
on the information screen in the multi-infor-mation display.
BK0211800US.book 116 ページ 2014年3月12日 水曜日 午後2時42分
Page 199 of 446

Multi Information display - Type 1 5-122 Features and controls
5
N00555001334
The multi information display displays warn- ings, the odometer, trip odometer, servicereminder, engine cool
ant temperature, fuel
remaining, outside temper
ature, selector lever
position, average and momentary fuel con-sumption, driving range, average speed, etc.
It is also possible to change elements such as the language and units used on the multiinformation display. [With ignition switch
or operation mode in
OFF]
NOTE
You can adjust to 8 different levels for when the front side-marker
and parking lights are
illuminated and when they are not. If the vehicle is equipped with the automatic light control, the light
switch is in a position
other than the “OFF” pos
ition and it is suffi-
ciently dark outside the vehicle, the meter illumination switches automatically to theadjusted brightness. The brightness level
of the instruments is
stored when the ignition switch is turned to the “OFF” or “LOCK”
position or the opera-
tion mode is put in OFF. If you press and hold the button for longer than about 2 second when the front side-marker and parking li
ghts are illuminated,
the brightness level changes to the maximum level. Pressing and holding the button forlonger than about 2 second again returns the brightness level to
the previous level.
Multi Information display - Type 1
1-
Warning display screen
P.5-128
2- Information screen
P.5-124
Interrupt display screen
P.5-127
3- Door ajar warning display screen
P.5-128
4- Odometer
P.5-129
BK0211800US.book 122 ページ 2014年3月12日 水曜日 午後2時42分
Page 200 of 446
![MITSUBISHI OUTLANDER 2015 3.G Owners Manual Multi Information display - Type 1
Features and controls 5-123
5
[With ignition switch or operation mode in ON]
N00555101188
Each time the multi information display switch is operated, th
e buzzer s MITSUBISHI OUTLANDER 2015 3.G Owners Manual Multi Information display - Type 1
Features and controls 5-123
5
[With ignition switch or operation mode in ON]
N00555101188
Each time the multi information display switch is operated, th
e buzzer s](/manual-img/19/7534/w960_7534-199.png)
Multi Information display - Type 1
Features and controls 5-123
5
[With ignition switch or operation mode in ON]
N00555101188
Each time the multi information display switch is operated, th
e buzzer sounds and the
multi information disp
lay changes between
information such as warnings, trip odometer,
1- Drive mode indicator display screen (if
so equipped)
P. 5 - 7 6
2- S-AWC control mode display screen (if
so equipped)
P. 5 - 7 9
3-
Warning display screen
P.5-128
4- Forward Collision Mitigation System
(FCM) OFF displa
y screen (if so
equipped)
P.5-106
5- Lane Departure Warning (LDW) dis-
play screen (if so equipped)
P. 5 - 1 1 1
6- ECO mode indicator display screen
P.5-177
7- Information screen
P.5-124
8- Selector lever
position display
P.5-62, 5-69
9- Engine coolant te
mperature display
P.5-128
10- Odometer
P.5-129
11- Cruise control display screen (if so
equipped)
P.5-92
12- Adaptive Cruise Control System (ACC)
display screen (if so equipped) P.5-96
13- ECO indicator (if so equipped)
P.5-133
14- Fuel remaining display screen
P.5-129
15- Outside temperature display screen
P.5-129
NOTE
The fuel units, outside
temperature units,
display language, and
other settings can be
changed. Refer to “Changing the function settings” onpage 5-134.
Multi information display switch
BK0211800US.book 123 ページ 2014年3月12日 水曜日 午後2時42分
Page 202 of 446
Multi Information display - Type 1
Features and controls 5-125
5
N00555801202
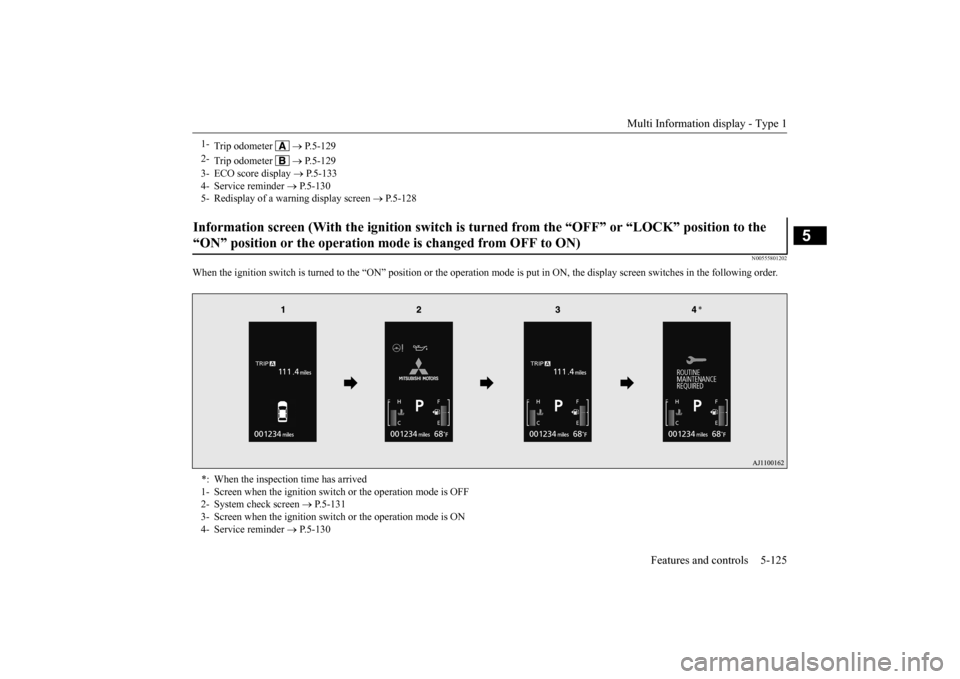
When the ignition switch is turned to the
“ON” position or the operation m
ode is put in ON, the disp
lay screen switches in the
following order.
1-
Trip odometer
P.5-129
2-
Trip odometer
P.5-129
3- ECO score display
P.5-133
4- Service reminder
P.5-130
5- Redisplay of a warning display screen
P.5-128
Information screen (With the igniti
on switch is turned from the “O
FF” or “LOCK” position to the
“ON” position or the operation mo
de is changed from OFF to ON)
*: When the inspection time has arrived 1- Screen when the ignition switch
or the operation mode is OFF
2- System check screen
P.5-131
3- Screen when the ignition switch
or the operation mode is ON
4- Service reminder
P.5-130
BK0211800US.book 125 ページ 2014年3月12日 水曜日 午後2時42分