2015 MITSUBISHI OUTLANDER tow
[x] Cancel search: towPage 370 of 446
Jack and tools
For emergencies 8-5
8
6. When you do not see any more steam or spray, open the hood. Look for obviousleaks, such as a split radiator hose. Be careful as components will be hot. Any leak source must be repaired.7. If there is no obvious leak source, check the coolant level in the engine coolant reserve tank. If there is
none, or if it is too
low, slowly add coolant. 8. If the engine coolant reserve tank needs coolant, you will probably also need toadd coolant to the radiator. Do not loosen or remove the radiator cap until the engine has cooled down.
9. Start the engine, a
nd slowly add coolant,
up to the bottom of the filler neck. Use plain water if you have to (and replace itwith the right coolant as soon as possible).
10. Replace the radiator cap and tighten it
fully. Check the engine coolant tempera-ture display on the mu
lti information dis-
play (Color liquid crystal display type) or the high coolant temperature warninglight (Mono-color liqui
d crystal display
type). You can start driving again when the high coolant temperature warningdoes not come on.
11. Have the system inspected by your autho-
rized Mitsubishi Motors
dealer or a repair
facility of your choice.
N00836601389
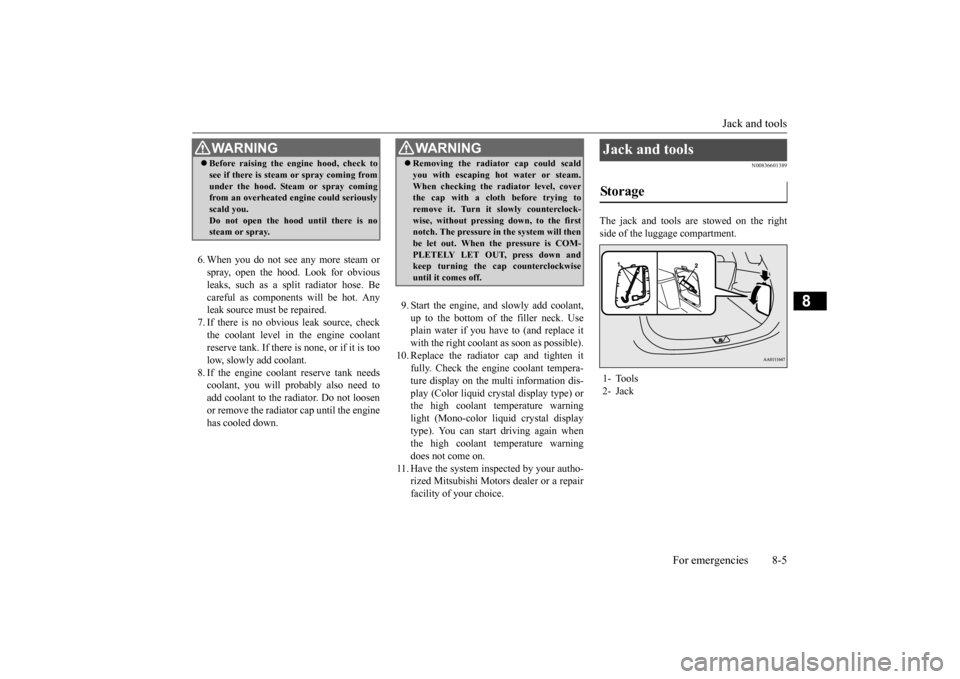
The jack and tools are stowed on the right side of the luggage compartment.
WA R N I N G Before raising the en
gine hood, check to
see if there is steam or spray coming fromunder the hood. Steam or spray comingfrom an overheated en
gine could seriously
scald you. Do not open the hood until there is nosteam or spray.
WA R N I N G Removing the radiat
or cap could scald
you with escaping hot water or steam.When checking the radiator level, coverthe cap with a cloth before trying to remove it. Turn it slowly counterclock- wise, without pressing down, to the firstnotch. The pressure in the system will then be let out. When the pressure is COM- PLETELY LET OUT, press down andkeep turning the cap counterclockwise until it comes off.
Jack and tools Storage 1- Tools 2- Jack
BK0211800US.book 5 ページ 2014年3月12日 水曜日 午後2時42分
Page 372 of 446
How to change a tire
For emergencies 8-7
8
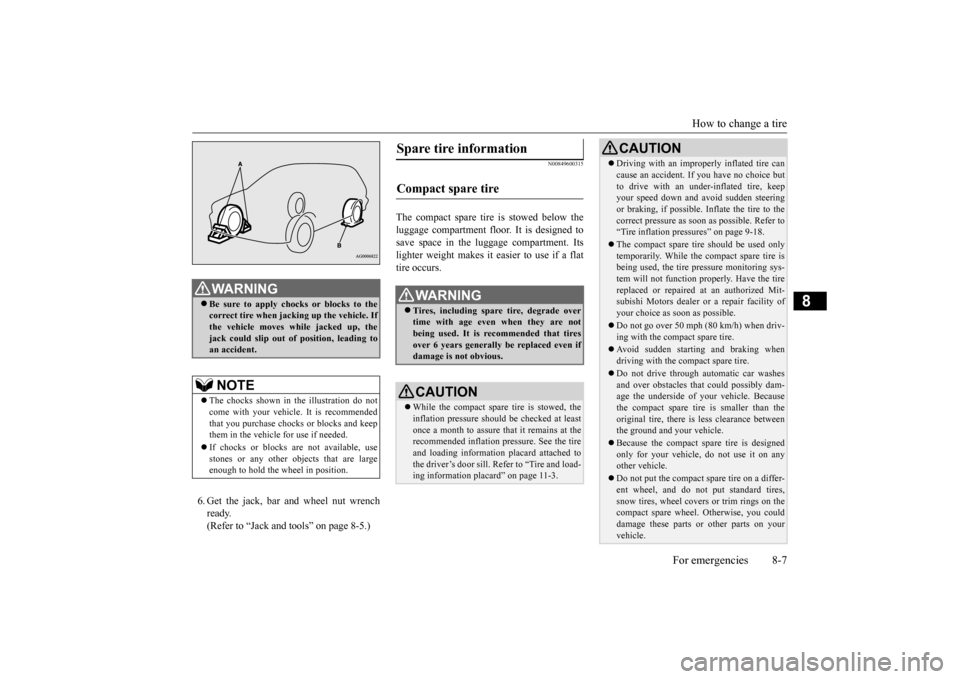
6. Get the jack, bar and wheel nut wrench ready.(Refer to “Jack and t
ools” on page 8-5.)
N00849600315
The compact spare tire is stowed below the luggage compartment fl
oor. It is designed to
save space in the luggage compartment. Itslighter weight makes it easier to use if a flat tire occurs.
WA R N I N G Be sure to apply choc
ks or blocks to the
correct tire when jacking up the vehicle. Ifthe vehicle moves while jacked up, the jack could slip out of
position, leading to
an accident.NOTE
The chocks shown in the illustration do not come with your vehicl
e. It is recommended
that you purchase chocks or blocks and keep them in the vehicle for use if needed. If chocks or blocks
are not available, use
stones or any other obj
ects that are large
enough to hold the wheel in position.
Spare tire information Compact spare tire
WA R N I N G Tires, including spar
e tire, degrade over
time with age even when they are not being used. It is recommended that tiresover 6 years generally
be replaced even if
damage is not obvious.CAUTION While the compact spare tire is stowed, the inflation pressure shoul
d be checked at least
once a month to assure that it remains at the recommended inflation pressure. See the tire and loading informati
on placard attached to
the driver’s door sill. Refer to “Tire and load-ing information placard” on page 11-3.
Driving with an imprope
rly inflated tire can
cause an accident. If
you have no choice but
to drive with an under-inflated tire, keepyour speed down and avoid sudden steering or braking, if possible. Inflate the tire to the correct pressure as s
oon as possible. Refer to
“Tire inflation pressures” on page 9-18. The compact spare tire should be used only temporarily. While the compact spare tire is being used, the tire pr
essure monitoring sys-
tem will not function pr
operly. Have the tire
replaced or repaired at an authorized Mit- subishi Motors dealer or
a repair facility of
your choice as soon as possible. Do not go over 50 mph (80 km/h) when driv- ing with the compact spare tire. Avoid sudden starting and braking when driving with the compact spare tire. Do not drive through automatic car washes and over obstacles that
could possibly dam-
age the underside of your vehicle. Because the compact spare tire is smaller than the original tire, there is less clearance betweenthe ground and your vehicle. Because the compact spare tire is designed only for your vehicle, do not use it on any other vehicle. Do not put the compact spare tire on a differ- ent wheel, and do not put standard tires, snow tires, wheel covers
or trim rings on the
compact spare wheel. Otherwise, you could damage these parts or other parts on your vehicle.CAUTION
BK0211800US.book 7 ページ 2014年3月12日 水曜日 午後2時42分
Page 379 of 446
Towing 8-14 For emergencies
8
N00837001898
If towing is necessary,
we recommend you to
have it done by a commercial tow truck ser- vice.When towing is required, transport the vehi- cle using a tow truck. Incorect towing equipment could damageyour vehicle.
There may be local re
gulations concerning
towing in your area. Obey the regulations of the area where youare driving your vehicle.
To w i n g If your vehicle needs to be towed
CAUTION Do not attempt to be
towed by another vehi-
cle with a rope.
NOTE
Your vehicle cannot to
w any other vehicle.
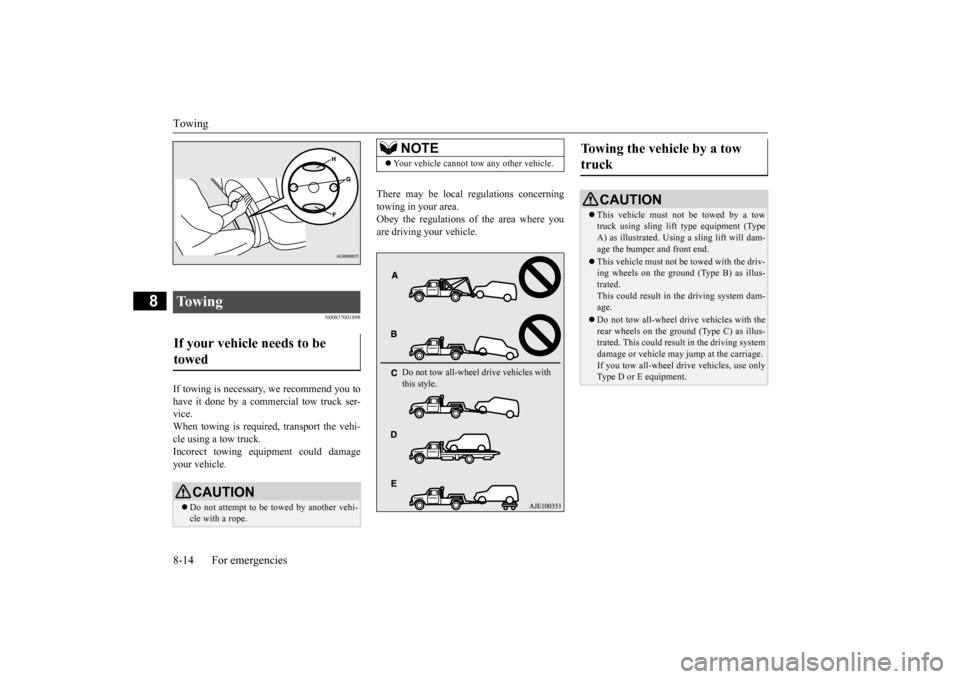
Do not tow all-wheel drive vehicles with this style.
Towing the vehicle by a tow truck
CAUTION This vehicle must not be towed by a tow truck using sling lift
type equipment (Type
A) as illustrated. Usi
ng a sling lift will dam-
age the bumper and front end. This vehicle must not be towed with the driv- ing wheels on the ground (Type B) as illus- trated. This could result in the driving system dam-age. Do not tow all-wheel drive vehicles with the rear wheels on the ground (Type C) as illus- trated. This could result in the driving system damage or vehicle may
jump at the carriage.
If you tow all-wheel driv
e vehicles, use only
Type D or E equipment.
BK0211800US.book 14 ページ 2014年3月12日 水曜日 午後2時42分
Page 380 of 446
Operation under adverse driving conditions
For emergencies 8-15
8
Release the parking brake. Set the selector lever to the “N” (NEUTRAL) position.
N00837201760
If your vehicle becomes
stuck in snow, sand,
or mud, it can often be moved by a rocking motion. Rock your vehicle back and forth to free it.Do not rev the engine or spin the wheels. Constant efforts to free a stuck vehicle can cause overheating and tr
ansaxle failure. Let
the engine idle for a few minutes to cool the transaxle before trying again. If your vehicle is still
stuck after several rock-
ing attempts, call for a commercial tow truck service.
[For front-wheel driv
e vehicle equipped with
the active stability control (ASC)]If the vehicle is towed with the ignitionswitch in the “ON” pos
ition or the operation
mode in ON and only the front wheels raised off the ground (Type C), the ASC may oper-ate, resulting in an accident. When towing the vehicle with the front wheels raised, keep the ignition switch or
the operation mode as
follows. [Except for vehicles equipped with the F. A . S . T. - k e y ]The ignition switch is in “LOCK”, “OFF” or “ACC” position. [Vehicles equipped with the F.A.S.T.-key]The operation mode is in OFF or ACC.
Towing a front-wheel drive vehi- cle with front wheels off the ground (Type C)
CAUTION
Operation under adverse driving conditions If your vehicle becomes stuck in sand, mud or snow
WA R N I N G When trying to rock
your vehicle out of a
stuck position, make sure that there are nopeople nearby. The
rocking motion can
make your vehicle suddenly lurch forward or backward, and inju
re any bystanders.
On wet roads
CAUTIONAvoid flooded roads. Water is often deeper than it looks, and you could be seriously hurtby driving into flood water. When driving in rain, on water-covered roads, or through a car
wash, water could get
into the brake discs and make them fail tem- porarily. In such cases, lightly press thebrake pedal to see if they are working prop- erly. If they are not, press the pedal lightly several times while driving to dry the brakepads or linings, then check them again. When driving in rain, a layer of water may form between the tires and the road surface (hydroplaning). This loosens your tires’ grip on the road, making it difficult to steer orbrake properly. When driving on a wet road:• Drive your vehicle at a safe speed.• Do not drive on worn tires.• Always keep the tires at the correct infla- tion pressures.
BK0211800US.book 15 ページ 2014年3月12日 水曜日 午後2時42分
Page 384 of 446
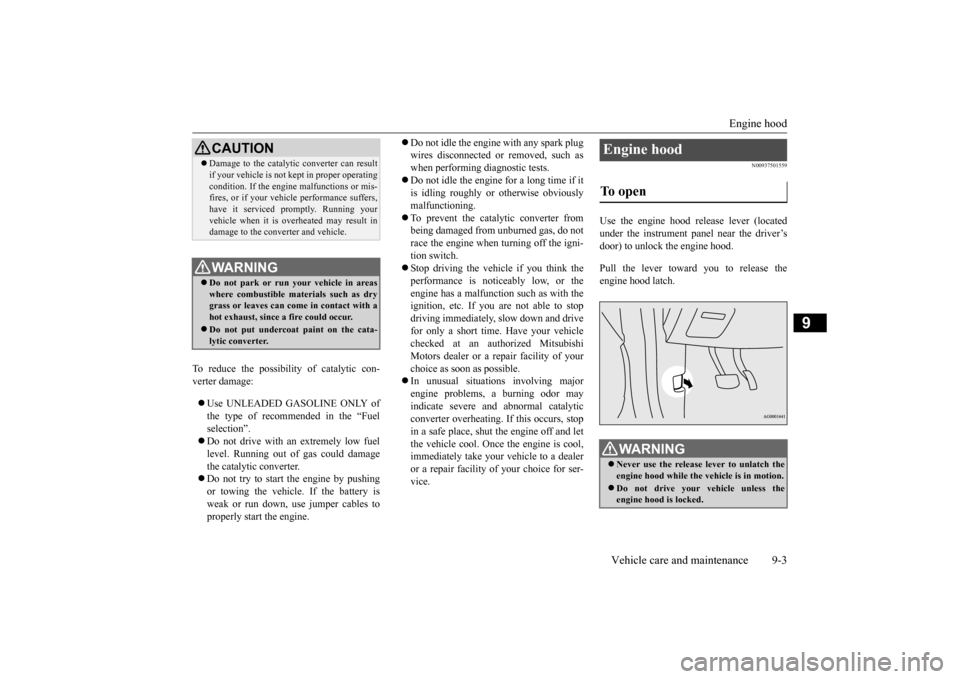
Engine hood
Vehicle care and maintenance 9-3
9
To reduce the possibili
ty of catalytic con-
verter damage: Use UNLEADED GASOLINE ONLY of the type of recommended in the “Fuel selection”. Do not drive with an extremely low fuel level. Running out of gas could damage the catalytic converter. Do not try to start the engine by pushing or towing the vehicle. If the battery is weak or run down, use jumper cables toproperly start the engine.
Do not idle the engine with any spark plug wires disconnected or removed, such aswhen performing
diagnosti
c tests.
Do not idle the engine
for a long time if it
is idling roughly or otherwise obviouslymalfunctioning. To prevent the catalytic converter from being damaged from unburned gas, do notrace the engine when turning off the igni- tion switch. Stop driving the vehicle if you think the performance is noticeably low, or the engine has a malfunction such as with theignition, etc. If you are not able to stop driving immediately,
slow down and drive
for only a short time. Have your vehiclechecked at an authorized Mitsubishi Motors dealer or a repair facility of your choice as soon
as possible.
In unusual situations involving major engine problems, a burning odor may indicate severe and abnormal catalyticconverter overheating.
If this occurs, stop
in a safe place, shut the engine off and let the vehicle cool. Once
the engine is cool,
immediately take your
vehicle to a dealer
or a repair facility of your choice for ser- vice.
N00937501559
Use the engine hood release lever (located under the instrument panel near the driver’s door) to unlock the engine hood. Pull the lever toward you to release the engine hood latch.
CAUTION Damage to the catalyti
c converter can result
if your vehicle is not
kept in proper operating
condition. If the engine
malfunctions or mis-
fires, or if your vehi
cle performance suffers,
have it serviced promptly. Running your vehicle when it is
overheated may result in
damage to the converter and vehicle.WA R N I N G Do not park or run your vehicle in areas where combustible materials such as dry grass or leaves can come
in contact with a
hot exhaust, since a fire could occur. Do not put undercoat paint on the cata- lytic converter.
Engine hood To open
WA R N I N G Never use the release lever to unlatch the engine hood while the
vehicle is in motion.
Do not drive your vehicle unless the engine hood is locked.
BK0211800US.book 3 ページ 2014年3月12日 水曜日 午後2時42分
Page 413 of 446

Replacement of light bulbs 9-32 Vehicle care and maintenance
9
N00950401656
N00901801131
1. When replacing the bulb on the left side of the vehicle, remo
ve the bolt (A) hold-
ing down the relay box and move the relay box toward the rear of the vehicle. (if so equipped)
2. Turn the cap (B) counterclockwise to remove it. 3. Turn the socket (C) counterclockwise to remove it, and then pull the bulb out of the socket. 4. To install the bulb, perform the removal steps in reverse.
Inside
Item
Wattage
1 - Cargo room light 8 W 2 - Dome light (rear) 8 W 3 -
Dome light (front)/Read- ing light
8 W
4 - Downlight – 5 - Vanity mirror lights 2 W 6 - Glove compartment light 1.4 W
NOTE
The downlight uses an LED instead of the bulb. Check with an
authorized Mitsubishi
Motors dealer or a re
pair facility of your
choice when the light needs to be repaired or replaced.
Headlights (low beam, except for vehicles equipped with high intensity discharge head- lights)/Daytime running lights
(if so equipped) * - Front of the vehicle
*- Front of the vehicle
BK0211800US.book 32 ページ 2014年3月12日 水曜日 午後2時42分
Page 414 of 446

Replacement of light bulbs
Vehicle care and maintenance 9-33
9
N00900301139
Do not attempt to disass
emble or repair head-
lights, and do not attempt to replace their bulbs.
N00901901099
1. Turn the cap (A) counterclockwise toremove it.
2. Turn the bulb (B) counterclockwise to remove it and then while holding down the tab (C), pull out the connector (D). 3. To install the bulb, perform the removal steps in reverse.
N00943201359
The alignment of the headlights should be checked by an authorized Mitsubishi Motors dealer or a repair fa
cility of your choice.
N00915501171
1. When replacing the bulb on the left side of the vehicle, move the relay box toward the rear of the vehicle. (if so equipped) (Refer to “Headlight
(low beam, except
for vehicles equipped with high intensity discharge headlights)/Daytime running light): Step 1” on page 9-32.2. Turn the socket (A
) counterclockwise to
remove it, and then pull the bulb out of the socket.
Headlights (low beam, for vehi- cles equipped with high inten-sity discharge headlights)
WA R N I N G A high voltage is present in the power cir- cuit and in the bulbs and bulb terminals. To avoid the risk of an electric shock, con-tact an authorized
Mitsubishi Motors
dealer whenever repair or replacement is necessary.
Headlights (high beam)
* - Front of the vehicle * - Front of the vehicle
Headlight aim adjustment Front side-marker lights
BK0211800US.book 33 ページ 2014年3月12日 水曜日 午後2時42分
Page 415 of 446

Replacement of light bulbs 9-34 Vehicle care and maintenance
9
3. To install the bulb, perform the removal steps in reverse.
N00917301577
When replacing the bulb on the left side ofthe vehicle, move the relay box toward the rear of the vehicle. (if so equipped)
(Refer to “Headlight (low beam, except for vehicles equipped with
high intensity dis-
charge headlights)/Daytime running light): Step 1” on page 9-32.) 1. Turn the cap (A) counterclockwise to remove it. 2. Pull out the socket (B), and then pull the bulb out of the socket.
3. To install the bulb, perform the removal steps in reverse. 1. Turn the socket (A) counterclockwise to remove it, and then pull the bulb out ofthe socket.
* - Front of the vehicle
Parking lights
Except for vehicles equipped with high intensity discharge headlights *: Front of the vehicle
Vehicles equipped with high inten-sity discharge headlights
BK0211800US.book 34 ページ 2014年3月12日 水曜日 午後2時42分