2015 MITSUBISHI OUTLANDER III belt
[x] Cancel search: beltPage 37 of 446
Third row seat (Seating 7 passengers) 4-10 Seat and restraint systems
4
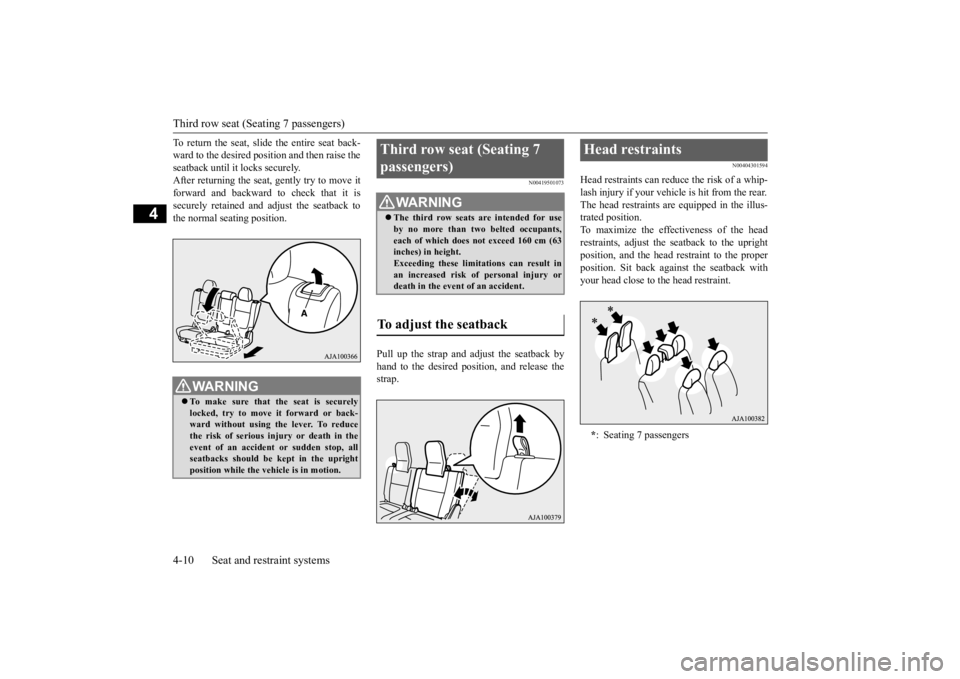
To return the seat, slide the entire seat back- ward to the desired position and then raise theseatback until it locks securely. After returning the seat, gently try to move it forward and backward to check that it issecurely retained and adjust the seatback to the normal seating position.
N00419501073
Pull up the strap and adjust the seatback by hand to the desired posit
ion, and release the
strap.
N00404301594
Head restraints can reduce the risk of a whip- lash injury if your vehicle is hit from the rear. The head restraints ar
e equipped in the illus-
trated position. To maximize the effectiveness of the head restraints, adjust the seatback to the uprightposition, and the head restraint to the proper position. Sit back against the seatback with your head close to the head restraint.
WA R N I N G To make sure that the seat is securely locked, try to move it forward or back-ward without using the lever. To reduce the risk of serious in
jury or death in the
event of an accident
or sudden stop, all
seatbacks should be kept in the upright position while the vehicle is in motion.
Third row seat (Seating 7 passengers)
WA R N I N G The third row seats are intended for use by no more than two belted occupants,each of which does not exceed 160 cm (63 inches) in height. Exceeding these limitations can result inan increased risk of
personal injury or
death in the event of an accident.
To adjust the seatback
Head restraints * : Seating 7 passengers
BK0211800US.book 10 ページ 2014年3月12日 水曜日 午後2時42分
Page 39 of 446
Making a cargo area 4-12 Seat and restraint systems
4
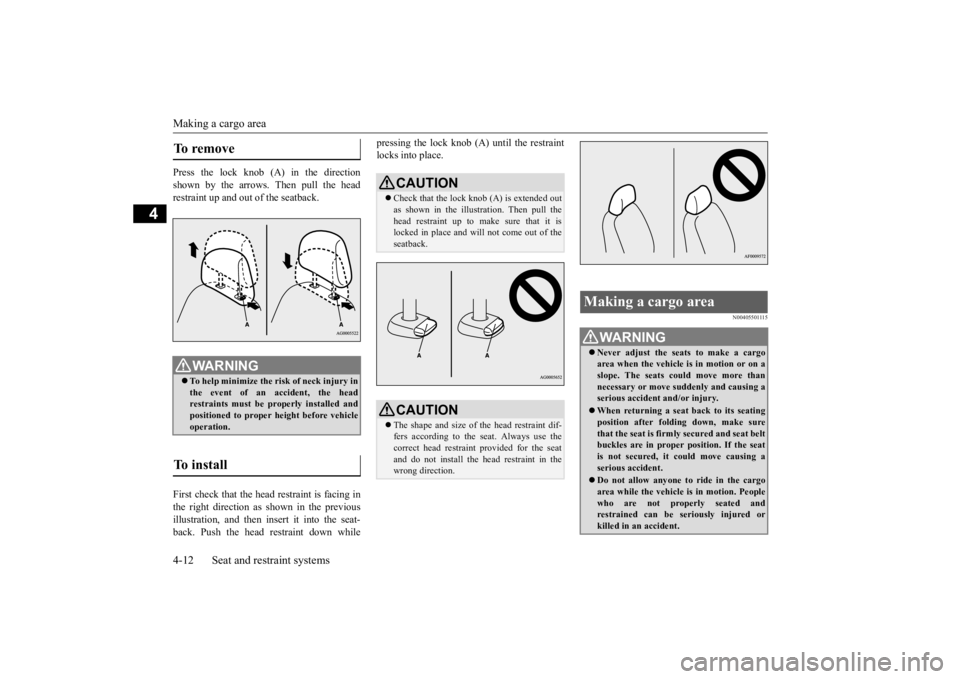
Press the lock knob (A) in the direction shown by the arrows. Then pull the head restraint up and out of the seatback. First check that the head restraint is facing in the right direction as
shown in the previous
illustration, and then insert it into the seat- back. Push the head restraint down while
pressing the lock knob (A) until the restraint locks into place.
N00405501115
To remove
WA R N I N G To help minimize the risk of neck injury in the event of an
accident, the head
restraints must be properly installed and positioned to proper height before vehicle operation.
To install
CAUTION Check that the lock knob (A) is extended out as shown in the illustration. Then pull the head restraint up to make sure that it is locked in place and will
not come out of the
seatback.CAUTION The shape and size of the head restraint dif- fers according to the seat. Always use the correct head restrain
t provided for the seat
and do not install the he
ad restraint in the
wrong direction.
Making a cargo area
WA R N I N G Never adjust the seats to make a cargo area when the vehicle is
in motion or on a
slope. The seats could move more thannecessary or move suddenly and causing a serious accident
and/or injury.
When returning a seat back to its seating position after folding down, make sure that the seat is firmly secured and seat beltbuckles are in proper position. If the seat is not secured, it could move causing a serious accident. Do not allow anyone to ride in the cargo area while the vehicle
is in motion. People
who are not properly seated and restrained can be seriously injured or killed in an accident.
BK0211800US.book 12 ページ 2014年3月12日 水曜日 午後2時42分
Page 40 of 446
Making a cargo area
Seat and restraint systems 4-13
4
N00405701120
The second row seat can be folded to create an additional cargo area.
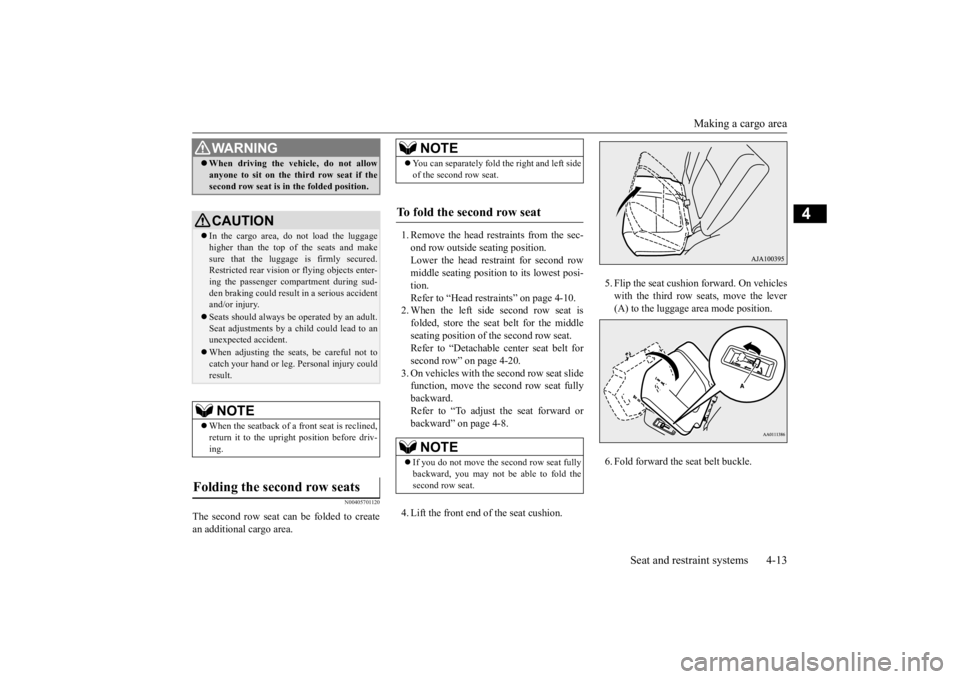
1. Remove the head rest
raints from the sec-
ond row outside seating position. Lower the head restraint for second rowmiddle seating position
to its lowest posi-
tion. Refer to “Head restraints” on page 4-10.2. When the left side second row seat is folded, store the seat belt for the middle seating position of the second row seat.Refer to “Detachable center seat belt for second row” on page 4-20. 3. On vehicles with th
e second row seat slide
function, move the second row seat fully backward. Refer to “To adjust the seat forward orbackward” on page 4-8. 4. Lift the front end of the seat cushion.
5. Flip the seat cushi
on forward. On vehicles
with the third row seats, move the lever(A) to the luggage area mode position. 6. Fold forward the seat belt buckle.
When driving the vehicle, do not allow anyone to sit on the third row seat if thesecond row seat is in the folded position.CAUTION In the cargo area, do not load the luggage higher than the top of the seats and makesure that the luggage is firmly secured. Restricted rear vision
or flying objects enter-
ing the passenger compartment during sud-den braking could result
in a serious accident
and/or injury. Seats should always be
operated by an adult.
Seat adjustments by a child could lead to an unexpected
accident.
When adjusting the seats, be careful not to catch your hand or leg.
Personal injury could
result.NOTE
When the seatback of a front seat is reclined, return it to the upright position before driv- ing.
Folding the second row seats
WA R N I N G
NOTE
You can separately fold
the right and left side
of the second row seat.
To fold the second row seat
NOTE
If you do not move the second row seat fully backward, you may not be able to fold the second row seat.
BK0211800US.book 13 ページ 2014年3月12日 水曜日 午後2時42分
Page 41 of 446
Making a cargo area 4-14 Seat and restraint systems
4
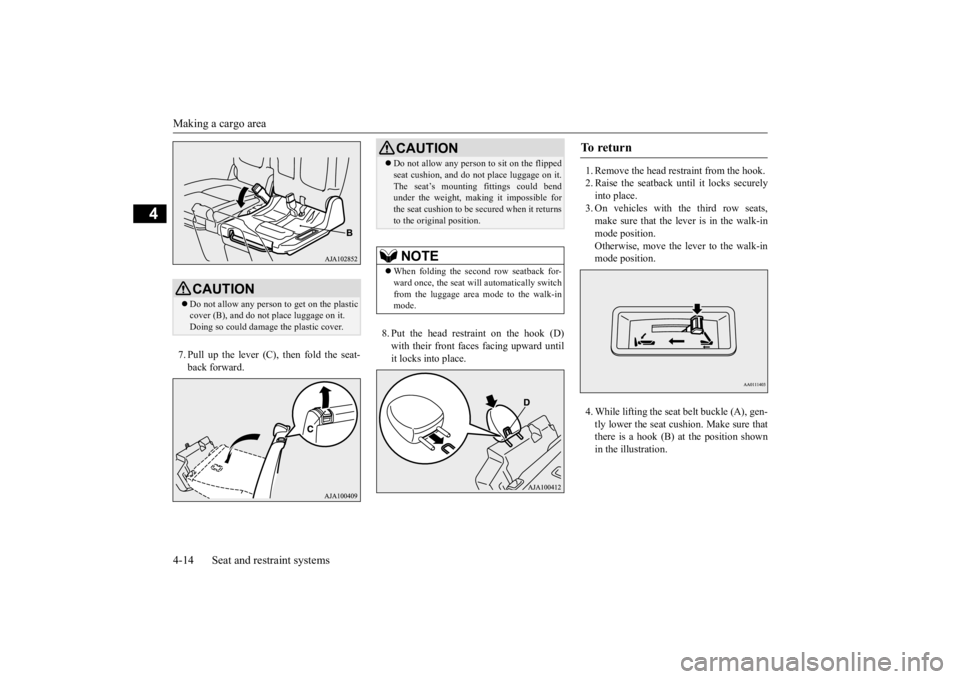
7. Pull up the lever (C), then fold the seat- back forward.
8. Put the head restraint on the hook (D) with their front faces facing upward until it locks into place.
1. Remove the head restraint from the hook. 2. Raise the seatback until it locks securely into place. 3. On vehicles with the third row seats,make sure that the lever is in the walk-in mode position. Otherwise, move the lever to the walk-inmode position. 4. While lifting the seat
belt buckle (A), gen-
tly lower the seat cushion. Make sure thatthere is a hook (B) at the position shown in the illustration.
CAUTION Do not allow any person
to get on the plastic
cover (B), and do not
place luggage on it.
Doing so could damage
the plastic cover.
CAUTIONDo not allow any person to sit on the flipped seat cushion, and do no
t place luggage on it.
The seat’s mounting
fittings could bend
under the weight, maki
ng it impossible for
the seat cushion to be secured when it returns to the original position.NOTE
When folding the second row seatback for- ward once, the seat will automatically switch from the luggage area
mode to the walk-in
mode.
To r e t u r n
BK0211800US.book 14 ページ 2014年3月12日 水曜日 午後2時42分
Page 42 of 446
Making a cargo area
Seat and restraint systems 4-15
4
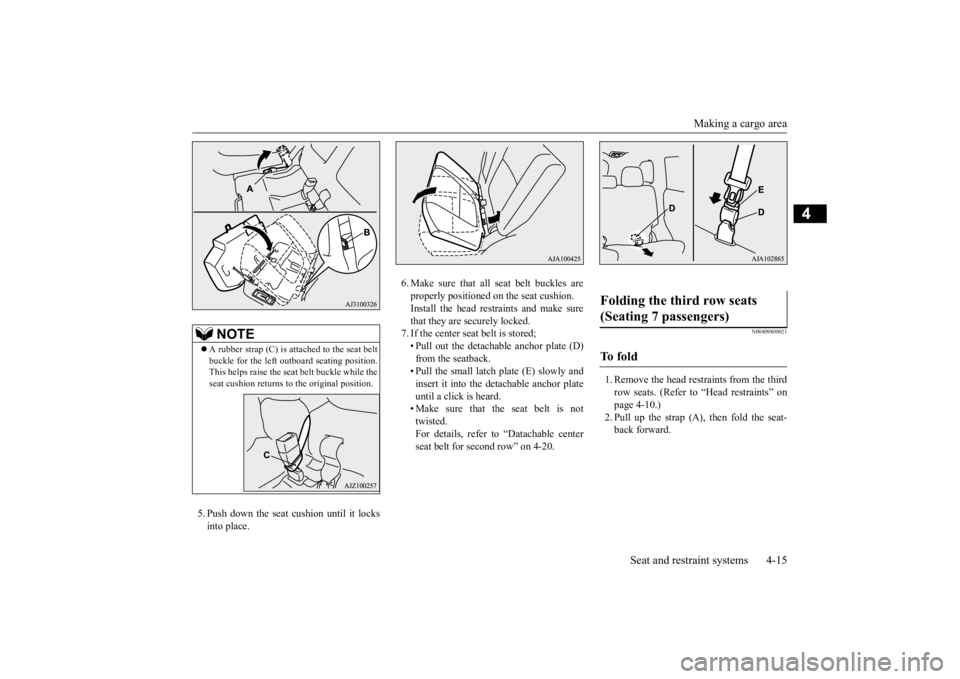
5. Push down the seat cushion until it locks into place.
6. Make sure that all seat belt buckles are properly positioned on the seat cushion.Install the head restraints and make sure that they are securely locked. 7. If the center seat belt is stored;• Pull out the detachable anchor plate (D) from the seatback. • Pull the small latch plate (E) slowly andinsert it into the detachable anchor plate until a click is heard. • Make sure that the seat belt is nottwisted. For details, refer to “Datachable center seat belt for second row” on 4-20.
N00409800021
1. Remove the head restraints from the thirdrow seats. (Refer to
“Head restraints” on
page 4-10.) 2. Pull up the strap (A), then fold the seat-back forward.
NOTE
A rubber strap (C) is attached to the seat belt buckle for the left out
board seating position.
This helps raise the seat
belt buckle while the
seat cushion returns to the original position.
Folding the third row seats (Seating 7 passengers) To f o l d
BK0211800US.book 15 ページ 2014年3月12日 水曜日 午後2時42分
Page 44 of 446
Seat belts
Seat and restraint systems 4-17
4
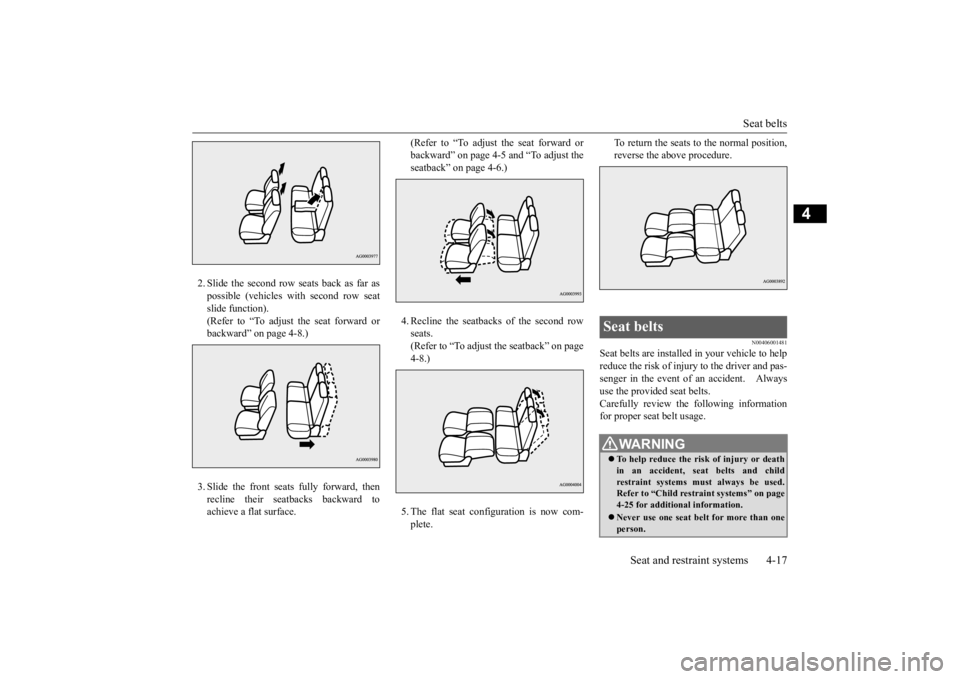
2. Slide the second row seats back as far as possible (vehicles with second row seatslide function). (Refer to “To adjust the seat forward or backward” on page 4-8.) 3. Slide the front seats fully forward, then recline their seatbacks backward to achieve a flat surface.
(Refer to “To adjust the seat forward or backward” on page 4-5 and “To adjust theseatback” on page 4-6.) 4. Recline the seatbacks of the second row seats.(Refer to “To adjust the seatback” on page 4-8.) 5. The flat seat configuration is now com- plete.
To return the seats to the normal position, reverse the above procedure.
N00406001481
Seat belts are installed in your vehicle to helpreduce the risk of injury to the driver and pas-senger in the event of an accident. Always use the provided seat belts. Carefully review the
following information
for proper seat belt usage.Seat belts
WA R N I N G To help reduce the risk of injury or death in an accident, se
at belts and child
restraint systems must always be used. Refer to “Child restra
int systems” on page
4-25 for additional information. Never use one seat belt for more than one person.
BK0211800US.book 17 ページ 2014年3月12日 水曜日 午後2時42分
Page 45 of 446

Seat belts 4-18 Seat and restraint systems
4
N00406201467
All seats are equipped with a seat belt which uses one combined lap-
and-shoulder belt with
an emergency locking retractor. This system is designed to provide both com- fort and safety. It permits full extension and automatic retraction of the belts during nor- mal vehicle operation.
A sensing device
inside the belt retractor is designed to lock the retractor in the event of a sudden change inthe vehicle’s motion.
Never carry more peop
le in you
r vehicle
than there are seat belts. Always adjust the seat
belt for a snug fit.
Always place the shou
lder belt over your
shoulder and across
your chest. Never put
it behind you or under your arm. Always wear the lap be
lt as low as possible
across your hips, not around your waist. Never modify or alter the seat belts in your vehicle. To reduce the risk to the driver of serious injury or death duri
ng deployment of the
driver’s airbag, always
properly wear the
seat belt and adjust th
e driver’s seat as far
back as possible while maintaining a posi- tion that still enables
you to fully apply the
pedals, easily control the steering wheel, and safely operate the vehicle. To reduce the risk to a front seat passen- ger of serious injury or death from a deploying airbag, make sure the passengeralways wears the seat belt properly, remains seated all the way back and upright in their seat,
and moves the seat as
far back as possible. Refer to “Supplemen- tal Restraint System (SRS) - airbag” on page 4-33 for additional information.WA R N I N G
Never hold an infant
or child in your arms
or on your lap
when riding in this vehicle
even when you are wearing your seat belt.Never place any part of the seat belt you are wearing around an
infant or child.
Failure to follow these simple instructionscreates a risk of serious injury or death to your child in the even
t of an accident or
sudden stop. Children 12 years ol
d and under should
always ride in the re
ar seat and be prop-
erly restrained. This reduces their risk of serious injury or de
ath in an accident,
especially due to a deploying front passen-ger’s airbag. Refer to
“Child restraint sys-
tems” on page 4-25 for additional information. Any child who is t
oo small to properly
wear a seat belt must be properlyrestrained in an
appropriate child
restraint system. Infants MUST be placed in a rear-facing child safety seat and
positioned in the rear
seat. In the event of an ac
cident, all seat belt
assemblies, including retractors andattachment hardware, should be inspected by an authorized Mitsubishi Motors dealer to determine whether replacementis necessary.WA R N I N G
Seat belt instructions
NOTE
For instructions on inst
alling a child restraint
system using a seat belt
, refer to “Installing a
child restraint system using the seat belt” on page 4-30.
BK0211800US.book 18 ページ 2014年3月12日 水曜日 午後2時42分
Page 46 of 446
Seat belts
Seat and restraint systems 4-19
4
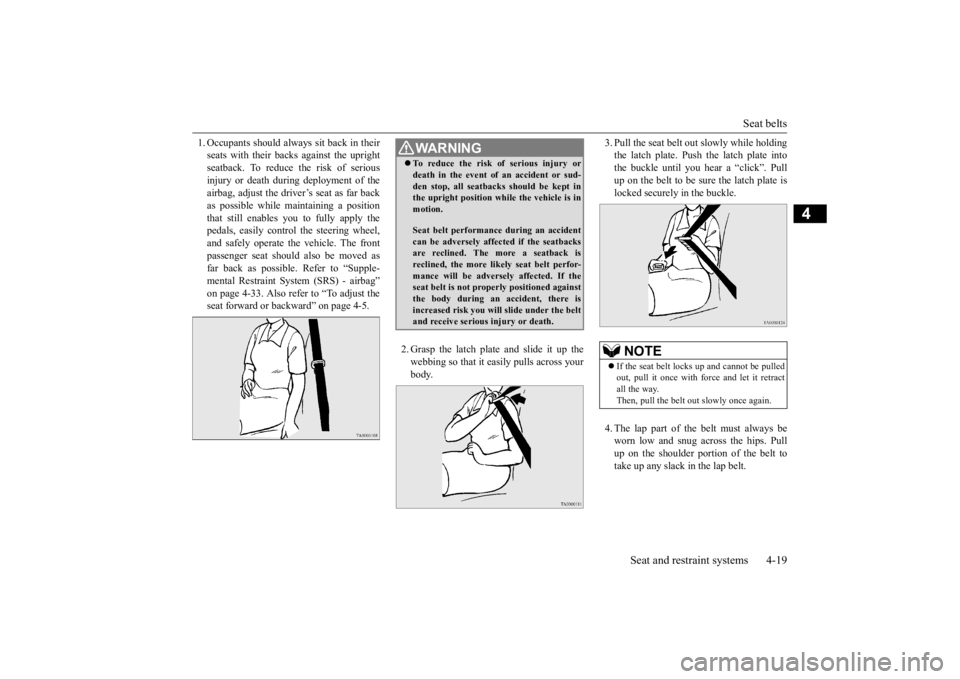
1. Occupants shoul
d always sit back in their
seats with their backs against the uprightseatback. To reduce the risk of serious injury or death during deployment of the airbag, adjust the driver’s seat as far backas possible while ma
intaining a position
that still enables you to fully apply the pedals, easily contro
l the steering wheel,
and safely operate the vehicle. The front passenger seat should
also be moved as
far back as possible. Refer to “Supple- mental Restraint Syst
em (SRS) - airbag”
on page 4-33. Also refe
r to “To adjust the
seat forward or backward” on page 4-5.
2. Grasp the latch plate and slide it up the webbing so that it ea
sily pulls across your
body.
3. Pull the seat belt out
slowly while holding
the latch plate. Push the latch plate intothe buckle until you he
ar a “click”. Pull
up on the belt to be sure the latch plate is locked securely in the buckle. 4. The lap part of the belt must always be worn low and snug across the hips. Pullup on the shoulder portion of the belt to take up any slack
in the lap belt.
WA R N I N GTo reduce the risk of serious injury or death in the event of
an accident or sud-
den stop, all seatbacks should be kept inthe upright position while the vehicle is in motion. Seat belt performance during an accident can be adversely affect
ed if the seatbacks
are reclined. The more a seatback isreclined, the more likely seat belt perfor- mance will be advers
ely affected. If the
seat belt is not proper
ly positioned against
the body during an accident, there is increased risk you will slide under the belt and receive serious
injury or death.
NOTE
If the seat belt lock
s up and cannot be pulled
out, pull it once with fo
rce and let it retract
all the way. Then, pull the belt out
slowly once again.
BK0211800US.book 19 ページ 2014年3月12日 水曜日 午後2時42分