Page 1 of 16
Owner’s Handbook
(6/14)
www .mitsubishicars.c om
2015 LANCER SERIES
2015 LANCER SERIES
Dieline -DO NOT PRINT!
Page 2 of 16
PLEASE PLACE COPIES OF THE FOLLOWING ITEMS IN THE POCKET BELOW:
1. Pre-Delivery Inspection Form (Customer Copy)
2. Triple Diamond Delivery Checklist (Customer Copy)
3. Salesperson or Key Dealership Contact’s Business Card
Owner ’s Handbook
(6/14)
www .mitsubishicars.c om
2015 LANCER SERIES
2015 LANCER SERIES
Dieline -DO NOT PRINT!
Page 3 of 16

1
Thank you for buying a Mitsubishi Lancer. There’s no doubt you’ve already realized how well
your car drives on the open road. What you may not know is all the great\
features that help
your car perform the way it does. In the pages ahead we’re going to r\
un through the basics
and prepare you for the road.
We’d also love to hear from you about your overall Mitsubishi experien\
ce. If you haven’t
already, please log on to www.MitsubishiSSIsurvey.com and tell us how we did. This will help
us make sure your next visit is that much better.
We hope you will visit the Mitsubishi Owner’s site where we store the latest Mitsubishi news
and special offers. Here you can also keep track of your car’s warranty and servicing needs,
get Roadside Assistance Information and tap into other owner-centric details. Just log on to
www.Mitsubishicars.com/ownersonly. Driver’s View ..................... Page 2-3
Controls ............................ Page 4-5
Own the Road ................... Page 6
Technology ....................... Page 7
Audio System .................... Page 8
Display Audio System
(if equipped) ..................... Page 9-10
Bluetooth
® (if equipped) ....Page 11
FAQ’s ................................ Page 12-13
Table of Contents
Page 4 of 16
2
3
106
13
1
7
8
Driver’s View
1 Side Mirror Adjustment .................Page 2
2 MMCS Navigation System
(if equipped) ................................ Page 3
3 Headlights and Fog Lights ............ Page 4
4 Air Conditioning ........................... Page 5
5 Windshield Wiper Lever ................ Page 5
6 Cruise Control ............................. Page 6
7 Paddle Shifters (if equipped) ........ Page 6
8 Multi Information Display (MID) .... Page 7
9 Audio System ............................... Page 8
10 Audio Remote Control Switch
(if equipped) ................................ Page 8
11 USB Port (if equipped) ................. Page 8
12 Display Audio System
(if equipped) ................................ Page 9
13 Bluetooth
® Controls
(if equipped) ................................ Page 11
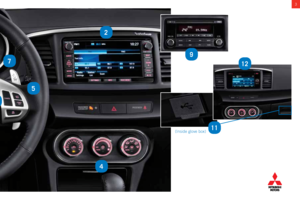
Page 5 of 16
3
6
7
5
4
9
11(Inside glove box)
2
12
Page 6 of 16
4CONTROLS
Regular Headlights Automatic Headlights
Headlights and other lights on.
Parking, tail, front and rear sidemarker lights, license plate and
instrument panel lights on.
Headlights and other lights turn on and off automatically in
accordance with outside light level.
All lights off
AUTOOFF
Fog Lights (if equipped)
High/Low Beam Switch
Fog Lights will illuminate only when headlights are on low beam.
Turning the knob in the direction of the ON position turns on the
fog lights. Turning the knob in the direction of the OFF position
turns off the fog lights. The knob will return to the neutral
position when released.
To change the headlights from high beam to low beam and vice versa, pull \
the turn signal lever fully towards you (1). An illuminated blue light\
in the
instrument cluster indicates when the headlights are on high beam.
• Headlight flasher
You can flash the high beams by pulling the lever gently towards you (\
2).
Page 7 of 16
 or recirculated air (\
Indicator light on)
C - Turn to select the blower speed. To the right increases blower")
5
A - Turn for Temperature control
B - Push to select outside air (Indicator light off) or recirculated air (\
Indicator light on)
C - Turn to select the blower speed. To the right increases blower speed. To the left decreases
blower speed. Turned all the way to the left turns the blower off.
Note: OFF is located above AUTO.
D - Push for air conditioning ON/OFF (Indicator light on/Indicator light of\
f).
E - Turn to select the air flow and direction mode (AUTO position is only \
auto
type air conditioning).
F - Push to defog the rear window (Indicator light on). Rear window
defogger light automatically turns off after 20 minutes.
To defog front windshield
1. Set the Mode Dial E to defrost
position.
2. Set the blower speed C to the maximum position.
3. Set the temperature A to highest position.
Air Conditioning (Automatic shown)
The wipers will operate once.
INT: Intermittent intervals can be
adjusted by turning the knob A
AUTO: The wipers will be operated
automatically by rain sensor
(if equipped).
Slow
FastRain Sensing Wipers (if equipped)It is possible to adjust the sensitivity of the rain sensor
by turning the AUTO ring C .
+ Higher sensitivity to rain
– Lower sensitivity to rain.
Windshield Wipers
CONTROLS
C
Page 8 of 16

A - CANCEL: To deactivate the cruise control
B - ACC RES: To increase the set speed or resume previously set cruise control operation.
C - COAST SET: To set the desired speed and to reduce the set speed
D - ON/OFF: To turn ON/OFF cruise control
To set a cruising speed
1. Press D and the CRUISE indicator light in the
meter cluster will be turned on.
2. Accelerate or decelerate to your desired speed
(above 25 mph). Press C and remove your foot
from the accelerator pedal.
To accelerate or decelerate speed
Press B to increase set cruising speed.
Press C to decrease set cruising speed.
To cancel the cruising speed
Press A or press brake pedal, or press D .
6OWN THE ROAD
– :SHIFT DO WN+ :SHIFT UP
Paddle Shifters (if equipped)
Seat Heater Switch (if equipped)
Position - Action
(HI) - For quick heating
(LO) - To keep the seat warm
Drive Mode Selector (if equipped)
The drive mode can be selected by pressing the
switch while the ignition switch is in the ON
position.
2WD: This mode is for economical driving on
normal dry roads and freeways.
4WD AUTO: This mode is for all driving conditions
on various roads.
4WD LOCK: This mode is for driving in slippery
conditions such as on snow-covered roads or sand.
Cruise Control
AB
C
D
Simply upshift or downshift
with a tap of your fingers,
without moving your hands
from the steering wheel.
You can return to the automatic
shifting mode by pulling the +
(SHIFT UP) side paddle shifter
towards you and holding for
over 2 seconds.


www .mitsubishicars.c om
2015 LANCER SERIES
2015 LANCER SERIES
Dieline -DO NOT PRINT!")

2. Triple Diamond Delivery Checklist (Customer Copy)
3. Salesperson or Key Dealership")
 ................................ Page 3
3 Headlights and Fog Lights")

2
12")
