2015 MITSUBISHI LANCER EVOLUTION reset
[x] Cancel search: resetPage 155 of 229

Maintenance
155
INFO/SETTINGS INFO
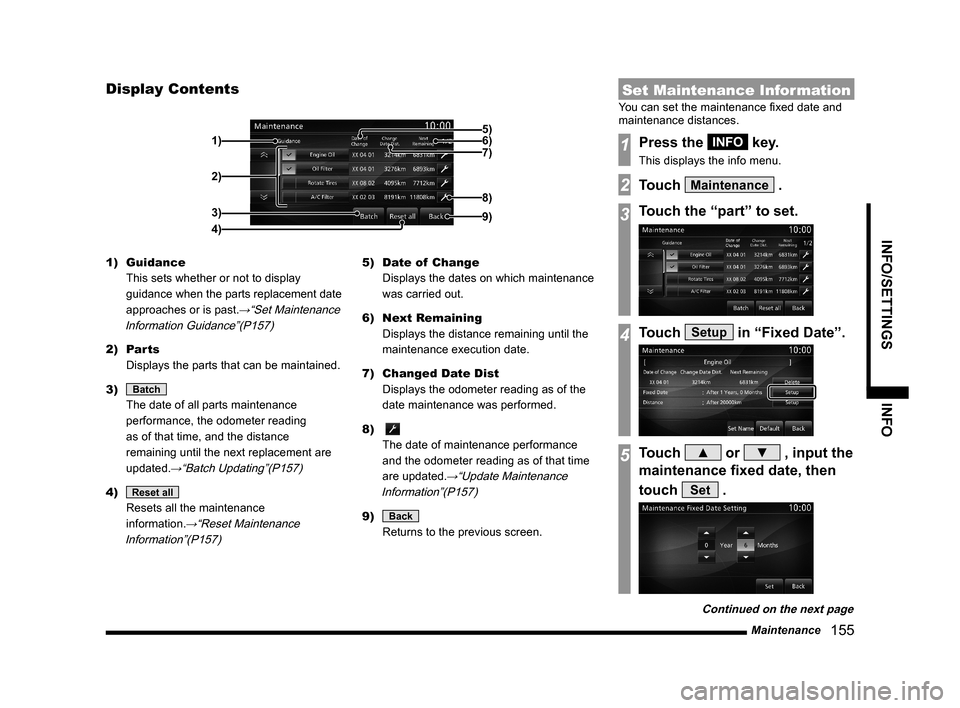
Display Contents
2)
3)
4) 1)
9)
8)
7) 6) 5)
1) Guidance
This sets whether or not to display
guidance when the parts replacement date
approaches or is past.
→“Set Maintenance
Information Guidance”(P157)
2) Parts
Displays the parts that can be maintained.
3)
Batch
The date of all parts maintenance
performance, the odometer reading
as of that time, and the distance
remaining until the next replacement are
updated.
→“Batch Updating”(P157)
4) Reset all
Resets all the maintenance
information.
→“Reset Maintenance
Information”(P157)
5) Date of Change
Displays the dates on which maintenance
was carried out.
6) Next Remaining
Displays the distance remaining until the
maintenance execution date.
7) Changed Date Dist
Displays the odometer reading as of the
date maintenance was performed.
8)
The date of maintenance performance
and the odometer reading as of that time
are updated.
→“Update Maintenance
Information”(P157)
9) Back
Returns to the previous screen.
Set Maintenance Information
You can set the maintenance fi xed date and
maintenance distances.
1Press the INFO key.
This displays the info menu.
2Touch Maintenance .
3Touch the “part” to set.
4Touch Setup in “Fixed Date”.
5Touch ▲ or ▼ , input the
maintenance fi xed date, then
touch
Set .
Continued on the next page
Page 157 of 229

Maintenance
157
INFO/SETTINGS INFO
Update Maintenance
Information
When parts are replaced, the maintenance
information is updated.
1Press the INFO key.
This displays the info menu.
2Touch Maintenance .
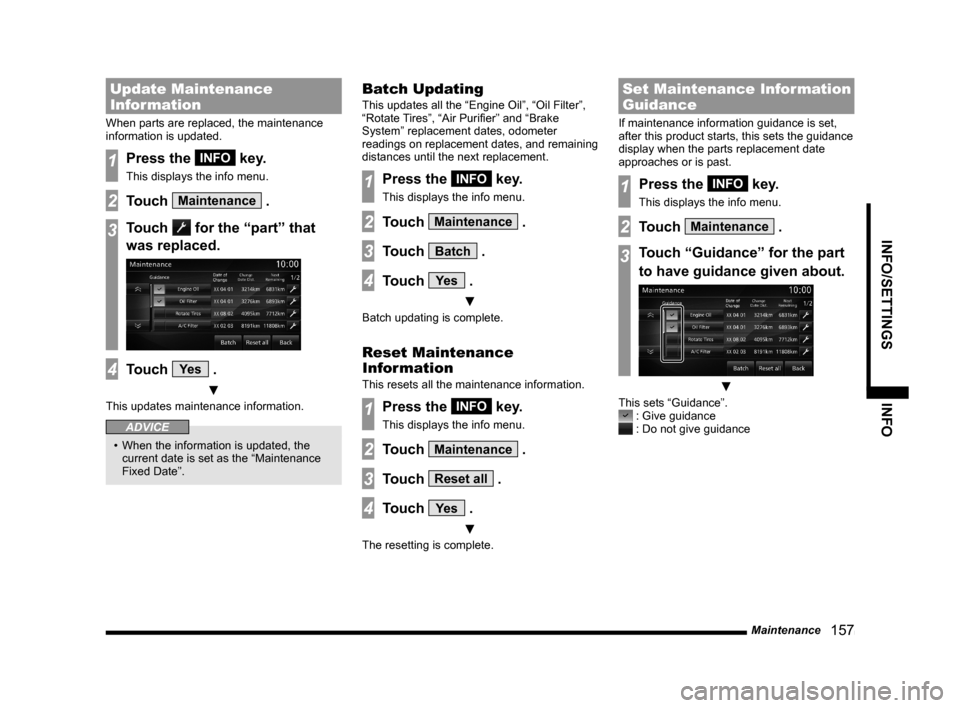
3Touch for the “part” that
was replaced.
4Touch Ye s .
▼
This updates maintenance information.
ADVICE
• When the information is updated, the
current date is set as the “Maintenance
Fixed Date”.
Batch Updating
This updates all the “Engine Oil”, “Oil Filter”,
“Rotate Tires”, “Air Purifi er” and “Brake
System” replacement dates, odometer
readings on replacement dates, and remaining
distances until the next replacement.
1Press the INFO key.
This displays the info menu.
2Touch Maintenance .
3Touch Batch .
4Touch Ye s .
▼
Batch updating is complete.
Reset Maintenance
Information
This resets all the maintenance information.
1Press the INFO key.
This displays the info menu.
2Touch Maintenance .
3Touch Reset all .
4Touch Ye s .
▼
The resetting is complete.
Set Maintenance Information
Guidance
If maintenance information guidance is set,
after this product starts, this sets the guidance
display when the parts replacement date
approaches or is past.
1Press the INFO key.
This displays the info menu.
2Touch Maintenance .
3Touch “Guidance” for the part
to have guidance given about.
▼
This sets “Guidance”. : Give guidance : Do not give guidance
Page 168 of 229

168 Voice Control
About the Learning Function
The voice control system has a learning
function. (This function cannot be used by
voice control systems using a Bluetooth
®
2.0 interface.) This learning function inputs
the driver's voice and way of speaking, and
makes voice recognition easier.
Also, the learned data can be reset (deleted), so
reset the data if the user will change for a long
period of time.
→“Voice control settings” (P215)
Skip Audio Guide
During audio guide, press the “SPEECH” key
again to skip the guide.
End Voice Control
• To stop voice control after starting up,
execute one of the following procedures.
- Press and hold down “SPEECH” key.
- Press a key such as
MODE key.
• If you do not speak after starting up voice
control, the system will automatically be in
pause mode.
(Press the “SPEECH” key again to restart
voice control.) If there is no operation for
a while in pause mode, voice control will
automatically end.
• If voice control is forced to shut down such
as by pressing the
MODE key, the voice
control cannot restart from where you left off.
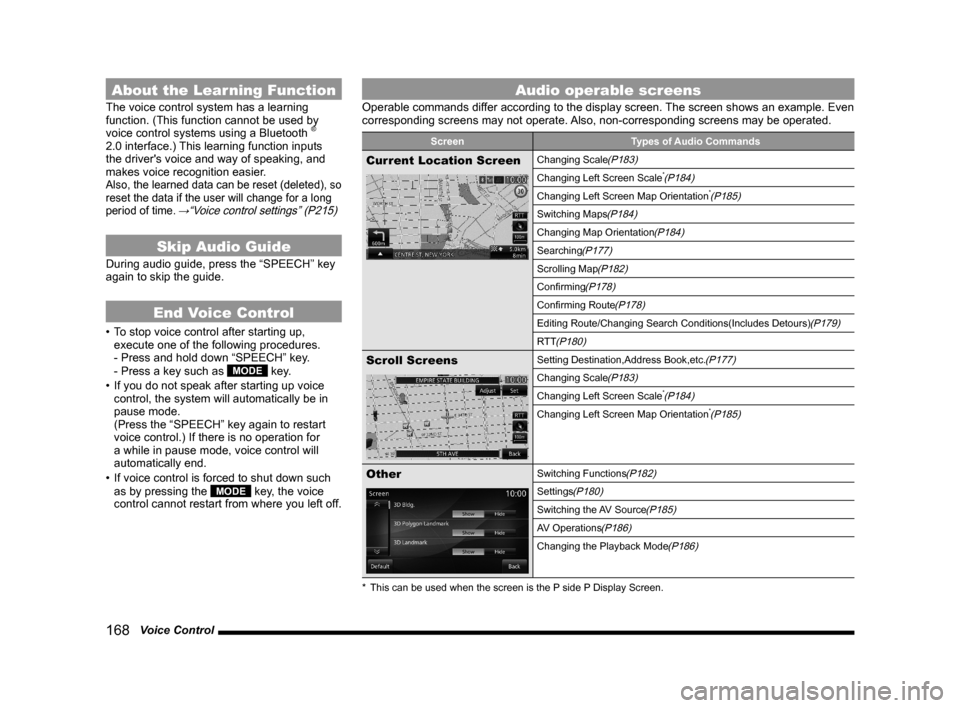
Audio operable screens
Operable commands differ according to the display screen. The screen shows an example. Even
corresponding screens may not operate. Also, non-corresponding screens may be operated.
Screen Types of Audio Commands
Current Location ScreenChanging Scale(P183)
Changing Left Screen Scale*(P184)
Changing Left Screen Map Orientation*(P185)
Switching Maps(P184)
Changing Map Orientation(P184)
Searching(P177)
Scrolling Map(P182)
Confi rming(P178)
Confi rming Route(P178)
Editing Route/Changing Search Conditions(Includes Detours)(P179)
RTT
(P180)
Scroll ScreensSetting Destination,Address Book,etc.(P177)
Changing Scale(P183)
Changing Left Screen Scale*(P184)
Changing Left Screen Map Orientation*(P185)
OtherSwitching Functions(P182)
Settings(P180)
Switching the AV Source(P185)
AV Operations(P186)
Changing the Playback Mode(P186)
* This can be used when the screen is the P side P Display Screen.
Page 182 of 229

182 List of Accepted Commands
Charging Timer
Charging Timer
Timer Charge Setting
Timer Charge
Remote Climate
ControlRemote Climate Control
Pre-Air Conditioning Settings
Pre-Air Conditioning
Set pre-air conditioning
Reset Trip
Reset Trip
Reset Trip information
Reset Trip info
Switching Functions
NAVI
(Current
Location)Current Location
MAP
Current place
Calendar
Calendar
Calendar screen
GPS Information
GPS Information
Vehicle location information
Location information
GPS
RV
Vehicle location
Current location
Compass
Voice Control
HelpVoice Control Help
Voice recognition help
User SD
User SD
SD Information
SD Card Information
SD card info
SD card display
Show SD card screen
Environment
Environment
Environmental Information
Environmental Information
screen
Trip
Trip
Trip Screen
Trip information
Charge Cost
Charge Cost
Charge Cost Screen
Charge Information
Charge Information Screen
Charge info screen
Display Distance
AreaDisplay Distance Area
Distance to Empty Area
Display Distance to Empty
Area
Distance to Empty Area
Screen
Show Distance to Empty
Area
Show Distance to Empty
Area screenMaintenance
Maintenance
Maintenance Information
Maintenance screen
Maintenance Information
screen
Air Conditioner
Air Conditioner
Air Conditioner Information
Air Conditioner Information
screen
Air Conditioner screen
HD Radio Data
InformationHD Information
HD Information screen
Display HD Information
screen
Version Info.
Version Info.
Version
Version Information
Version Information screen
Version screen
Map Reg. Code
Map Reg. Code
Map Registration Code
Telephone
Telephone
Change
LanguageChange Language
Scrolling Map
Scroll Up
Scroll Up
Scroll Up-Right
Scroll Up-Right
Scroll Right
Scroll Right
Scroll Down-Right
Scroll Down-Right
Scroll Down
Scroll Down
Page 186 of 229

186 List of Accepted Commands
SD
SD
Listen to SD
SD Playback
Set to SD
Play SD
SD Card
Listen to SD cards
SD Card Playback
Set to SD card
Play the SD card
iPod
iPod
Listen to iPod
Play iPod
USB
USB
Listen to USB
Play USB
USB memory
AUX
AUX
CD
CD
Listen to CD
Play CD
Sirius
Sirius
Listen to Sirius
Set to Sirius
Receive Sirius
Bluetooth Audio
Bluetooth Audio
Listen to Bluetooth Audio
Play Bluetooth AudioAV Operations
Audio Off
Audio Off
Turn audio off
Turn off music
Stop music
Stop audio
Audio
Audio
Audio on
Listen to audio
Play audio
Play music
Music ON
Listen to music
Start music
Seek Up
Seek Up
Seek Down
Seek Down
Stop Seek
Stop Seek
Update Ser vice
ListUpdate Service List
Start service list update
Normal Play
Normal Play
Normal playback
Next Folder
Next Folder
Next directory
Previous Folder
Previous Folder
Previous directory
Change Playlist
ModeChange Playlist Mode
Switch playlist modes
Next Preset
StationNext Preset Station
Next Preset
Previous Preset
StationPrevious Preset Station
Previous Preset
Last Preset
Last Preset station
Play
Play
Pause
Pause
Stop play
Stop play
Stop
Search by Track
NumberSearch by Track Number
Track number
Search from track number
Change Sub
ChannelChange Sub Channel
Changing the Playback Mode
Repeat
Repeat
Start Repeat
Repeat ON
Folder Repeat
Folder Repeat
Start Folder Repeat
Folder Repeat ON
Repeat folder
Playlist Repeat
Playlist Repeat
Start Playlist Repeat
Playlist Repeat ON
Track Repeat
Track Repeat
Start Track Repeat
Track Repeat ON
Page 215 of 229

System Settings
215
INFO/SETTINGS SETTINGS
Set Passcode
You can lock the telephone functions with a
passcode.
1Press the SETTINGS key.
This displays the settings menu.
2Touch System .
3Touch Pairing .
4Touch Set Passcode .
5Input any “four-digit
passcode”, then touch
Enter .
▼
The passcode setting is complete.
Keyboard Layout
This changes the keyboard layout.
1Press the SETTINGS key.
This displays the settings menu.
2Touch System .
3Touch Keyboard Layout .
4Touch Alphabet or PC .
▼
The layout change is complete.
Voice control settings
Allows you to enable or disable the voice
control guide and reset training data.
1Press the SETTINGS key.
This displays the settings menu.
2Touch System .
3Touch Voice control settings .
4Change the settings, then
touch
Back .
▼
The setting change is complete.
Page 220 of 229

220 Other Settings Others
Item Settings content
Horn Answerback with Remote
Engine Start*Enables/disables the function that sounds the horn when the
engine is started with the remote controller.
Accessor y Power Timeout
Sets the duration ACC stays ON when the ignition switch is
ACC.
Reset the Vehicle Settings
1Execute up to Step 2 in “Vehicle
Settings”(P216)
.
▼
2Touch Reset all .
3Touch Ye s .
▼
The resetting of equipment setting is
complete.